Last updated on February 18, 2025
Start Free Trial
No Credit Card Required
What is Remote Desktop Gateway (RD Gateway)?
Why use Remote Desktop Gateway?
How does Remote Desktop Gateway work?

Tip
Is Your Remote Desktop Gateway Secure?
Did you know that Remote Desktop Services are a common attack vector? In fact, 90% of ransomware breaches involve RDP abuse. Protect your access with robust multi-factor authentication.
How to set up Remote Desktop Gateway?
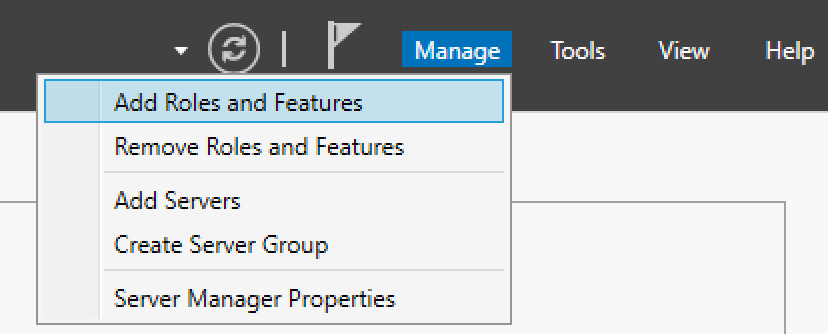
1. Install the Remote Desktop Role


Secure Your RD Gateway with MFA – Start Your Free Trial Now →


PowerShell Alternative: Installing the Remote Desktop Gateway Role
Install-WindowsFeature RDS-Gateway -IncludeAllSubFeature -RestartGet-WindowsFeature RDS-Gateway
Start Free Trial
No Credit Card Required
2. Create CAP and RAP Policies


Create a Connection Authentication Policy


Create a Resource Authorization Policy


Start Free Trial
No Credit Card Required
PowerShell Alternative: Creating CAP and RAP Policies
Note
3. Install an SSL Certificate on RD Gateway
PowerShell Alternative: Installing & Binding an SSL Certificate
$pfxPath = "C:\path\to\cert.pfx"

$pfxPass = ConvertTo-SecureString "P@ssw0rd" -AsPlainText -Force

Import-PfxCertificate -FilePath $pfxPath -CertStoreLocation "Cert:\LocalMachine\My" -Password $pfxPass# Replace below with your actual Connection Broker name and certificate details
$connectionBroker = "MyConnectionBroker.domain.local"
Set-RDCertificate -Role RDGateway `
-ConnectionBroker $connectionBroker `
-ImportPath $pfxPath `
-Password $pfxPass `
-ForceNote
How to Test Your Remote Desktop Gateway Connection


PowerShell Alternative: Quick Test with MSTSC Parameters
# Example: Connect to "TargetServer" via "RDGatewayServer"
mstsc.exe /v:TargetServer.domain.local /gateway:RDGatewayServer.domain.localHow to Protect Your Remote Desktop Gateway Connection
Free MFA for Remote Desktop Gateway
Here’s how to instantly increase the security of your RD Gateway in one hour or less.