Last updated on December 17, 2025
Overview of MFA for Cisco AnyConnect VPN with Cisco FTD Firepower Firewall
This documentation describes how to integrate Rublon MFA with Cisco FTD Firepower Firewall using the RADIUS protocol to enable multi-factor authentication for logins using the Cisco AnyConnect VPN.
Demo Video

Supported Authentication Methods
| Authentication Method | Supported | Comments |
| Mobile Push | ✔ | N/A |
| FIDO | – | N/A |
| Passcode | ✔ | N/A |
| SMS Passcode | – | N/A |
| SMS Link | ✔ | N/A |
| Phone Call | ✔ | N/A |
| QR Code | – | N/A |
| Email Link | ✔ | N/A |
| YubiKey OTP | ✔ | N/A |
| RFID | – | N/A |
Before You Start Configuring MFA for Cisco AnyConnect VPN with Cisco FTD Firepower Firewall using RADIUS
Before configuring Rublon MFA for Cisco AnyConnect VPN with Cisco FTD Firepower Firewall:
- Ensure you have prepared all required components.
- Create an application in the Rublon Admin Console.
- Install the Rublon Authenticator mobile app.
Required Components
1. User Identity Provider (IdP) – You need an external Identity Provider, such as FreeRADIUS or Microsoft NPS.
2. Rublon Authentication Proxy – Install the Rublon Authentication Proxy if you have not already and configure the Rublon Authentication Proxy as an RADIUS proxy.
3. Cisco AnyConnect VPN with Cisco FTD Firepower Firewall – A properly installed and configured Cisco AnyConnect VPN and Cisco FTD Firepower Firewall.
Create an Application in the Rublon Admin Console
1. Sign up for the Rublon Admin Console. Here’s how.
2. In the Rublon Admin Console, go to the Applications tab and click Add Application.
3. Enter a name for your application (e.g., Cisco VPN) and then set the type to Rublon Authentication Proxy.
4. Click Save to add the new application in the Rublon Admin Console.
5. Copy the values of System Token and Secret Key of the newly created application. You will need them later.
Install Rublon Authenticator
Some end-users will probably use the Rublon Authenticator mobile app. So, as a person configuring MFA for Cisco AnyConnect VPN with Cisco FTD Firepower Firewall, we highly recommend you install the Rublon Authenticator mobile app, too. Thanks to that, you will be able to test MFA for Cisco AnyConnect VPN with Cisco FTD Firepower Firewall via Mobile Push.
Download the Rublon Authenticator for:
Configuring Multi-Factor Authentication (MFA) for Cisco AnyConnect VPN with Cisco FTD Firepower Firewall using RADIUS
Rublon Authentication Proxy
1. Edit the Rublon Auth Proxy configuration file and paste the previously copied values of System Token and Secret Key in system_token and secret_key, respectively.
2. Config example file in YAML:
global:
  secret_source: plain  # Options: plain, env, vault

log:
  debug: false

rublon:
  api_server: https://core.rublon.net
  system_token: YOURSYSTEMTOKEN
  secret_key: YOURSECRETKEY

proxy_servers:
  - name: RADIUS-Proxy
    type: RADIUS
    radius_secret: YOURRADIUSSECRET
    ip: 0.0.0.0
    port: 1812
    mode: standard
    auth_source: LDAP_SOURCE_1
    auth_method: push,email
    cert_path: /etc/ssl/certs/ca.crt
    pkey_path: /etc/ssl/certs/key.pem
    force_message_authenticator: false

auth_sources:
- name: LDAP_SOURCE_1
  type: LDAP
  ip: 172.16.0.127
  port: 636
  transport_type: ssl
  search_dn: dc=example,dc=org
  access_user_dn: cn=admin,dc=example,dc=org
  access_user_password: CHANGE_ME
  ca_certs_dir_path: /etc/ssl/certs/
See: How to set up LDAPS certificates in the Rublon Authentication Proxy?
3. (Optional) If you want to use the Challenge Mode, change:
mode: standard
To:
mode: challenge
Then, you can set the message displayed on the challenge request:
challenge_request: “Enter Your MFA Code”
If you do not set challenge_request in the config file, the default message will be used instead, as defined in the Rublon Authentication Proxy documentation.
Cisco FTD Firepower Firewall
1. Log in to Cisco FTD Device Manager.
2. From the top bar, select Objects and then select Identity Sources from the left pane.
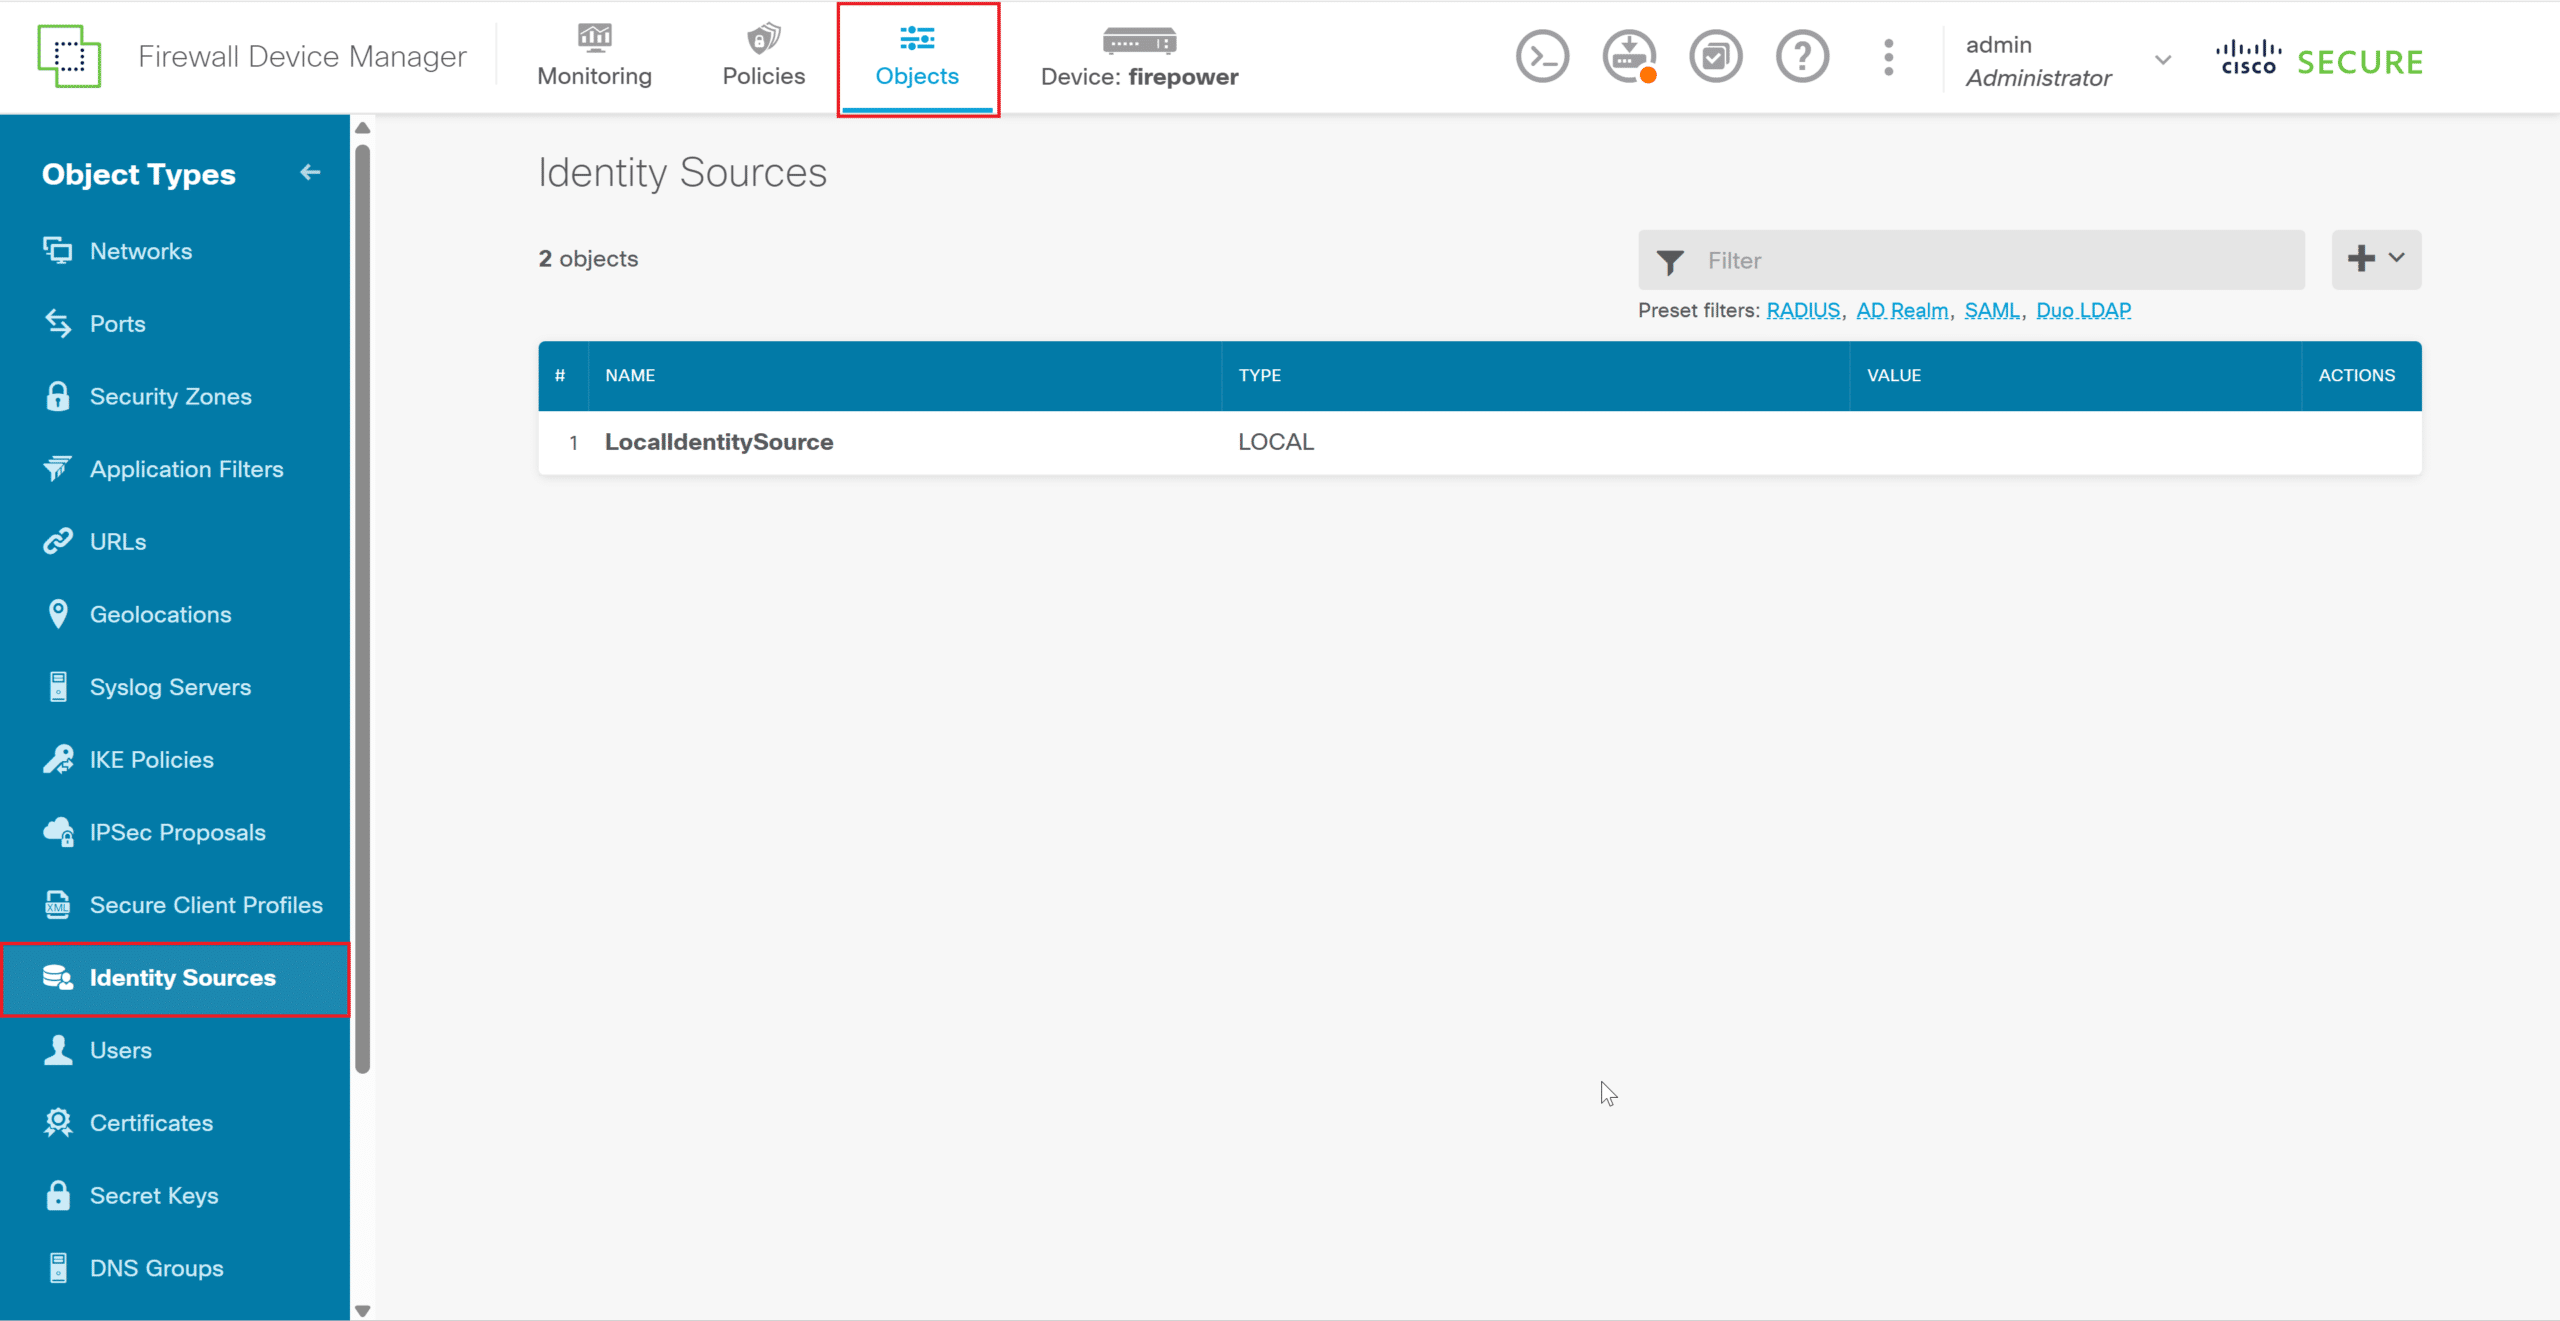
3. Click the plus icon and select RADIUS Server.

4. Create a new RADIUS Server and click OK to save it. Refer to the following images and table.
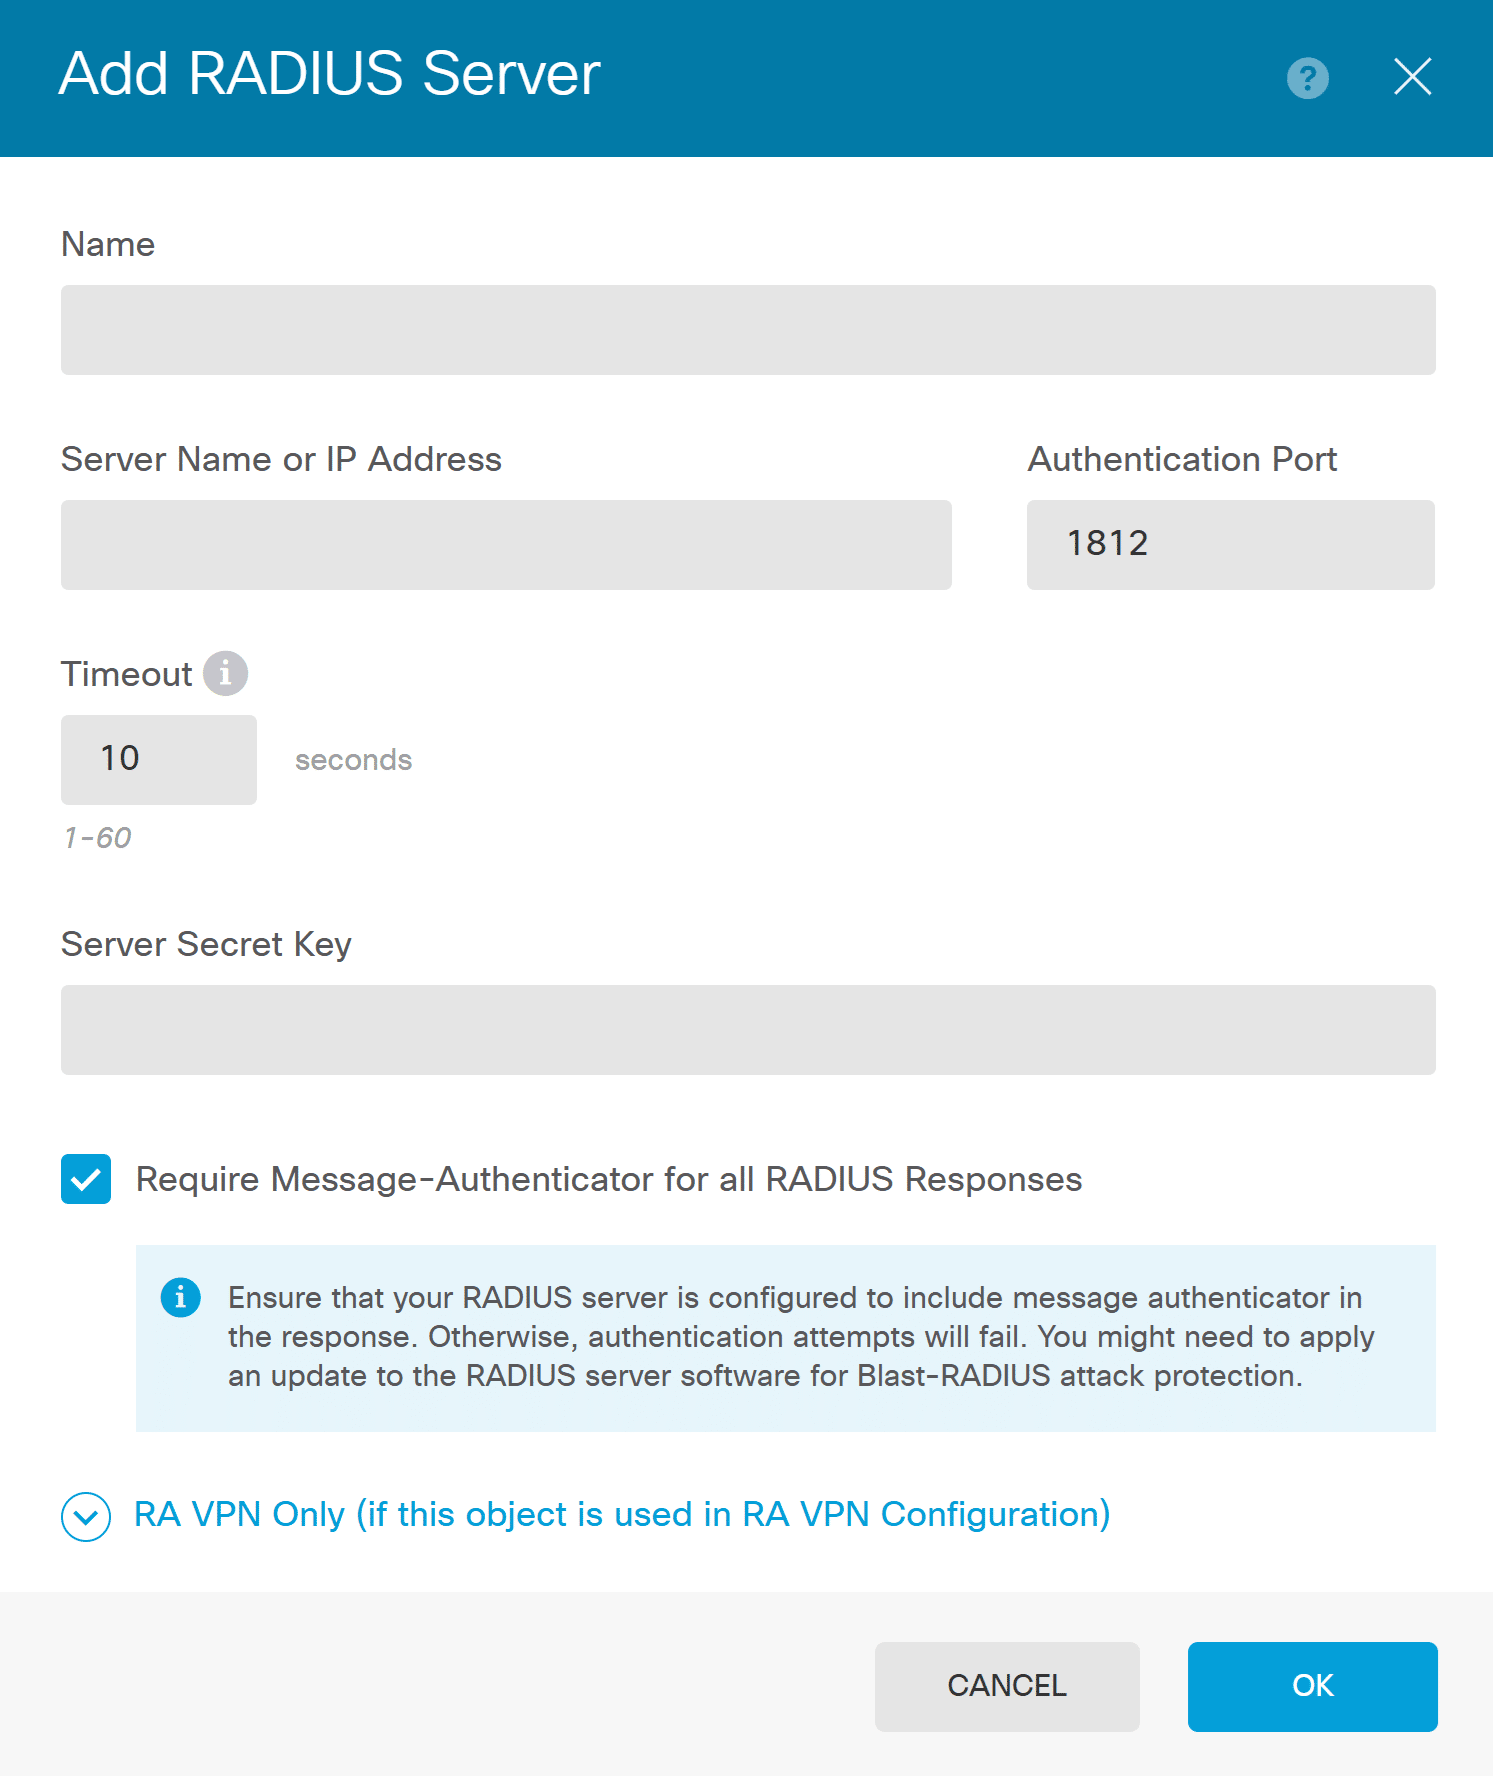
| Name | A name for the Rublon Auth Proxy RADIUS Server |
| Server Name or IP Address | The IP Address of your Rublon Auth Proxy RADIUS Server |
| Authentication Port | 1812 (Default for RADIUS) |
| Timeout | 60 |
| Server Secret Key | The RADIUS Secret shared between Rublon Auth Proxy and Cisco FTD |
| Require Message-Authenticator for all RADIUS Responses | Check. This is important; you must check this option |
| Expand RA VPN Only (if this object is used in RA VPN Configuration) | |
| Redirect ACL | Optional. Select an RA VPN Redirect ACL if you use any |
| Interface used to connect to RADIUS Server | Select Manually choose interface and from the dropdown, select the interface where the Rublon Auth Proxy server is available to Cisco FTD |
5. In Identity Sources, click the plus icon again, but this time select RADIUS Server Group.
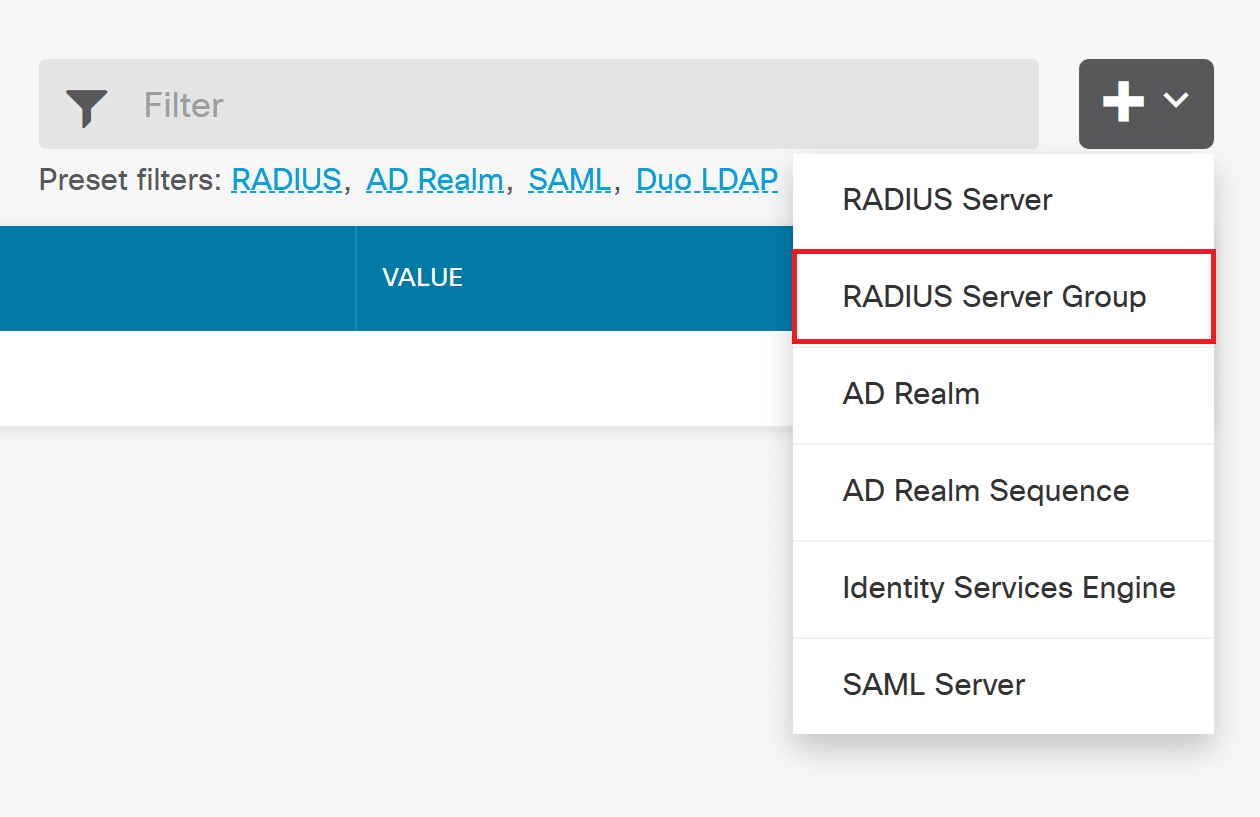
6. Create a new RADIUS Server Group and click OK to save it. Refer to the following images and table.

| Name | A name for your Rublon Auth Proxy RADIUS Server Group |
| Dead time | 10 (Default) |
| Maximum Failed Attempts | 3 (Default) |
| Dynamic Authorization (for RA VPN Only) | Optional. Leave unselected. |
| Realm that Supports the RADIUS Server | Specify the AD Realm server if the RADIUS server relies on an Active Directory (AD) server for user authentication. If your RADIUS server is configured this way, you need to select the AD realm that specifies the AD server working alongside the RADIUS server. For more information on how to create an AD Realm, refer to MFA for Cisco AnyConnect VPN with Cisco FTD Firepower Firewall – LDAP(S). |
| RADIUS Server | Click the plus icon and select the RADIUS Server you have created before |
| TEST ALL SERVERS | Click TEST ALL SERVERS to verify your settings. In a new window, specify the username and password from your AD/LDAP realm and confirm Rublon MFA when prompted. Upon successful connection, you should see “All Servers have been successfully tested”. |
7. Deploy your configuration changes (a new RADIUS Server and RADIUS Server Group) to Cisco FDT.

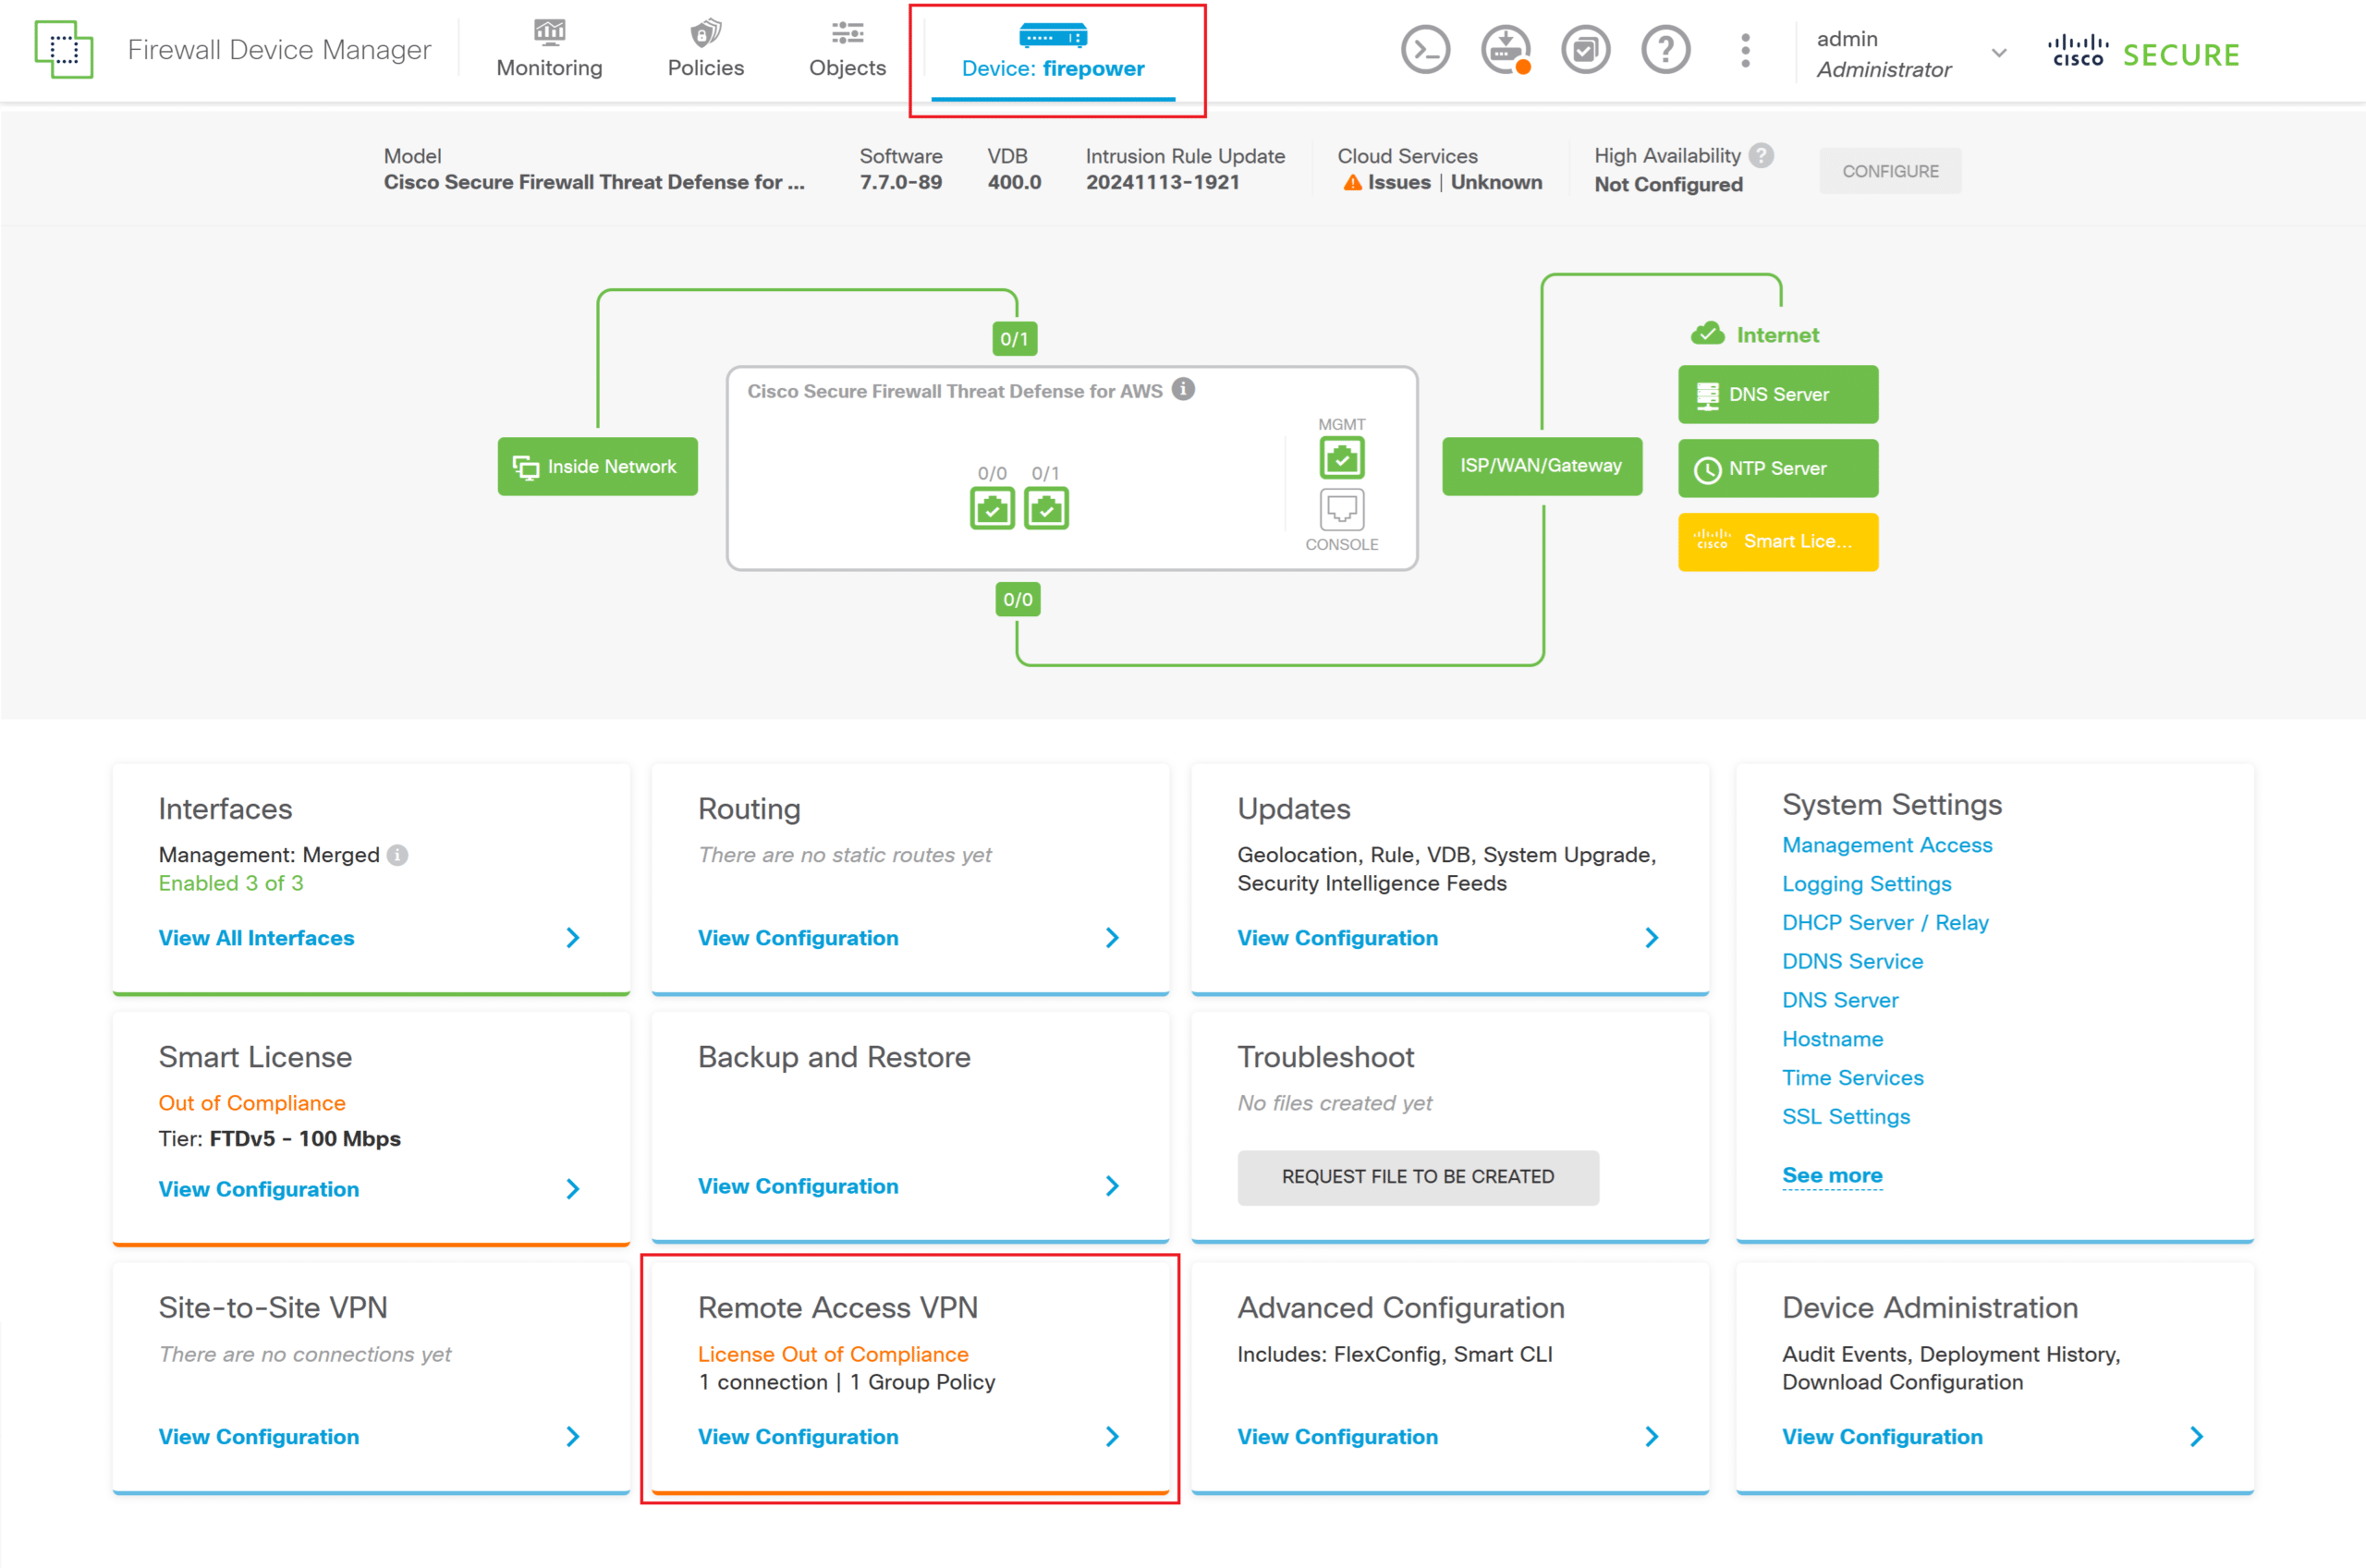
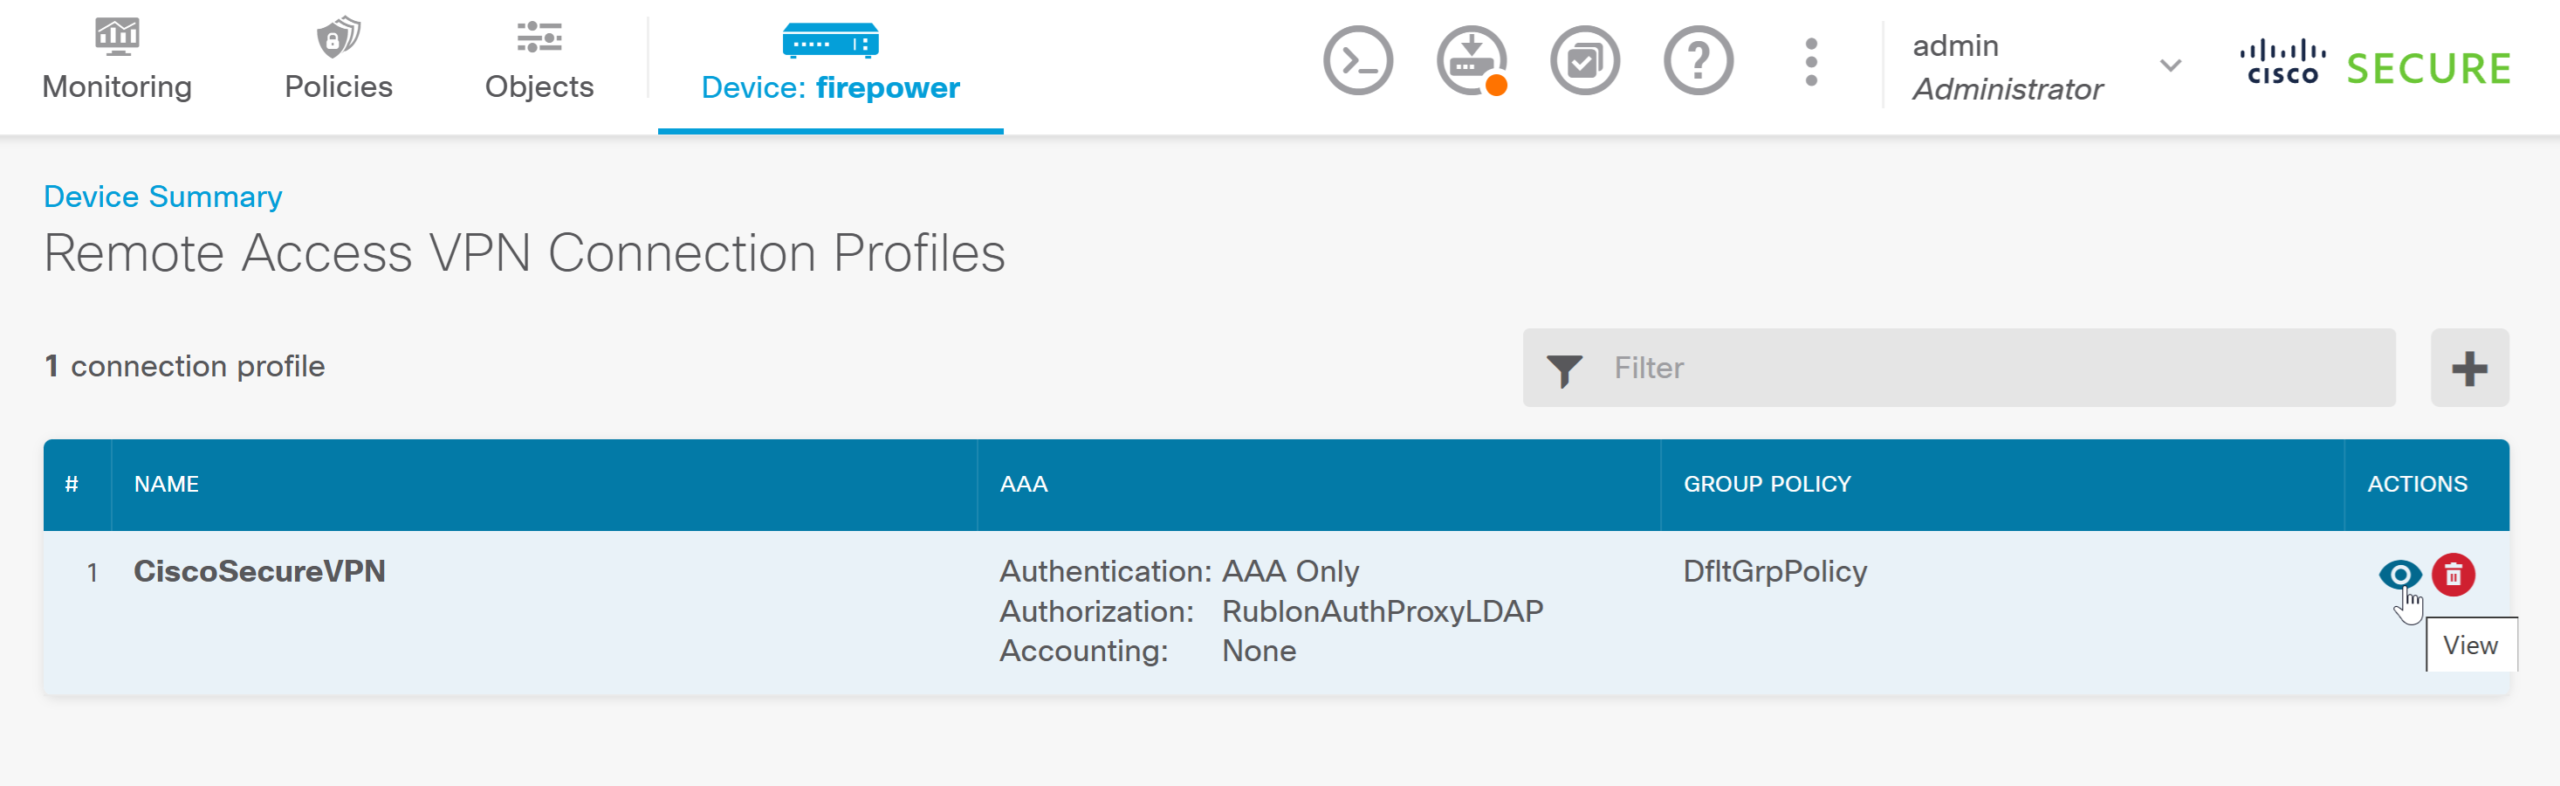
8. Now, you need to specify the new Identity Source in the Cisco Remote VPN configuration. From the top bar, select Device: <hostname> (where <hostname> is the name of your instance) and then select View Configuration in the Remote Access VPN section.
9. View the configuration of your existing Remote Access VPN.
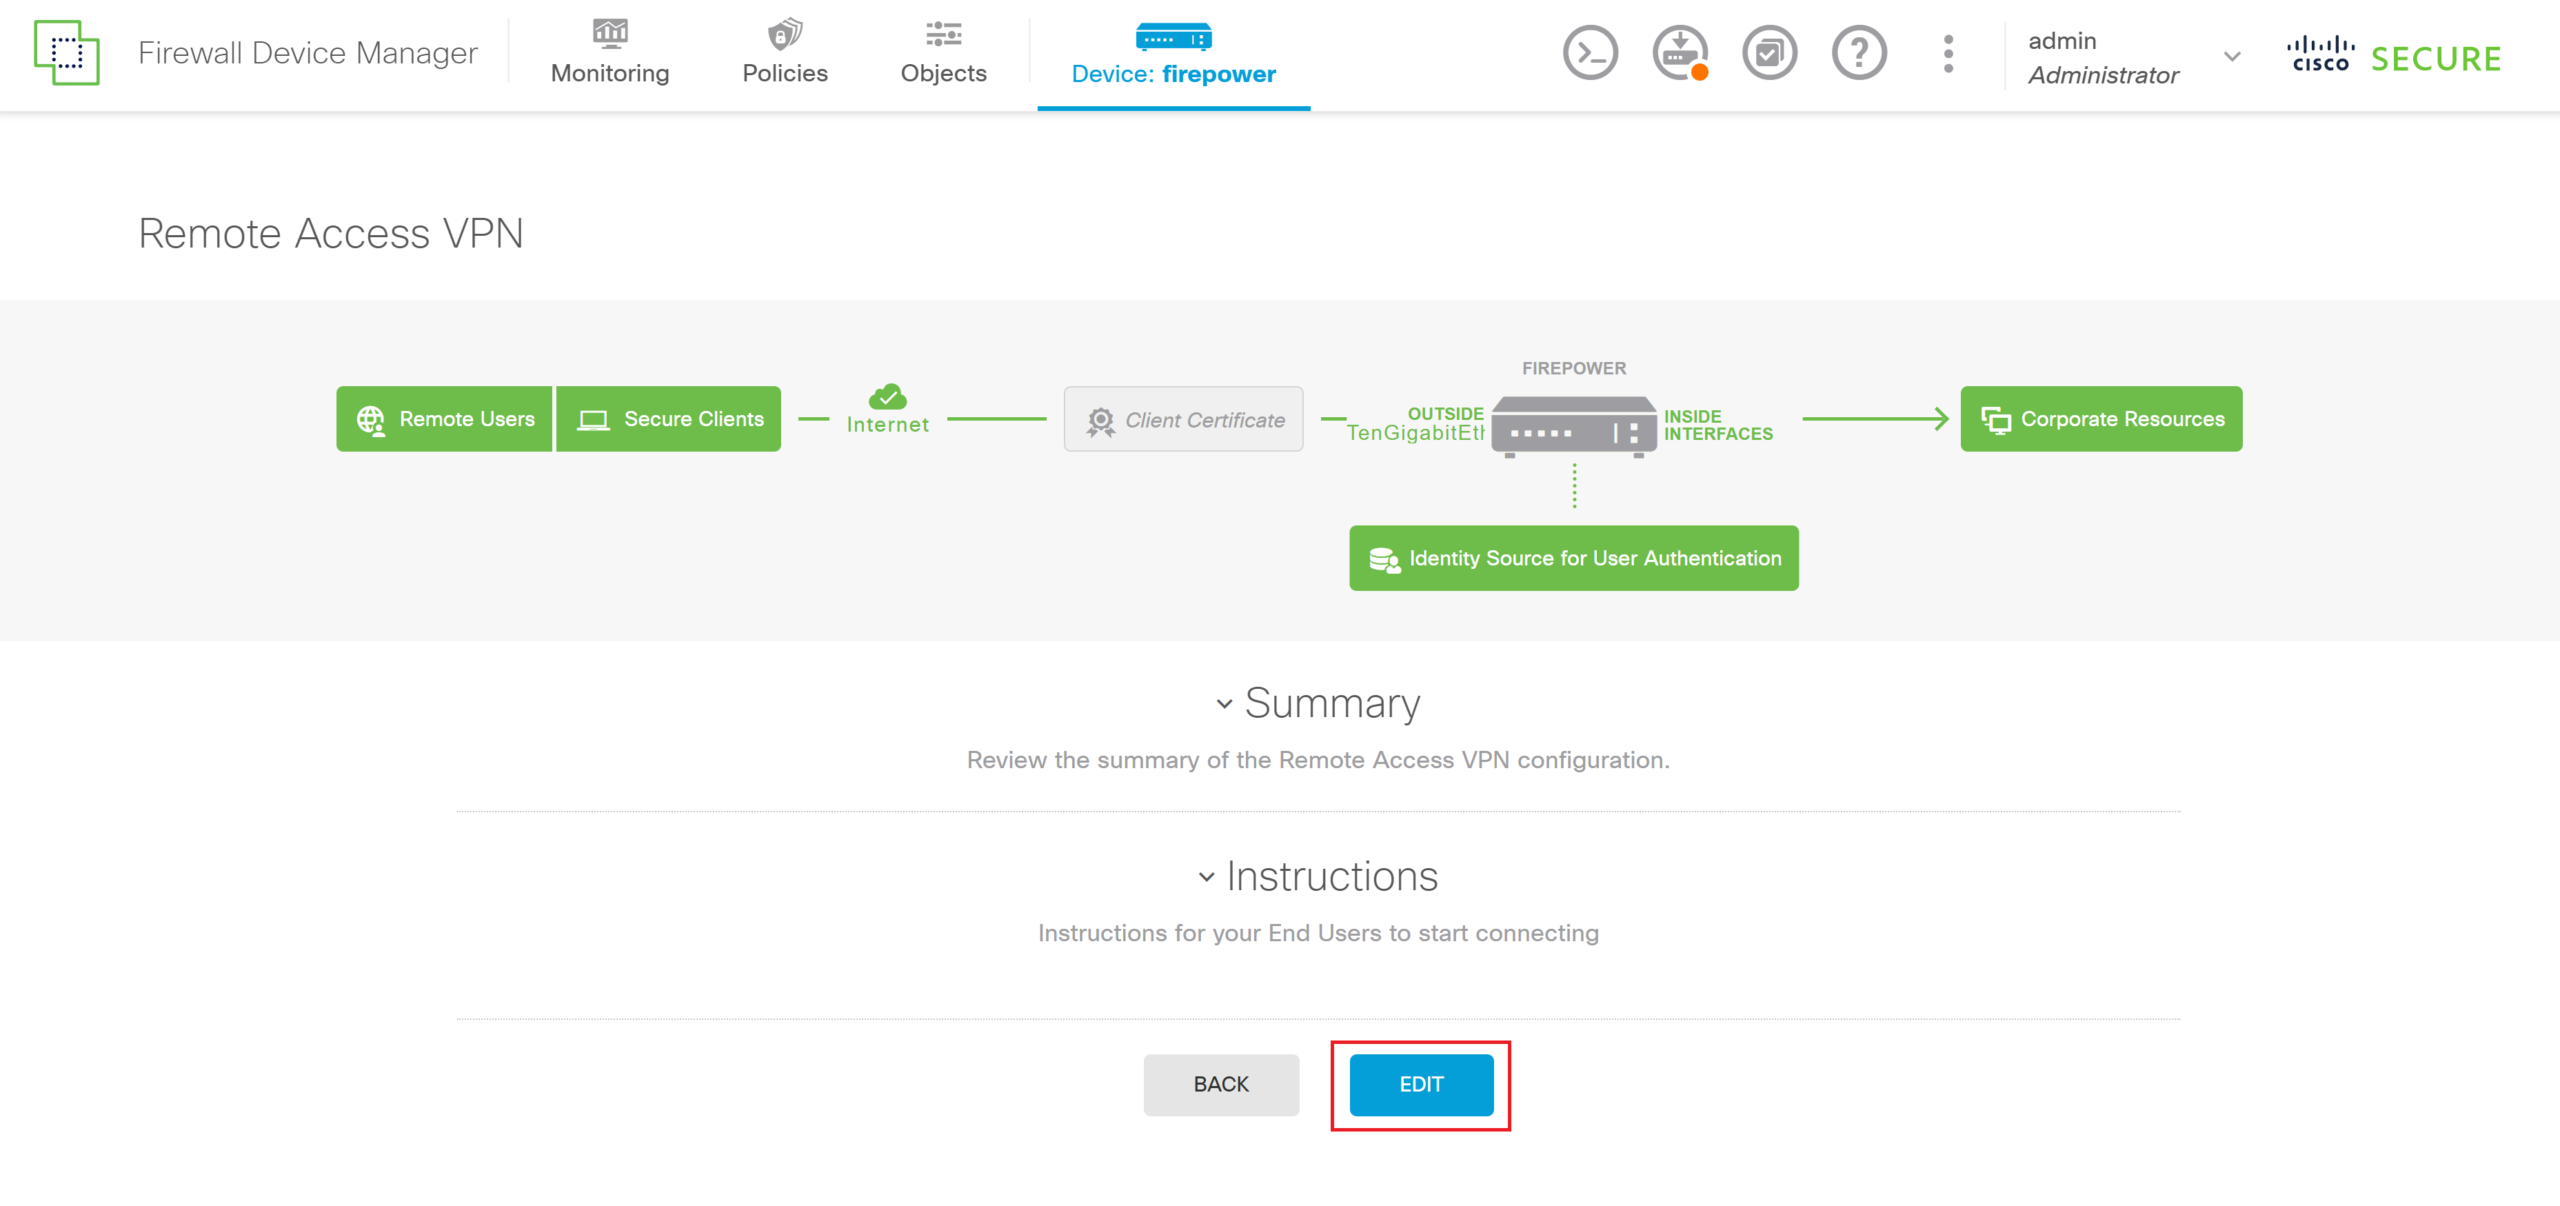
10. Edit the configuration of your Remote Access VPN.
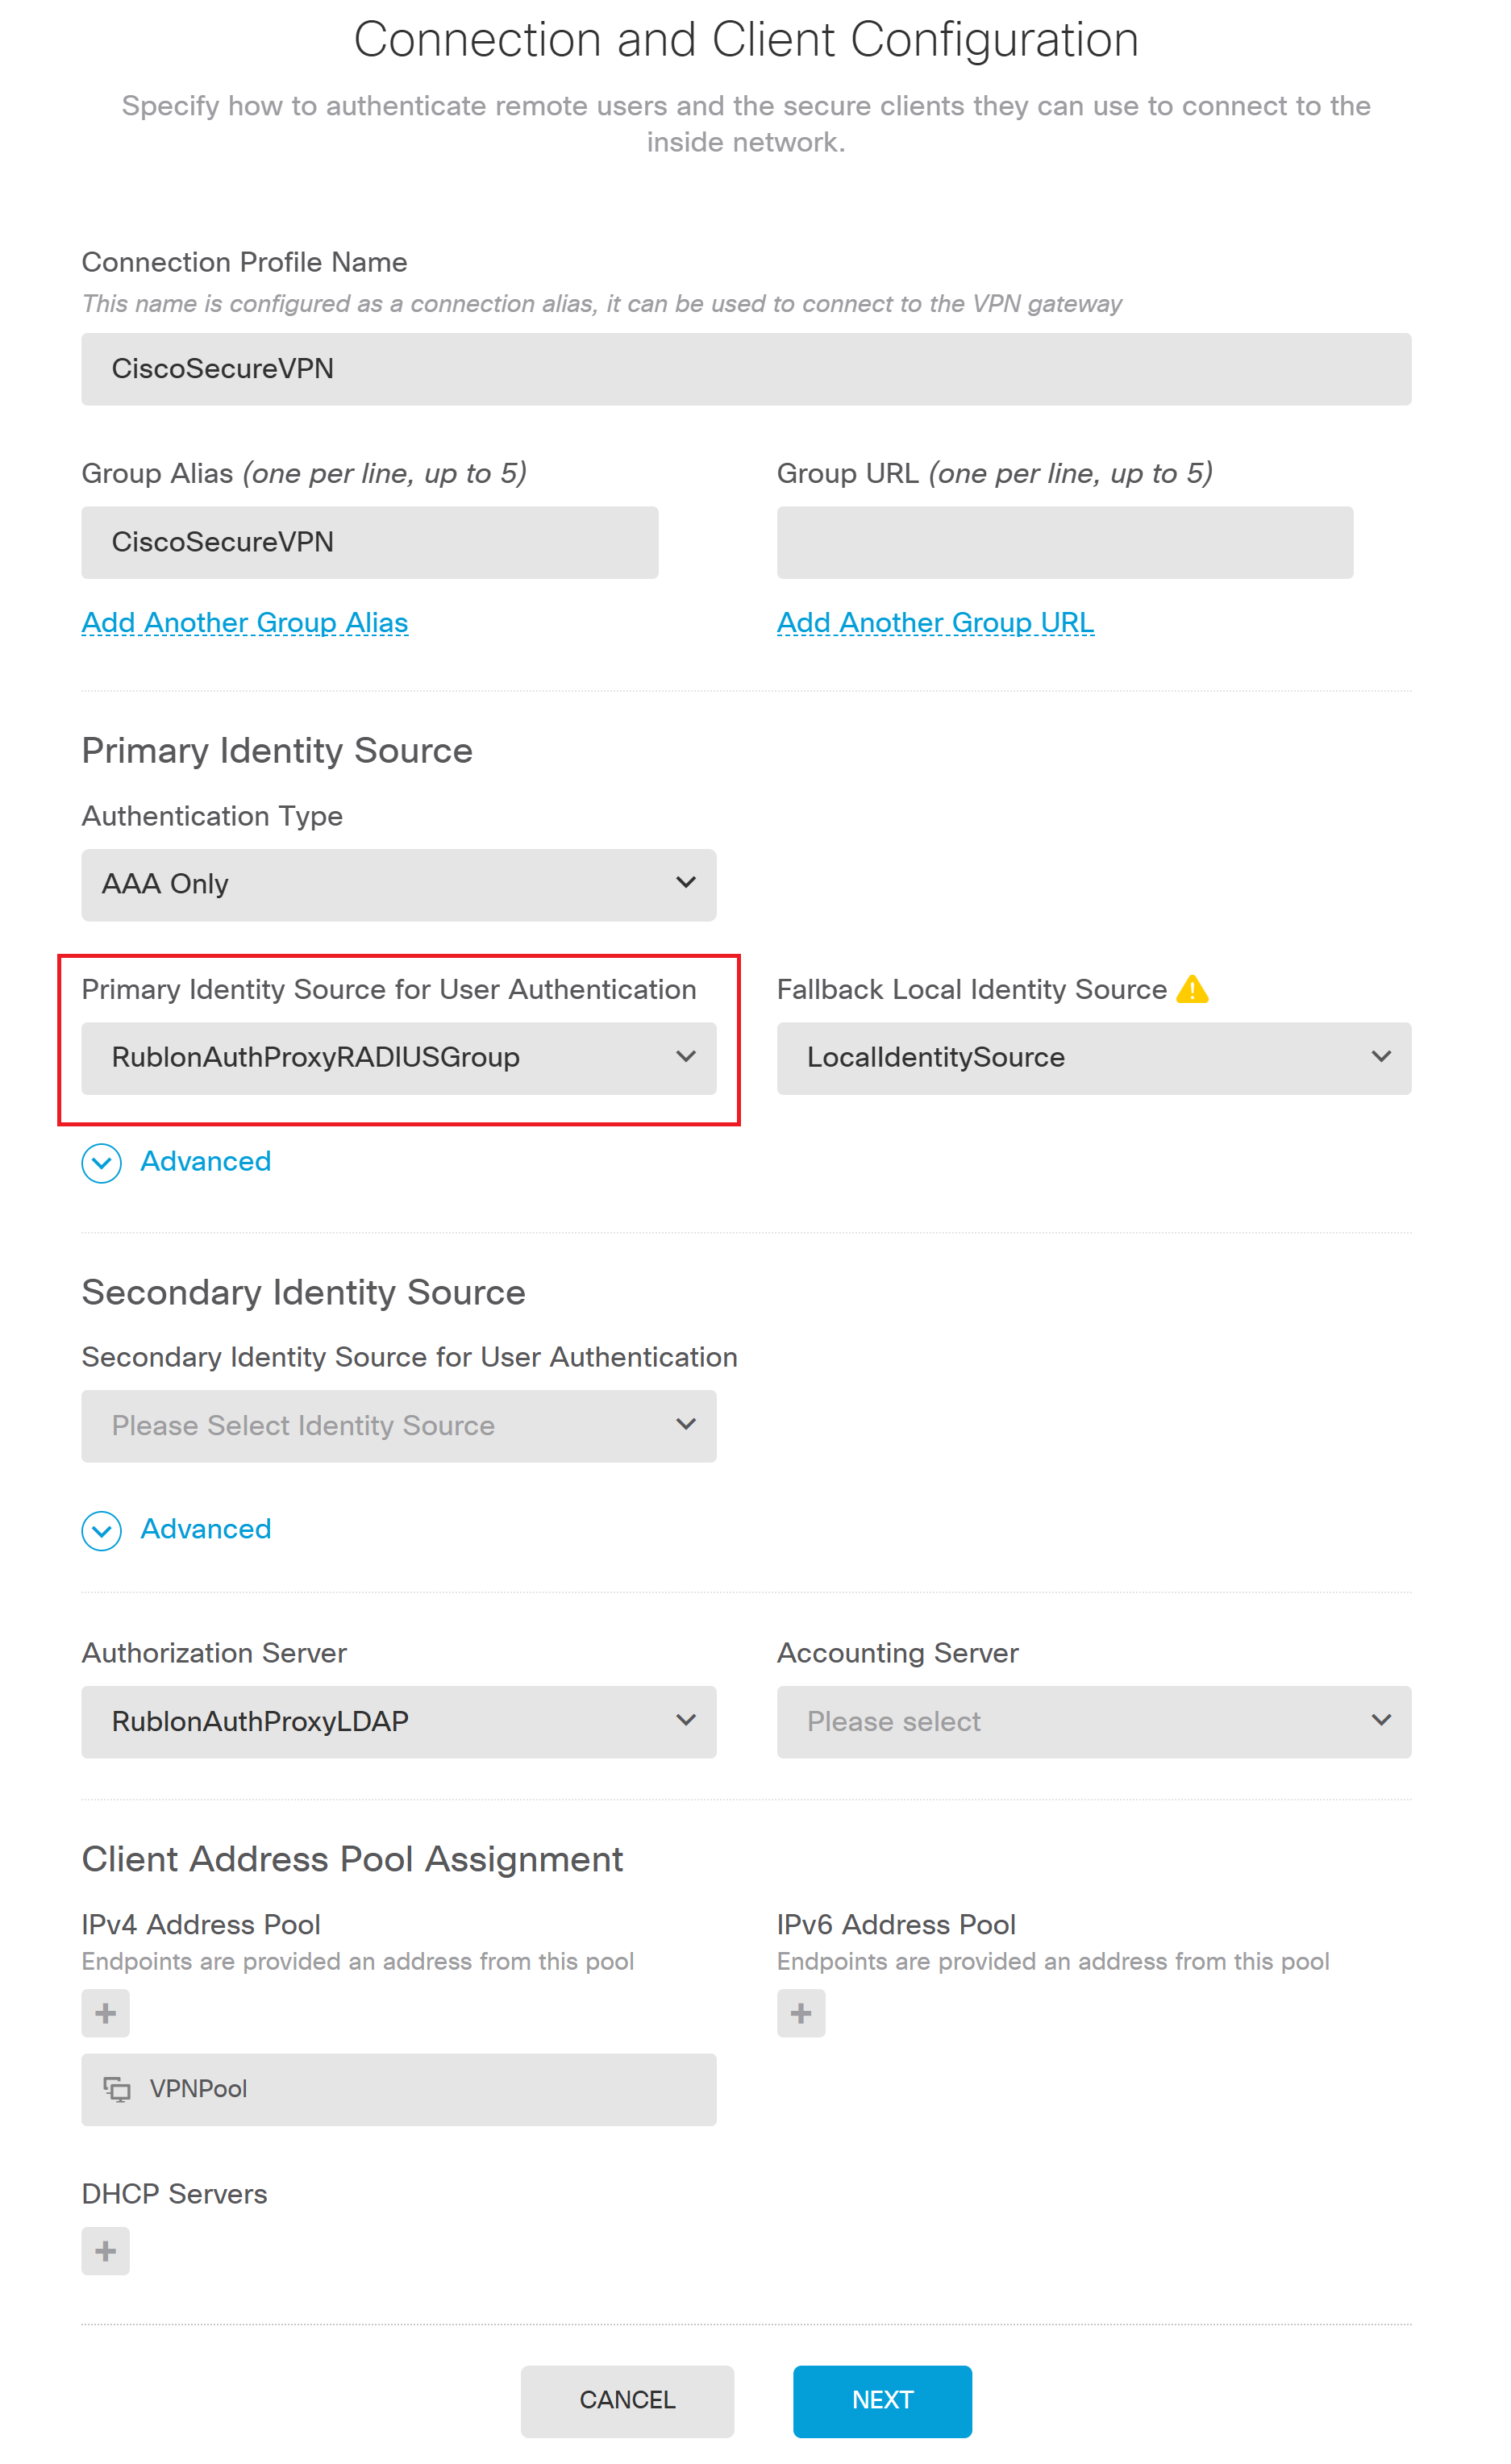
11. Add the Rublon Auth Proxy RADIUS Group Identity Source under Primary Identity Source for User Authentication.
12. Save and close your Remote Access VPN Settings, and then deploy changes to Cisco FTD.
Testing Multi-Factor Authentication (MFA) for Cisco AnyConnect VPN with Cisco FTD Firepower Firewall Integrated Via RADIUS
This example portrays logging in to Cisco AnyConnect VPN with Cisco FTD Firepower Firewall with Rublon Multi-Factor Authentication. Mobile Push has been set as the second factor in Rublon Authentication Proxy configuration (AUTH_METHOD was set to push).
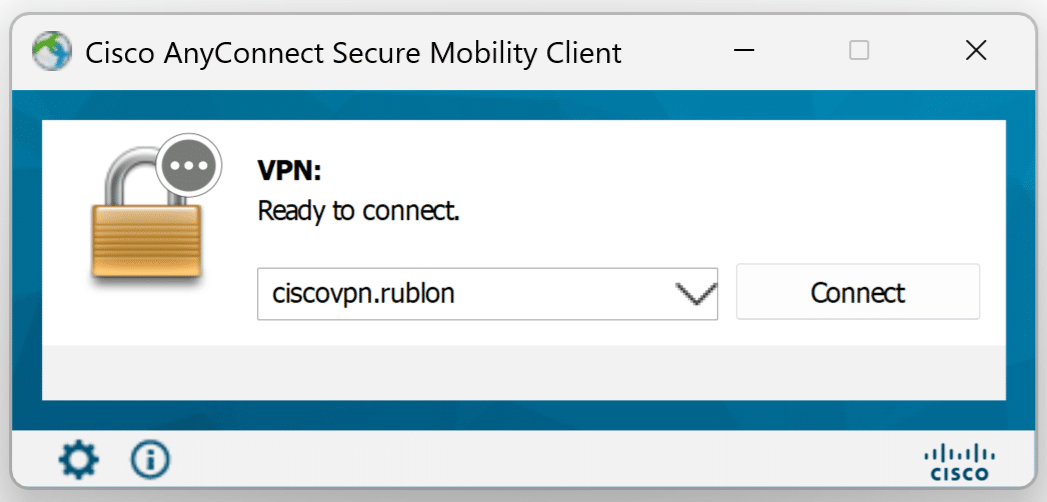
1. Open the Cisco AnyConnect Secure Mobility Client and connect to your public FQDN/IP of the Remote Access VPN
2. Enter the username and password.
3. Rublon will send a Mobile Push authentication request to your phone. Tap APPROVE.
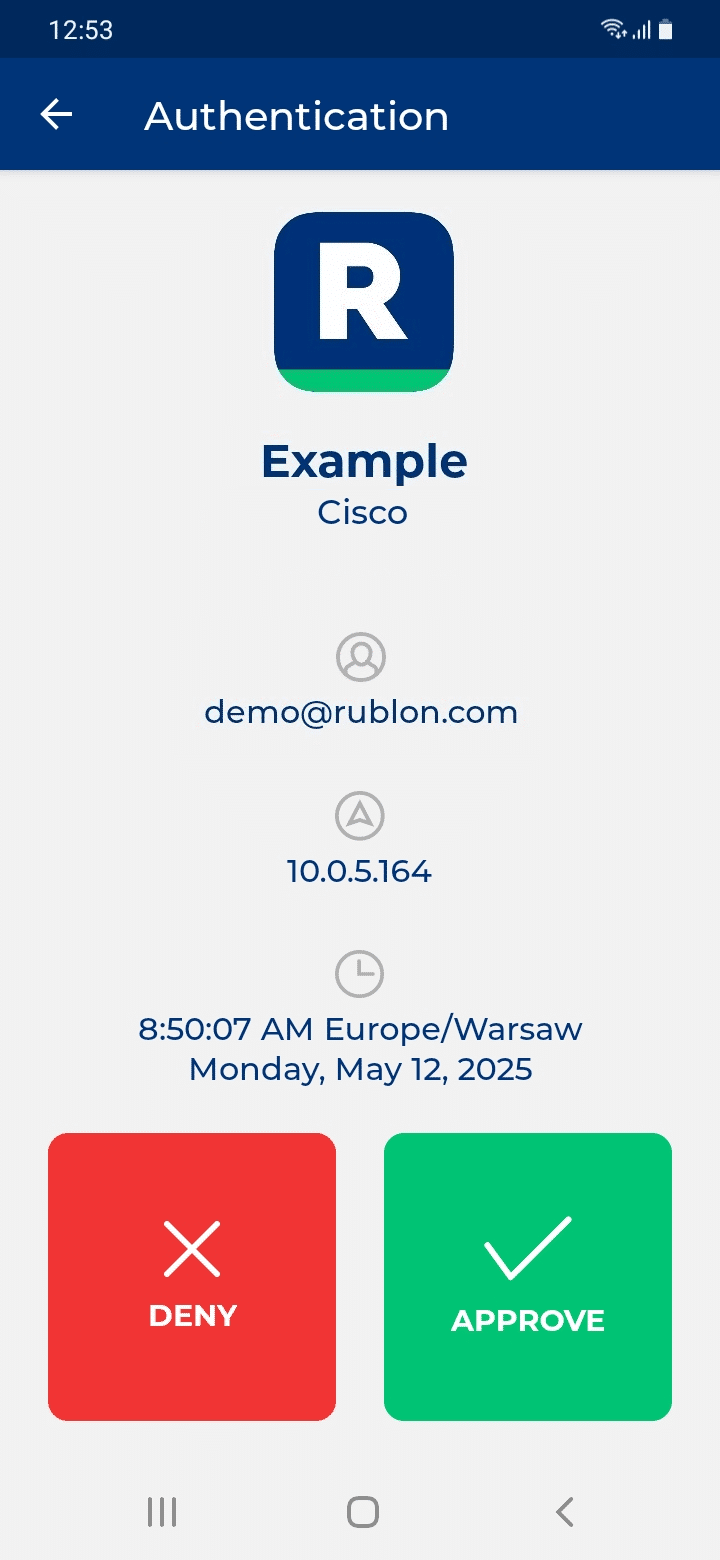
4. You will be logged in to Cisco AnyConnect VPN with Cisco FTD Firepower Firewall.
Troubleshooting MFA for Cisco AnyConnect VPN with Cisco FTD Firepower Firewall Using RADIUS
If you encounter any issues with your Rublon integration, please contact Rublon Support.