Last updated on July 7, 2025
Overview of MFA for Fortinet FortiGate SSL VPN Using RADIUS
Multi-Factor Authentication (MFA) for Fortinet FortiGate SSL VPN using FortiClient or a web browser is an additional layer of security that requires users to provide two authentication factors to gain access to the VPN. The initial factor requires users to enter their Active Directory / RADIUS username and password. Following the completion of the first factor, the user then has to authenticate with an available authentication option, like Mobile Push or Email Link. Once both factors have been completed, the user can access the resource. Enabling Two-Factor Authentication (2FA) or Multi-Factor Authentication (MFA) for Fortinet FortiGate SSL VPN helps protect from hackers accessing resources even if they possess the user’s login credentials.
Demo Video

Supported Authentication Methods
| Authentication Method | Supported | Comments |
| Mobile Push | ✔ | N/A |
| FIDO | – | N/A |
| Passcode | ✔ | N/A |
| SMS Passcode | – | N/A |
| SMS Link | ✔ | N/A |
| Phone Call | ✔ | N/A |
| QR Code | – | N/A |
| Email Link | ✔ | N/A |
| YubiKey OTP | ✔ | N/A |
| RFID | – | N/A |
Before you start
You need to install and configure Rublon Authentication Proxy before configuring Fortinet FortiGate SSL VPN to work with it. Read Rublon Authentication Proxy and follow the steps in the Installation and Configuration sections. Afterward, follow the Configuration section in this document.
Ensure that you have properly set up your authentication source, that is an external Identity Provider (IdP) like RADIUS, OpenLDAP, or Microsoft Active Directory.
Configuration of MFA for Fortinet FortiGate SSL VPN Using RADIUS
Follow the steps in this section to enable Rublon 2FA in your Fortinet FortiGate SSL VPN.
Add Rublon Authentication Proxy as RADIUS Server in Fortinet FortiGate
1. Log in to the Fortinet FortiGate administrator panel.
2. Click the User & Authentication section on the left to expand it and click RADIUS Servers.

3. Click the Create New button to add your Rublon Authentication Proxy.
4. Fill in the form and click OK to add your new server. Refer to the following image and table.

| Name | Set a name for your new server, e.g. Rublon Authentication Proxy. |
| Authentication method | Select Specify and then select PAP. |
| Primary Server Name/IP | Enter the IP address or FQDN of your Rublon Authentication Proxy. |
| Primary Server Secret | Enter the RADIUS Secret set in Rublon Authentication Proxy. |
Configure a User Group
1. Click the User & Authentication section on the left to expand it and click User Groups.
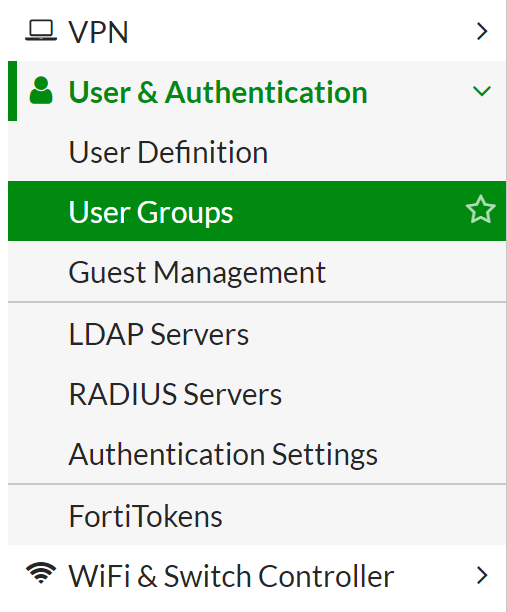
2. If you already have an existing user group, double-click the name of the group to edit its settings. If you haven’t created a user group yet, click Create New to create one. Enter the following information in the New User Group form:
| Name | Rublon |
| Type | Firewall |
3. Click the Add button in the Remote Groups section. In Add Group Match, select the Rublon Authentication Proxy remote server. You do not have to specify a group. Click OK to add the remote server.

4. Click OK to save the user group settings.
5. LDAP Server Only: If you are using an LDAP server (e.g., Active Directory) in your Rublon Authentication Proxy, adding the user group via GUI might not be enough. You might have to complete the following steps to map to the DN of an AD group using CLI.
After saving the group settings, click Edit, then click Edit in CLI, and then execute the following commands:
set member NAME_OF_THE_SERVER_FROM_LDAP_SERVERS
config match
edit 1
set server-name NAME_OF_THE_SERVER_FROM_LDAP_SERVERS
set group-name DN_OF_THE_GROUP_FROM_AD
next
end
end
You can now close the console and refresh the page. You should now see your mapping to the DN of an AD group.
6. RADIUS Server Only: If you are using a RADIUS server (e.g., FreeRADIUS) in your Rublon Authentication Proxy, you have to include the name of the group you just created in the Rublon Authentication Proxy configuration file’s RADIUS_CLASS_ATTR parameter inside the Servers section, e.g.,
"RADIUS_CLASS_ATTR": "Rublon",
Remember to restart the Rublon Authentication Proxy service for the change to take effect.
For more information, refer to the Rublon Authentication Proxy documentation.
Note
If a user has two accounts with the same name in the FortiGate system – one is a user account for VPN connections and the other is an administrative account (defined in System → Administrators) – and both accounts authenticate through an external Identity Provider (IdP), then after deploying the Rublon Authentication Proxy, switch the administrative account to local authentication (System → Administrators → Edit Administrator → set Type to Local User).
Retaining the admin account’s authentication through the external Identity Provider will result in the user’s VPN connections not requiring a second factor of authentication. This happens because FortiGate sees two accounts with the same username in the same source. If the admin account (using the same username) is also configured in the external IdP and does not require MFA, FortiGate will finalize the login as soon as it receives a positive response for that account—before the Rublon Auth Proxy authentication process completes (which takes longer, for example because it waits for the user’s approval in the Rublon Authenticator app). Switching the admin account to “Local User” ensures that FortiGate no longer searches for an alternate identity source with the same username, thereby always requiring a second factor of authentication for VPN connections.
Configure Firewall Policy and Mapping
1. Configure the SSL VPN Tunnel if you have not already.
2. Click Policy & Objects on the left to expand it and select IPV4 Policy.
Note: In some cases, there will be a Firewall Policy option instead of an IPV4 Policy.
3. Create or edit the policy related to your SSL-VPN interface.
4. In Source, add the address space (e.g., SSLVPN_TUNNEL-ADDR1) and the group (Rublon if you followed this document closely) you created before
5. Click OK to save the changes.
6. Click VPN on the left to expand it and select SSL-VPN Settings.
7. Navigate to the Authentication/Portal Mapping section.
8. Create New or Edit existing mapping to grant access to the group you created before. Unless your requirements are different, allow full-access.
9. Click OK and then Apply to save the changes.
Configure Timeout and Additional Options
The default timeout in the Fortinet appliance is 5 seconds, which is far too short for anything other than Passcode authentication. You have to increase the timeout in the Fortinet command line interface. We recommend you increase the timeout to at least 180 seconds.
1. Connect to the appliance command-line interface (CLI). If you need more information, refer to the documentation that came with your Fortinet device.
2. Execute the following commands:
config system global
set remoteauthtimeout 60
set ldapconntimeout 60000
end- remoteauthtimeout: This time is specified in seconds.
- ldapconntimeout: This time is specified in milliseconds.
Log in to FortiGate SSL VPN using MFA for Fortinet FortiGate SSL VPN Integrated Via RADIUS
Rublon MFA for FortiGate SSL VPN supports both login via web browser and FortiClient VPN. While this example portrays logging in to Fortinet FortiGate SSL VPN via a web browser, you can also click Launch FortiClient and use the FortiClient VPN to log in.
In this example, Mobile Push has been set as the second factor in Rublon Authentication Proxy configuration (AUTH_METHOD was set to push).
1. Open the Fortinet FortiGate SSL VPN login page in your browser.
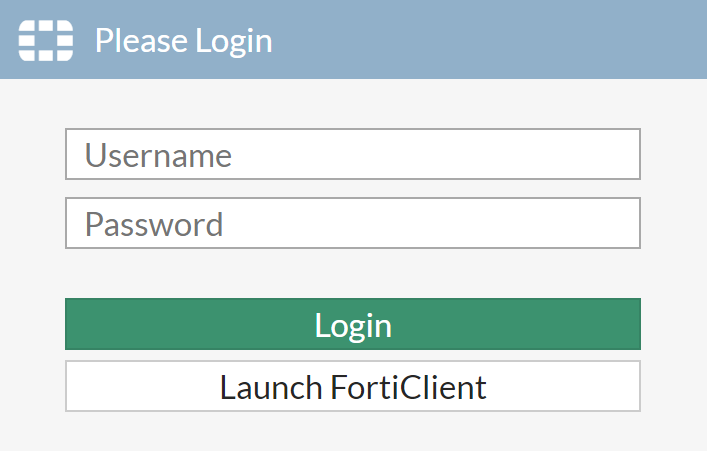
2. Provide your username and password and click Login.
3. You will be sent an automatic push notification on your phone.
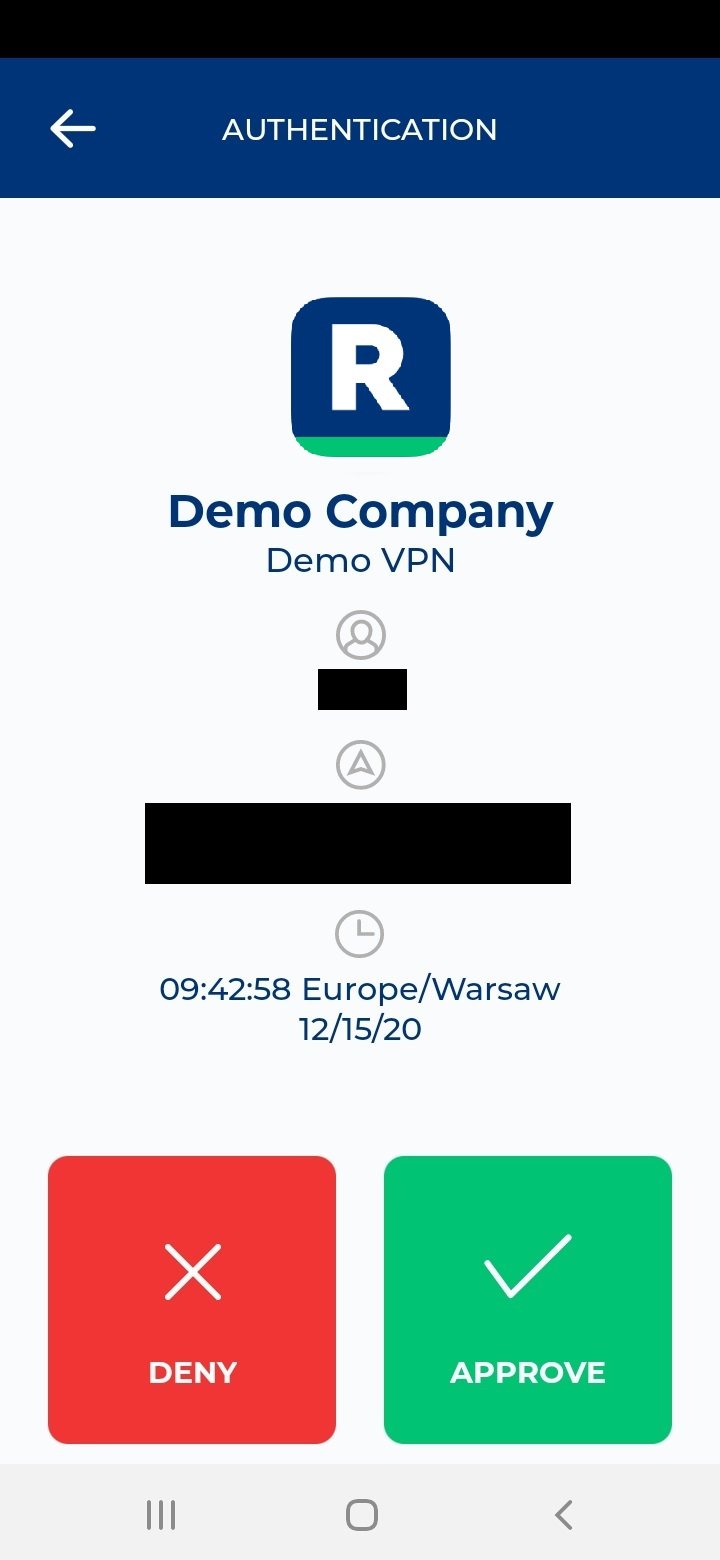
4. Tap APPROVE.
5. You will be logged in to your VPN.
Troubleshooting MFA for Fortigate SSL VPN Using RADIUS
Blast-RADIUS Vulnerability Protection
RADIUS integrations may enforce the validation of the Message-Authenticator RADIUS attribute as part of their mitigations for the Blast-RADIUS vulnerability.
The Rublon Authentication Proxy supports the Message-Authenticator attribute starting from version 3.5.3. The Rublon Auth Proxy uses the force_message_authenticator option in the configuration file (set to true by default) to safeguard against Blast-RADIUS attacks.
If you are experiencing issues with your RADIUS integration, ensure that the force_message_authenticator is set to true.
If you are using Rublon Authentication Proxy 3.5.2 or older, update to the newest available version.
If you encounter any issues with your Rublon integration, please contact Rublon Support.