Last updated on February 6, 2025
Multi-Factor Authentication (MFA) for OpenVPN on pfSense is a double-layer approach to OpenVPN user authentication. OpenVPN MFA strengthens the traditional username and password layer with a strong second layer. The possible second layers include but are not limited to a Mobile Push notification and Mobile Passcode (TOTP). Enabling Multi-Factor Authentication (MFA) for OpenVPN on pfSense prevents unwanted access, even if hackers know the user’s login credentials.
Overview of MFA for OpenVPN on pfSense
The purpose of this document is to enable Rublon Two-Factor Authentication (2FA/MFA) for users connecting to OpenVPN on pfSense. To achieve that, you have to use Rublon Authentication Proxy, an on-premise RADIUS proxy server, which allows you to integrate Rublon with OpenVPN on pfSense to add Multi-Factor Authentication to your VPN logins. This document describes using pfSense in tandem with OpenVPN. pfSense is an open-source router and firewall that can be managed using WebGUI.
This integration instruction is for the OpenVPN Open Source Community version, which differs from the OpenVPN Access Server documentation.
Supported Authentication Methods
| Authentication Method | Supported | Comments |
| Mobile Push | ✔ | N/A |
| FIDO | – | N/A |
| Passcode | ✔ | N/A |
| SMS Passcode | – | N/A |
| SMS Link | ✔ | N/A |
| Phone Call | ✔ | N/A |
| QR Code | – | N/A |
| Email Link | ✔ | N/A |
| YubiKey OTP | ✔ | N/A |
| RFID | – | N/A |
Demo Video
Before you start
You need to install and configure the Rublon Authentication Proxy itself before configuring OpenVPN and pfSense to work with it. Please read the Rublon Authentication Proxy documentation and follow the steps in the Installation and Configuration sections. Afterward, follow the Configuration section in this document.
Ensure that you have correctly set up your authentication source, that is, an external Identity Provider (IdP) like OpenLDAP, Microsoft Active Directory, FreeIPA, or standalone FreeRADIUS.
Note
The FreeRADIUS built into pfSense offers a very limited set of settings and does not allow you to specify the user email attribute. For this reason, you cannot use the built-in FreeRADIUS in this integration. Use a standalone FreeRADIUS or any other Identity Provider listed in the previous paragraph.
You need a properly configured pfSense. It is assumed you already have an OpenVPN Server added in pfSense under VPN → OpenVPN. A primary authentication solution should be configured for your OpenVPN users before you begin to deploy multi-factor authentication from Rublon. Refer to the documentation at pfsense.org if you have not installed and configured pfSense yet.
Configuration of MFA for OpenVPN on pfSense
1. Open a web browser and navigate to the pfSense WebGUI.
2. Go to System → Package Manager. Switch to the Available Packages tab.
3. Find openvpn-client-export and click Install. Click the Confirm button to start the installation. After a short while, you should see that the installation has been successfully completed. You should now have the package visible in the Installed Packages tab.

4. Go to the System → User Manager.
5. Switch to the Authentication Servers tab. Click Add.

6. Fill in the form. Refer to the following image and table for more information about the settings. Click Save to add the Authentication Server.

| Descriptive name | Specify any name you like, e.g., Rublon Authentication Proxy. |
| Type | Always select RADIUS. Rublon Authentication Proxy acts as a RADIUS proxy. Select RADIUS regardless of whether you use Active Directory, LDAP, or RADIUS as your IdP. |
| Protocol | Select PAP. |
| Hostname or IP address | Enter the IP address of your Rublon Authentication Proxy. |
| Shared Secret | Enter the RADIUS_SECRET from Rublon Authentication Proxy. |
| Services offered | Change to Authentication. |
| Authentication port | Set to 1812. |
| Accounting port | N/A. Leave the default value. |
| Authentication Timeout | Controls how long the RADIUS server may take to respond to an authentication request. Default: 5 Recommended: 60 |
| RADIUS NAS IP Attribute | Enter the IP to use for the “NAS-IP-Address” attribute during RADIUS Access-Requests. |
Note
We do not recommend setting the same timeout value in Authentication Timeout in this form and AUTH_TIMEOUT in the config file of the Rublon Authentication Proxy. Such a setup has a history of issues. What we recommend is setting AUTH_TIMEOUT in the config file to be slightly longer than Authentication Timeout in the form, for example:
Authentication Timeout: 60
AUTH_TIMEOUT: 90
7. Click Save.
8. Go to VPN → OpenVPN. Find your interface on the OpenVPN Server list. Click the pen icon on the right.

9. Switch to the Servers tab. Make sure Server mode is set to Remote Access (User Auth).
10. Make sure Backend for authentication is set to the Authentication Server you created in Step 6.

11. Scroll down to the Advanced Configuration section. In the Custom options field, enter:
reneg-sec 0
hand-window 120
- The reneg-sec n option allows you to change the time (in seconds) after which a data channel key renegotiation happens. Change to 0 to never have to authenticate again as long as you don’t disconnect.
- The hand-window 120 option ensures that the authentication process is timed out correctly when a user does not manage to perform 2FA in time.
Note
We strongly recommend you set reneg-sec to 0. If you set a different value, your users might receive 2FA reauthentication requests after the time specified by that value.
The default value is 3600 seconds, so if you do not add the reneg-sec 0 option and leave Additional configuration options empty, your users will be asked to reauthenticate every hour.
12. Other settings depend on your personal needs. Click Save to save the changes.
13. Switch to the Client Export tab. Navigate to Advanced → Additional configuration options.
14. In the Additional configuration options section, add the reneg-sec 0 and hand-window 120 options. Note that these two options need to be set both on the server side (like you did in Step 11) and on the client side (here) to work properly.
15. Click Save as default to save the change.
16. Scroll down to the OpenVPN Clients section, and click the appropriate download button based on your needs. Windows Installer is a popular choice, but you are free to choose any of the available options.

17. You now have an appropriate installer file or package for your OpenVPN users. Your configuration is now complete. After installing the package, your users have Rublon 2FA enabled when logging in to the VPN.
Testing MFA for OpenVPN on pfSense
Depending on the choice you made in Step 16 of the previous section, logging in to your VPN might look slightly different. Refer to the Demo Video for an example with the Viscosity OpenVPN Client. This section portrays an example of logging in to OpenVPN if you chose the Windows Installer in Step 16 of the Configuration section of this document. It is assumed you have already downloaded and installed the client.
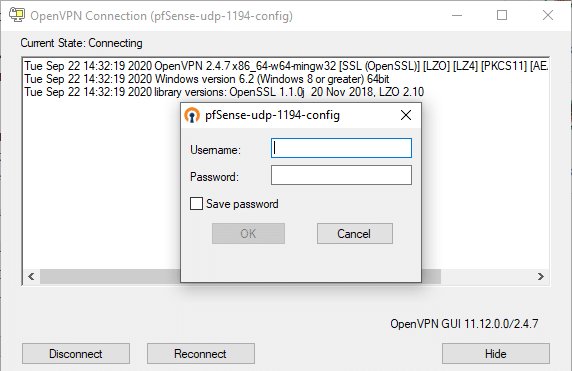
1. Right-click the OpenVPN icon in the system tray.
2. Select the connection, and select Connect.
3. You will be asked to provide the credentials. Enter your username and password. Click OK.
4. Check your mailbox for an email from Rublon. Open the email, and click Sign In.

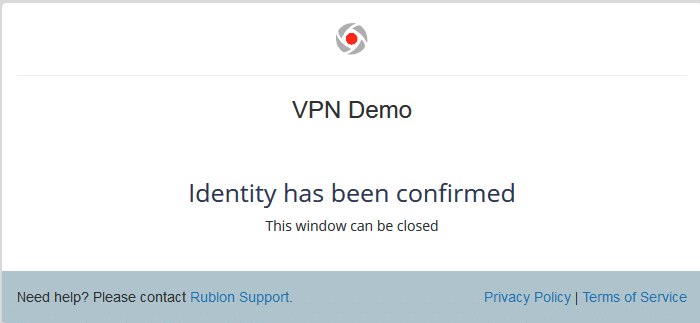
5. You will be successfully logged in to your VPN.

Troubleshooting
Blast-RADIUS Vulnerability Protection
RADIUS integrations may enforce the validation of the Message-Authenticator RADIUS attribute as part of their mitigations for the Blast-RADIUS vulnerability.
The Rublon Authentication Proxy supports the Message-Authenticator attribute starting from version 3.5.3. The Rublon Auth Proxy uses the force_message_authenticator option in the configuration file (set to true by default) to safeguard against Blast-RADIUS attacks.
If you are experiencing issues with your RADIUS integration, ensure that the force_message_authenticator is set to true.
If you are using Rublon Authentication Proxy 3.5.2 or older, update to the newest available version.
If you have a problem or question, refer to OpenVPN – FAQ first.
If you encounter any issues with your Rublon integration, please contact Rublon Support.