Last updated on December 15, 2025
Important
Please contact Rublon Support if you’d like to use Rublon Access Gateway.
Overview
Rublon Access Gateway works as a web application that allows you to secure the login process by using Two-Factor in the form of an additional Rublon authentication performed after logging in through an authentication source. The application allows you to use one of three authentication sources (LDAP, Microsoft Active Directory, RADIUS). Rublon Access Gateway makes it possible to define integrations with common web applications like Office 365, G Suite, Freshdesk, etc. The data between Rublon Access Gateway and added applications is transferred using the SAML 2.0 standard.
Rublon Access Gateway supports PHP versions equal to or greater than 7.4 but less than 8.0.
You can use Rublon Access Gateway to:
- Add an application (Office 365, Salesforce etc.) and therefore introduce Rublon into its authentication process.
- Configure an Authentication Source (LDAP, Microsoft Active Directory, RADIUS).
- Secure your login process by using 2FA in the form of an additional Rublon authentication performed after logging in with your authentication source.
Rublon Access Gateway supports the following authentication methods:
Network Diagram
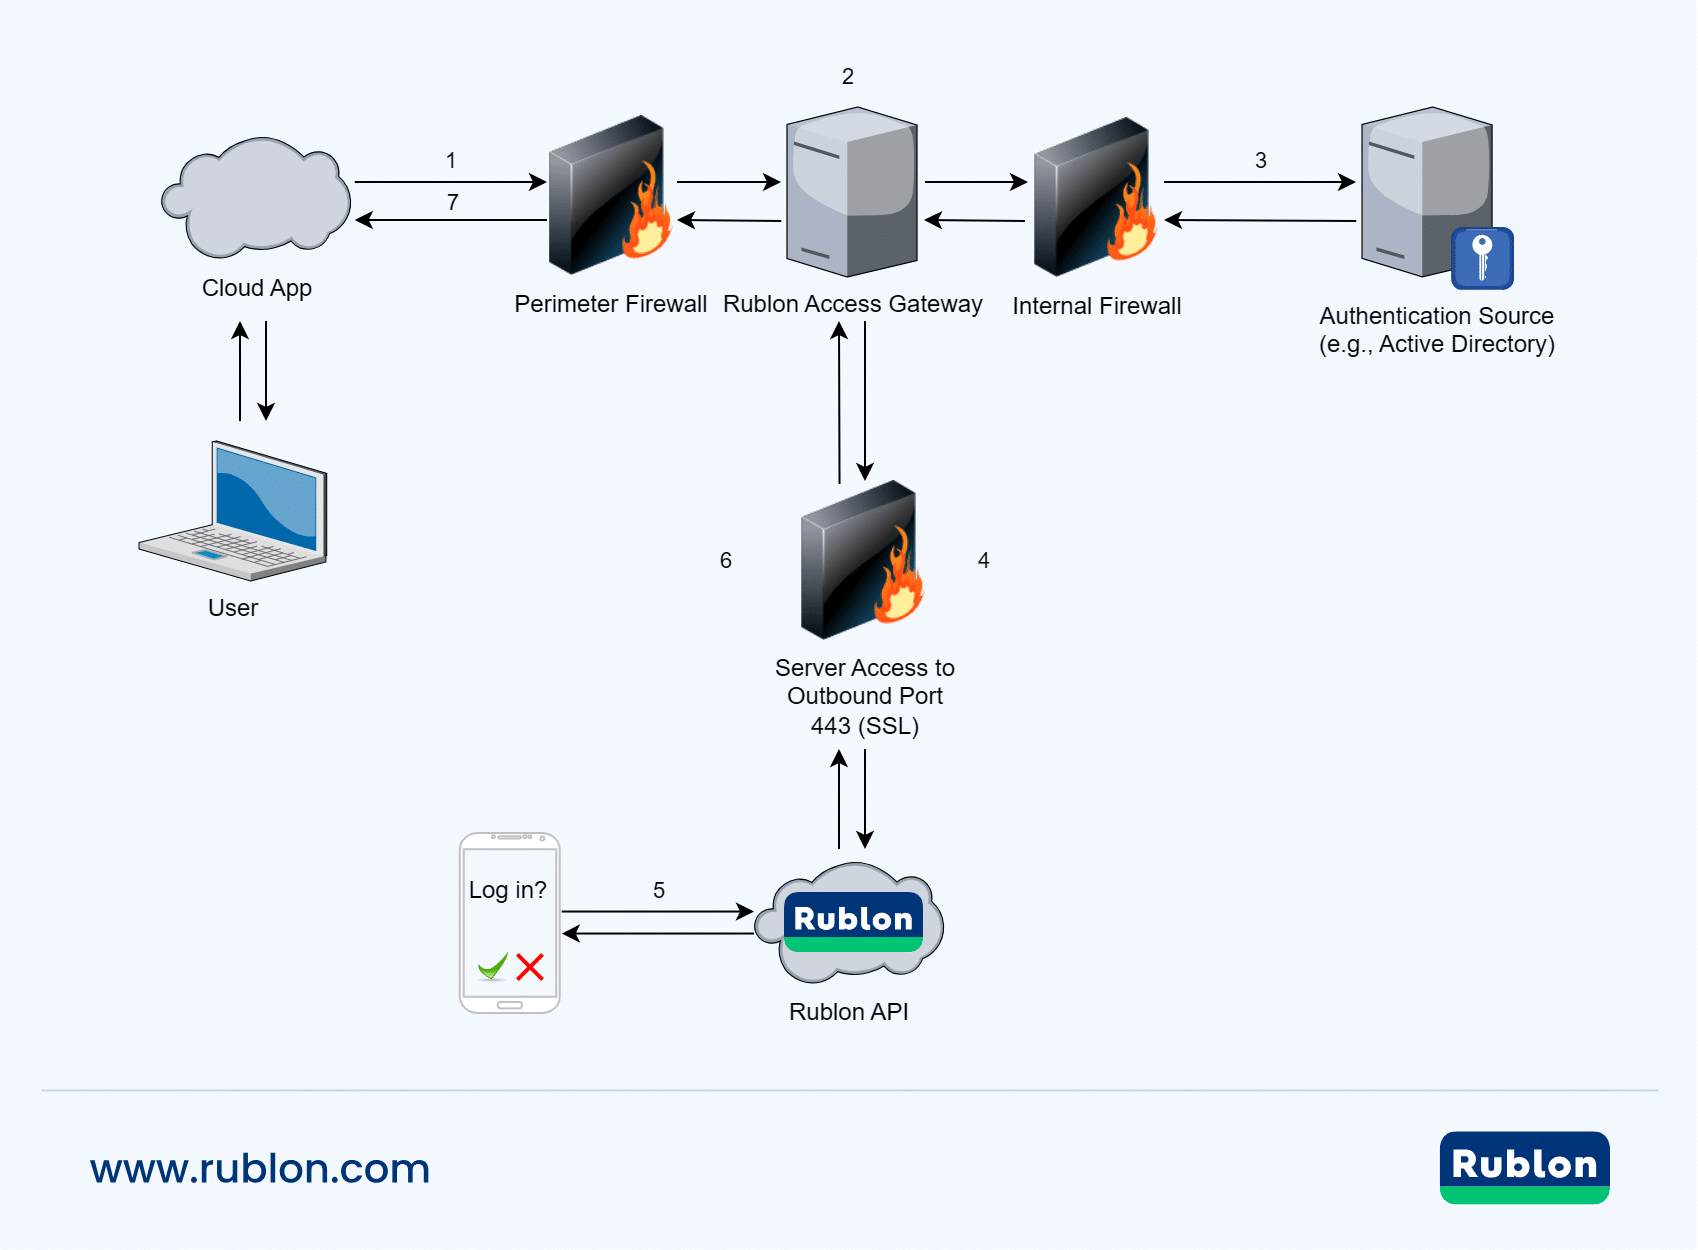
1. Initiate login to a cloud app.
2. Login request sent to Rublon Access Gateway.
3. Perform primary authentication against your identity provider (FreeRADIUS, FreeIPA, OpenLDAP, Active Directory, etc.).
4. Establish a connection to Rublon API.
5. Perform secondary authentication using one of the authentication methods.
6. Receive a success response.
7. Log in the user.
Installation
Rublon Access Gateway enables two-factor authentication for popular cloud services like Microsoft Office 365 and other applications that allow integrations via SAML (e.g. Cisco AnyConnect).
Rublon Access Gateway works on both Windows Server and Linux.
Refer to the appropriate subsection to install Rublon Access Gateway on Windows Server or Linux.
Windows Server
1. Install IIS HTTP Server. (We recommend you install IIS Through GUI)
2. After installing IIS, add ASP.NET and CGI Support:
- To do that, use Add Roles and Features in Server Manager.
- Follow most of the steps as described in the guide on how to install IIS Server. The only difference is at the Server Roles step → Expand Web Server (IIS) → Expand Web Server → Expand Application Development → Select ASP.NET 4.8 and CGI
- Follow the rest of the steps to complete the installation wizard.
3. Download PHP 7.4.33 and unzip the contents of the downloaded file to the desired location, e.g., C:\PHP.
4. Download and install PHP Manager.
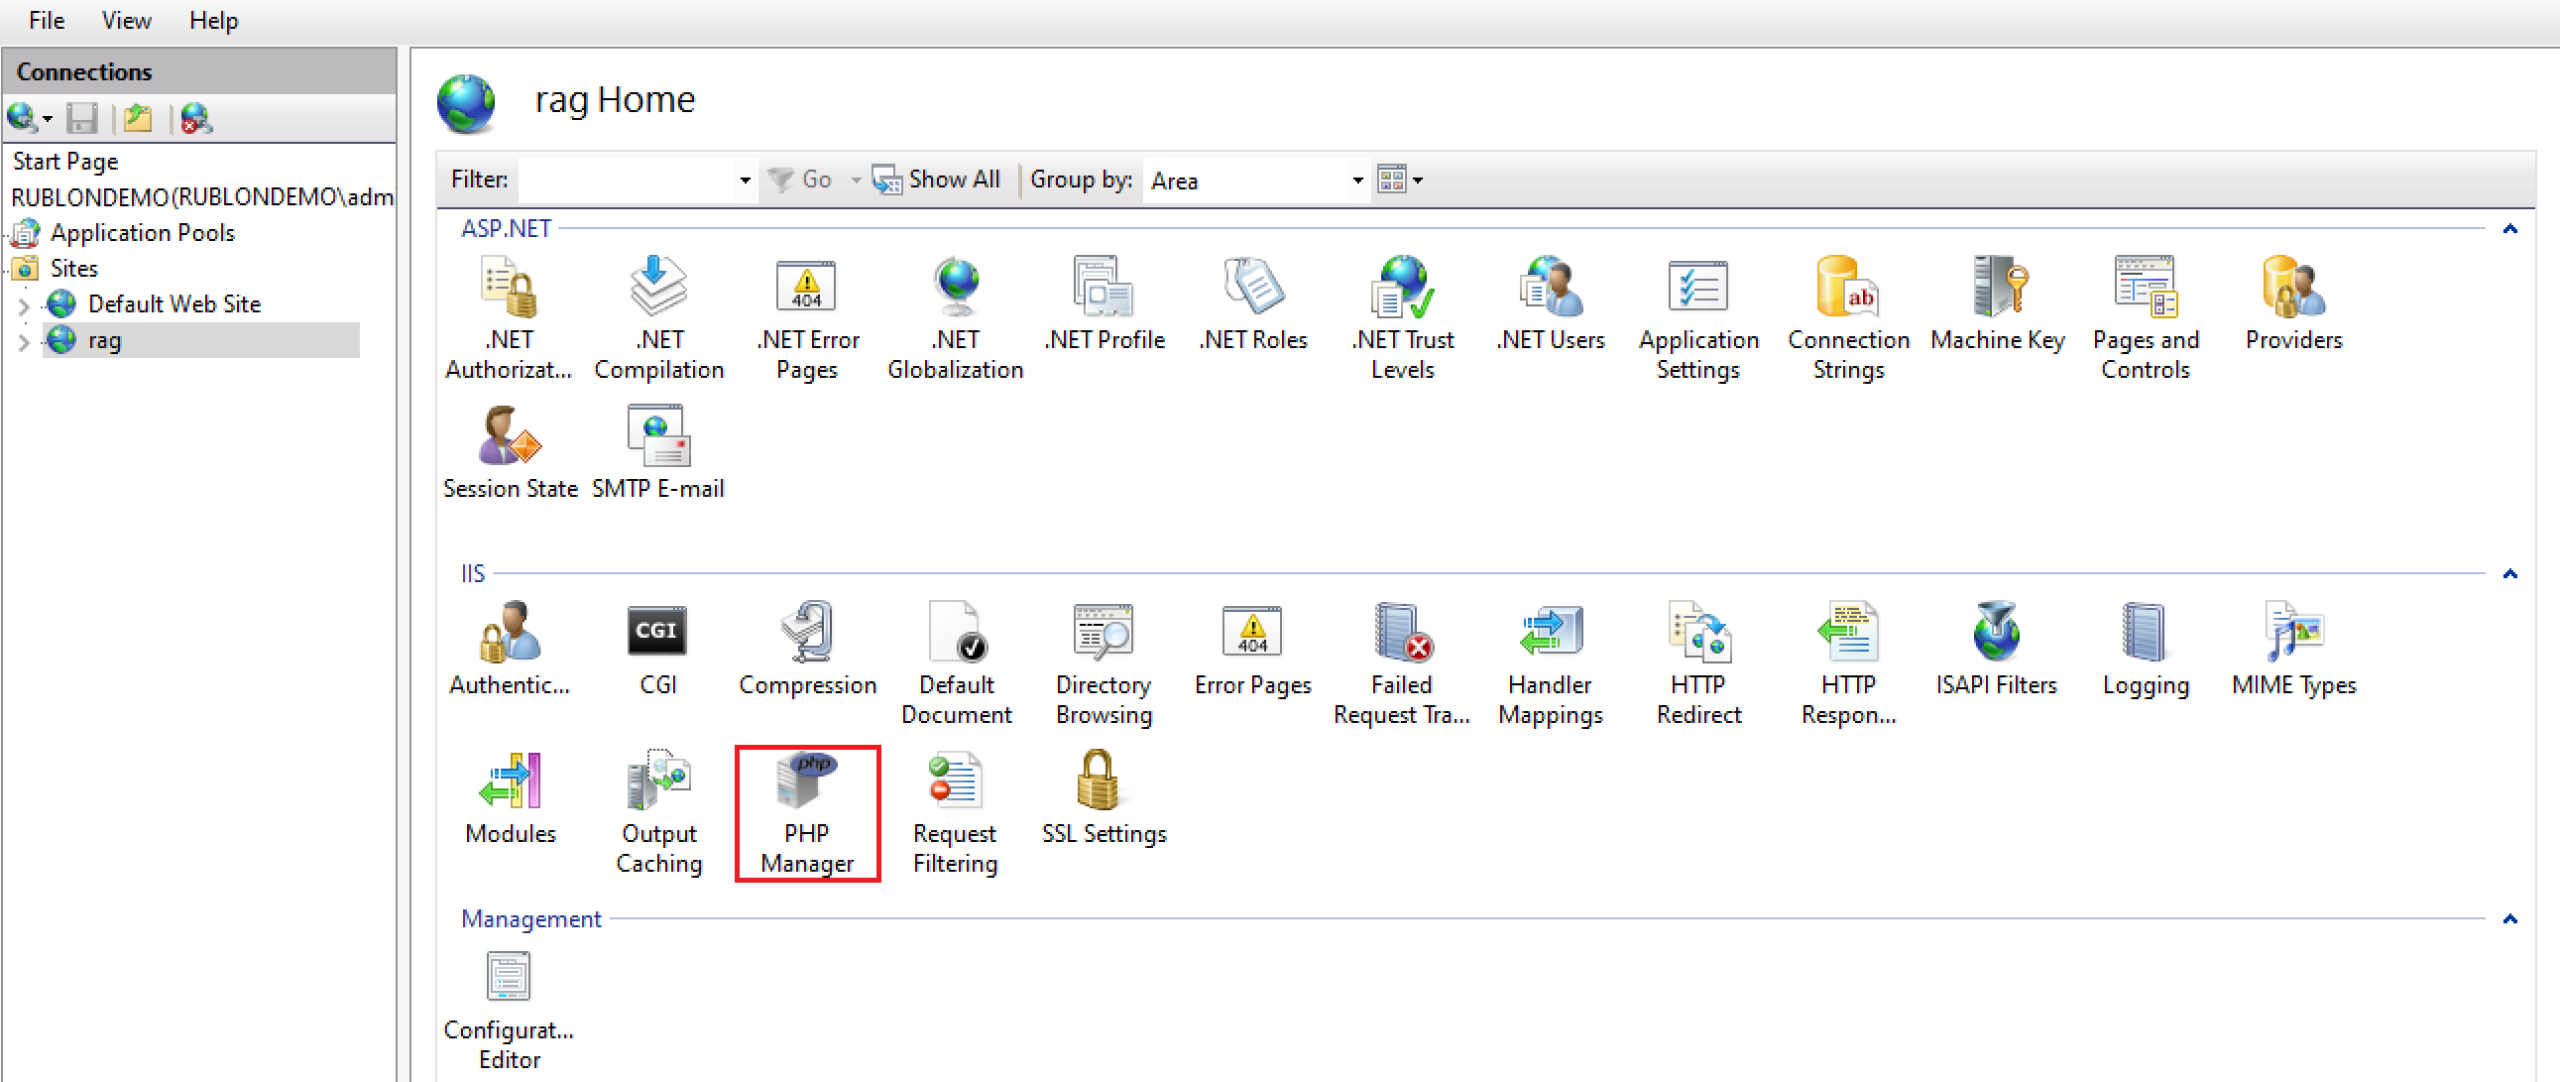
5. Open IIS Manager and select your site from the context menu on the left.
6. Double-click PHP Manager.
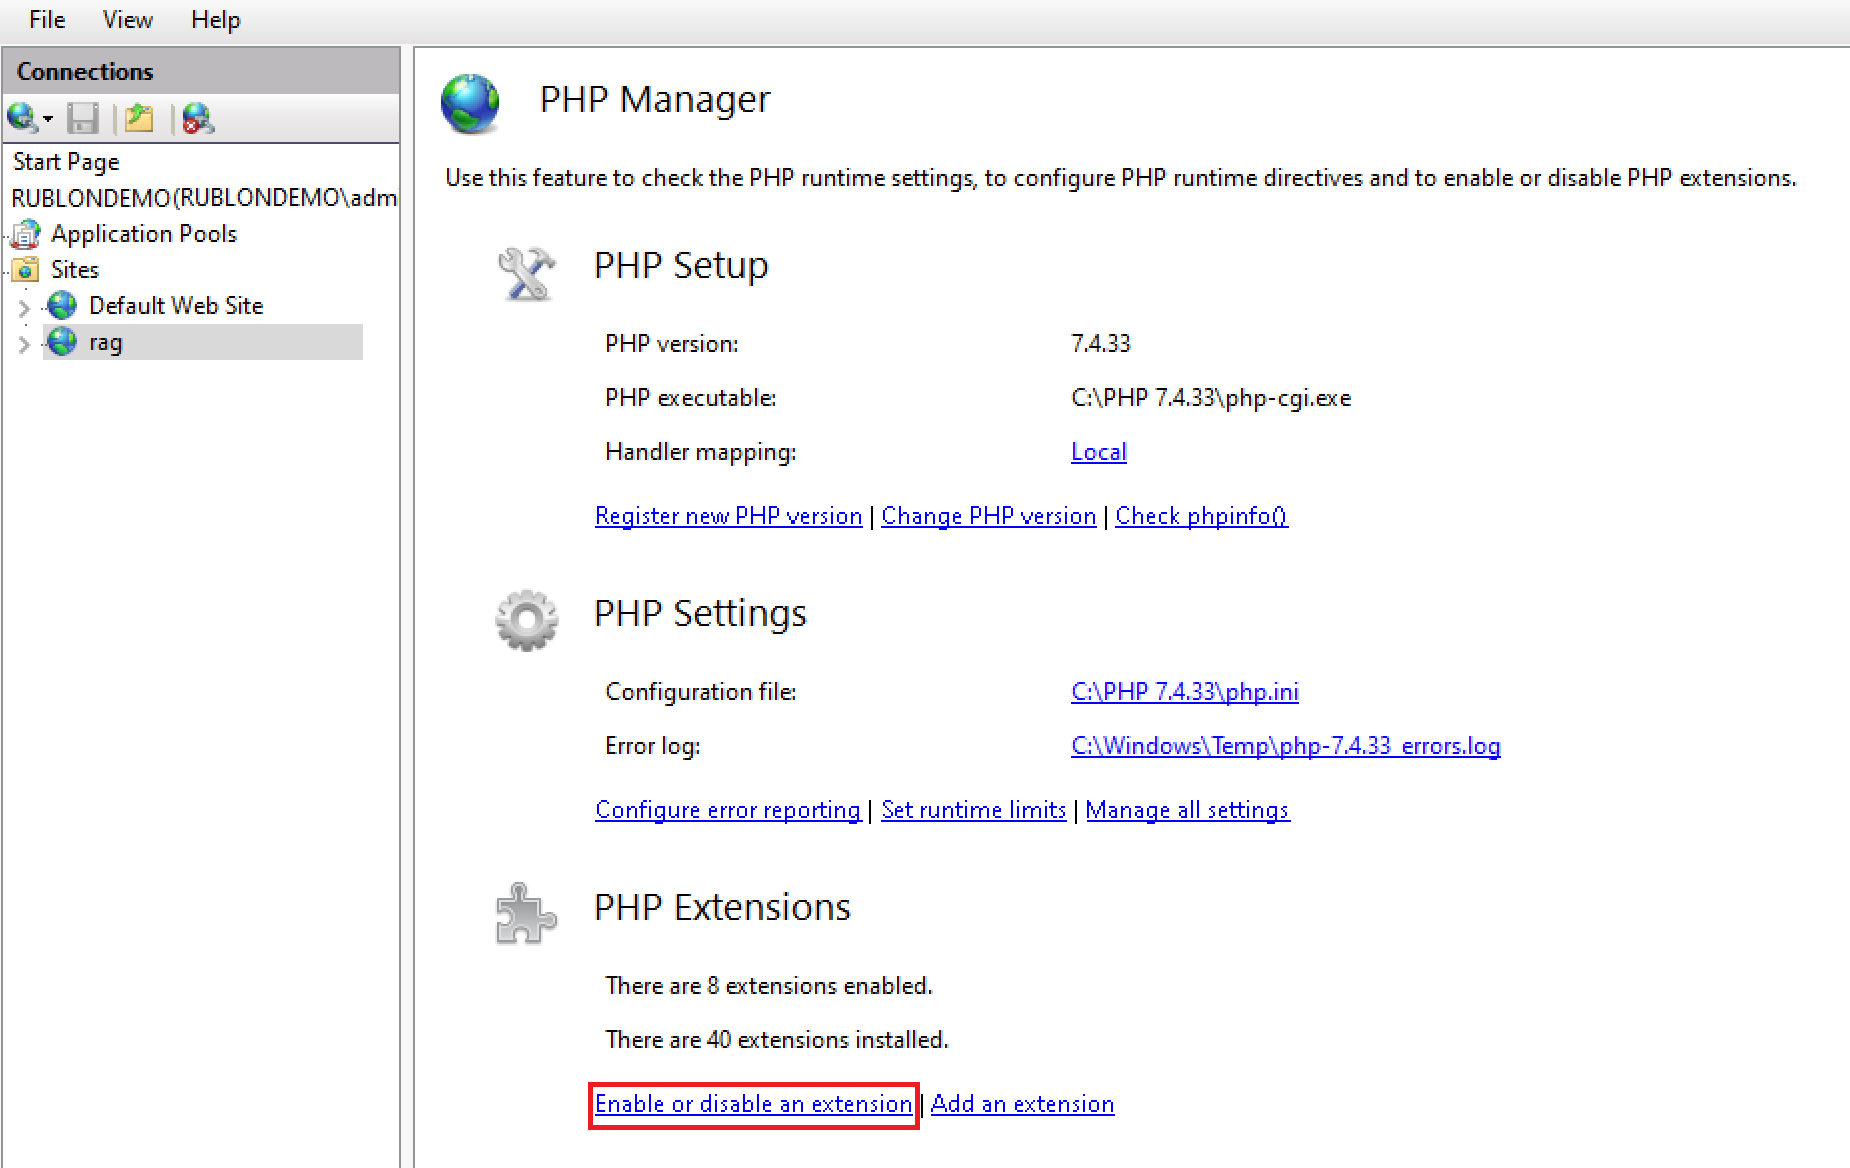
7. Register the new PHP Version by specifying the path to the php-cgi.exe file located in the folder where you previously unzipped your PHP file.
8. Enable three additional extensions required for Rublon Access Gateway. Navigate to the bottom and click Enable or disable an extension. Then, select the following extensions and click Enable:
- php_openssl
- php_curl
- php_ldap

9. Restart IIS to make your changes take effect.
10. Download the package of Rublon Access Gateway and unzip the files into the root C:\inetpub\wwwroot directory so that your path looks as follows: C:\inetpub\wwwroot\rag.
11. Purchase an SSL certificate for your server (using a fully qualified domain name) from a commercial Certificate Authority (CA) or purchase a wildcard SSL certificate. Add the SSL certificate to IIS Manager (Server Certificates icon).
It is also possible to generate a free certificate with Let’s Encrypt, but you will need to demonstrate the control of the domain. Certificates generated with Let’s Encrypt must be renewed manually every 90 days.

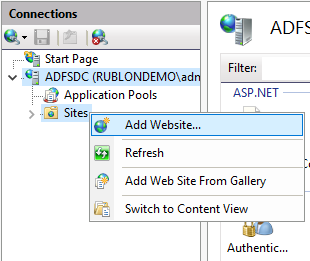
12. Create a Website for Rublon Access Gateway. Right-click the Sites submenu in IIS Manager, and choose Add Website…
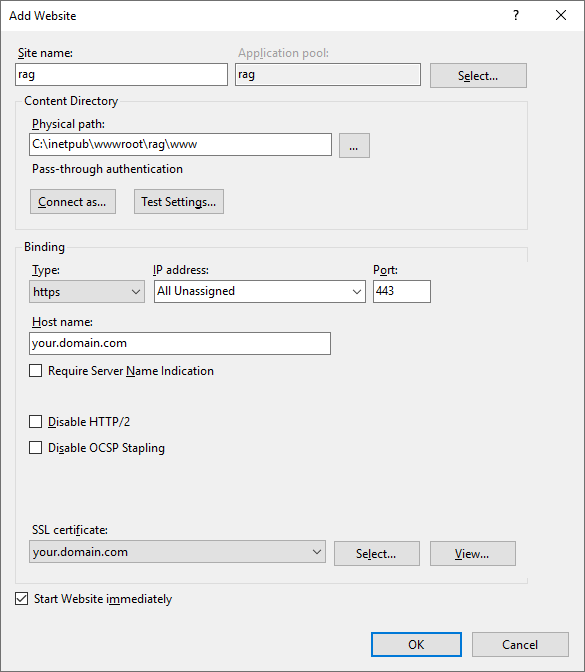
13. Make the Physical path field point to the rag\www directory.
14. Select the https protocol in the Type dropdown.
15. Specify your domain Host name.
16. Select your SSL certificate.
17. Click OK to add your website.
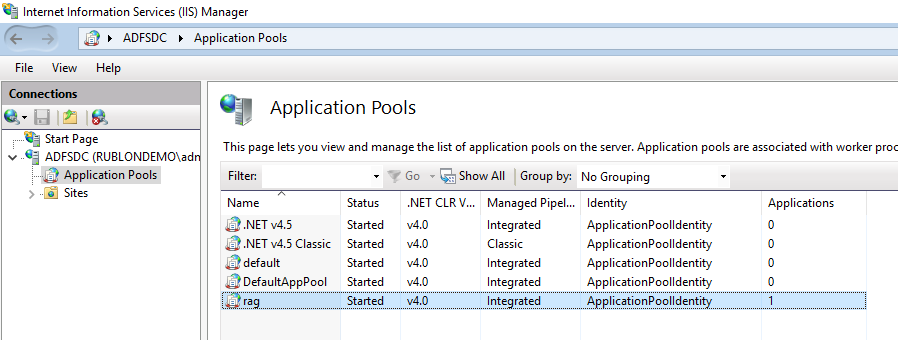
18. Open the Application Pools node underneath the machine node. Here you can see that the name of the application pool is the same as the name of your IIS site.
You do not have to make any changes in this view, but if you would like to learn more about Applications Pools, refer to this Microsoft documentation page.
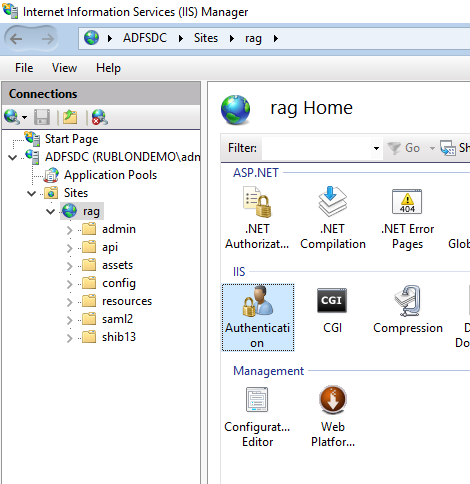
19. Select your site from the pane on the left, and then double-click Authentication.
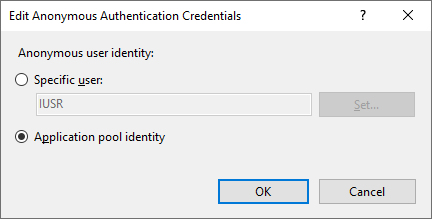
20. Right-click Anonymous Authentication and select Edit….
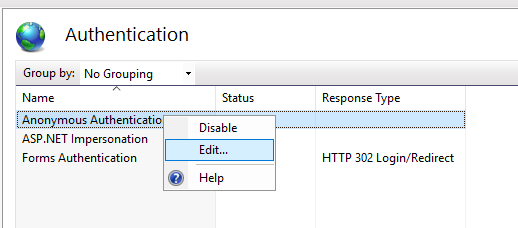
21. Select Application pool identity and click OK.
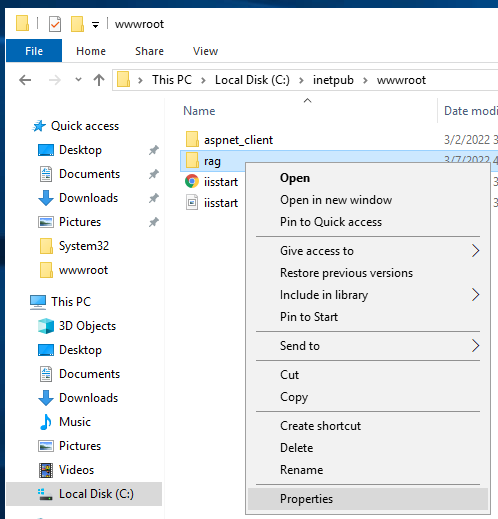
22. Open File Explorer and go to C:\inetpub\wwwroot.
23. Find a folder with the name of your IIS site, right-click it, and select Properties.
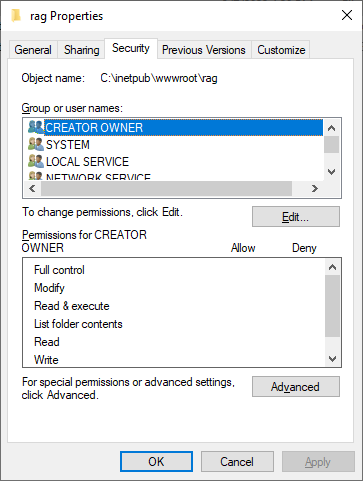
24. Select the Security tab and then click Edit….
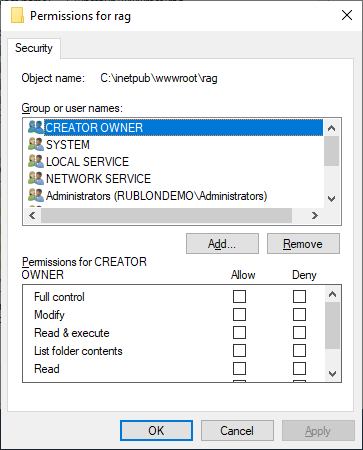
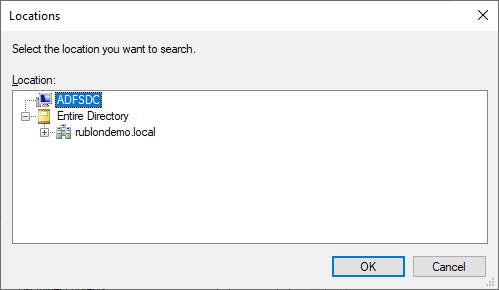
25. A window with permissions will open. Click Add….
26. Click Locations….
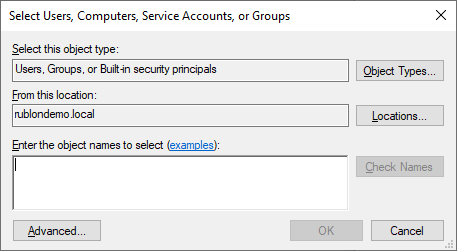
27. Select your Local Server Name (by default, Domain Name is selected) and click OK.
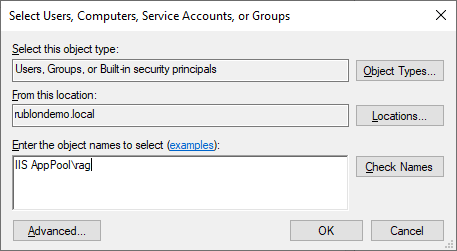
28. Type the following in the Object Names text field:
IIS AppPool\<your_application_pool_name>
Remember to replace <your_application_pool_name> with the actual name of your application pool.
29. Click Check Names and then click OK.
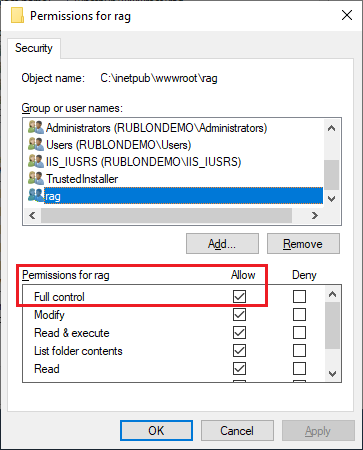
30. Grant Full control permissions and click OK, and then click OK again to close the Properties dialog.
31. Download and move the cacert.pem file into your PHP SSL directory (PHP\version\extras\ssl). It contains the certificates in PEM format and is directly used with the php_curl library.
32. Modify your php.ini file. Rublon Access Gateway needs the following changes to run:
- Set the curl.cainfo parameter, it should look like:
curl.cainfo="C:\Program Files\iis express\PHP\v7.2\extras\ssl\cacert.pem"
- Add the php_ldap.dll file to the extension list:
extension=php_ldap.dll
- Replace
;extension=php_openssl.dllwithextension=php_openssl.dll - Replace
;extension=php_curl.dllwithextension=php_curl.dll - Set
cgi.fix_pathinfo = 1 - Set
cgi.force_redirect = 1 - Set
fastcgi.impersonate = 0
33. Download and install the latest Microsoft Visual C++ Redistributable. (It’s required by FastCGI.)
34. Your Rublon Access Gateway should be configured to run on your domain name (previously defined/configured when installing IIS). To check if Rublon Access Gateway is working properly, please type your domain URL or FQDN in your browser.
35. Default password for the administrator panel is:
7^aG$a51Gb.@gaSa6$)s/a
After you sign in to the Rublon Access Gateway config panel, you can change the password.
36. Your installation is finished.
Linux
Tested on the following Linux distributions:
- Ubuntu 20.04
- Ubuntu 22.04
We recommend you use one of the preceding Linux distributions if possible. Other distributions should work, too. If you successfully complete the installation on another Linux distribution, let us know so we can update the list of tested distributions.
We recommend you install Rublon Access Gateway in your local network via Docker containers. Please follow the steps below.
1. Before you start, ensure you have a domain name for your Rublon Access Gateway and a valid SSL certificate in Apache format. If you do not have a domain name, register one. If you do not have a certificate you could use, purchase an SSL certificate for your server (using a fully qualified domain name) from a commercial Certificate Authority (CA). It is also possible to generate a free certificate with Let’s Encrypt, but you will need to demonstrate the control of the domain. Certificates generated with Let’s Encrypt will have to be manually renewed every 90 days.
2. Download the package for Rublon Access Gateway and unzip the archive.
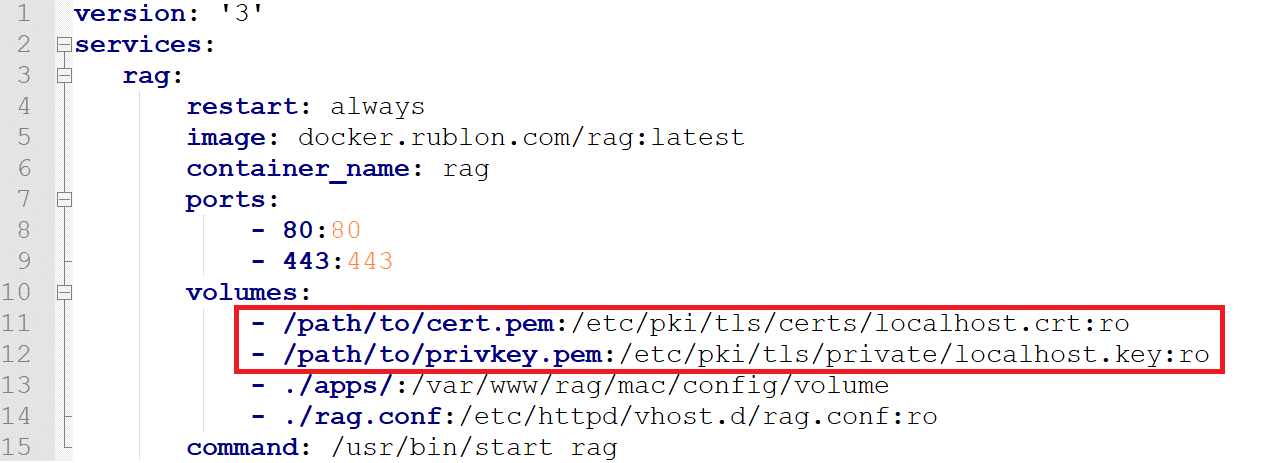
3. Edit the docker-compose.yml file.
4. You have to set paths to your SSL certificate. Your SSL certificate has to be in Apache certificate format, hence two paths. Locate volumes /path/to/cert.pem and /path/to/privkey.pem and replace these default paths with proper paths to your certificate and key.
Things to note:
- If your certificate is located in e.g.
/path/to/cert.pem, then the certificate will be mounted with Read-Only rights in the following location:/etc/pki/tls/certs/localhost.crt. - If your key is located in e.g.
/path/to/privkey.pem, then the key will be mounted with Read-Only rights in the following location:/etc/pki/tls/certs/localhost.key. - Rublon Access Gateway applications will be stored in the
appsfolder.
5. Save the docker-compose.yml file.
6. Edit the rag.conf file.
7. Locate ServerName rag.yourdomain.com and replace yourdomain with the name of your domain.
In the <VirtualHost *:80> section, locate RewriteCond %{SERVER_NAME} = rag.yourdomain.com and replace yourdomain with the name of your domain.
In the <VirtualHost *:443> section, locate ServerName rag.yourdomain.com and replace yourdomain with the name of your domain.
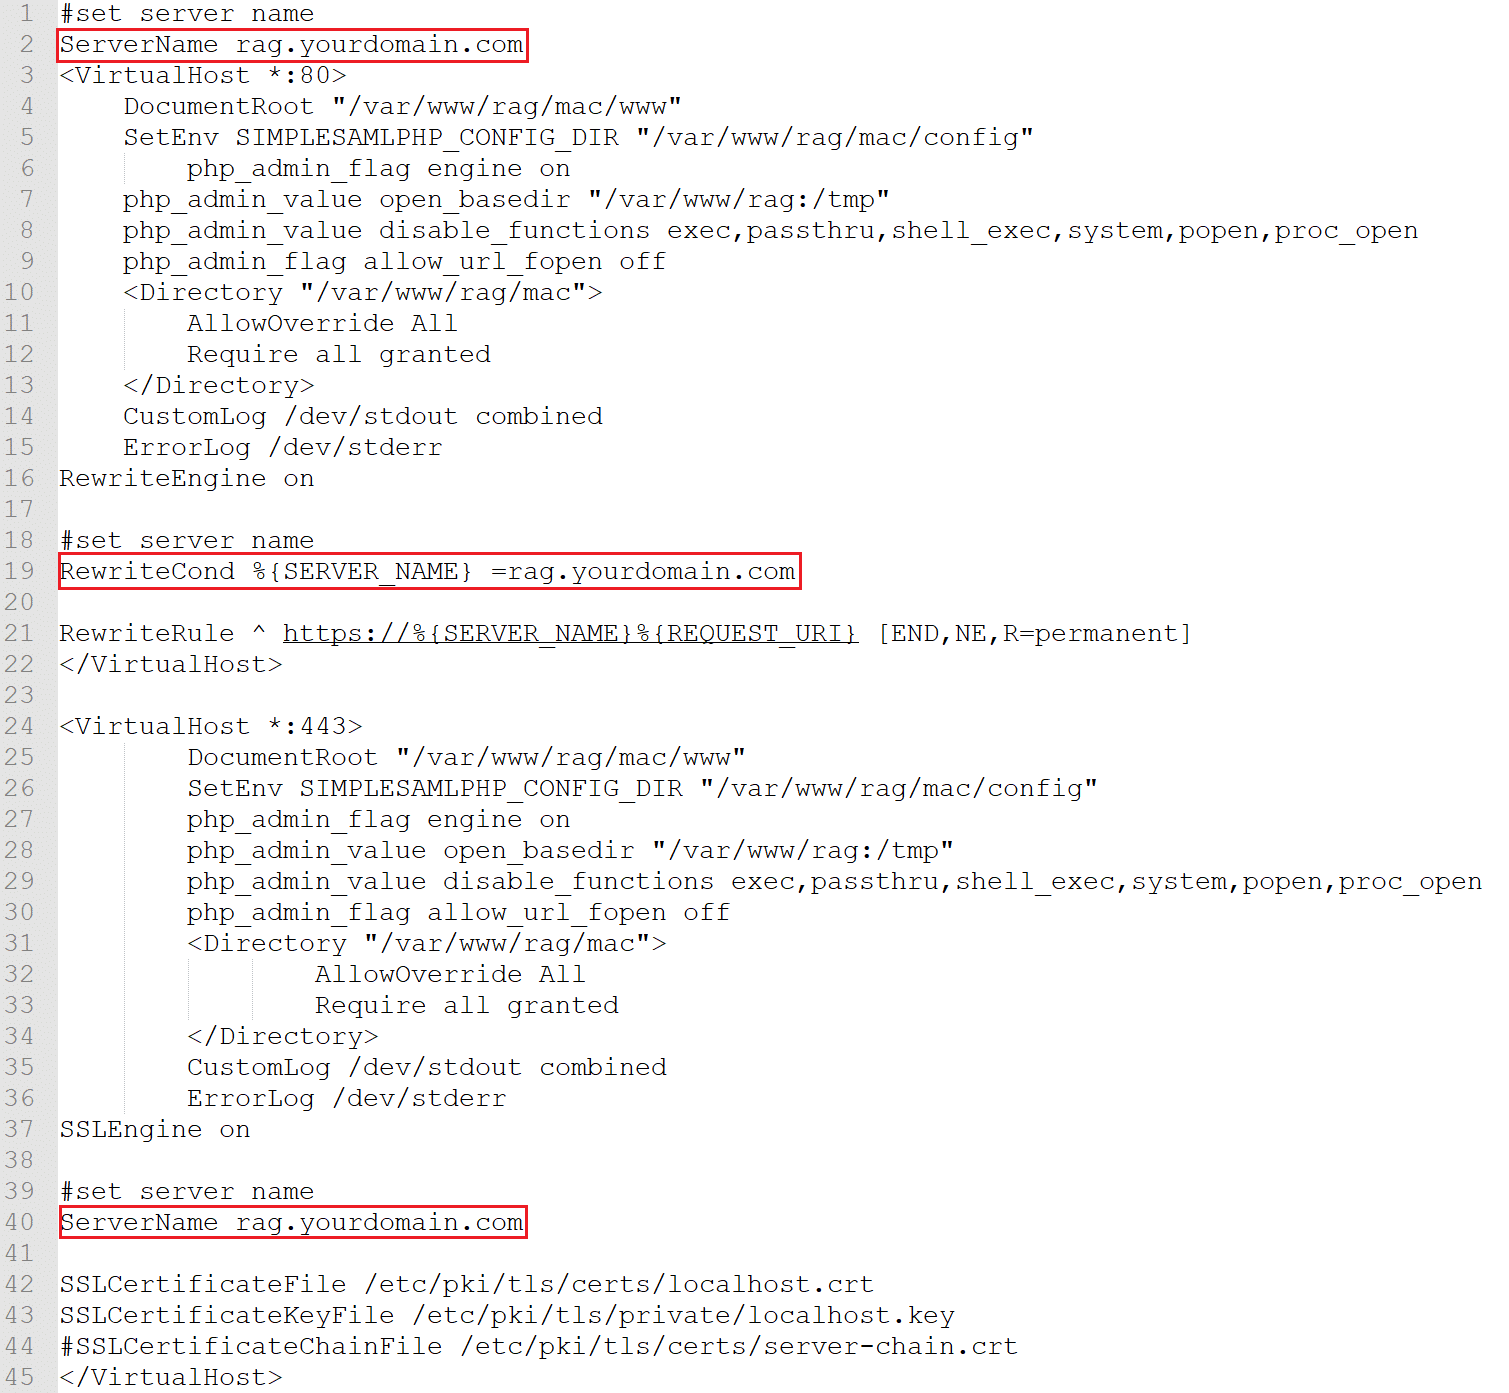
8. Save the rag.conf file.
9. Modify your php.ini file. Rublon Access Gateway needs the following changes to run:
- Replace
;extension=php_openssl.dllwithextension=php_openssl.dll - Replace
;extension=php_curl.dllwithextension=php_curl.dll
10. Run the following command to start Docker containers:
docker-compose up -d
11. Run the following command to see the logs:
docker-compose logs
12. After the first run, check if all containers have been started successfully. Run the following command to see a list of running containers and their status:
docker ps
Ensure container rag is up and running.
Note
You might experience the following error when authenticating to Docker on Ubuntu 18.04:
Error saving credentials: error storing credentials - err: exit status 1, out: `Cannot autolaunch D-Bus without X11 $DISPLAY`
Install gnupg2 to fix the preceding error:
apt install gnupg2 pass
13. If you have specified your ServerName to be e.g. https://rag.yourdomain.com, then this is the URL you have to go to in order to access the admin portal of your local Rublon Access Gateway instance.
14. Default password for the administrator panel is:
7^aG$a51Gb.@gaSa6$)s/a
After you sign in to the Rublon Access Gateway config panel, you can change the password.
15. Your installation is finished.
Configuration
Note
Opening your web browser and entering <your_domain> in the address bar will allow you to sign in to the Rublon SSO Portal.
However, you must configure your Rublon Access Gateway first before accessing the SSO Portal.
To go to the configuration page of the Rublon Access Gateway, enter the following in the address bar of your web browser: <your_domain>/config.
After a successful installation, open the config of Rublon Access Gateway in your browser. If the address of your Rublon Access Gateway is example.com, you have to go to example.com/config. The remainder of this documentation will walk you through the process of Rublon Access Gateway configuration. You will learn about all configuration options and all features of Rublon Access Gateway.
Settings tab
1. Sign in to the Rublon Access Gateway administrator panel.
2. Go to the Settings tab and choose the Rublon subtab.
3. Set the required data and save all changes by clicking the SAVE ALL SETTINGS button. Refer to the following image and table to learn how to fill the form.
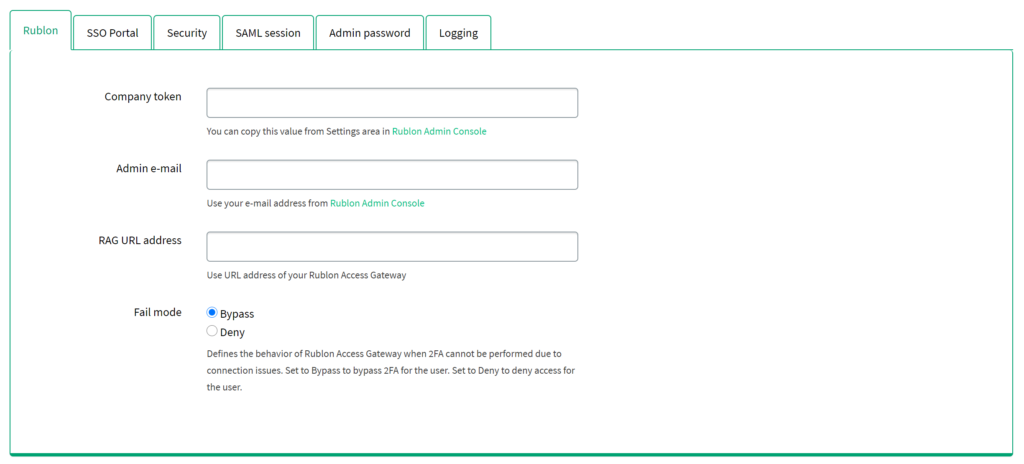
| Company token | Required. Enter the company token from the Rublon Admin Console (Settings tab → API section). |
| Admin e-mail | Required. Enter the email address of the owner of the organization created in the Rublon Admin Console. |
| RAG URL address | Optional. You can set a static URL for the Rublon Access Gateway application. It is used for the SAML communication between Rublon Access Gateway and your application. You should set this address when, for example, your domain has an alias(es) or is available on the HTTP and HTTPS protocols. We recommend you set the RAG URL address to a static HTTPS link because it is better to force SSL everywhere for security reasons. |
| Fail mode | Required. Default: Bypass. Set the behavior of Rublon in case the connection to the Rublon Server cannot be established. |
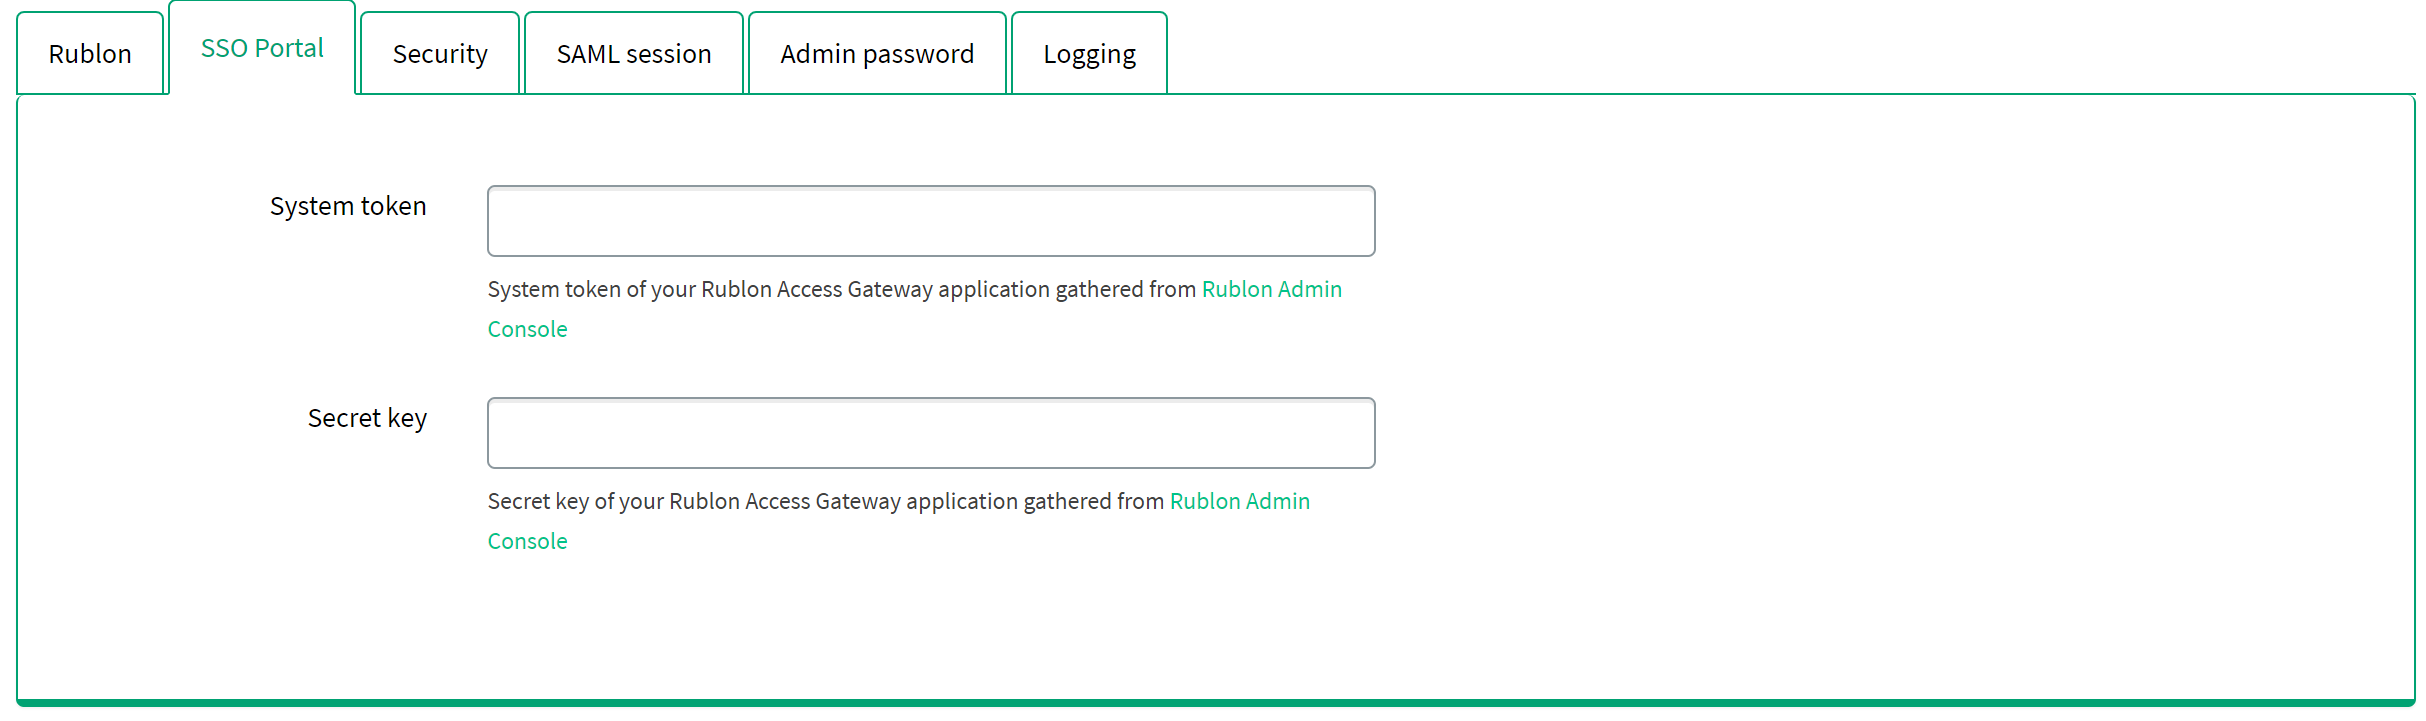
4. Go to the SSO Portal subtab. Set System Token and Secret Key of your Rublon Access Gateway application from Rublon Admin Console. This step is required if you would like to use the Rublon SSO Portal.
5. Go to the Security subtab. This section provides an option to import your own certificate file with a private key for the Identity Provider. It is recommended for security reasons. The certificate is used for signing SAML requests and responses. The private key is used for encrypting SAML responses. All imported files must have the extension *.crt. You can use the SSL certificate you have used for your IIS server in the Installation section.

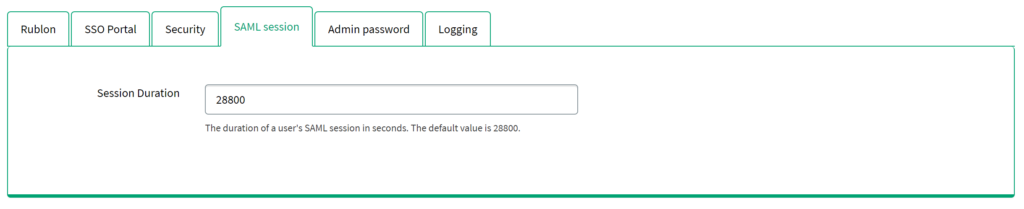
6. Go to the SAML session subtab. This section provides an option to change the default SAML session duration time (in seconds). By default, the SAML session is valid for 8 hours (28800 seconds). SAML session is initialized during the authentication process of your applications. It is recommended to configure the application so that after logging out, the SAML session will also be disconnected. If you log out without disconnecting your SAML session, the next login will use the same session.
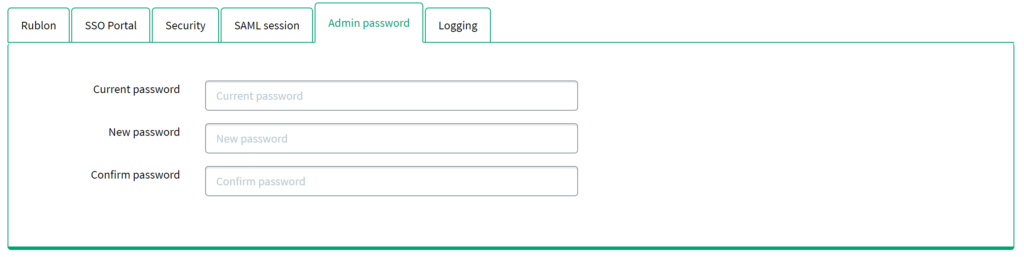
7. Go to the Admin password subtab. This subtab provides an option to change the default administrator password for your Rublon Access Gateway. For security reasons, it is recommended to change the default password right after the first login. Anyone who has access to the domain and knows the specified password will be able to access the administration panel.
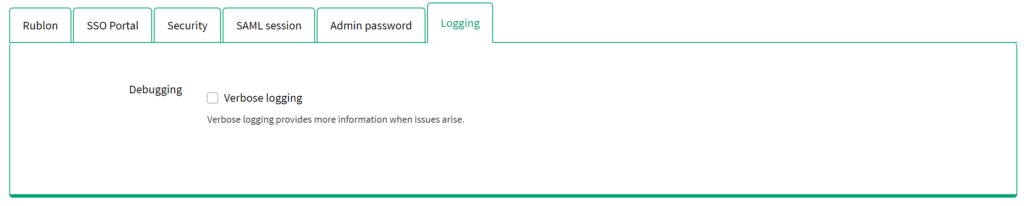
8. Go to the Logging subtab. Check Verbose logging, which provides more detailed log entries in case some issues occur in the Rublon Access Gateway application.
If you would like to read the log file, please follow the steps below:
- Go to the location:
rag\log - Read the RAG.log file by using any text editor.
Authentication Source tab
The Authentication Source tab allows you to select the active source type and update source type configuration data. Only one source type can be active at a time. Depending on the source that end-users will use for primary authentication, select and configure the appropriate source type. Three available source types are LDAP (e.g. OpenLDAP), Microsoft Active Directory, RADIUS.
Authentication Source Configuration – LDAP
1. Open the Authentication Source tab, and select LDAP in the Source type dropdown. Click SET ACTIVE to set LDAP as the active source type.
2. Select the LDAP subtab. Fill in the form with the appropriate parameters. Please refer to the following image and table.
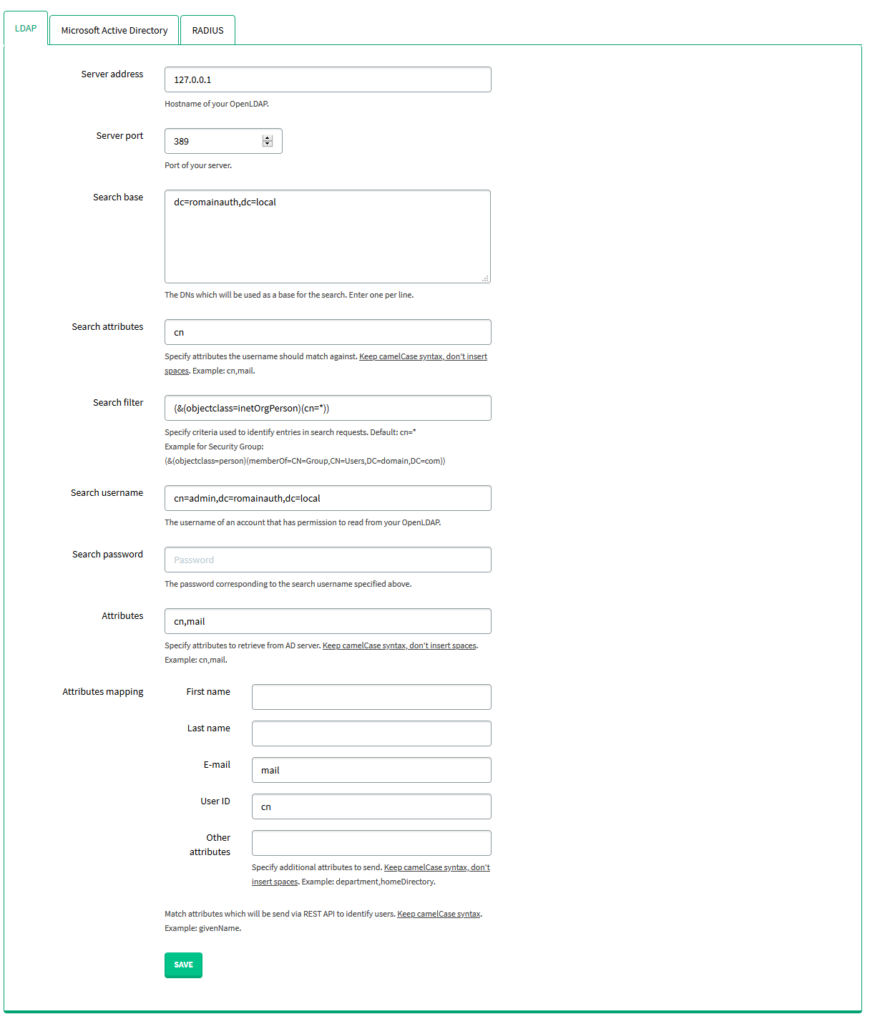
| Server address | The hostname of your OpenLDAP |
| Server port | The port of your server |
| Search base | The DNS that will be used as a base for the search. Enter one per line. |
| Search attributes | The attributes the username should match against, e.g. sAMAccount, mail. |
| Search filter | Specify criteria used to identify entries in search requests. We recommend you create an Active Directory Security Group and add all the users required to use the Rublon 2FA app to that group. Default: cn=* Example for Search filter using Security Group: (&(objectclass=person)(memberOf=CN=Group,CN=Users,DC=domain,DC=com)) in which: objectclass=person – specifies that the Search filter should search only for users memberOf – forces to extract and use the members of the specified group only CN=Group,CN=Users,DC=domain,DC=com – the group base DN (group location in Active Directory) |
| Search username | The username of an account that has permission to read from your OpenLDAP. |
| Search password | The password corresponding to the search username specified above. |
| Attributes | Specify attributes to retrieve from the Active Directory server. Keep camelCase syntax, don’t insert spaces. Used to narrow down the list of user attributes. If left empty, then when logging in to an integrated application, Rublon Access Gateway will return all fields set for this particular user. If for example cn,mail are the defined attributes, then when logging in, Rublon Access Gateway will return only these two parameters. |
| Attributes mapping | Match attributes, which will be sent via REST API to identify users. Stick to the camelCase syntax and do not use spaces, e.g. givenName, department, homeDirectory |
3. Click SAVE to update your LDAP configuration.
Authentication Source Testing – LDAP
You can test the authentication with LDAP as the authentication source.
1. Select the Authentication Source tab, and ensure LDAP is the chosen source in the Source type dropdown. If not, select LDAP as the Source type, and click SET ACTIVE to save the change.

2. Switch to the Users tab to see the user list. In case of any errors, double-check your LDAP configuration in the Authentication Source tab.
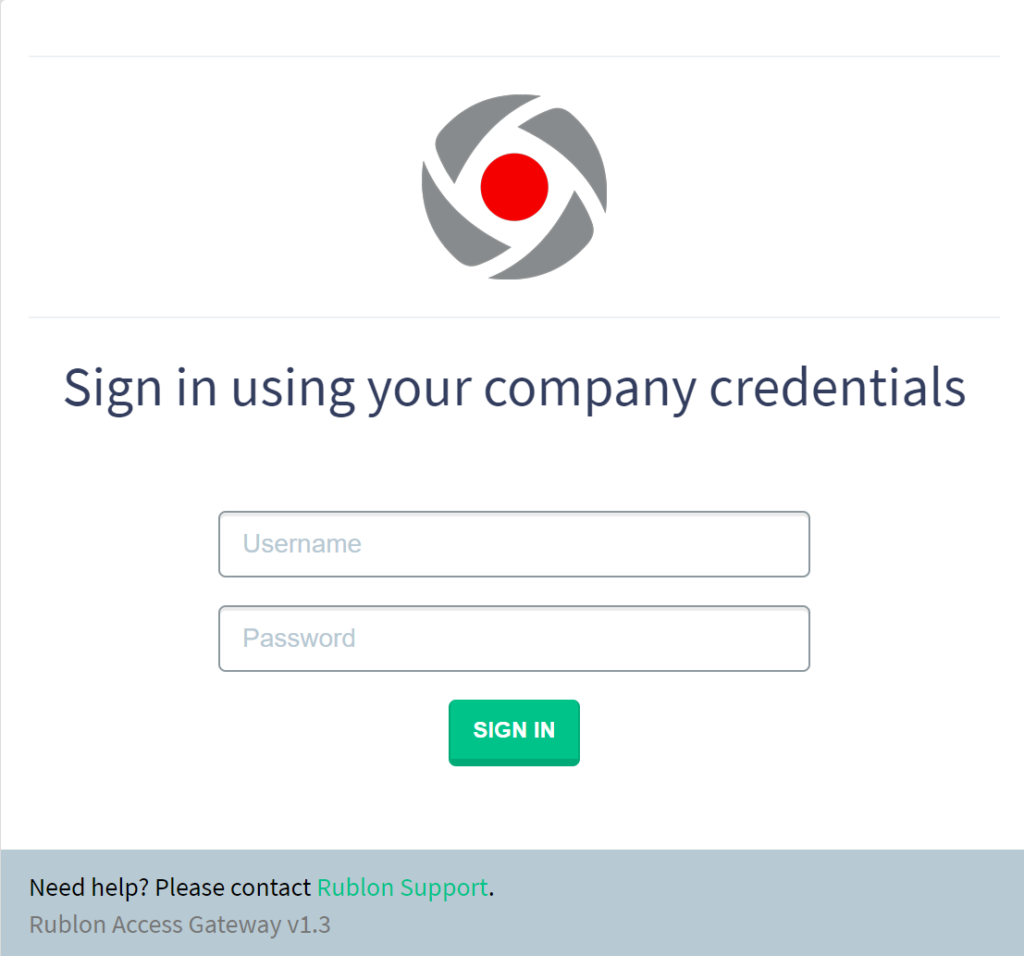
3. Go to https://your_domain/module.php/core/authenticate.php?as=LDAP to test single user login.
4. Enter your username and password, and click SIGN IN.
5. After logging in, you should see the user attributes.
6. It is recommended you log out using the Logout link in the top right corner to end the SAML session.
Authentication Source Configuration – Microsoft Active Directory
1. Open the Authentication Source tab, and select Microsoft Active Directory in the Source type dropdown. Click SET ACTIVE to set Microsoft Active Directory as the active source type.
2. Select the Microsoft Active Directory subtab. Fill in the form with the appropriate parameters. Please refer to the following image and table.
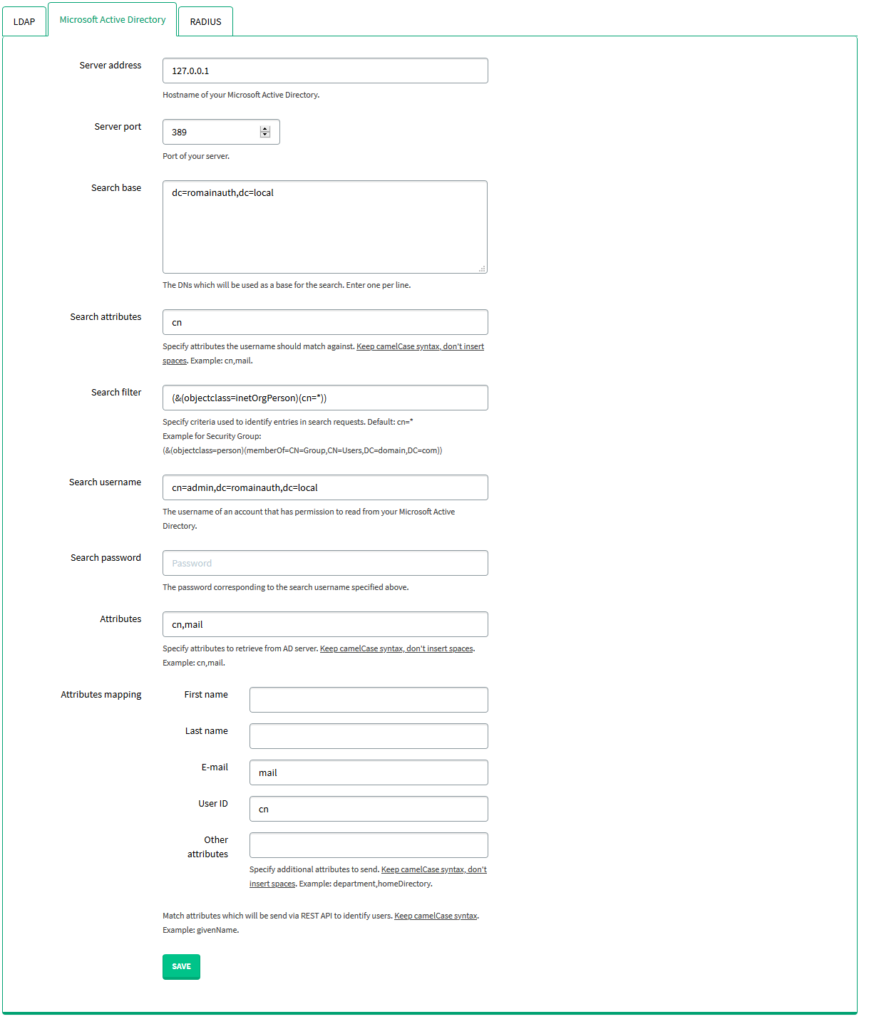
| Server address | The hostname of your Microsoft Active Directory. |
| Server port | The port of your Microsoft Active Directory. |
| Search base | The DNS that will be used as a base for the search. Enter one per line. |
| Search attributes | The attributes the username should match against, e.g. sAMAccount, mail. |
| Search filter | Specify criteria used to identify entries in search requests. We recommend you create an Active Directory Security Group and add all the users required to use the Rublon 2FA app to that group. Default: cn=* Example for Search filter using Security Group: (&(objectclass=person)(memberOf=CN=Group,CN=Users,DC=domain,DC=com)) in which: objectclass=person – specifies that the Search filter should search only for users memberOf – forces to extract and use the members of the specified group only CN=Group,CN=Users,DC=domain,DC=com – the group base DN (group location in Active Directory) |
| Search username | The username of an account that has the permission to read from your Microsoft Active Directory. |
| Search password | The password corresponding to the search username specified above. |
| Attributes | Specify attributes to retrieve from the Active Directory server. Keep camelCase syntax, don’t insert spaces. Used to narrow down the list of user attributes. If left empty, then when logging in to an integrated application, Rublon Access Gateway will return all fields set for this particular user. If for example cn,mail are the defined attributes, then when logging in, Rublon Access Gateway will return only these two parameters. |
| Attributes mapping | Match attributes, which will be sent via REST API to identify users. Stick to the camelCase syntax and do not use spaces, e.g. givenName, department, homeDirectory |
3. Click SAVE to update your Microsoft Active Directory configuration.
Authentication Source Testing – Microsoft Active Directory
You can test the authentication with Microsoft Active Directory as the authentication source.
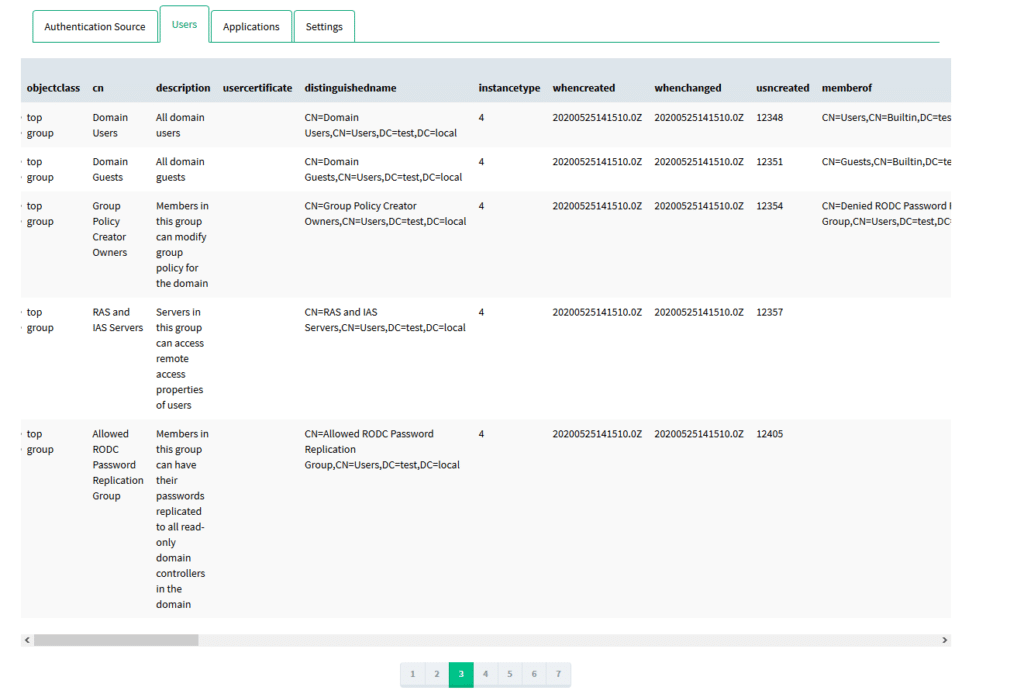
1. Select the Authentication Source tab, and ensure Microsoft Active Directory is the chosen source in the Source type dropdown. If not, select Microsoft Active Directory as the Source type, and click SET ACTIVE to save the change.
2. Switch to the Users tab to see the user list. In case of any errors, double-check your LDAP configuration in the Authentication Source tab.
3. Go to https://your_domain/module.php/core/authenticate.php?as=Microsoft%20Active%20Directory to test single user login.
4. Enter your username and password, and click SIGN IN.
5. After logging in, you should see the user attributes.
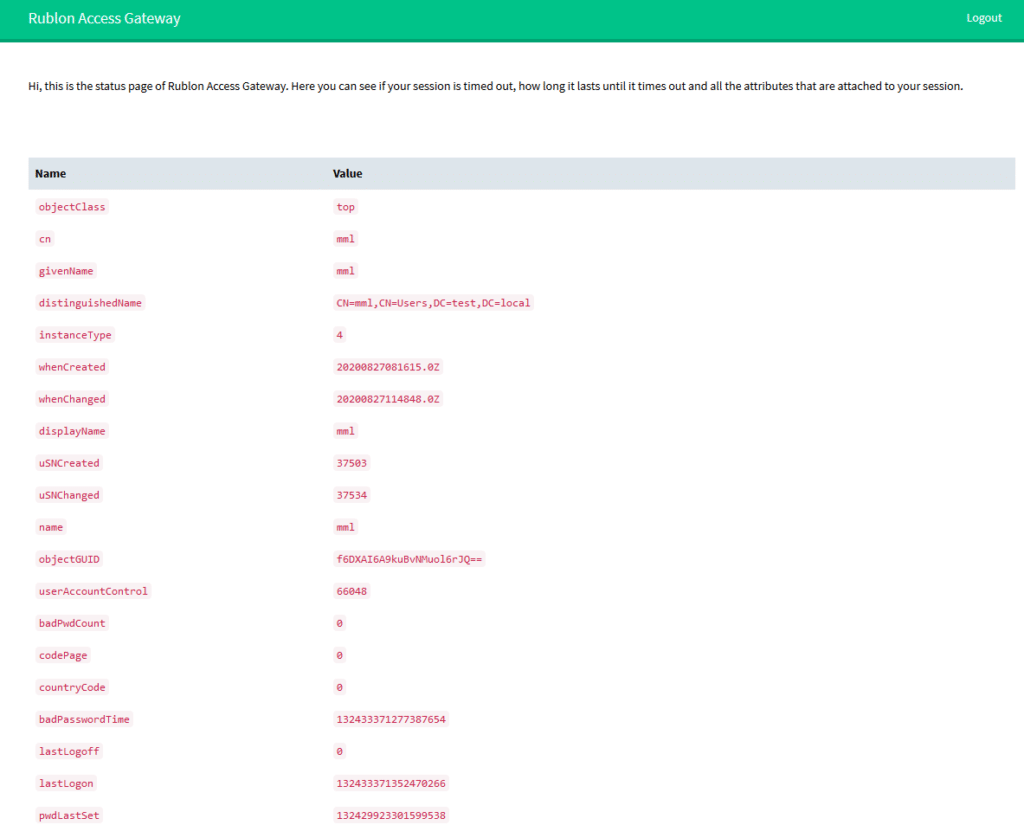
6. It is recommended you log out using the Logout link in the top right corner to end the SAML session.
Authentication Source Configuration – RADIUS
1. Open the Authentication Source tab, and select RADIUS in the Source type dropdown. Click SET ACTIVE to set RADIUS as the active source type.
2. Select the RADIUS subtab. Fill in the form with the appropriate parameters. Please refer to the following image and table.

| Servers | The list of RADIUS servers to use. Clicking the green + (plus sign) button opens a form that asks you to specify the address and port of your RADIUS server as well as the RADIUS Secret. Clicking the ADD SERVER button adds the server to the Servers list. |
| Timeout | Time (in seconds) after which connection attempts to the RADIUS server will be aborted. |
| Retries | The number of reconnection attempts when a response is not received. |
| NAS identifier | The NAS-Identifier that should be set in Access-Request packets. |
| Username attribute | The attribute name in which the username should be stored. |
| Attribute vendor | The vendor for the RADIUS attributes you are interested in. |
| Attribute vendor type | The vendor attribute-type of the attribute, which contains the attributes for the user |
| Attributes mapping | Match attributes, which will be sent via REST API to identify users. Stick to the camelCase syntax and do not use spaces, e.g. givenName, department, homeDirectory. |
3. Click SAVE to update your RADIUS configuration.
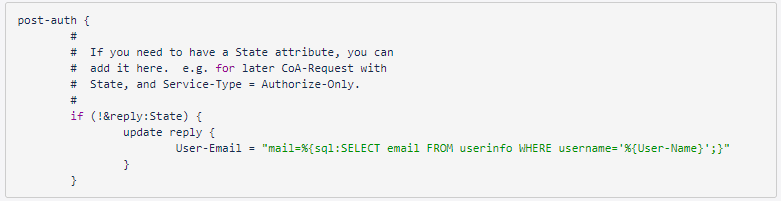
NOTE: The Attribute vendor and Attribute vendor type fields are required if you declared returning of attribute 26 (Vendor-Specified) in the RADIUS configuration, and the dictionary (/etc/raddb/dictionary on the vagrant server) creates a custom vendor to return your own attribute. For example:

10000 is the vendor ID and 1 is the ID of your own attribute.
In addition to the above change, you should also modify /etc/raddb/sites-enabled/default. It is possible only after obtaining administrative privileges (sudo command). This change concerns additionally returning the email address to the RADIUS server after successful authentication. By default, the server returns only the User-Name field, which is not sufficient in the CORE context.
Remember to restart the service after both changes. Use the following command:
systemctl restart radiusd
It’s also worth checking if the service is up properly:
systemctl status radiusd
WARNING! Run the RADIUS module in RAG-U, because simplesamlphp will not have access to the required classes. Just go to mac\modules\radius and modify the default-disable file name to default-enable.
Authentication Source Testing – RADIUS
You can test the authentication with RADIUS as the authentication source.
1. Select the Authentication Source tab, and ensure RADIUS is the chosen source in the Source type dropdown. If not, select RADIUS as the Source type, and click SET ACTIVE to save the changes.
2. The Users tab is inactive for the RADIUS authentication source because it’s not possible to get the list of users without accessing the database. Such access to the database would be possible if the client made it public, which is impossible for security reasons.
3. Go to https://your_domain/module.php/core/authenticate.php?as=RADIUS to test single user login.
4. Enter your username and password, and click SIGN IN.
5. After logging in, you should see the user attributes.
6. It is recommended you log out using the Logout link in the top right corner to end the SAML session.
Applications tab
After you have configured the settings and your authentication source, you can finally add your application to Rublon Access Gateway – either manually or by importing application metadata.
The Applications tab allows you to download XML metadata and the Rublon Access Gateway certificate, display all applications, and add or remove an application.
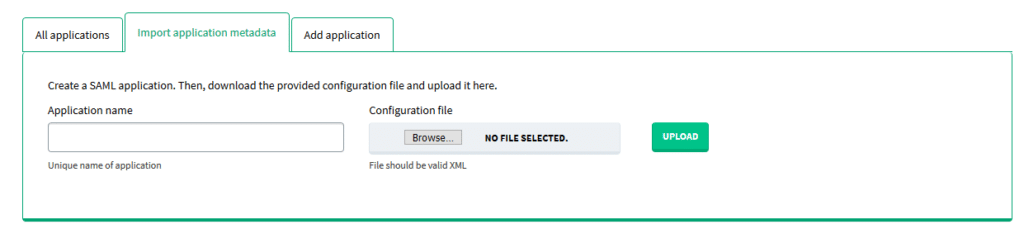
Adding an application by importing an XML file
1. Sign in to your Rublon Access Gateway instance, open the Applications tab, and select the Import application metadata subtab.
2. Enter the name of your application, select your XML file, and click Upload.
3. Your entry will appear on the applications list under the All applications subtab.
Manually adding an application
If your application does not support exporting to an XML file, you can also enter the metadata values manually. Please refer to the following image and table to learn more.
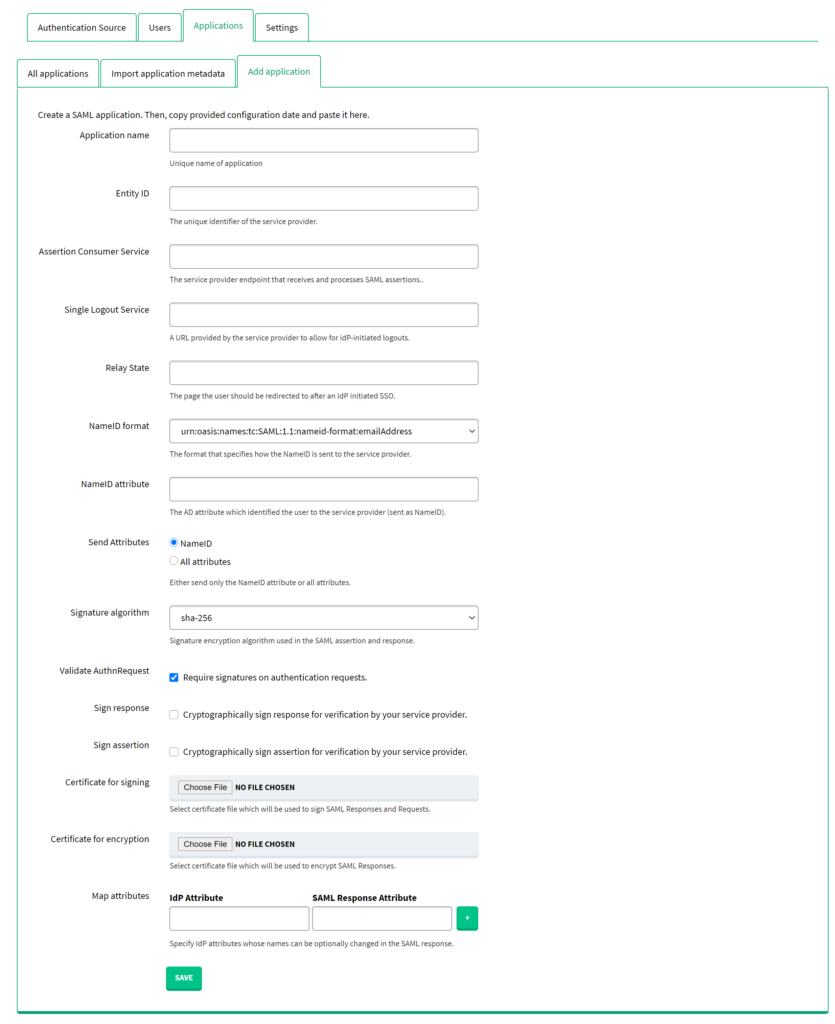
| Application name | Name of the application. It has to be unique. |
| Entity ID | The unique identifier of the Service Provider. This value has to be exactly the same as the one you set on the Service Provider side. |
| Assertion Consumer Service | The service provider endpoint that receives and processes SAML assertions. |
| Single Logout Service | A URL provided by the service provider to allow for idP-initiated logouts. |
| Relay State | The page the user should be redirected to after an IdP-initiated SSO. Only a few integrations require setting this parameter. Refer to the documentation of your integration and look for information about Relay State. If there is no specific information regarding this field, leave it empty. |
| NameID format | Defines the NameID format sent to the Service Provider. |
| NameID attribute | Active Directory attribute, which identifies the user to the Service Provider (sent as NameID). |
| Send Attributes | Active Directory attribute, which defines whether to only send the NameID attribute or all attributes defined in Attributes under Authentication Source → Microsoft Active Directory or Authentication Source → LDAP, depending on your active authentication source. In case RADIUS is your active authentication source, all attributes are sent regardless of this option. |
| Signature algorithm | Signature encryption algorithm used in the SAML assertion and response. |
| Validate AuthnRequest | Check this checkbox if you would like Rublon Access Gateway to require signatures on authentication requests. |
| Sign response | Check this checkbox if you would like Rublon Access Gateway to cryptographically sign responses for verification by your Service Provider. |
| Sign assertion | Check this checkbox if you would like Rublon Access Gateway to cryptographically sign assertions for verification by your Service Provider. |
| Certificate for signing | Select the certificate file, which will be used to sign SAML Responses and Requests. |
| Certificate for encryption | Select the certificate file, which will be used to encrypt SAML Responses. |
| Map attributes | Specify one or more IdP attributes whose names can be optionally changed in the SAML response. IdP Attribute – one of the attributes defined in the Attributes field of your authentication source (LDAP or Active Directory). SAML Response Attribute – the name of the attribute returned in the SAML response Used only if All attributes is selected in Send Attributes. |
Removing an application
1. Go to the Applications tab and select the All applications subtab.
2. Find the application you wish to remove and click the REMOVE button.

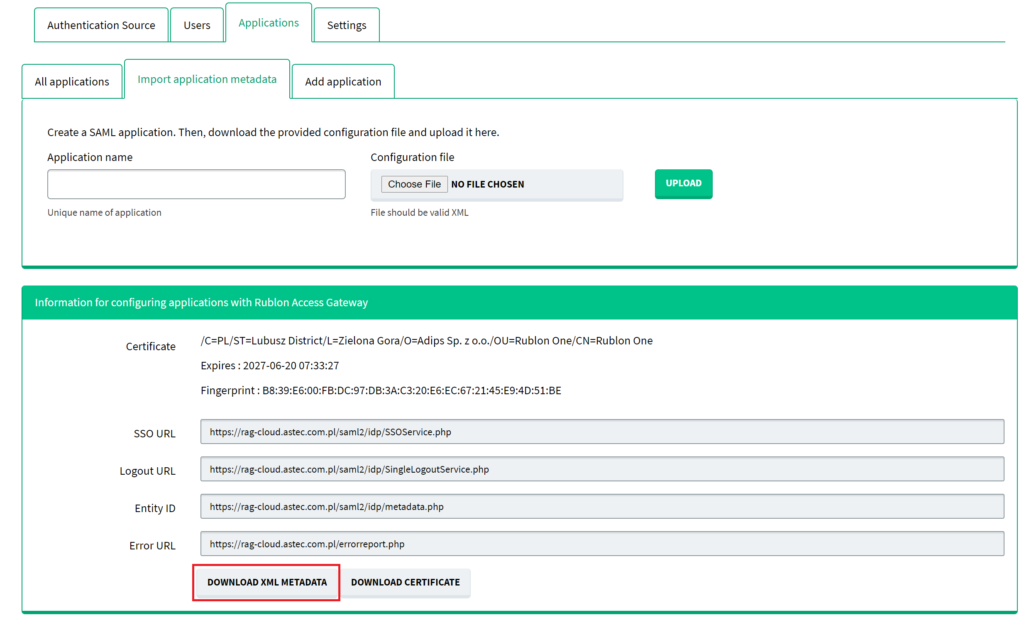
Downloading Rublon Access Gateway metadata
1. Sign in to your Rublon Access Gateway instance using the administrator password. Open the Applications tab.
2. Click the Download XML metadata button at the bottom of the page to get your metadata.
3. You can also download the certificate, which Rublon Access Gateway will use to sign and encrypt SAML messages.
4. If your application doesn’t support XML importing, you can also manually copy the metadata values.
5. Verify all links are in HTTPS. If not, set a static RAG URL address in Settings → Rublon.
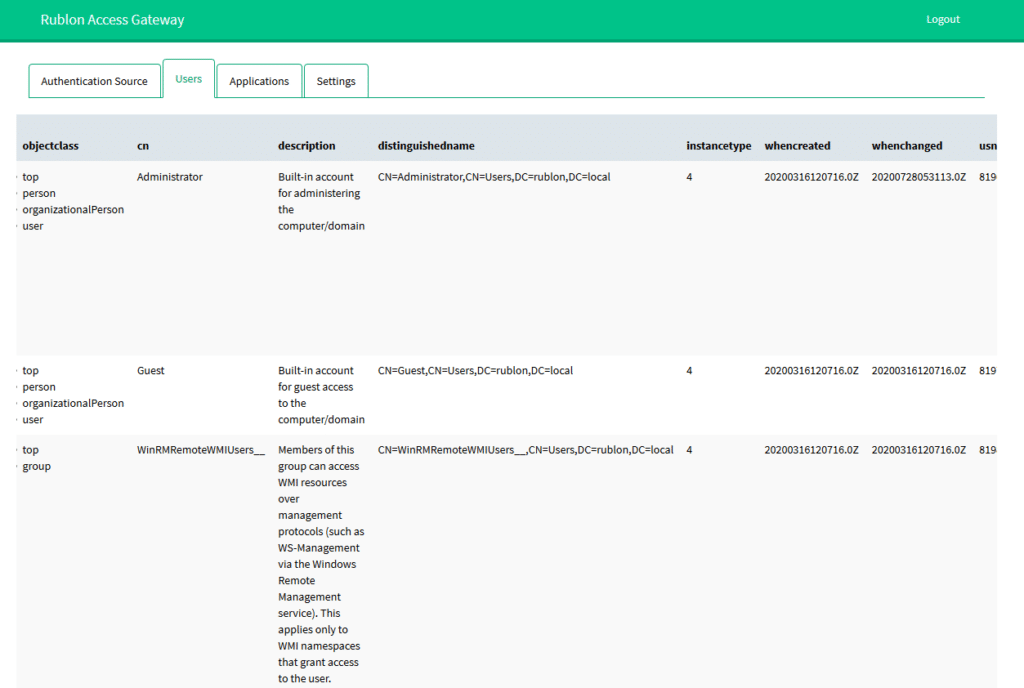
Users tab
The Users tab shows a list of users with all attributes fetched from the defined authentication source. Users tab is not supported for RADIUS authentication source, because in order to fetch the full list, Rublon Access Gateway would need to have direct access to the RADIUS database, which is impossible due to security risks.
SSO Portal
Refer to the Rublon SSO Portal documentation to learn how to configure and use the Rublon SSO Portal.
Useful links
1. Installation of URL Rewrite module to force HTTPS on a website (How to redirect HTTP to HTTPS in IIS section):
https://miketabor.com/how-to-install-a-lets-encrypt-ssl-cert-on-microsoft-iis
2. Introduction to Application Pool Identities:
https://docs.microsoft.com/en-us/iis/manage/configuring-security/application-pool-identities
3. How to enable detailed IIS errors:
https://mid.as/kb/00211/how-to-enable-detailed-iis-errors
Troubleshooting
If you encounter any issues with your Rublon integration, please contact Rublon Support.
To help us troubleshoot your issue faster, you can do the following:
1. Send us your SAML queries.
2. Enable detailed IIS errors and send us a detailed description of the issue.
1. How to Get the SAML queries
If you experience issues with a particular cloud application, sending us your SAML queries can help us troubleshoot your issue.
To get the SAML queries:
1. Install the SAML Chrome Panel extension on Google Chrome.
2. Open Dev Tools.
3. Initialize the log-in process to your application, e.g., via the Rublon SSO Portal.
4. Go all the way up to the point the log-in attempt fails.
5. Export the SAML queries from the browser’s SAML tab.
2. How to Enable Detailed IIS Errors
If you are getting an HTTP error on your IIS, such as 404, you can force IIS to show a more verbose description of the issue: <HostName> → IIS → Error Pages → Edit Feature Settings → Detailed errors.
Refer to link number 4 in Useful Links for more detailed instructions.
Make sure to send us the verbose version of your IIS error.
Solutions to Known IIS Errors
If you are getting a 404.15 – Not Found error:
- In IIS, open the Configuration Editor.
- Change the value for the parameter configuration/system.webServer/security/requestFiltering/requestLimits@maxQueryString to 10,000.
Related Posts
Rublon Access Gateway – Release Notes
Rublon Access Gateway – Integrations