Last updated on October 28, 2025
Note
This is archived documentation for Rublon Authentication Proxy version 1.2.2. This archived version is intended for users who have already deployed version 1.2.2 and cannot update or install the newest version.
We cannot guarantee the instructions in this archived version are up to date. For the most up-to-date instructions, please refer to the newest version.
Overview
Rublon Authentication Proxy is an on-premise RADIUS proxy server allowing Rublon integration with any service that uses RADIUS as an authentication source. Currently supported system is Linux (tested on CentOS, Ubuntu). Available authentication methods are email and push.
Before you start
You have to set up an external Identity Provider (IdP) where user identities are managed.
The list of tested and verified Identity Providers:
- OpenLDAP
- FreeIPA
- FreeRADIUS (standalone, full version)
- Active Directory
We refer to Identity Provider as authentication source throughout Rublon documentation.
If you are using a RADIUS server as your authentication source, you need to configure your RADIUS server first.
Every user who wants to log in using Rublon Authentication Proxy must have their email address added to their Active Directory / RADIUS account. Rublon needs the user’s email address to perform 2FA. No user database synchronization is required thanks to this.
How does Rublon Authentication Proxy work?
After deploying Rublon Authentication Proxy as an on-premise service and setting it up as a RADIUS authentication source in chosen integration apps (e.g. OpenVPN), Rublon Authentication Proxy listens for any incoming authentication requests. After receiving one, it starts 1FA against the chosen authentication source set in Rublon Authentication Proxy’s configuration (RADIUS or LDAP). If it proceeds, 2FA is being started. Upon successful 2FA, Rublon Authentication Proxy sends the Access Accept response back, which finishes the authentication process. The following diagram shows a simplified, successful communication process:

Updating Rublon Authentication Proxy
- Stop rublon service:
systemctl stop rublon.service
or
service rublon stop - Download the latest rublonauthproxy package and unpack it.
- Replace the lib directory inside the previously deployed rublonauthproxy folder.
- Make sure the rublonauthproxy/lib/rublonauthproxy file has proper permissions:
chmod 775 rublonauthproxy/lib/rublonauthproxy - Run the service:
systemctl start rublon.service
or
service rublon start
Uninstallation
- Stop rublon service:
systemctl stop rublon.service
or
service rublon stop - Remove rublon.service:
rm -f /lib/systemd/system/rublon.service - Remove the rublonauthproxy directory:
rm -rf rublonauthproxy
Configuration
The config.json configuration file must be located inside the rublonauthproxy/config directory. Use a proper JSON convention. All property names must be uppercase.
Example configuration templates are the easiest way to start a configuration. You can find them at the bottom of this post and they are also located inside the rublonauthproxy/config directory after unpacking Rublon Authentication Proxy.
Note that even though LDAP is set as an authentication source, it still requires RADIUS secret.
If you would like to use RADIUS as an authentication source, you have to configure your RADIUS server first. Instruction can be found here.
To obtain Rublon token and secret, sign in to Rublon Admin Console and add a new application as Authentication Proxy.
Sections
PROXY
| IP | IP address the proxy will be listening on. If left empty, Rublon Authentication Proxy will be listening on 0.0.0.0. |
| PORT | Port the proxy will be listening on. Default: 1812 |
| MODE | “standard” – login using a predefined 2FA auth method, or using Append Mode. “challenge” – use RADIUS Challenge. Rublon Authentication Proxy will respond with the AccessChallenge packet and wait for the TOTP code provided in the next request. “nocred” – specific system integration. Rublon Authentication Proxy will search for user email in AD, and then perform 2FA against Rublon. Default: “standard” |
| DEBUG | Whether to log more verbose information to log files. Default: false |
| REMOVE_LOGS_OLDER_THAN | Logs are stored within a day range. This number indicates how many log files should be kept. If the number of log files reaches this value, the last log file is overridden by the newest. Default: 7 |
| AUTH_SOURCE | Either “ldap” or “radius”. Indicates which authentication source should be used for primary authentication. |
| USE_HOSTS_WHITELIST | Indicates whether to use hosts IP whitelist. If set to true, Rublon Authentication Proxy will drop all the packets from hosts not listed inside the config/hosts.json file. Default: false |
| USE_APPEND_MODE | Available only in “standard” mode. Allows the user to choose the auth method by appending it to the password. More details can be found in the Append Mode section of this document. Default: false |
| APPEND_MODE_SEPARATOR | If “USE_APPEND_MODE” is set to true, Append Mode will use this value to extract the appended auth method used by the user. Default: “,” (comma) |
| AUTH_TIMEOUT | Time limit (in seconds) for a user to finish 2FA. After that time the login request will be rejected and the user will have to reauthenticate. Set AUTH_TIMEOUT to be slightly longer than the RADIUS timeout in an integrated system (e.g. OpenVPN) as otherwise users might receive redundant email or push notifications. Default: 90 |
LDAP
| HOST | Hostname or IP address of Active Directory used for primary authentication. |
| PORT | LDAP port used for primary authentication. By default 389 is used for “plain” connection and 636 for “ssl”. |
| SEARCH_DN | Distinguished Name used to search groups of users that will authenticate with Rublon Authentication Proxy. This is normally your company AD FQDN. Example: dc=example,dc=com |
| TIMEOUT | Time (in seconds) after which LDAP connection attempt will be aborted and access rejected. Default: 10 |
| USERNAME_ATTRIBUTE | Username attribute used to login. Default: sAMAccountName |
| ACCESS_USER_DN | Full bind_dn of user having read access in Active Directory. This account will be used for user search. We suggest creating an additional user with read access only on your AD. |
| ACCESS_USER_PASS | Password of the user mentioned above. |
| SECURITY_GROUP_DN | Distinguished name of a group whose users will be authenticated against. If not set, all users found by using SEARCH_DN will be able to log in. |
| CUSTOM_FILTER | Rublon Authentication Proxy will grant access only to the users matching this LDAP filter. Use standard LDAP filter syntax. |
| TRANSPORT TYPE | “plain” – do not use encryption when connecting via LDAP, not recommended“ssl” – use SSL encryption, trust certificates located inside certs directory if present. “starttls” – start with a normal connection and then immediately switch to an encrypted one. Default option is: “plain”. |
| CERT_DIR_PATH | Path to the directory containing certificates for the SSL connection. Certs should be in .pem format. One cert per file. By default Rublon Authentication Proxy will search inside the config/certs directory. |
RADIUS
| IP | IP address of RADIUS server used for primary authentication. |
| PORT | Port of RADIUS server for Access request, usually 1812. |
| SECRET | RADIUS Secret |
| TIMEOUT | Time (in seconds) after which connection attempt will be aborted. Note that you have to multiply this value by retries count. Default: 5 |
| RETRIES | Number of reconnection attempts when response is not received. Default: 3 |
| PROXY_REQUESTS | Whether to proxy non-PAP requests to the RADIUS server. Rublon 2FA will be performed after a successful authentication. Works only in “standard” proxy mode and with “AUTH_SOURCE” set to “radius”. Append Mode will work only with PAP protocol. See Non-PAP protocol for RADIUS communication for more information. Default: false |
| NAS_IP_ADDRESS | IP address that will be sent in the “NAS-IP-Address” attribute to the RADIUS server. If left empty, no “NAS-IP-Address” is sent. However proxied requests will copy “NAS-IP-Attribute” from origin requests. |
| EMAIL_ATTR_NAME | Attribute that should be received from RADIUS within the AccessAccept packet containing the user’s email. Modify only if, for some reason, you have changed the suggested RADIUS server configuration. Default: “Rublon-Email” |
| CLIENT_IP_ATTR | RADIUS attribute that contains an IP address which will be displayed during the user authentication process e.g. “NAS-IP-Address”. If this attribute is not found within the request authentication packet, the IP address found in UDP datagram will be used. It will usually be a local IP address. Case sensitive. Default: “Calling-Station-Id” |
RUBLON
| API_HOST | Rublon API host (core.rublon.net) |
| TOKEN | Token of an application added in Rublon Admin Console |
| SECRET | Secret of an application added in Rublon Admin Console |
| AUTH_METHOD | Authentication method used for 2FA. Valid options are “push” and “email”. You can provide an array of values here, e.g. [“push”, “email”]. In this case if “push” fails, “email” will be used instead. Default: “email” |
| FAIL_MODE | Either “bypass” or “deny”. Indicates whether user’s access should be bypassed or denied when connection issues with Rublon server occur. Default: “bypass” |
Append Mode
AppendMode is a feature available in Rublon Authentication Proxy when using “standard” mode. It allows you to choose your authentication method by appending specific values to your password followed by the append mode separator chosen by admin.
AppendMode works only in “standard” mode. You can enable it by adding the following options to your configuration file under the “PROXY” section:
“USE_APPEND_MODE”: true
“APPEND_MODE_SEPARATOR”: “,”
By default the separator is set to “,” (comma).
How does it work?
After enabling AppendMode inside the configuration file, you can append the following values to your password after “APPEND_MODE_SEPARATOR”:
- “push”
- “email”
- “123456” – the TOTP code; must be exactly 6 characters long with no spaces in-between
If the appended value is not recognized, the entire provided string is treated as a password and the predefined authentication method is used.
Note that AppendMode is case sensitive. Values like “Push”, “EMAIL”, “pUsH” do not work.
Examples
Let’s assume that your password is: “pancakes123”, and the separator is not set in the configuration file, so its value is by default set to “,” (comma).
If you would like to choose push as the authentication method, type:
pancakes123,pushIf you would like to choose email as the authentication method, type:
pancakes123,emailIf you would like to choose totp as the authentication method, type:
pancakes123,123456Where 123456 is the TOTP code from the mobile app.
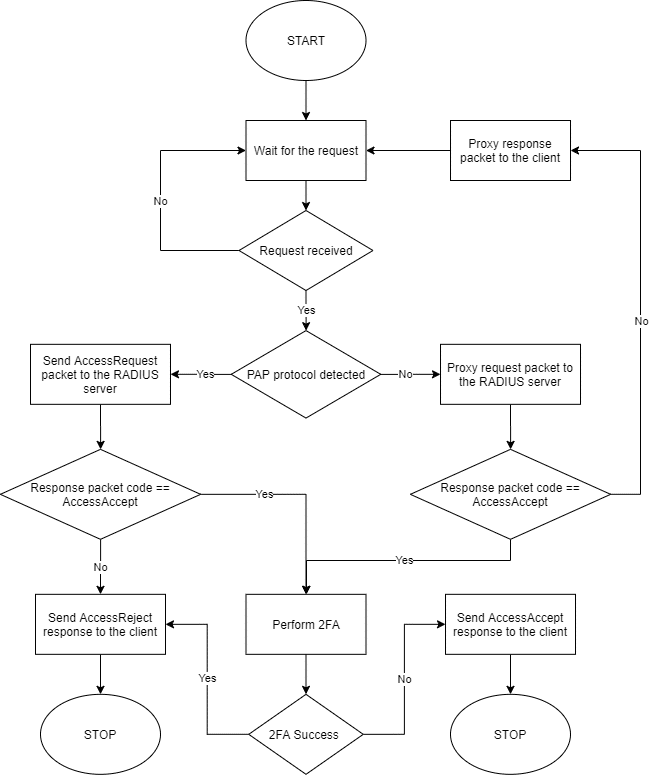
Non-PAP protocol for RADIUS communication
By default, Rublon Authentication Proxy uses only the PAP protocol to authenticate users. This means that all systems trying to use other protocols (like CHAPv1, EAP-MS-CHAPv2) to communicate with Rublon Authentication Proxy will not work. However, it is possible to configure Rublon Authentication Proxy to proxy all non-PAP requests to the RADIUS server.
To do so, add:
“PROXY_REQUESTS”: true
To your configuration file, under the “RADIUS” section. Rublon 2FA will be performed upon receiving the AccessAccept response packet from the RADIUS server.
If the RADIUS server was configured to accept these protocols, protocols such as CHAPv1 or MS-CHAPv2 (even EAP-MS-CHAPv2) should work from now on.
Refer to the following flowchart, which portrays how proxying works.
Configuration examples
LDAP as authentication source
{
"PROXY": {
"IP": "172.16.1.100",
"PORT": 1812,
"AUTH_SOURCE": "ldap"
},
"LDAP": {
"HOST": "172.16.3.100",
"PORT": 389,
"SEARCH_DN": "dc=test,dc=local",
"ACCESS_USER_DN": "cn=Administrator,cn=Users,dc=test,dc=local",
"ACCESS_USER_PASSWORD": "XXXXXXXXXXXX"
},
"RADIUS": {
"SECRET": "secret"
},
"RUBLON": {
"API_HOST": "https://core.rublon.net",
"TOKEN": "token",
"SECRET": "secret",
"AUTH_METHOD": "push"
}
}
Please note that even though you are using LDAP as an authentication source, you still need to provide RADIUS secret! That’s because Rublon Authentication Proxy works as if it were a RADIUS server on its own.
RADIUS as authentication source
{
"PROXY": {
"IP": "172.16.0.100",
"PORT": 1812,
"AUTH_SOURCE": "radius"
},
"RADIUS": {
"SERVER_IP": "172.16.3.100",
"PORT": 1812,
"SECRET": “secret”
},
"RUBLON": {
"API_HOST": "https://core.rublon.net",
"TOKEN": "token",
"SECRET": "secret",
"AUTH_METHOD": "email"
}
}
Running multiple instances
To run multiple instances, copy the rublonauthproxy directory and the rublon.service file and make sure both instances listen on a different port. You will have to edit the copied rublon.service file so that the file points to a valid location. After completing these steps, run the new service.
1. Copy the rublonauthproxy directory:
cp -r rublonauthproxy rublonauthproxy2
2. Edit the config.json file inside the rublonauthproxy2 directory.
3. Copy rublon.service:
cp /lib/systemd/system/rublon.service /lib/systemd/system/rublon2.service
4. Edit rublon2.service:
- Change the start command:
ExecStart=/home/testuser/rublonauthproxy/lib/rublonauthproxy start
toExecStart=/home/testuser/rublonauthproxy2/lib/rublonauthproxy start 2
Note the “2” after “start” - Change the stop command:
ExecStop=/home/testuser/rublonauthproxy/lib/rublonauthproxy stop
toExecStop=/home/testuser/rublonauthproxy2/lib/rublonauthproxy stop 2
5. Reload the services:systemctl daemon-reload
6. Run the service:service rublon2 start
Troubleshooting
Set DEBUG option within your configuration file to true and check your rublonauthproxy.log file located inside the rublonauthproxy/logs directory. Information contained there should in most cases be enough to troubleshoot issues related to Rublon Authentication Proxy.
Note that most issues occur due to incorrect configuration.
If you encounter any issues with your Rublon integration, please contact Rublon Support.