Last updated on December 12, 2024
Overview
Minimum Hardware Requirements:
- 1 CPU
- 300 MB disk space
- 4 GB RAM
How Does Rublon Authentication Proxy work?
After you deploy the Rublon Authentication Proxy as an on-premises service and set it up as a RADIUS or LDAP authentication source on one or more services (e.g. OpenVPN), the Rublon Authentication Proxy starts listening for any incoming authentication requests.
When you initiate login to one of the integrated services, the Rublon Authentication Proxy receives an Access-Request. Then, Rublon asks for your IdP credentials. If the user credentials you provided are correct, Rublon initiates the second step of authentication.
After you complete the second step of authentication, the Rublon Authentication Proxy returns an Access-Accept response, which concludes 2FA. The following diagram shows a simplified, successful authentication process:

The following diagram portrays a Rublon Authentication Proxy login flow along with the names of protocols used in each part of the transaction.

Before You Start
Rublon Authentication Proxy is not an Identity Provider (IdP). Rublon Authentication Proxy is a RADIUS proxy server that pulls users from an external IdP. As a result, you have to use (or set up) an external IdP that manages your user identities.
List of tested and verified IdPs:
- Active Directory
- OpenLDAP
- FreeIPA
- FreeRADIUS (standalone, full version)
- Cisco ACS
- Microsoft NPS (Network Policy Server)
Rublon requires a user’s email address to perform 2FA. Consequently, every user who wants to log in using the Rublon Authentication Proxy must have their email address assigned in the Rublon Admin Console. If the user has an email address added to their IdP account, Rublon will automatically add this email address to the Rublon Admin Console during user enrollment. Otherwise, you must manually add the user’s email address in the Admin Console.
Install Rublon Authentication Proxy
Linux
- If your Linux distribution uses glibc (GNU libc) version 2.29 or higher, download the rublonauthproxy package.
- If your Linux distribution uses glibc (GNU libc) version 2.28 or lower, download the rublonauthproxy_py36 package.
More info about glibc version
- Deploy rublonauthproxy-latest in the desired location on the server and unpack it (make sure to change the file name when copy-pasting the command below).
tar -xzf rublonauthproxy-X.Y.Z.tgz - Go to the unpacked folder:
cd rublonauthproxy - Create a service file:
make service - Move the created service file to /lib/systemd/system:
mv rublon.service /lib/systemd/system - Reload daemon services:
systemctl daemon-reload - Create a rublonauthproxy/config/config.json file based on config.example.json (you can use our minimal config file templates).
Windows
- Download the Rublon Authentication Proxy installer.
- Launch the installer with administrator rights and follow the instructions to complete the installation.
- Modify the Rublon Auth Proxy\config\config.json file based on config.example.json.
Note
Configure Rublon Authentication Proxy
Sections
IMPORTANT
- Use the PROXIES section to define all proxy servers to be run with the Rublon Authentication Proxy (the Auth Proxy can simulate multiple proxies with one installation).
- Use the AUTH_SOURCES section to define all Identity Providers (IdP) that will be used by proxy servers.
LOGGING SECTION
PROXY SECTION
You can define one or more proxies in this section.
- GENERAL PROXY SETTINGS apply to all proxies, both RADIUS and LDAP
- RADIUS PROXY SETTINGS apply only to proxies that are RADIUS proxies
- LDAP PROXY SETTINGS apply only to proxies that are LDAP proxies
GENERAL PROXY SETTINGS
This subsection describes the possible options of a single element in the “PROXIES” array inside the configuration file. These options are related to both RADIUS and LDAP proxies. See the configuration example for more details.
RADIUS PROXY SETTINGS
LDAP PROXY SETTINGS
Known Limitations
AUTH_SOURCES SECTION
- LDAP SOURCE SETTINGS applies only to LDAP authentication sources
- RADIUS SOURCE SETTINGS applies only to RADIUS authentication sources
LDAP SOURCE SETTINGS
RADIUS SOURCE SETTINGS
You can configure multiple RADIUS authentication sources by adding more than one list element in the AUTH_SOURCES section. See the configuration example to find out how to do it.
| NAME | The unique identifier used to distinguish this authentication source. Ensure all names under the AUTH_SOURCES section are unique. |
| AUTH_PROTOCOL | The auth protocol that this authentication source uses: “LDAP” or “RADIUS” Default: “RADIUS” |
| IP | The IP address of the RADIUS server used for primary authentication. |
| PORT | The port of the RADIUS server for Access-Request. Typically, this port is 1812. |
| SECRET | The RADIUS Secret used in the Rublon Authentication Proxy – RADIUS server communication. If left empty, the proxy’s RADIUS_SECRET is used. |
| TIMEOUT | The time (in seconds) after which a single connection attempt with the RADIUS server will be aborted. Note that you have to multiply this value by the retries count to get the actual time, after which Rublon will abort trying to connect to the RADIUS server. Default: 5 |
| RETRIES | The number of reconnection attempts when a response is not received. Default: 3 |
| PROXY_REQUESTS | Whether to proxy requests to the RADIUS server. Rublon MFA will be performed after successful authentication. Works only in “standard” proxy mode. Append Mode does not work when proxying requests. Note that you will have to set the proxy’s RADIUS Secret to the same value as the RADIUS server secret. See Non-PAP protocol for RADIUS communication communication for more information. Default: false |
| NAS_IP_ADDRESS | The IP address that will be sent in the “NAS-IP-Address” attribute to the RADIUS server. If left empty, no “NAS-IP-Address” is sent. However, proxied requests will copy “NAS-IP-Attribute” from origin requests. |
| EMAIL_ATTR_NAME | The attribute that should be received from RADIUS within the Access-Accept packet containing the user’s email. Modify only if, for some reason, you have changed the suggested RADIUS server configuration. Default: “Rublon-Email” |
Append Mode
Append Mode is a feature available in Rublon Authentication Proxy when the “standard” mode is set in the configuration file. Append Mode allows you to choose your authentication method by appending specific values to your password when logging in to an integrated service. The specific value is preceded by the append mode separator.
Append Mode works only in “standard” mode. Enable Append Mode by adding the following options to one of your server’s configurations under the “SERVERS” section:
“USE_APPEND_MODE”: true
“APPEND_MODE_SEPARATOR”: “,”
By default, the separator is set to “,” (comma).
How does it work?
After you enable Append Mode, when logging in to an integrated service, type in your password. Then, append the APPEND_MODE_SEPARATOR. Then, you can append one of the following values:
- “push”
- “email”
- “123456” – the TOTP code; must be exactly 6 characters long with no spaces in-between
If Append Mode is enabled but the user only provides their password without appending anything, the authentication method set in AUTH_METHOD is used.
Similarly, if the appended value is not recognized, the entire provided string is treated as a password and the authentication method set in AUTH_METHOD is used.
Note that AppendMode is case-sensitive. Values like “Push”, “EMAIL”, “pUsH” do not work.
Examples
Let’s assume that your password is: “pancakes123”, and the separator is not set in the configuration file, so its value is the default “,” (comma).
If you would like to choose push as the authentication method, type:
pancakes123,pushIf you would like to choose email as the authentication method, type:
pancakes123,emailIf you would like to choose totp as the authentication method, type:
pancakes123,123456Where 123456 is the TOTP code generated by Rublon Authenticator.
Non-PAP protocol for RADIUS communication
By default, the Rublon Authentication Proxy uses only the PAP protocol to authenticate users. This means that all systems that try to use other protocols (like CHAPv1, EAP-MS-CHAPv2) to communicate with Rublon Authentication Proxy will not work. However, it is possible to configure the Rublon Authentication Proxy to proxy all non-PAP requests to the RADIUS server.
To do so, add:
"PROXY_REQUESTS": true
To your configuration file, under the “RADIUS” section. Rublon 2FA will be performed upon receiving the Access-Accept response packet from the RADIUS server.
If the RADIUS server was configured to accept these protocols, protocols such as CHAPv1 or MS-CHAPv2 (even EAP-MS-CHAPv2) should work from now on.
Refer to the following flowchart, which portrays how proxying works.

Configuration example
{
  "LOGGING": {
    "DEBUG": "false",
    "REMOVE_LOGS_OLDER_THAN": 7
  },
  "PROXIES": [
    {
      "NAME": "RADIUS_PROXY",
      "AUTH_PROTOCOL": "RADIUS",
      "RADIUS_SECRET": "secret_to_communicate_with_the_proxy",
      "IP": "172.16.1.100",
      "PORT": 1812,
      "MODE": "standard",
      "AUTH_SOURCE": "LDAP_1,LDAP_2",
      "AUTH_METHOD": "email",
      "USE_APPEND_MODE": true,
      "APPEND_MODE_SEPARATOR": ",",
      "RUBLON_API": "https://core.rublon.net",
      "RUBLON_TOKEN": "SYSTEM_TOKEN",
      "RUBLON_SECRET": "SECRET_KEY"
    },
    {
      "NAME": "LDAP_PROXY",
      "AUTH_PROTOCOL": "LDAP",
      "IP": "0.0.0.0",
      "PORT": "636",
      "AUTH_SOURCE": "LDAP_1",
      "AUTH_METHOD": "push,email",
      "FAIL_MODE": "deny",
      "TRANSPORT_TYPE": "ssl",
      "PRIVATE_KEY": "C:\\Path\\To\\Private_key.pem",
      "CERT_KEY": "C:\\Path\\To\\Certificate.pem",
      "RUBLON_API": "https://core.rublon.net",
      "RUBLON_TOKEN": "SYSTEM_TOKEN",
      "RUBLON_SECRET": "SECRET_KEY"
    }
  ],
  "AUTH_SOURCES": [
    {
      "NAME": "LDAP_1",
      "AUTH_PROTOCOL": "LDAP",
      "IP": "172.16.3.100",
      "SEARCH_DN": "dc=test,dc=local",
      "ACCESS_USER_DN": "cn=Administrator,cn=Users,dc=test,dc=local",
      "ACCESS_USER_PASSWORD": "v3ryH@rdpa$$w0rd"
    },
    {
      "NAME": "LDAP_2",
      "AUTH_PROTOCOL": "LDAP",
      "IP": "172.16.3.101",
      "SEARCH_DN": "dc=test2,dc=local",
      "ACCESS_USER_DN": "cn=Administrator,cn=Users,dc=test2,dc=local",
      "ACCESS_USER_PASSWORD": "v3ryH@rdpa$$w0rd"
    },
    {
      "NAME": "RADIUS_1",
      "AUTH_PROTOCOL": "RADIUS",
      "IP": "172.16.2.100",
      "PORT": 1812,
      "SECRET": "secret_to_communicate_with_radius_server"
    }
  ]
}
Start Rublon Authentication Proxy
Linux
To run Rublon Authentication Proxy, start the service using one of the following commands:
systemctl start rublon.service
or
service rublon start
Windows
Run Rublon Authentication Proxy as a console application to ensure everything is set up properly:
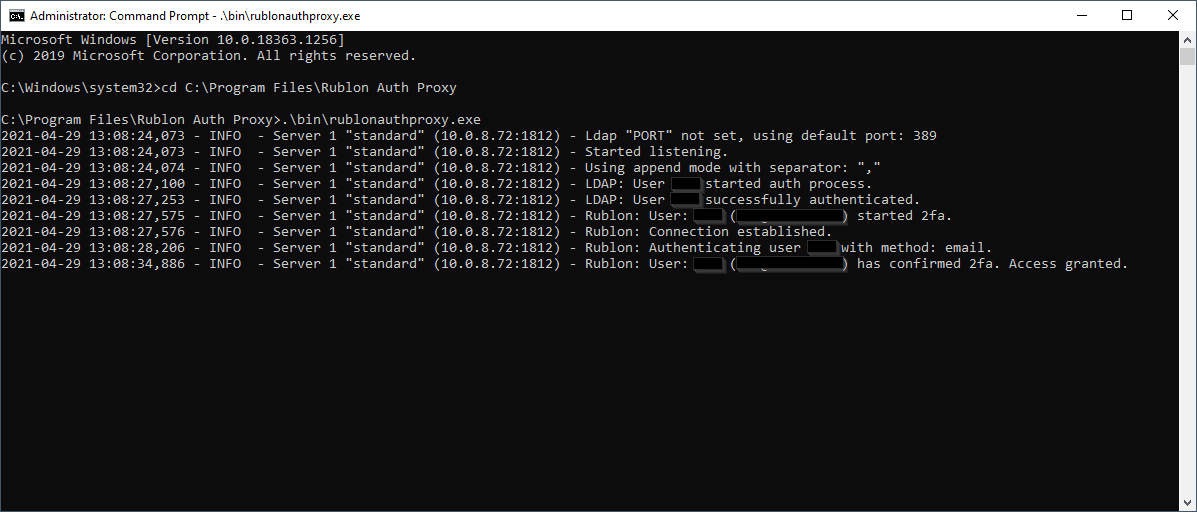
- Open cmd as administrator and go to the proxy’s installation directory:
cd C:\Program Files\Rublon Auth Proxy
- Run the proxy:
.\bin\rublonauthproxy.exe
If Rublon Authentication Proxy is configured properly, the console displays the Started listening log. At this point, you can test user authentication. To test user authentication, use NTRadPing or start configuring Rublon with one of the services that support the Rublon Authentication Proxy.
If everything works, start the proxy as a service:
net start RublonAuthProxy
Alternatively, you can start the proxy as a service in the following way:
- Find Rublon Authentication Proxy Service on the Windows services list (services.msc).
- Right-click Rublon Authentication Proxy Service and select Start.
Update Rublon Authentication Proxy
Linux
- Stop Rublon service:
systemctl stop rublon.service
or
service rublon stop - Download the latest rublonauthproxy package and unpack it.
- Replace the lib directory inside the previously deployed rublonauthproxy folder.
- Make sure the rublonauthproxy/lib/rublonauthproxy file has proper permissions:
chmod 775 rublonauthproxy/lib/rublonauthproxy - Run the service:
systemctl start rublon.service
or
service rublon start
Windows
Run the installer over your current installation to update the Rublon Authentication Proxy. Config and log files will be preserved.
Uninstall Rublon Authentication Proxy
Linux
- Stop Rublon service:
systemctl stop rublon.service
or
service rublon stop - Remove rublon.service:
rm -f /lib/systemd/system/rublon.service - Remove the rublonauthproxy directory:
rm -rf rublonauthproxy
Windows
Run the unins000.exe file located in the installation directory. Note that configuration and log files will be preserved.
Troubleshooting
If you are facing an issue with the Rublon Authentication Proxy, try restarting the Rublon Authentication Proxy.
If restarting the Rublon Authentication Proxy didn’t fix your issue, go to your configuration file and set the DEBUG option to true. Then, check the contents of your rublonauthproxy.log file. Information contained in this file should in most cases be enough to troubleshoot issues related to the Rublon Authentication Proxy.
If you installed the Rublon Authentication Proxy on Windows, then rublonauthproxy.log is located in the following location:
C:\Program Files\Rublon Auth Proxy\logs\rublonauthproxy.log
If you installed the Rublon Authentication Proxy on Linux, then rublonauthproxy.log is located in the following location:
rublonauthproxy/logs/rublonauthproxy.log
Note that most issues occur due to incorrect configuration.
If you encounter any issues with your Rublon integration, please contact Rublon Support.
Related Posts
Rublon Authentication Proxy – Release Notes
Rublon Authentication Proxy – Integrations
Rublon Authentication Proxy – Download