Last updated on December 8, 2025
Overview
The purpose of this document is to enable Rublon Multi-Factor Authentication (MFA) for users logging in to Kemp LoadMaster. In order to achieve that using SAML, you have to use Rublon Access Gateway. All required steps will be described in this document.
Supported Authentication Methods
| Authentication Method | Supported | Comments |
| Mobile Push | ✔ | N/A |
| FIDO | ✔ | N/A |
| Passcode | ✔ | N/A |
| SMS Passcode | ✔ | N/A |
| SMS Link | ✔ | N/A |
| Phone Call | ✔ | N/A |
| QR Code | ✔ | N/A |
| Email Link | ✔ | N/A |
| YubiKey OTP | ✔ | N/A |
| RFID | – | N/A |
Before you start
You need to install and configure Rublon Access Gateway itself before configuring Kemp LoadMaster to work with it. Please read the Rublon Access Gateway documentation and follow the steps in Installation and Configuration sections. Afterwards, continue with this document.
Configuration
1. When in Kemp, navigate to the left panel, and select Add New under the Virtual Services section.
2. Specify the parameters for your Virtual Service, and click the Add this Virtual Service button. If you would like to learn more, please visit this web page.

3. Navigate to Certificates & Security → Intermediate Certificates, and select a new Intermediate Certificate by importing it. Click Add Certificate.
The same certificate will be used when adding a new application in Rublon Access Gateway later on in this section. You can use the certificate downloaded by clicking DOWNLOAD CERTIFICATE in the Information for configuring applications with Rublon Access Gateway section of the Applications → All applications tab, or use any other certificate of your choice.

4. Navigate to Virtual Services → Manage SSO, and fill in the Add new Client Side Configuration field with the name of your new SSO configuration. Afterwards, click Add to create a new Client Side Configuration.
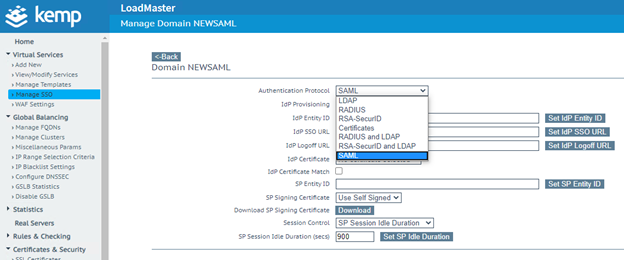
5. Select SAML in the Authentication Protocol drop-down list.
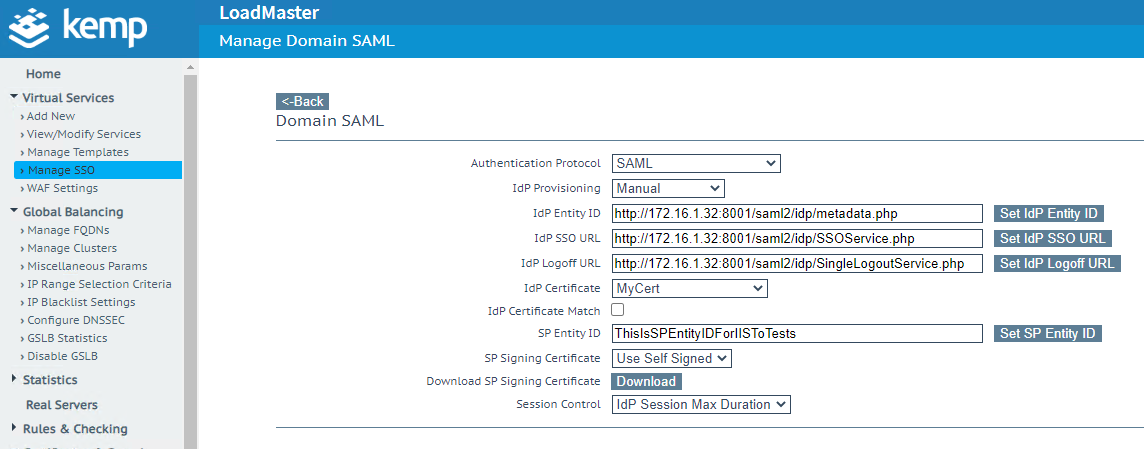
6. Get the necessary SAML configuration data from Rublon Access Gateway. Go to Applications → All applications, and find SSO URL, Logout URL, and Entity ID in the Information for configuring applications with Rublon Access Gateway section. Refer to the screenshots and table.
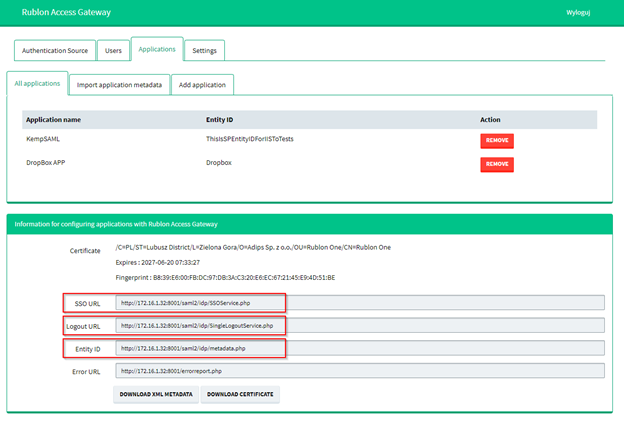
| Rublon Access Gateway | Kemp |
| SSO URL | IdP SSO URL |
| Logout URL | IdP Logoff URL |
| Entity ID | IdP Entity ID |
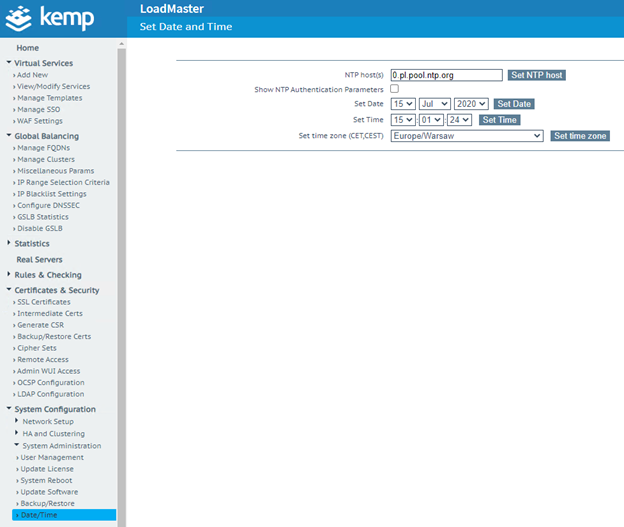
7. Go to System Configuration → System Administration → Date/Time, and set the correct time zone. If you encounter any problems with the SSO (using SAML), use the NTP host(s) setting. Simply setting the time zone to Set time zone (CET, CEST) may not be sufficient.
8. Switch to Rublon Access Gateway, and add a new application. Navigate to Applications → Add application. It’s very important to choose the same certificate as in Kemp, and enter the correct Entity ID.
9. Enter the address of Kemp’s Virtual Service in Assertion Consumer Service and Single Logout Service fields.
10. Uncheck Validate AuthnRequest.
11. Check Sign response and Sign assertion.
12. In Certificate for signing and Certificate for encryption, select the same certificate as in Kemp (Step 3).
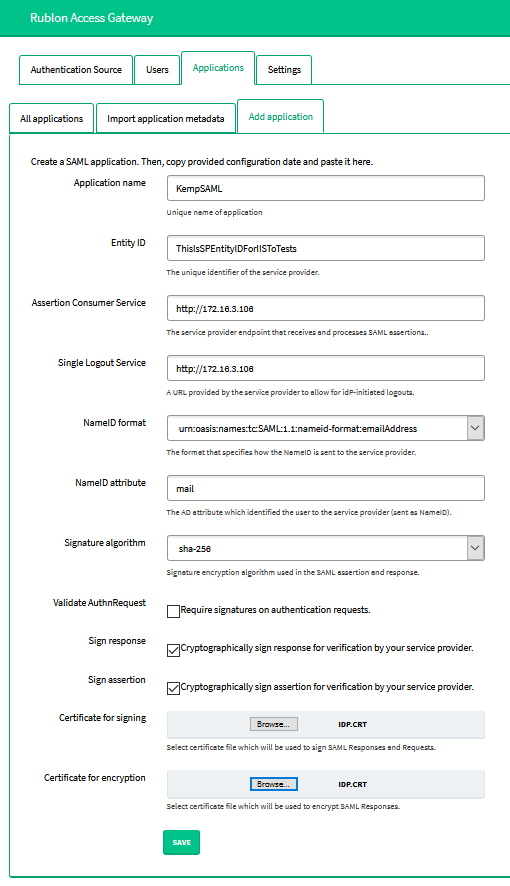
13. Click SAVE to add a new application. The correctly configured SAML SSO can now be used in a virtual service.
14. Get back to Kemp, and go to Virtual Services → View/Modify Services. Click Modify. Select the appropriate SAML SSO service in the ESP Options tab. See the picture below.

15. Set the Client Authentication Mode to SAML. Select the previously configured SSO Domain. Set Allowed Virtual Hosts, Allowed Virtual Directories and Server Authentication Mode according to your configuration.
16. Your configuration is complete. Your users have 2FA enabled when logging in to their Virtual Service.
Log in to Kemp LoadMaster with Rublon 2FA
1. Run the Virtual Service. The first thing you will see is the Rublon Access Gateway login page.

2. Provide your username and password. A window should appear with a selection of various 2FA options from Rublon.

3. Let’s use the email option (first icon on the left). Select it, and you should receive an email from Rublon Two-Factor Authentication. Confirm your login by clicking the link provided in the email.
4. One of the options in the Rublon 2FA window is to Remember this device. Check it, and you will not be required to do any additional authentication during your next login.
5. After selecting the desired 2FA option, you will get an email from Rublon. Open it and press the Sing In button.
6. You should be redirected to your service now.
7. After successfully logging in to Kemp LoadMaster, an active session in Users Management will also appear. See the picture below.

Troubleshooting
If you encounter any issues with your Rublon integration, please contact Rublon Support.