Last updated on March 25, 2025
This documentation describes how to synchronize users and groups from Microsoft Entra ID into the Rublon Admin Console using Rublon Directory Sync. This specific sync is also called Rublon Entra ID Sync.
Rublon Directory Sync is a powerful feature designed to streamline the synchronization of user data into the Rublon Admin Console. With Directory Sync, you can effortlessly integrate users and groups from both Active Directory (AD) and Entra ID, ensuring that your user information remains current and accurate.
What is synchronized?
The following data can be synchronized from Microsoft Entra ID into the Rublon Admin Console:
- Entra ID Users (into the Users tab in the Rublon Admin Console)
- Including User Aliases
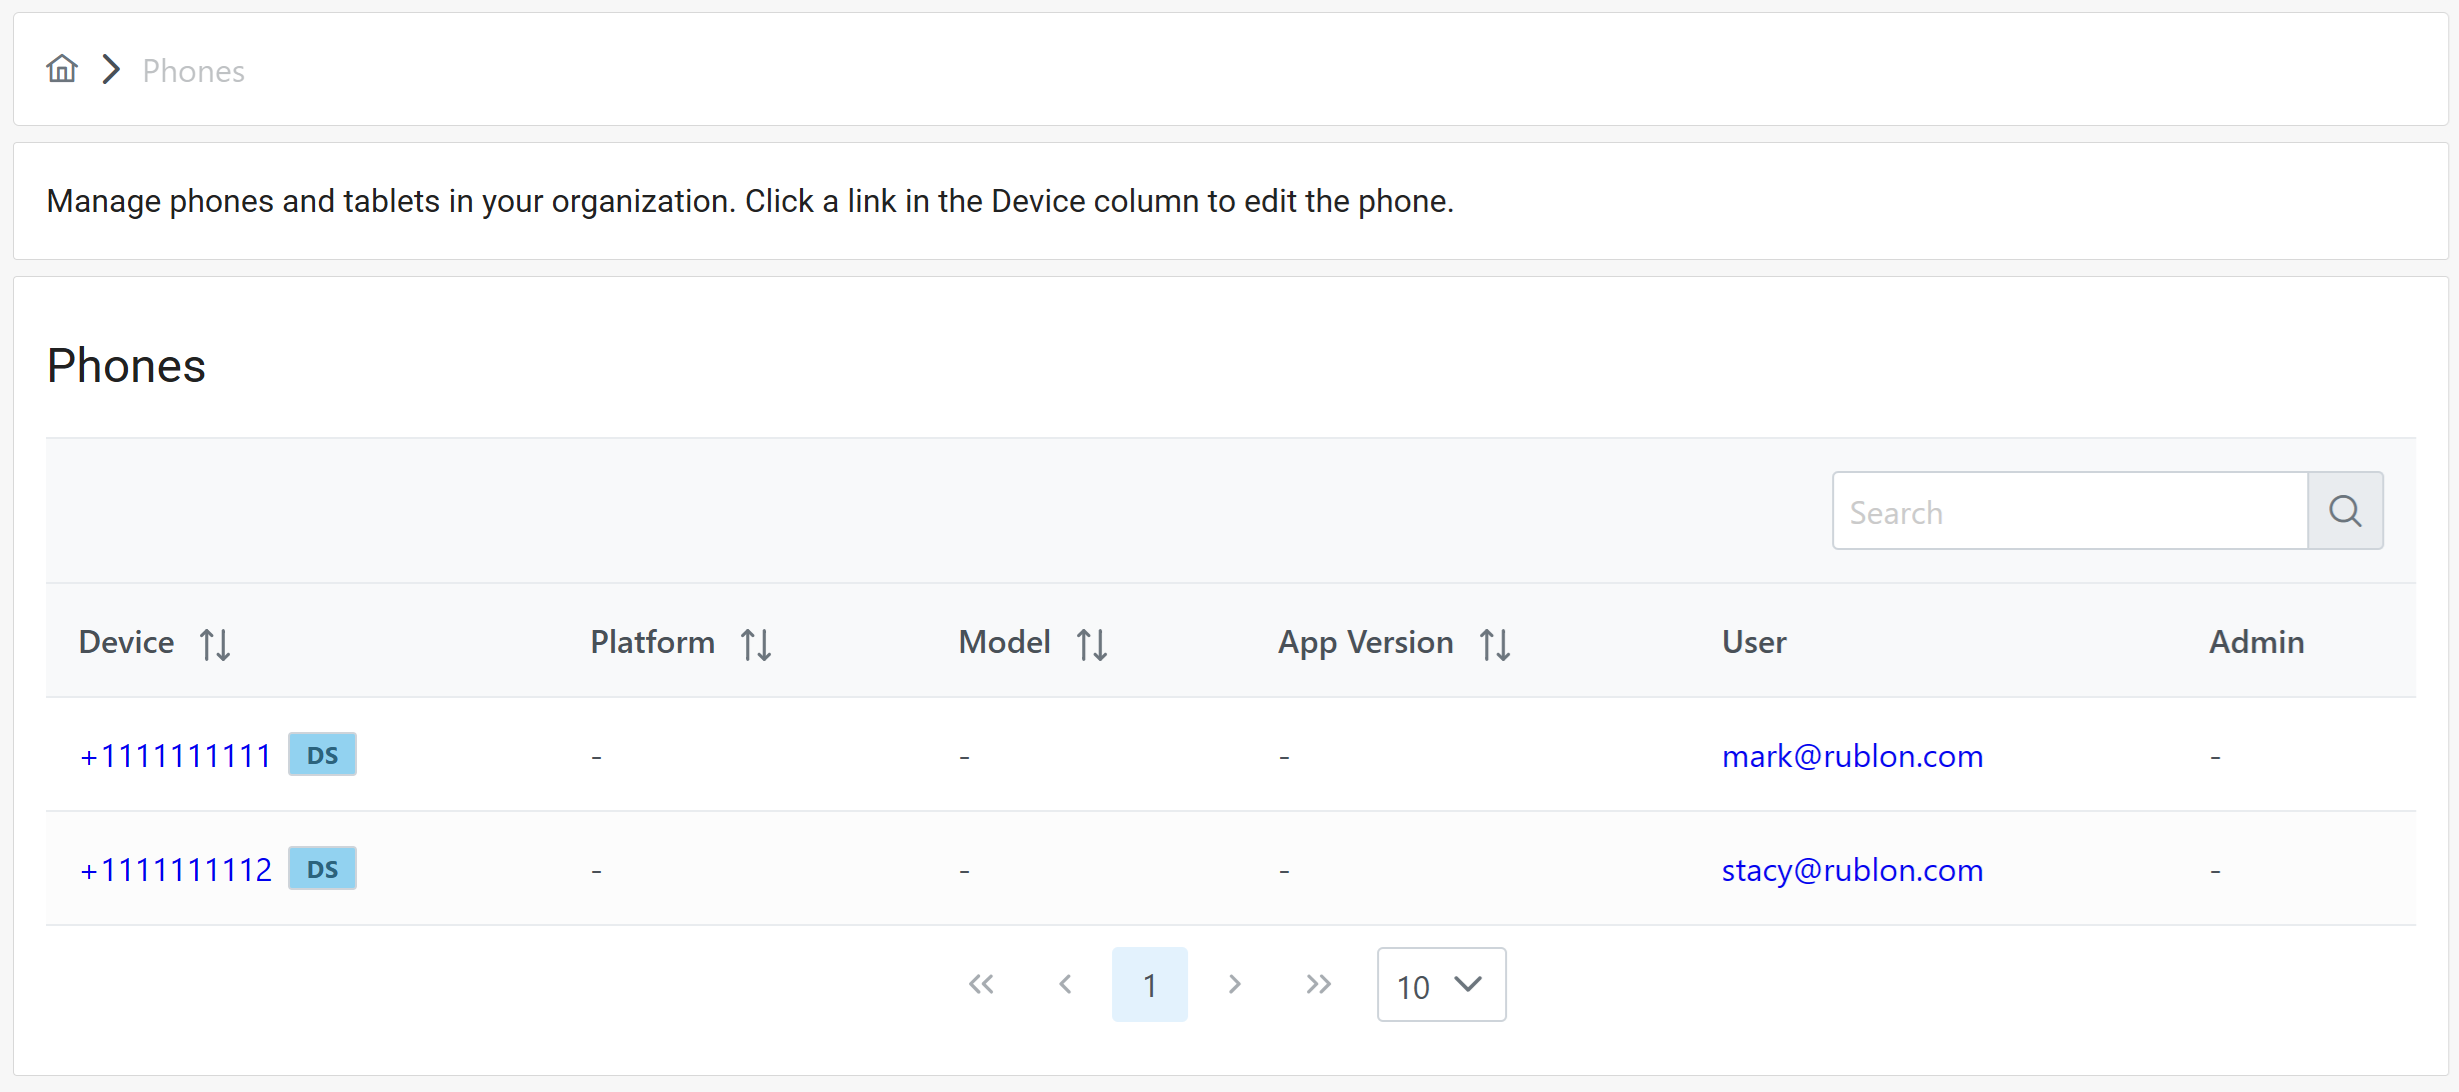
- Entra ID User Phone Numbers (into the Phones tab in the Rublon Admin Console)
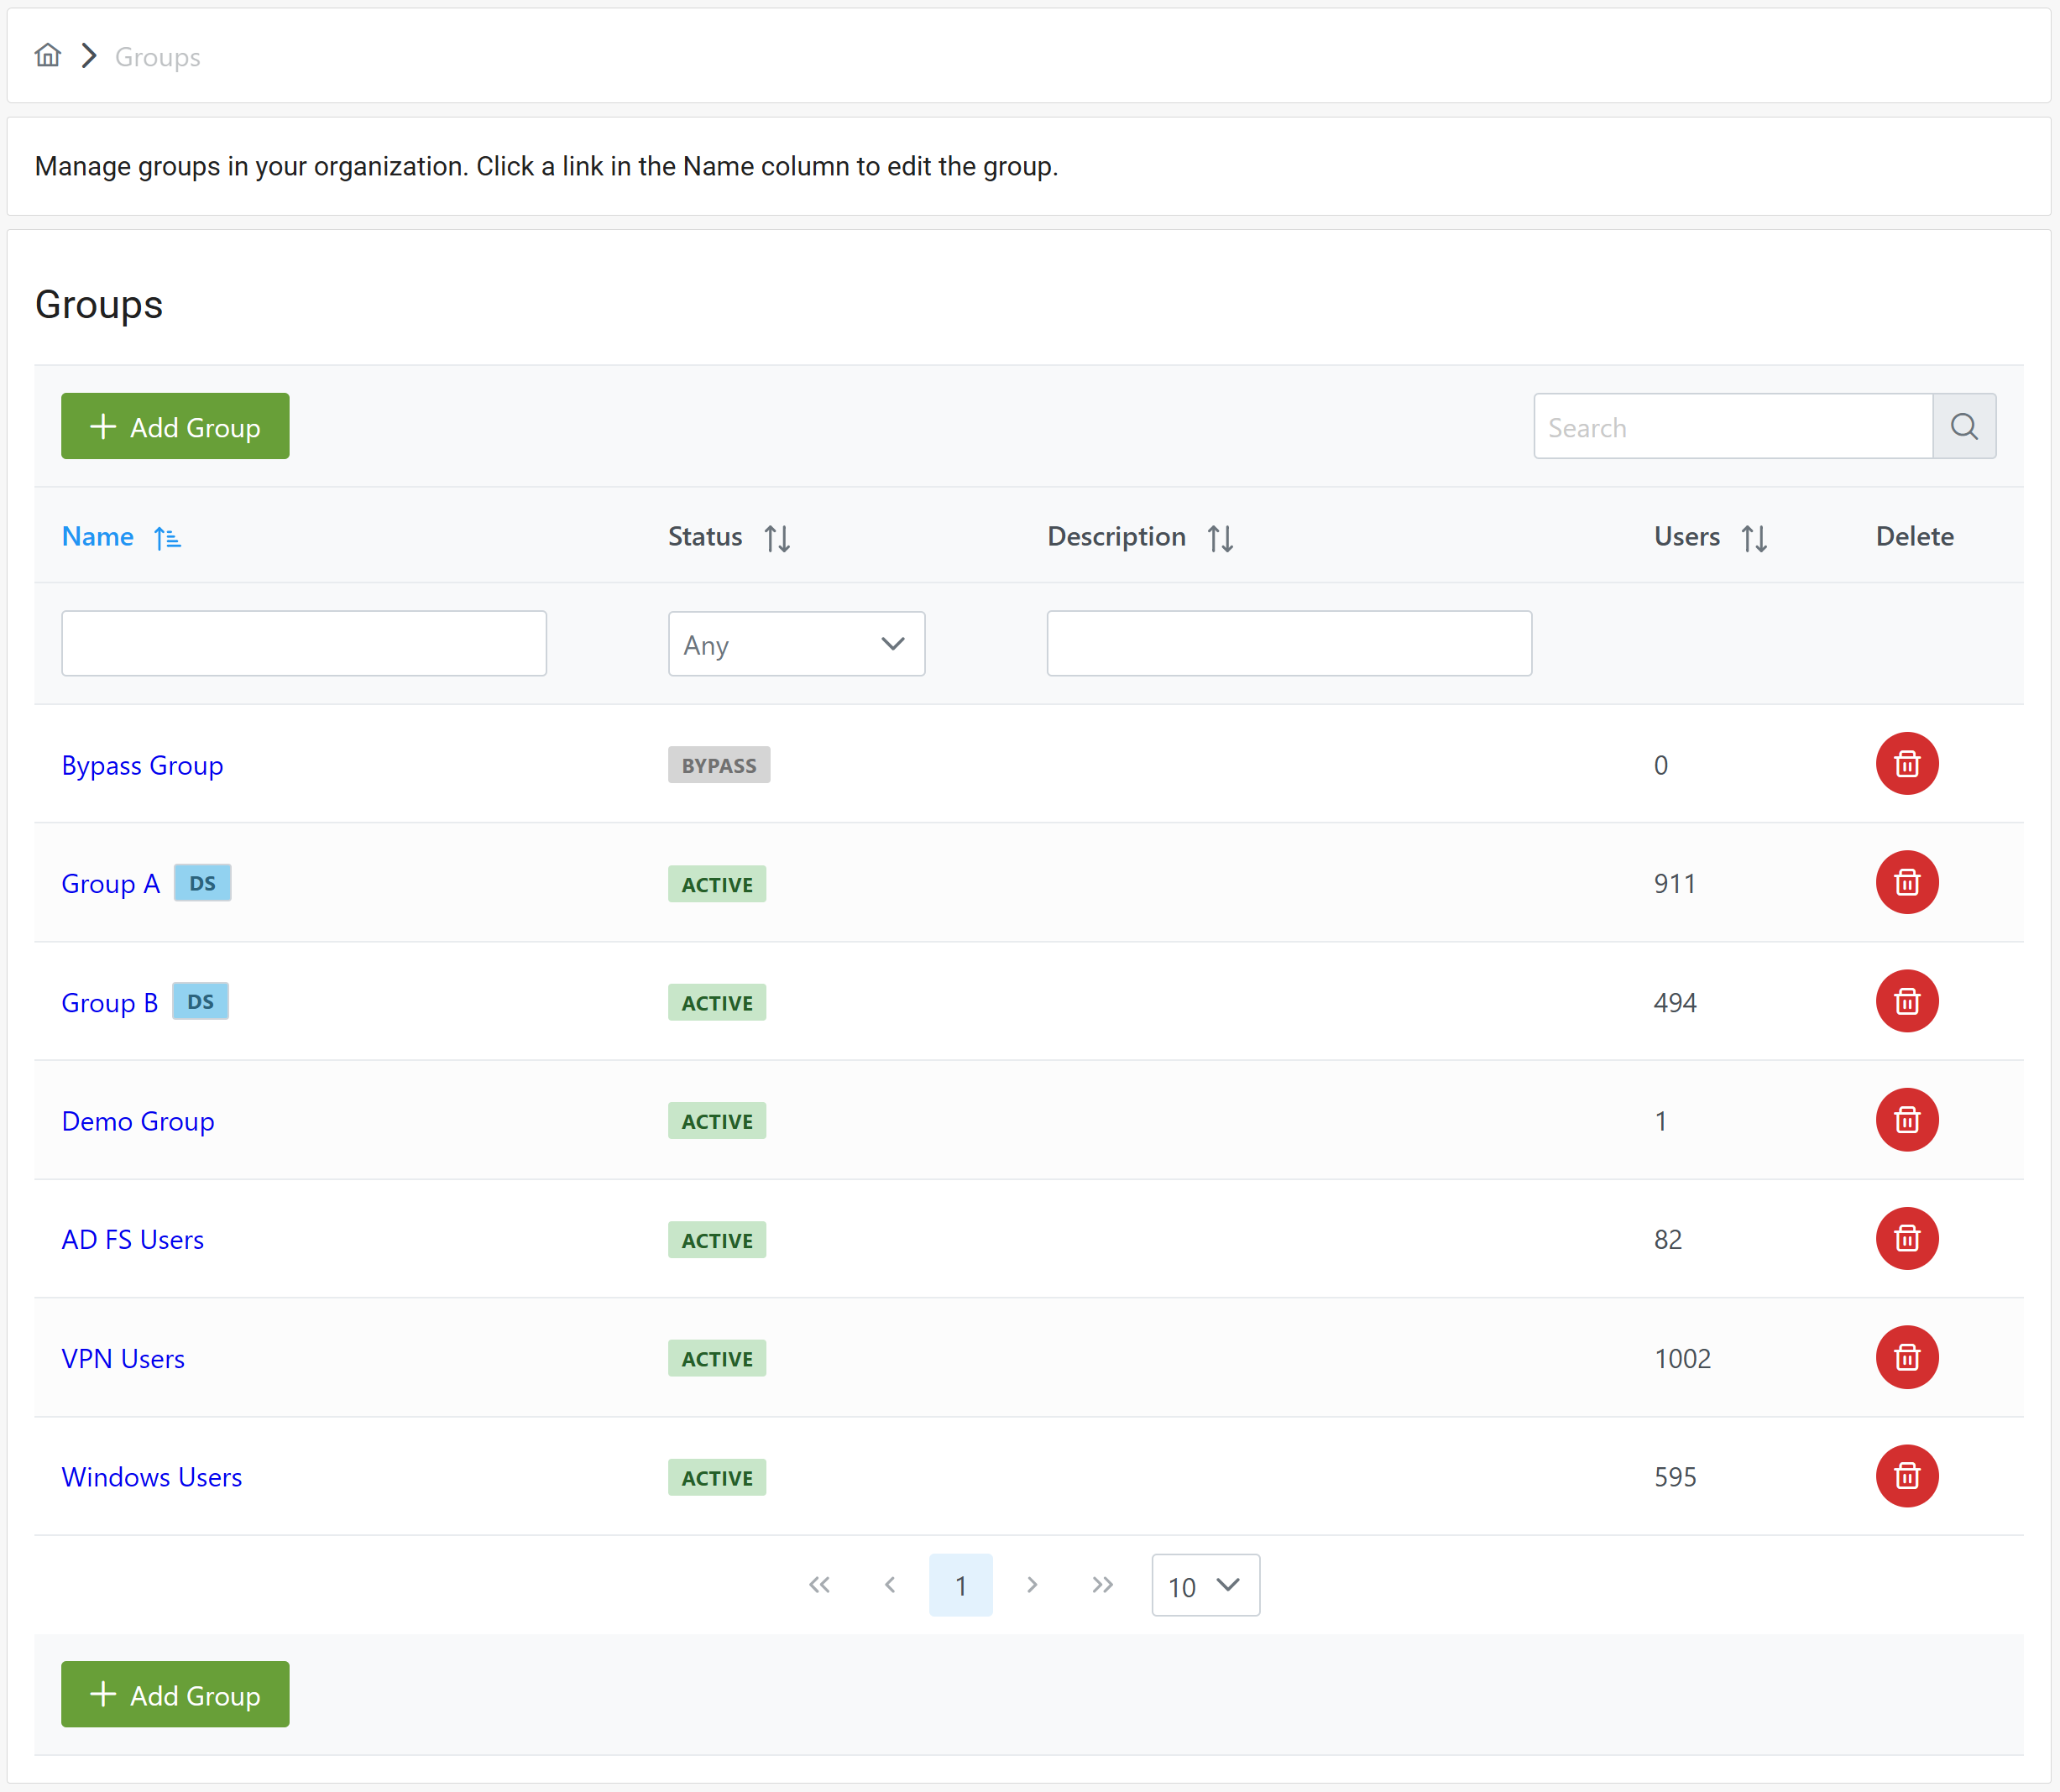
- Entra ID Groups (into the Groups tab in the Rublon Admin Console)
The following data cannot be synchronized:
- Entra ID Administrators
Rublon Entra ID Sync – Network Diagram
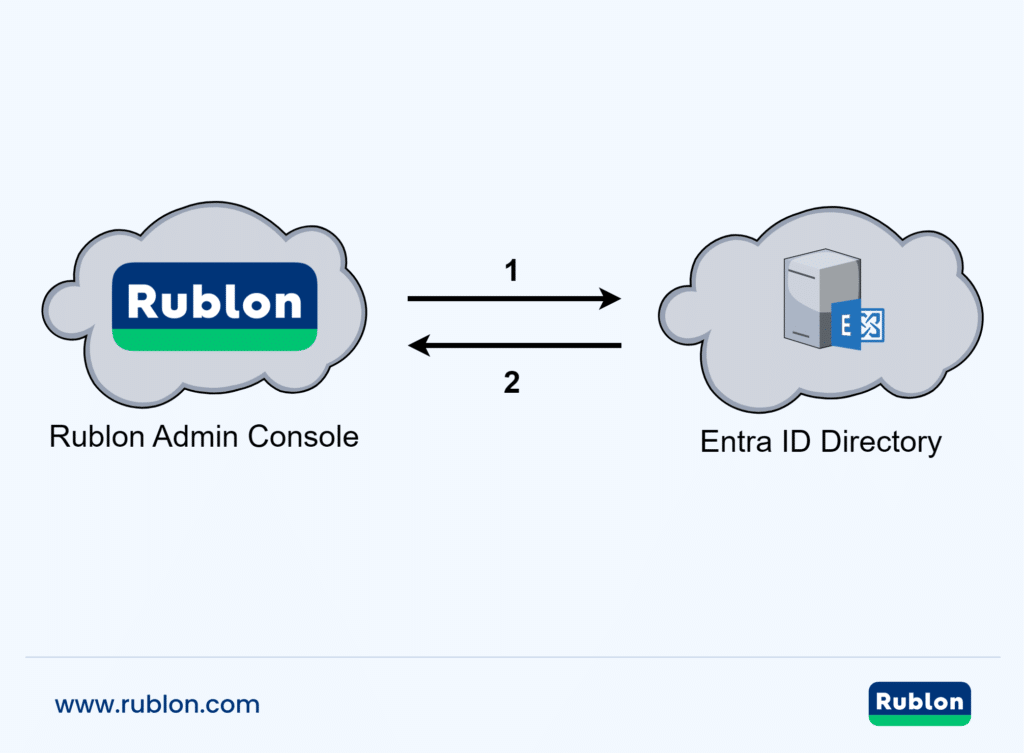
1. Rublon Entra ID Sync requests information from Microsoft Entra ID.
2. Rublon Entra ID Sync synchronizes users and groups from Entra ID to the Rublon Admin Console.
Prerequisites
- You must have an organization in the Rublon Admin Console (If you do not have one, create it: Rublon Account Registration)
- You must have one of the following Rublon Admin Console administrator roles to synchronize users from Entra ID into the Admin Console: Owner, Administrator, or User Manager.
- You must have an Entra ID admin service account with the Global Administrator role to authorize the synchronization.
- You must have at least one user and one group in Microsoft Entra ID so that Rublon has can perform synchronization.
Configuring Rublon Entra ID Sync
1. Sign in to the Rublon Admin Console.
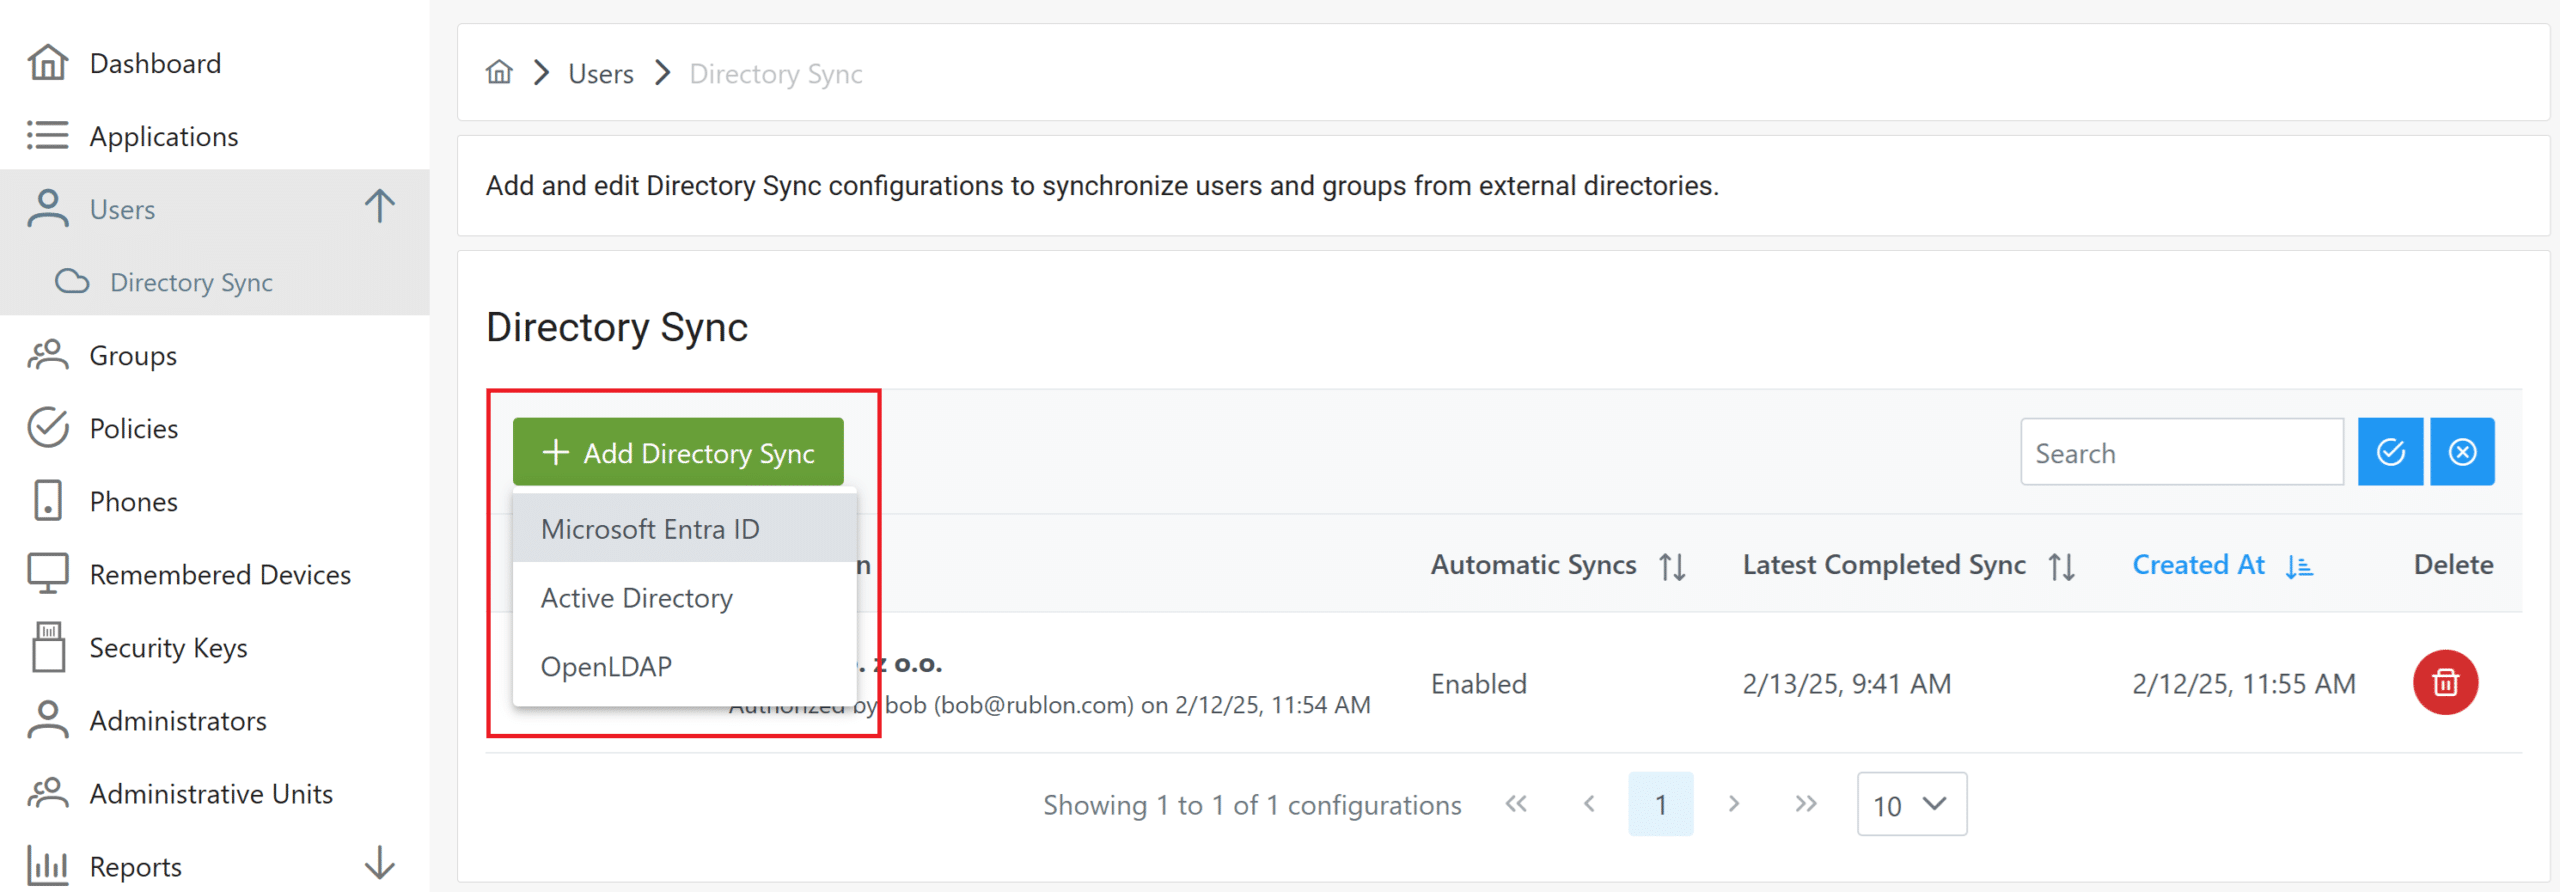
2. Expand the Users tab and select Directory Sync.
3. Select Add Directory Sync and then Microsoft Entra ID.
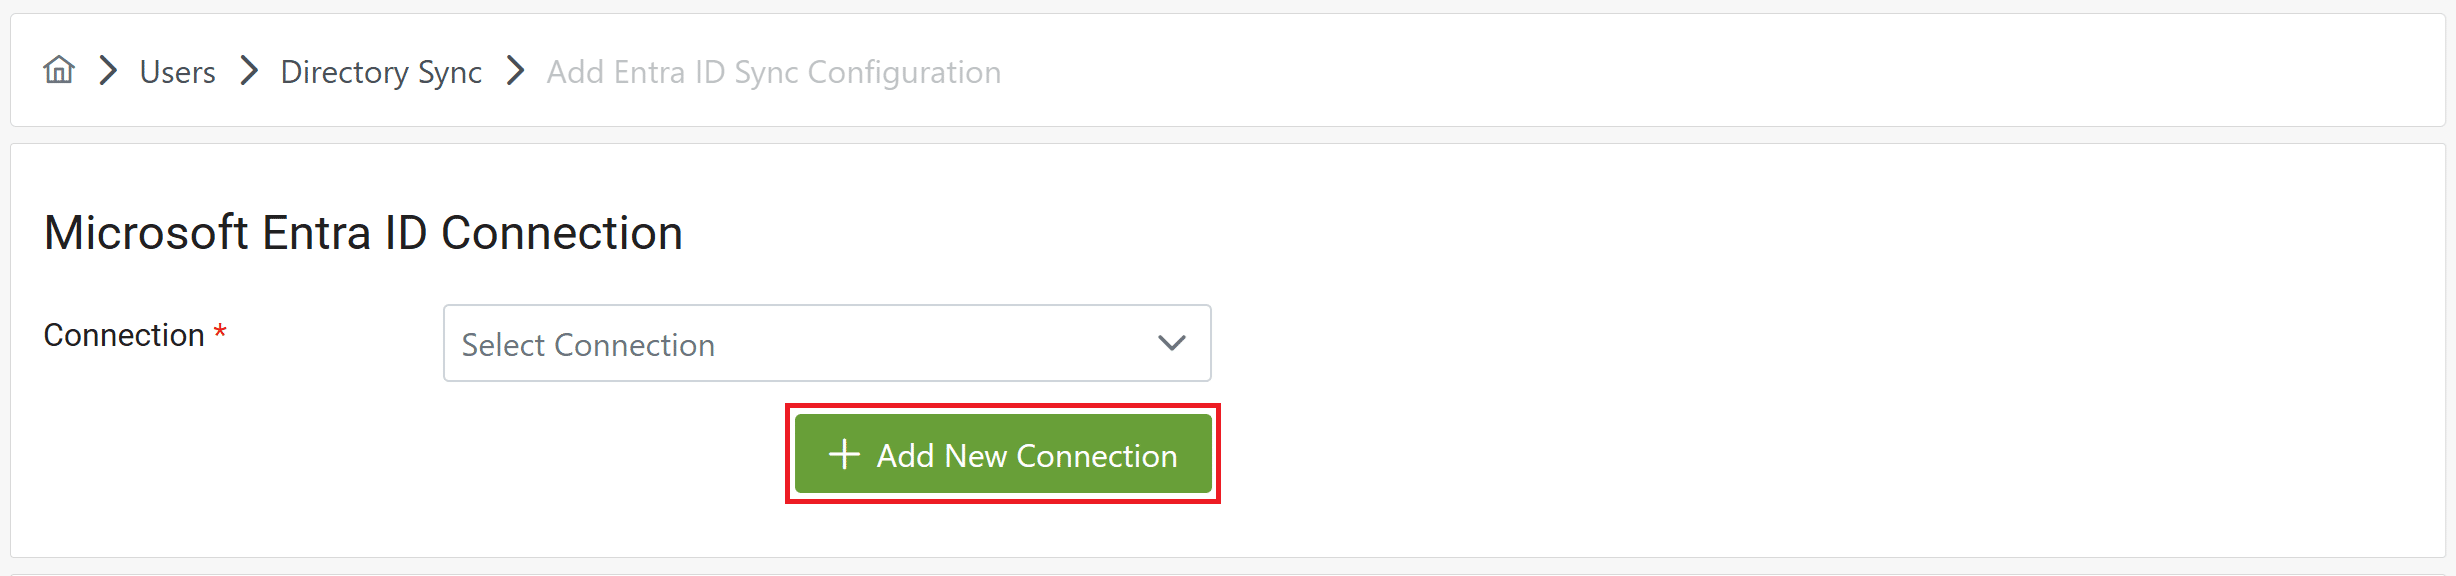
4. Select Add New Connection.
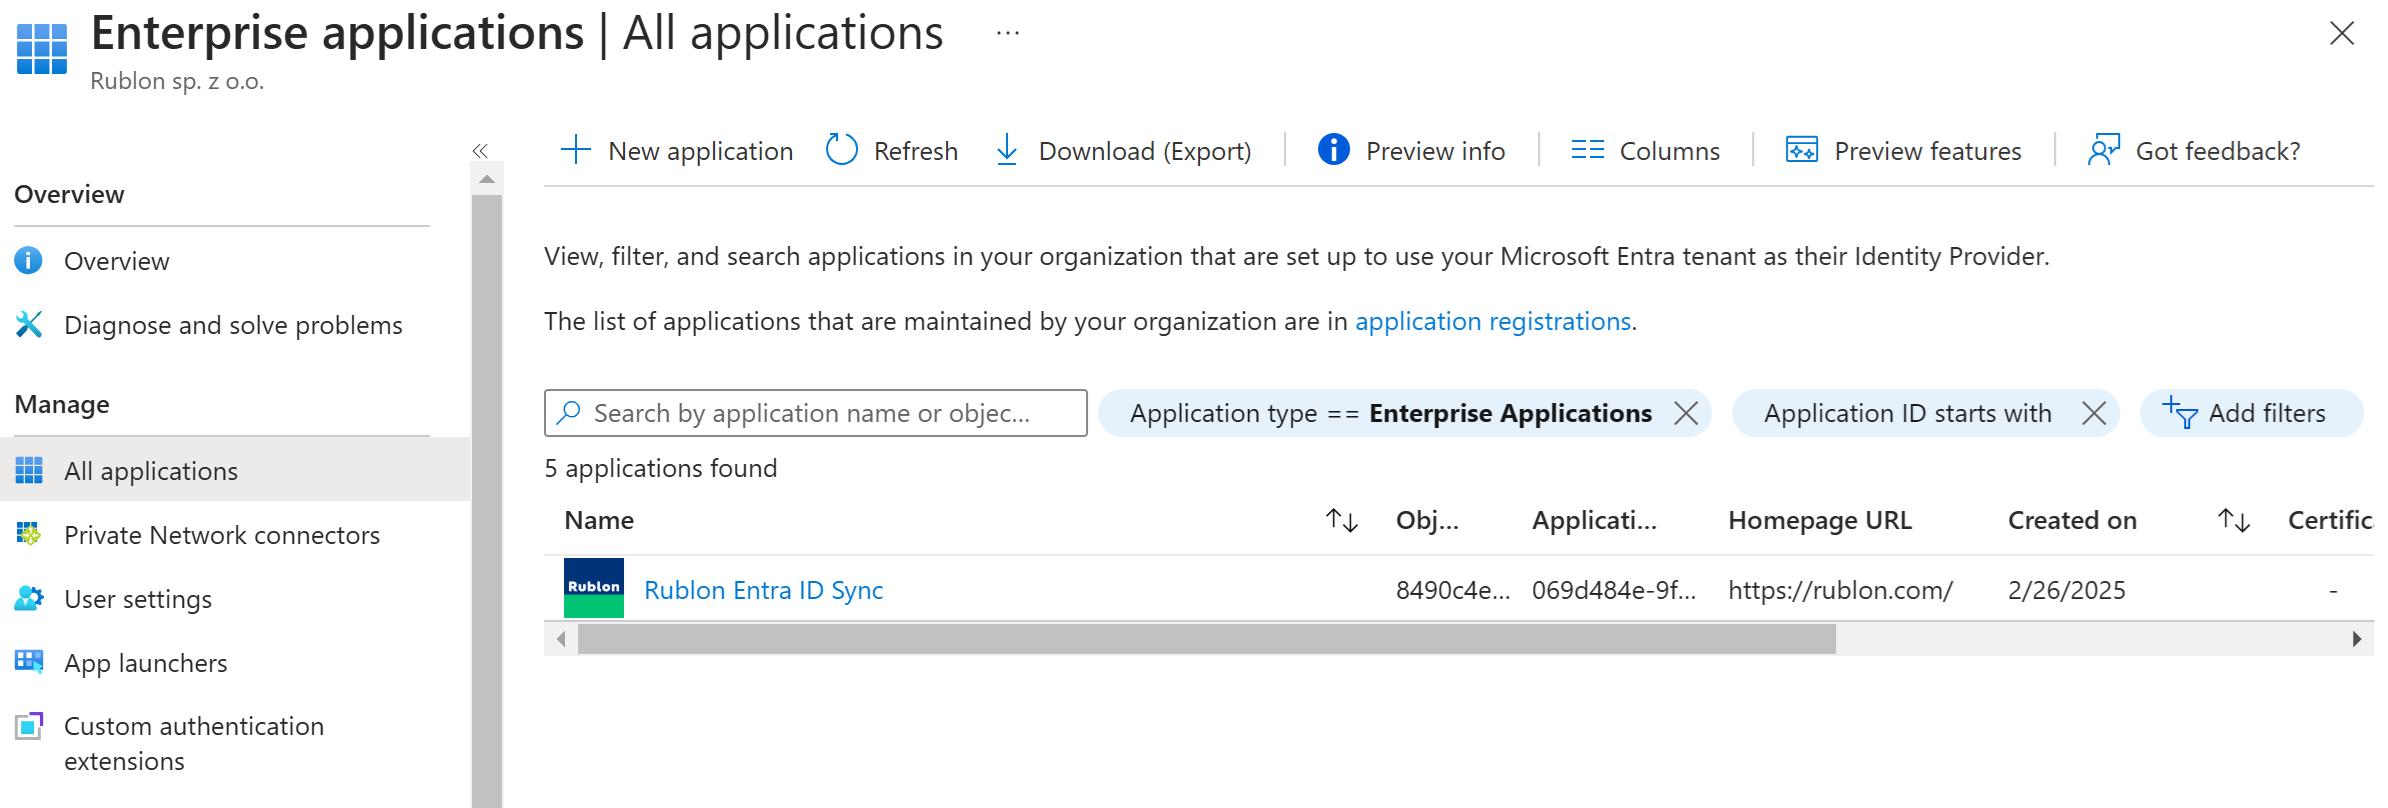
5. Sign in to your account and authorize the Microsoft Entra ID Sync. You will be asked to grant permissions to Rublon Entra ID Sync. Check Consent on behalf of your organization and select Accept.
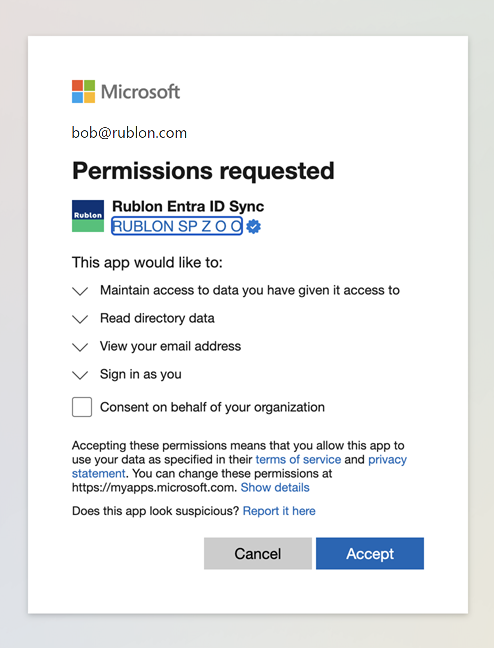
After successful authorization, the Rublon Entra ID Sync application should be visible in the Applications → Enterprise applications tab of the Microsoft Entra admin center.
6. Fill in Details and Attributes and click Save. Refer to the following image and table.
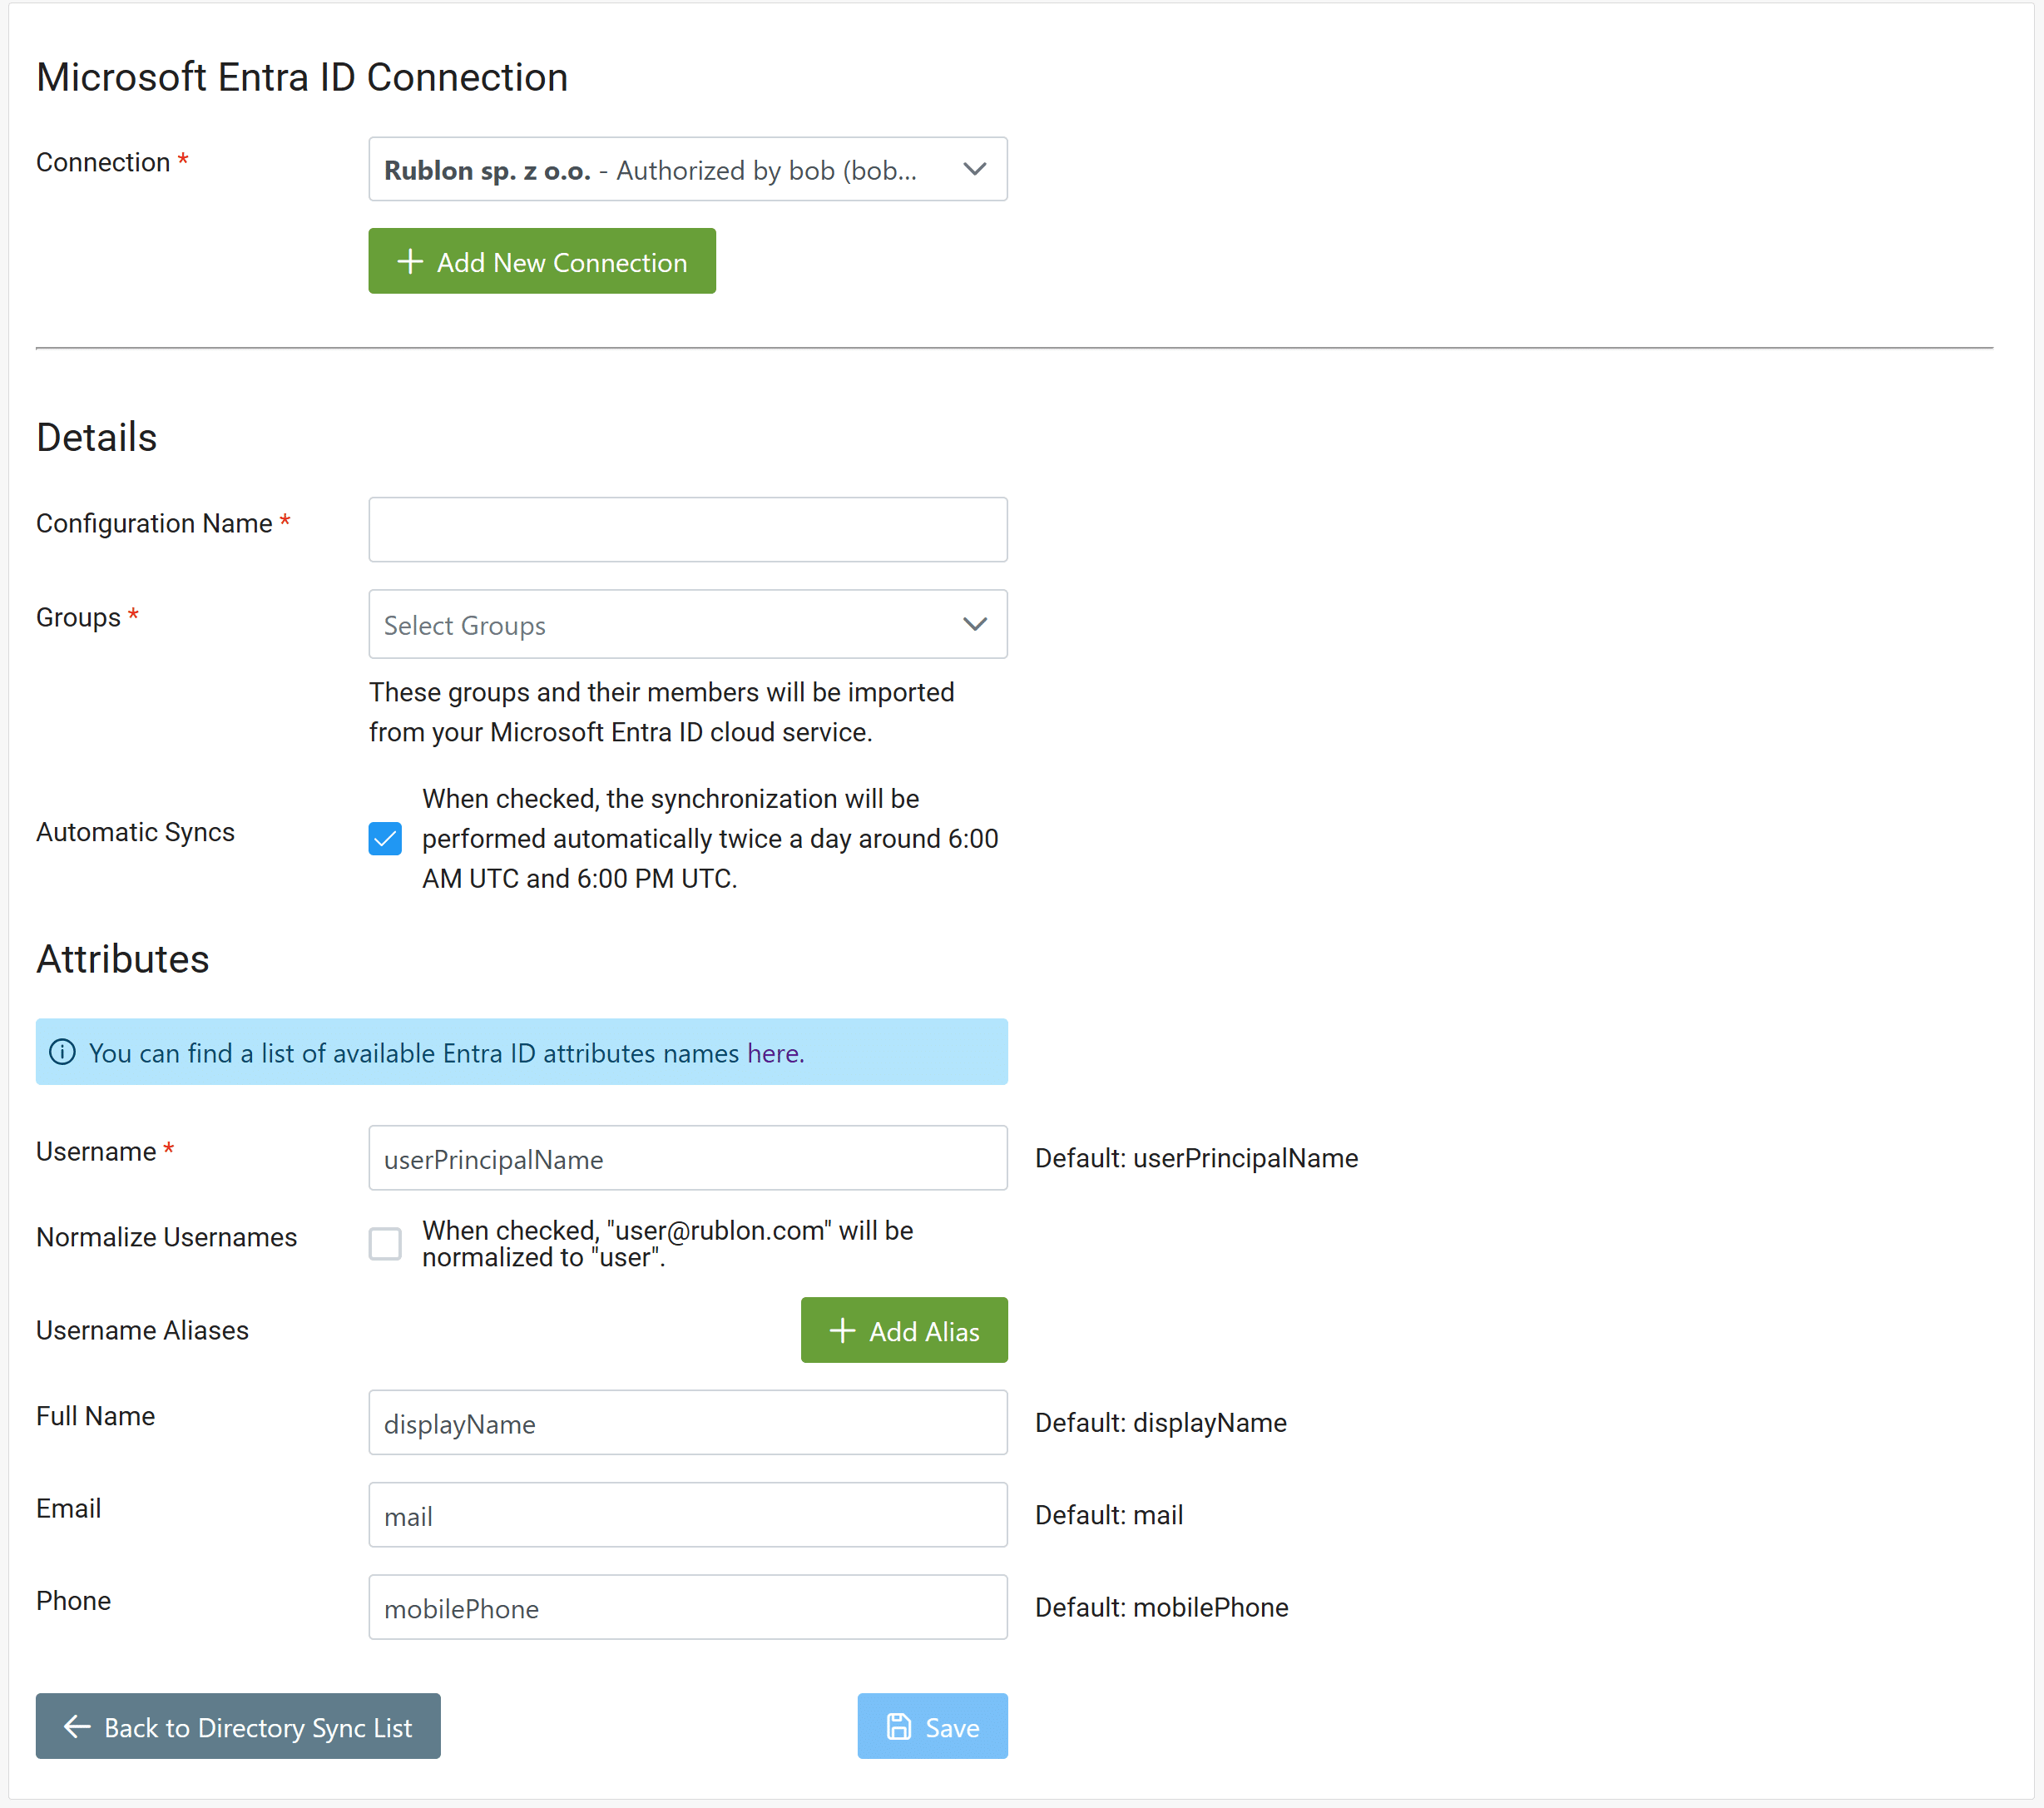
| Configuration Name | Required. Enter a name for your Entra ID Configuration. |
| Groups | Required. Select the groups that should be synchronized with Rublon. Only the users from the selected groups will be synchronized into the Admin Console. You must select at least one group. |
| Automatic Syncs | Optional. When checked, the synchronization will be performed automatically twice a day around 6:00 AM UTC and 6:00 PM UTC. Default: Checked. |
| Username | Required. The attribute that will serve as the username for each user after they are synchronized into the Users tab. For a list of available attributes, refer to the official Microsoft documentation. Default: userPrincipalName |
| Normalize Usernames | Optional. When checked, “username@rublon.com” will be normalized to “user”. For more information on normalization, refer to How to Enable Username Normalization?. Default: Unchecked. |
| Aliases | Optional. Allows you to define username aliases. Any Entra ID attribute can be used as an alias. For example, you can use givenName as alias1. After synchronization, these aliases will be added to each user’s profile in the Rublon Admin Console. For a list of available attributes, refer to the official Microsoft documentation. Default: No aliases defined. |
| Full Name | Optional. The attribute that will serve as the Full Name for each user after they are synchronized into the Users tab. For a list of available attributes, refer to the official Microsoft documentation. Default: displayName |
| Optional. The attribute that will serve as the Email Address for each user after they are synchronized into the Users tab. For a list of available attributes, refer to the official Microsoft documentation. Default: mail | |
| Phone | Optional. The attribute that will serve as the Phone Number for each user after they are synchronized into the Users tab. For a list of available attributes, refer to the official Microsoft documentation. Note that the phone number in Entra ID must be in the following format: +<prefix>XXXXXXXX, e.g., +15550100. Default: mobilePhone |
7. After saving the changes, click Synchronize Now. Synchronization might take up to a few minutes, depending on the number of synced users.
If any errors or warnings occur during synchronization, you can review them by clicking the Show Errors or Show Warnings buttons.
You can rerun the synchronization manually at any time. Automatic syncs will be performed twice a day if Automatic Syncs is checked in Details.
Reviewing Synchronization Result in the Rublon Admin Console
1. Sign in to the Rublon Admin Console.
2. Go to the Users tab.
3. Explore the user list, looking for users from Entra ID. Users synchronized from Entra ID will have a DS badge next to their usernames. You can also look for a specific user by entering their username in the search field and pressing Enter.
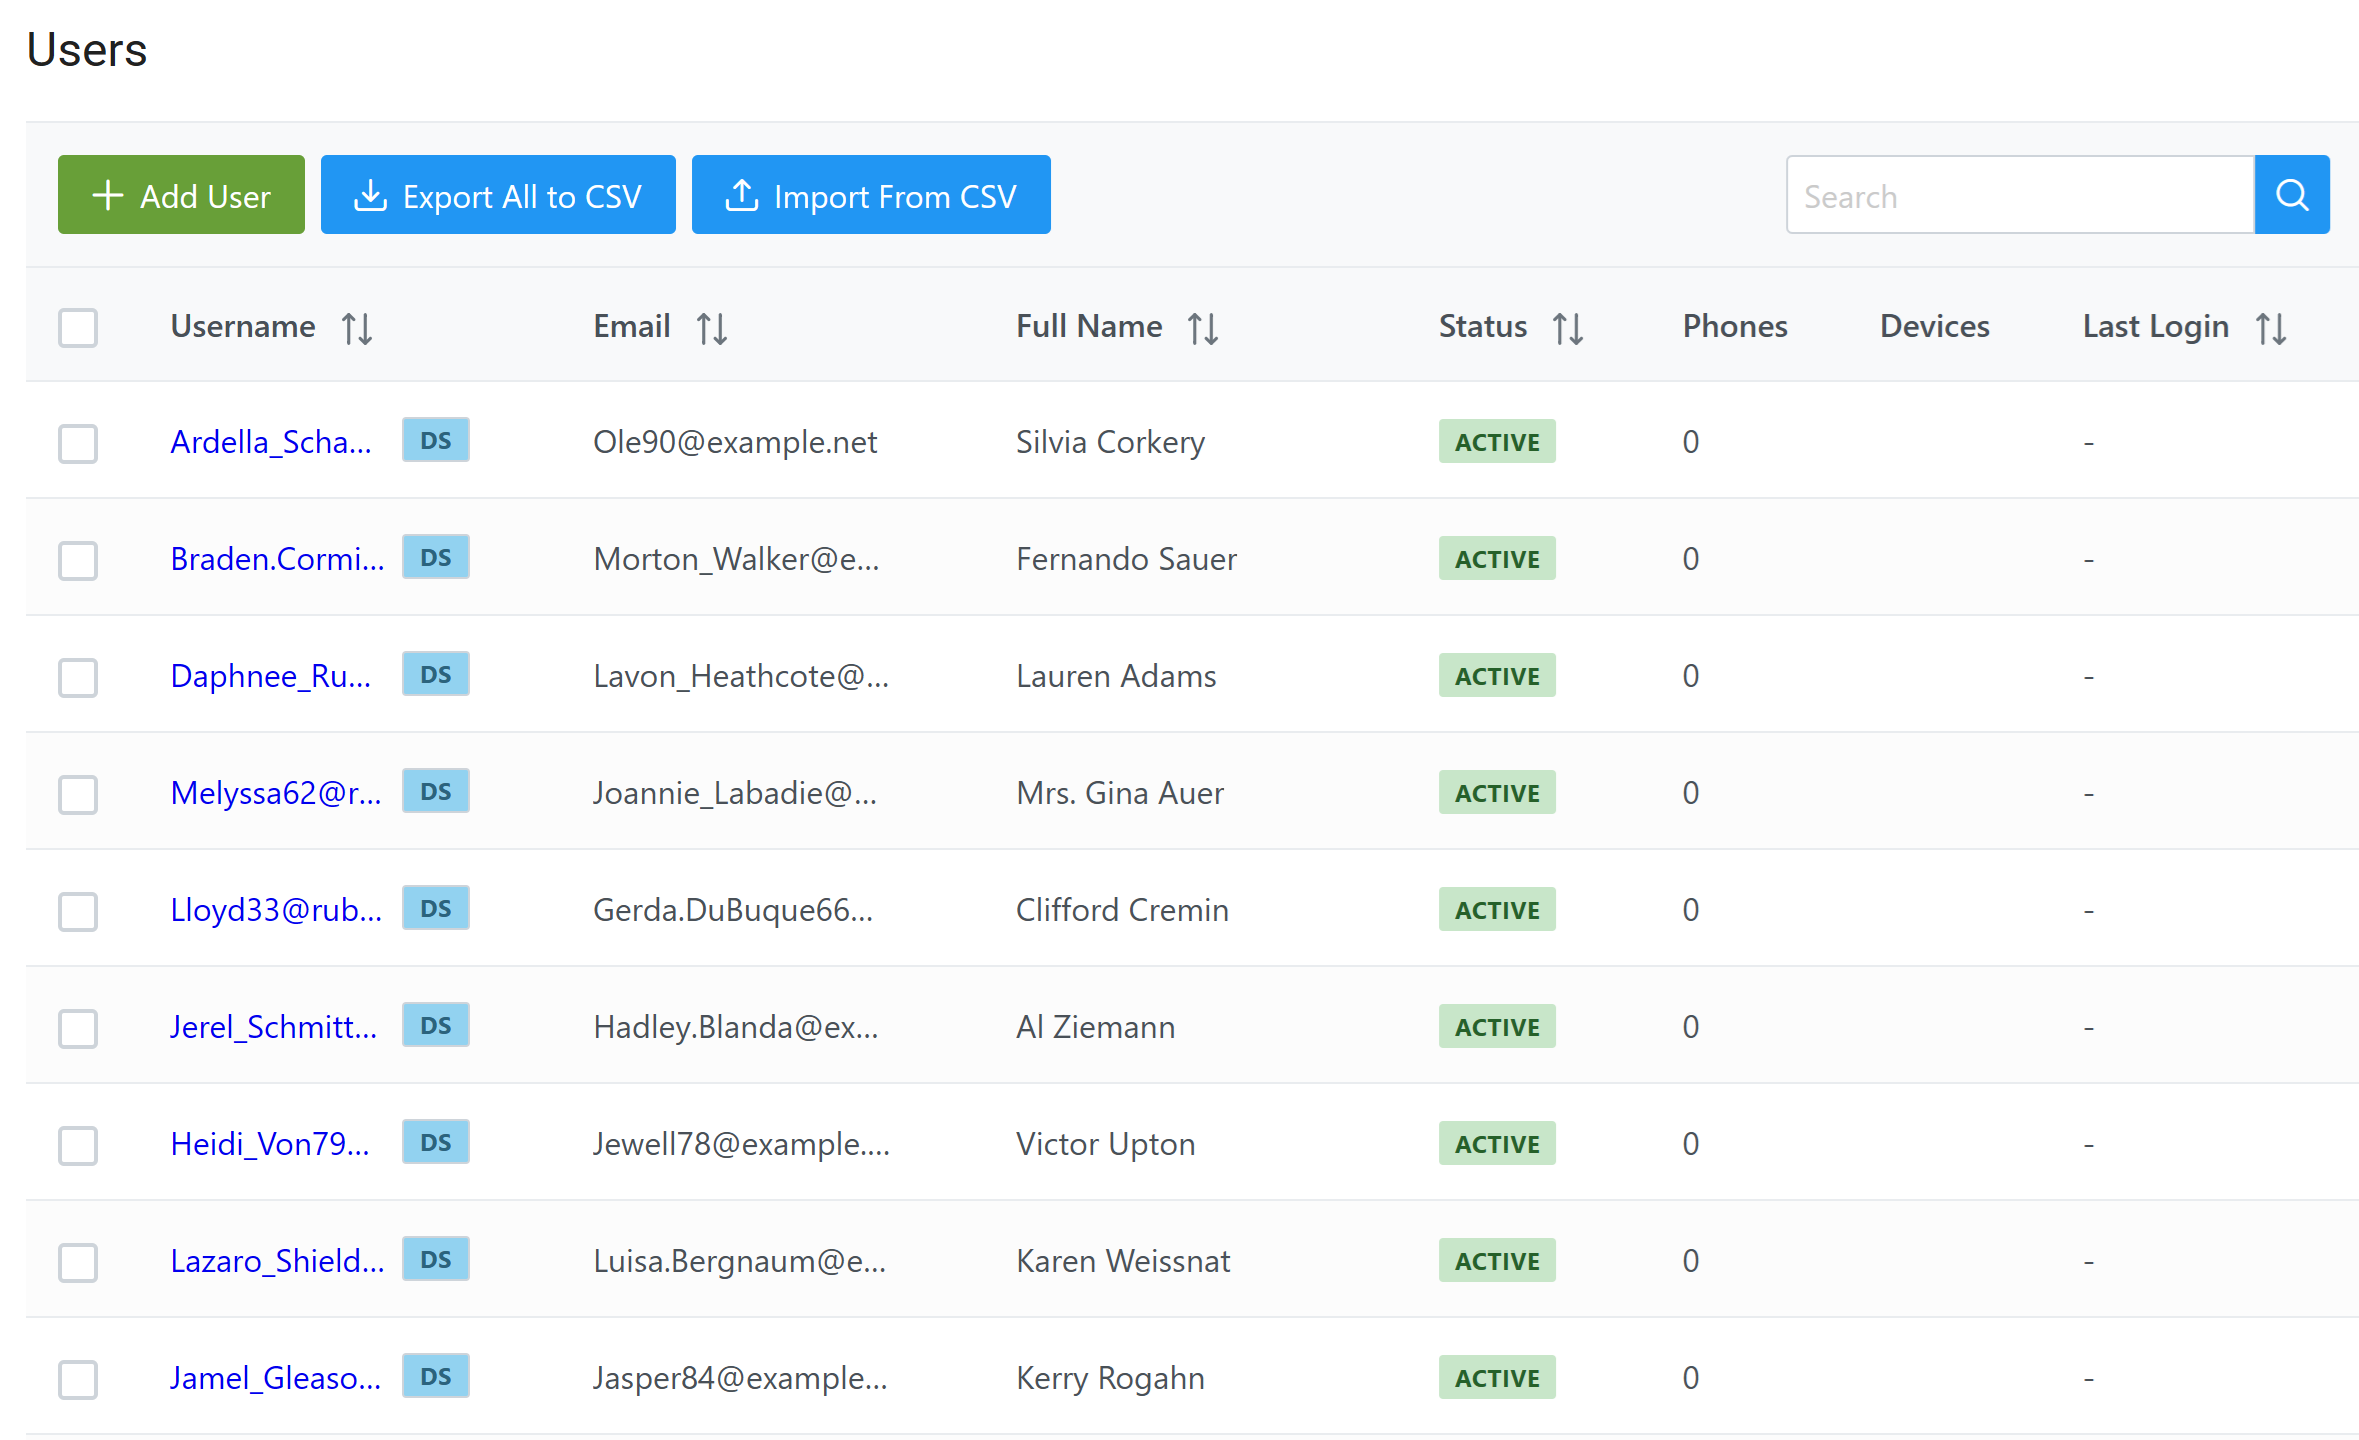
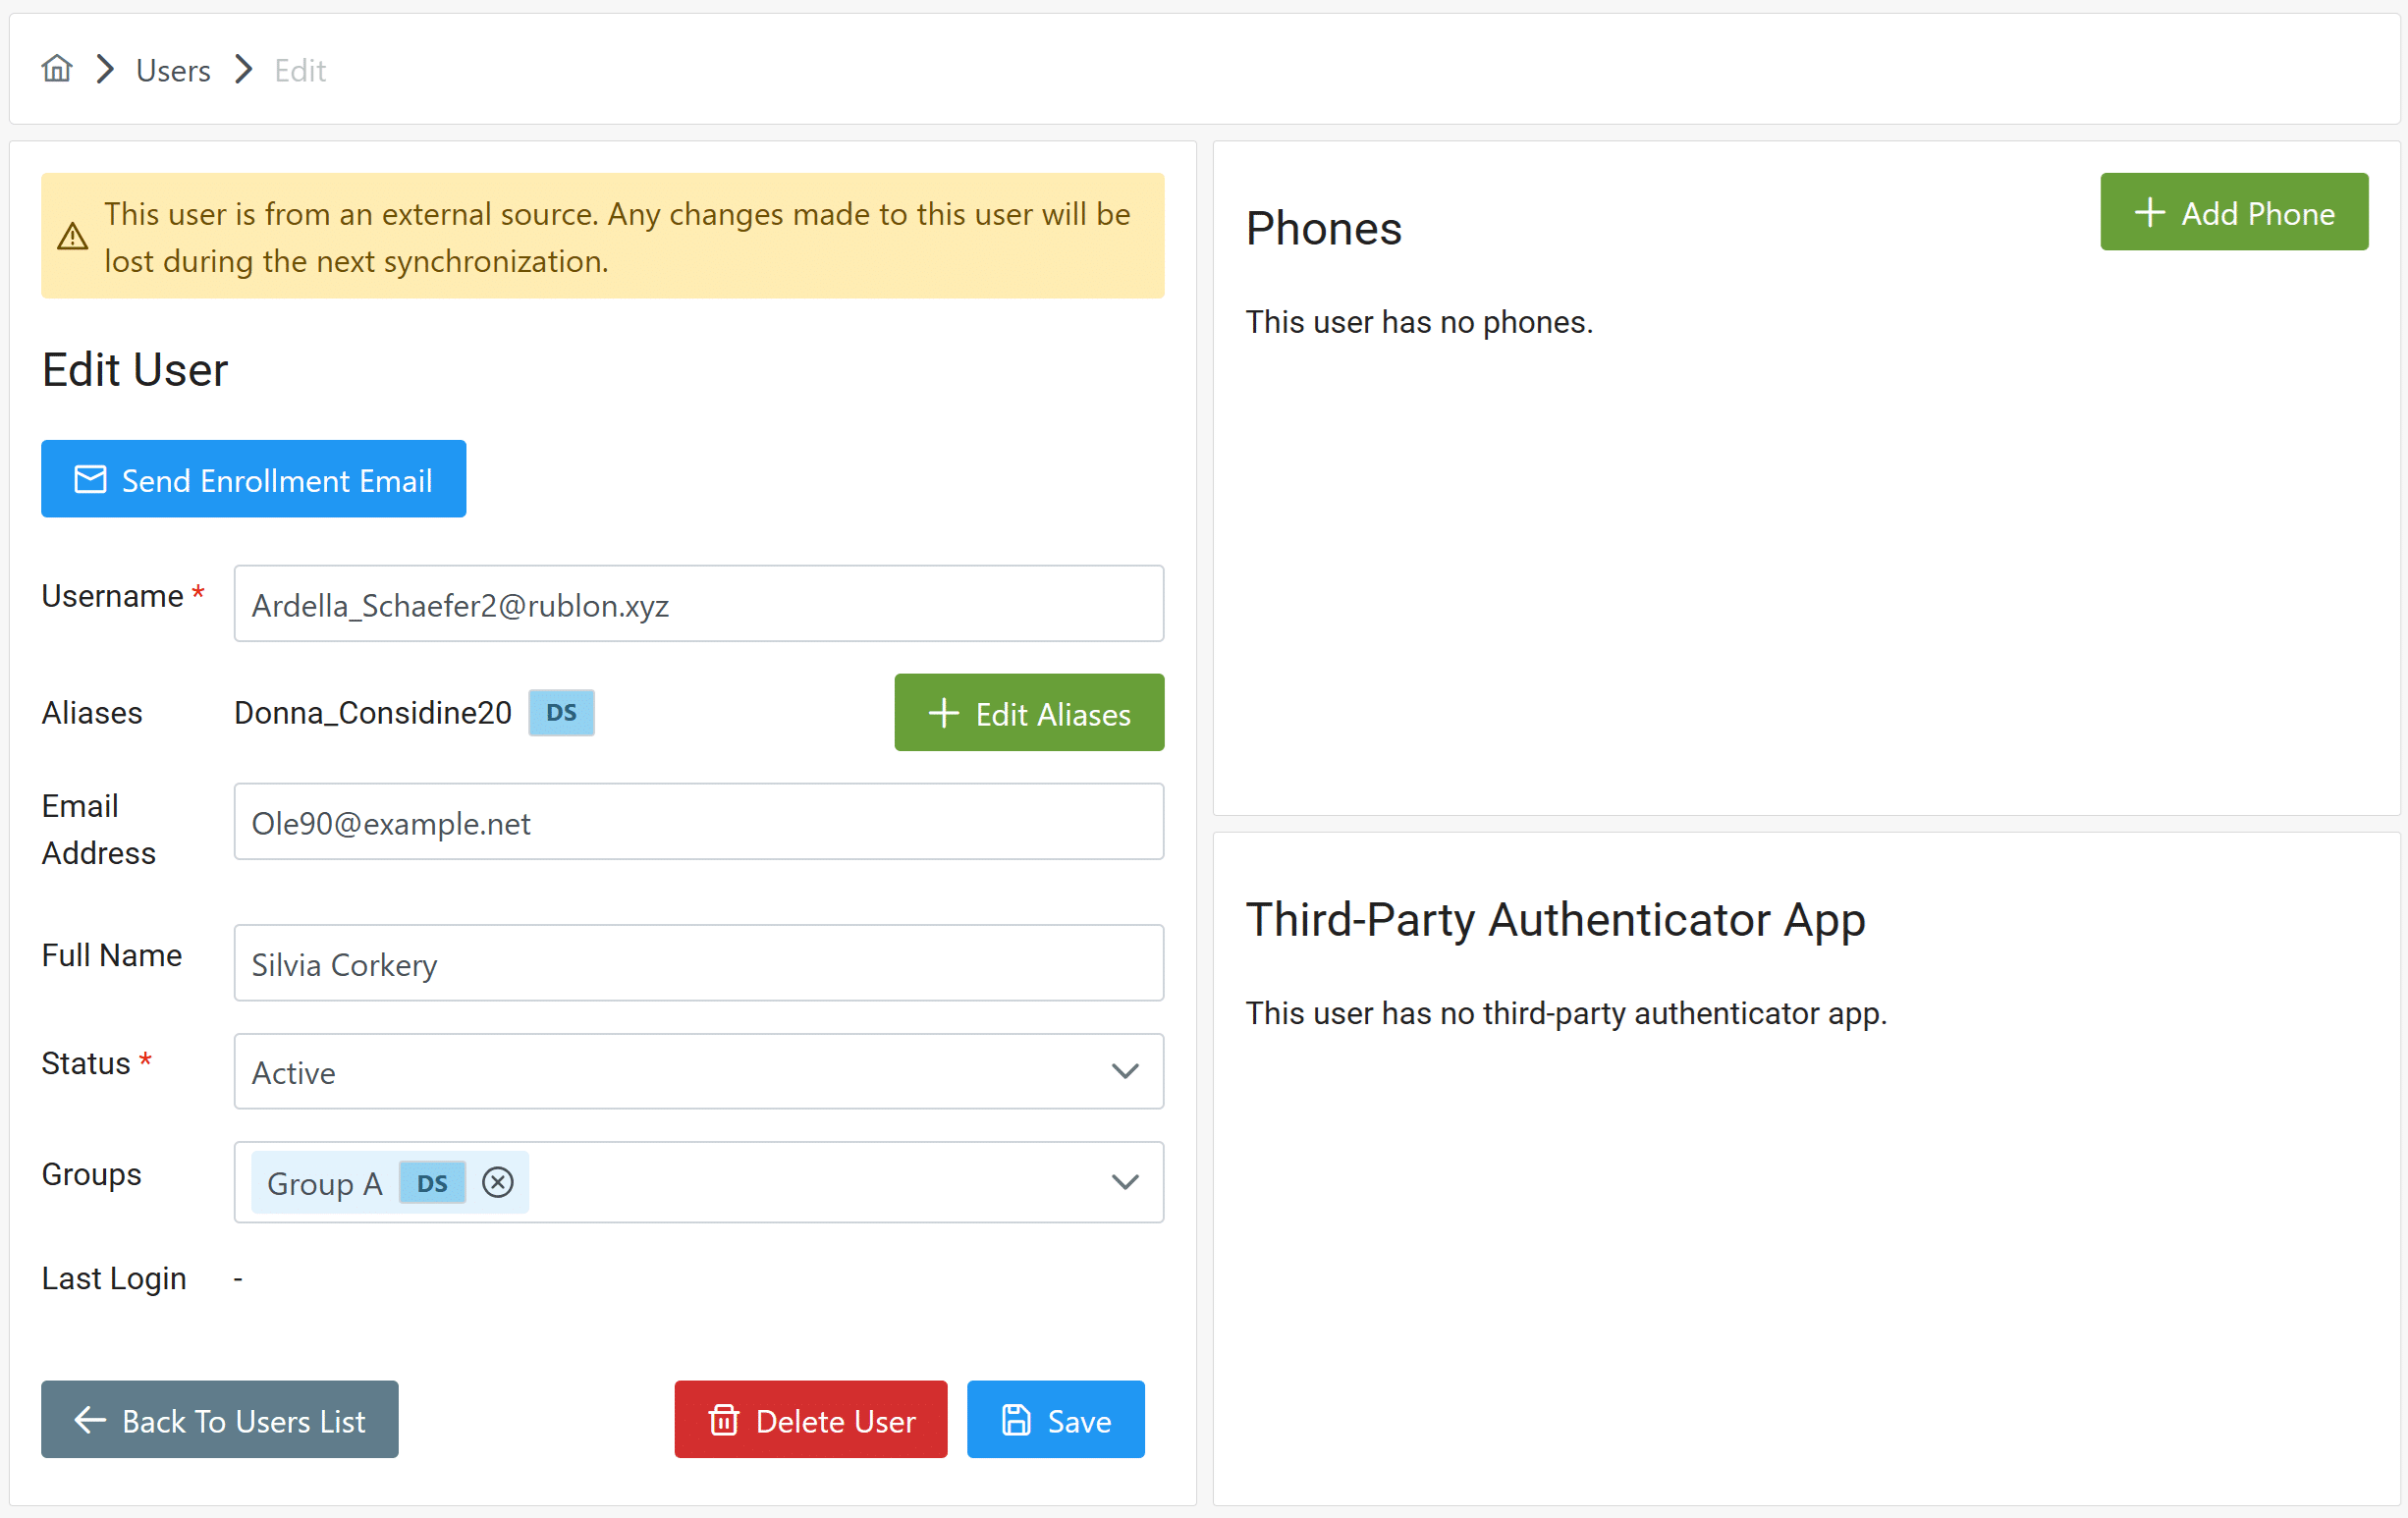
4. Clicking the link in the Username column will show the Edit User view with more information about the user, including the groups this user is a member of. Note that user aliases from Entra ID will also be synced if they exist.
You can browse and edit groups synchronized from Entra ID in the Groups tab. Groups synchronized from Entra ID will have a DS badge.
User phone numbers synced from Entra ID can be viewed in the Phones tab.
5. In Reports → Audit Logs, you can see information about synchronizations: when they were started and whether they were completed successfully. For a full list of possible events, refer to this table.
Deleting Entra ID Sync Configuration
1. Sign in to the Rublon Admin Console.
2. Expand the Users tab and select the Directory Sync tab.
3. Find the configuration you would like to delete.
4. Click the trash bin icon under Delete.
5. You will be asked to confirm that you would like to delete the configuration. You cannot revert this.
6. Click Delete to delete the configuration.
Note
Deleting an Entra ID Sync configuration does not delete any users or groups. After deletion, users and groups with the DS badge remain in the Admin Console.
Troubleshooting
If you have a problem or question, refer to Entra ID Sync – FAQ first.
If you encounter any issues not described in our FAQ, please contact Rublon Support.
Related Posts
Rublon Admin Console – Documentation
How to synchronize users from Active Directory using Directory Sync