Last updated on July 6, 2026
Overview
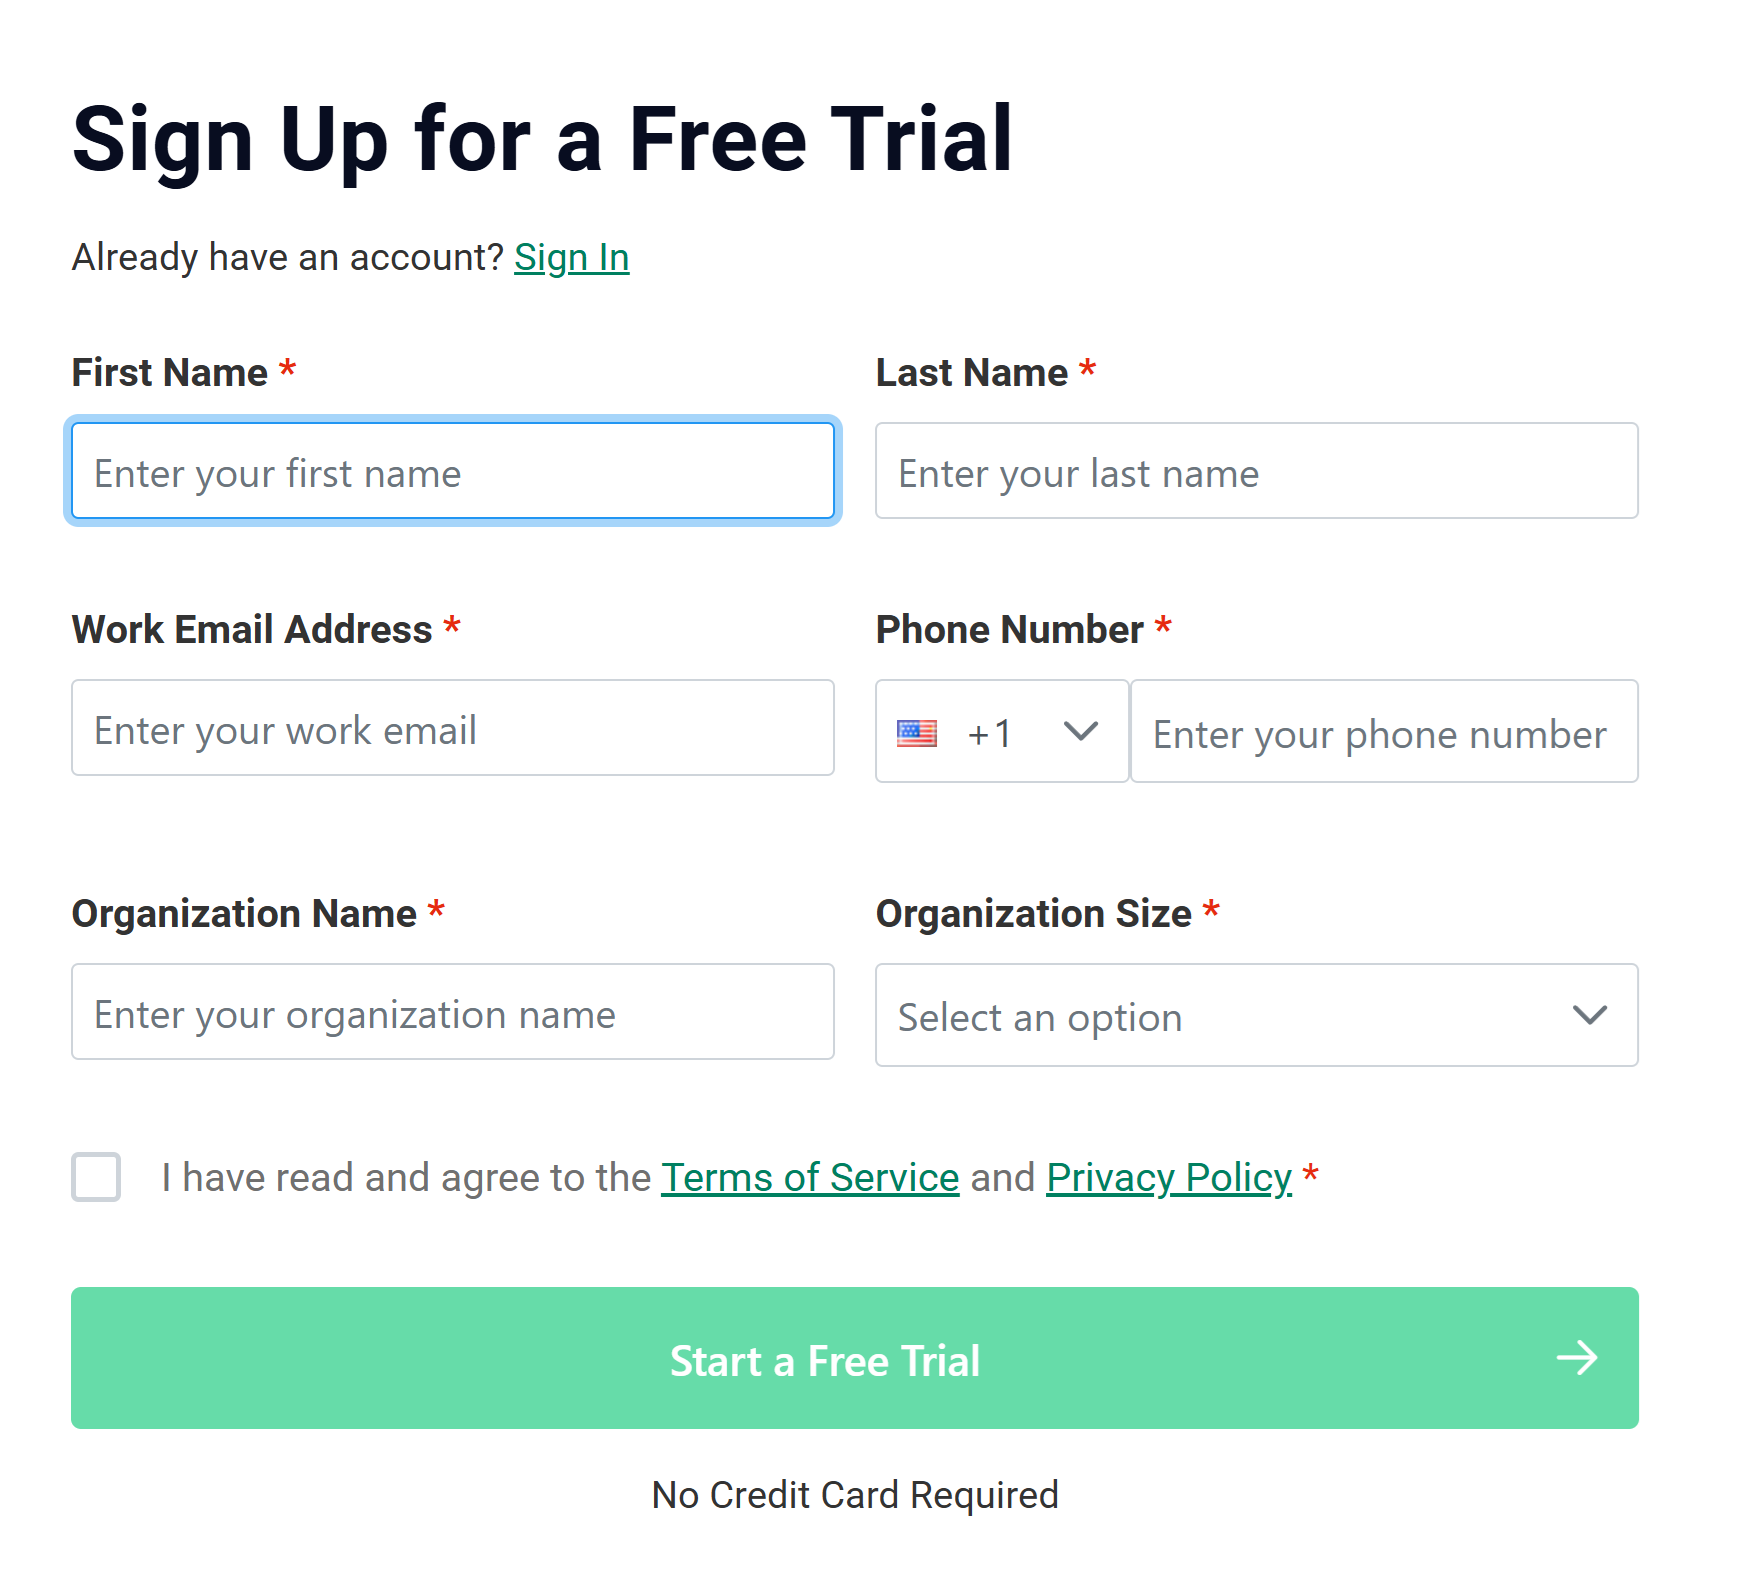
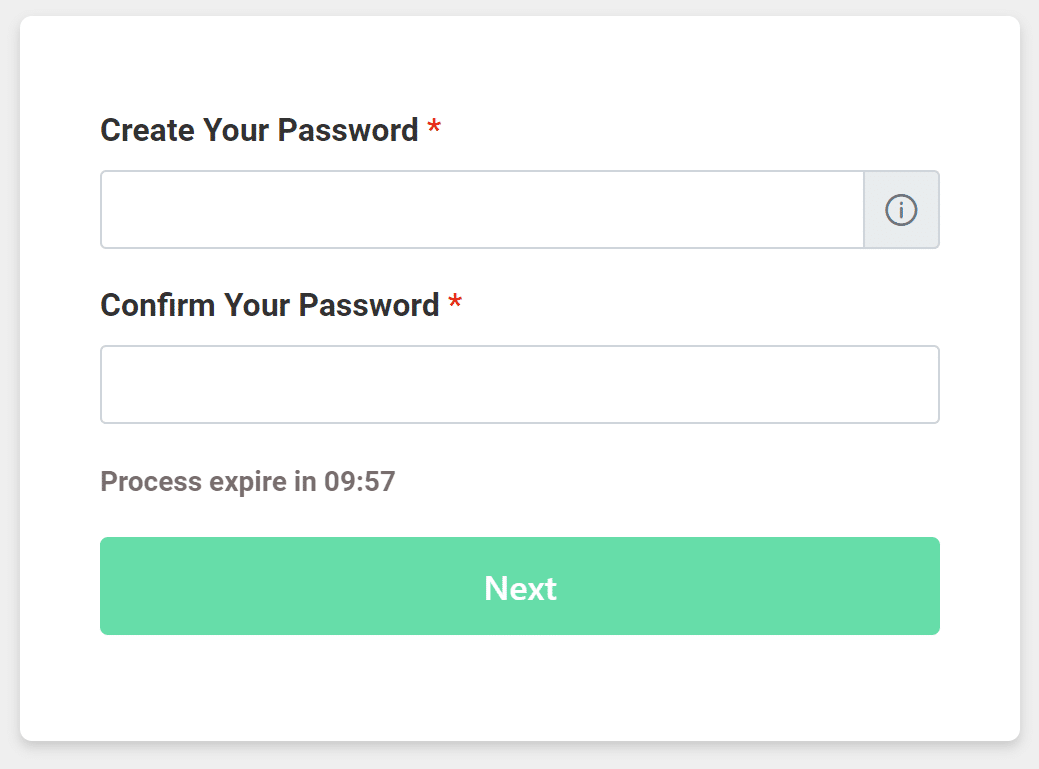
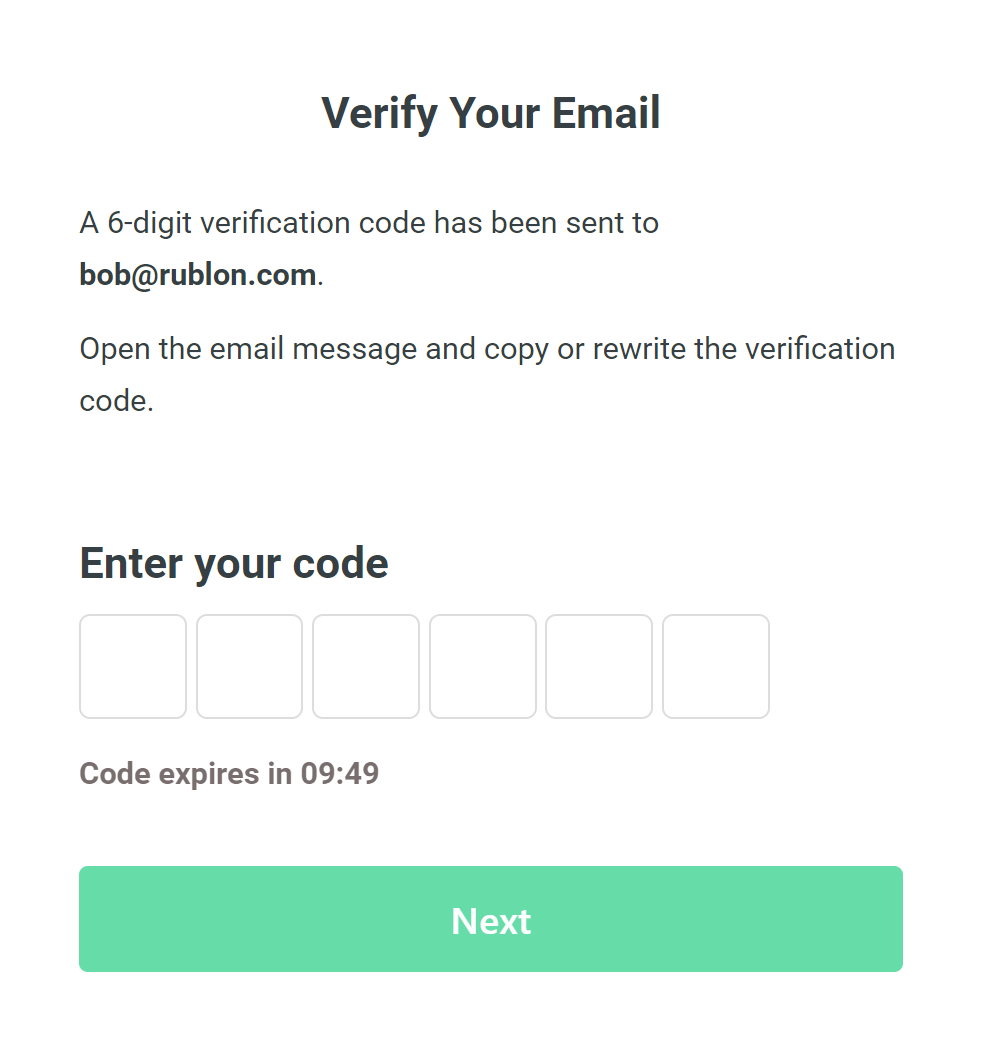
Rublon MFA Account Registration


Note

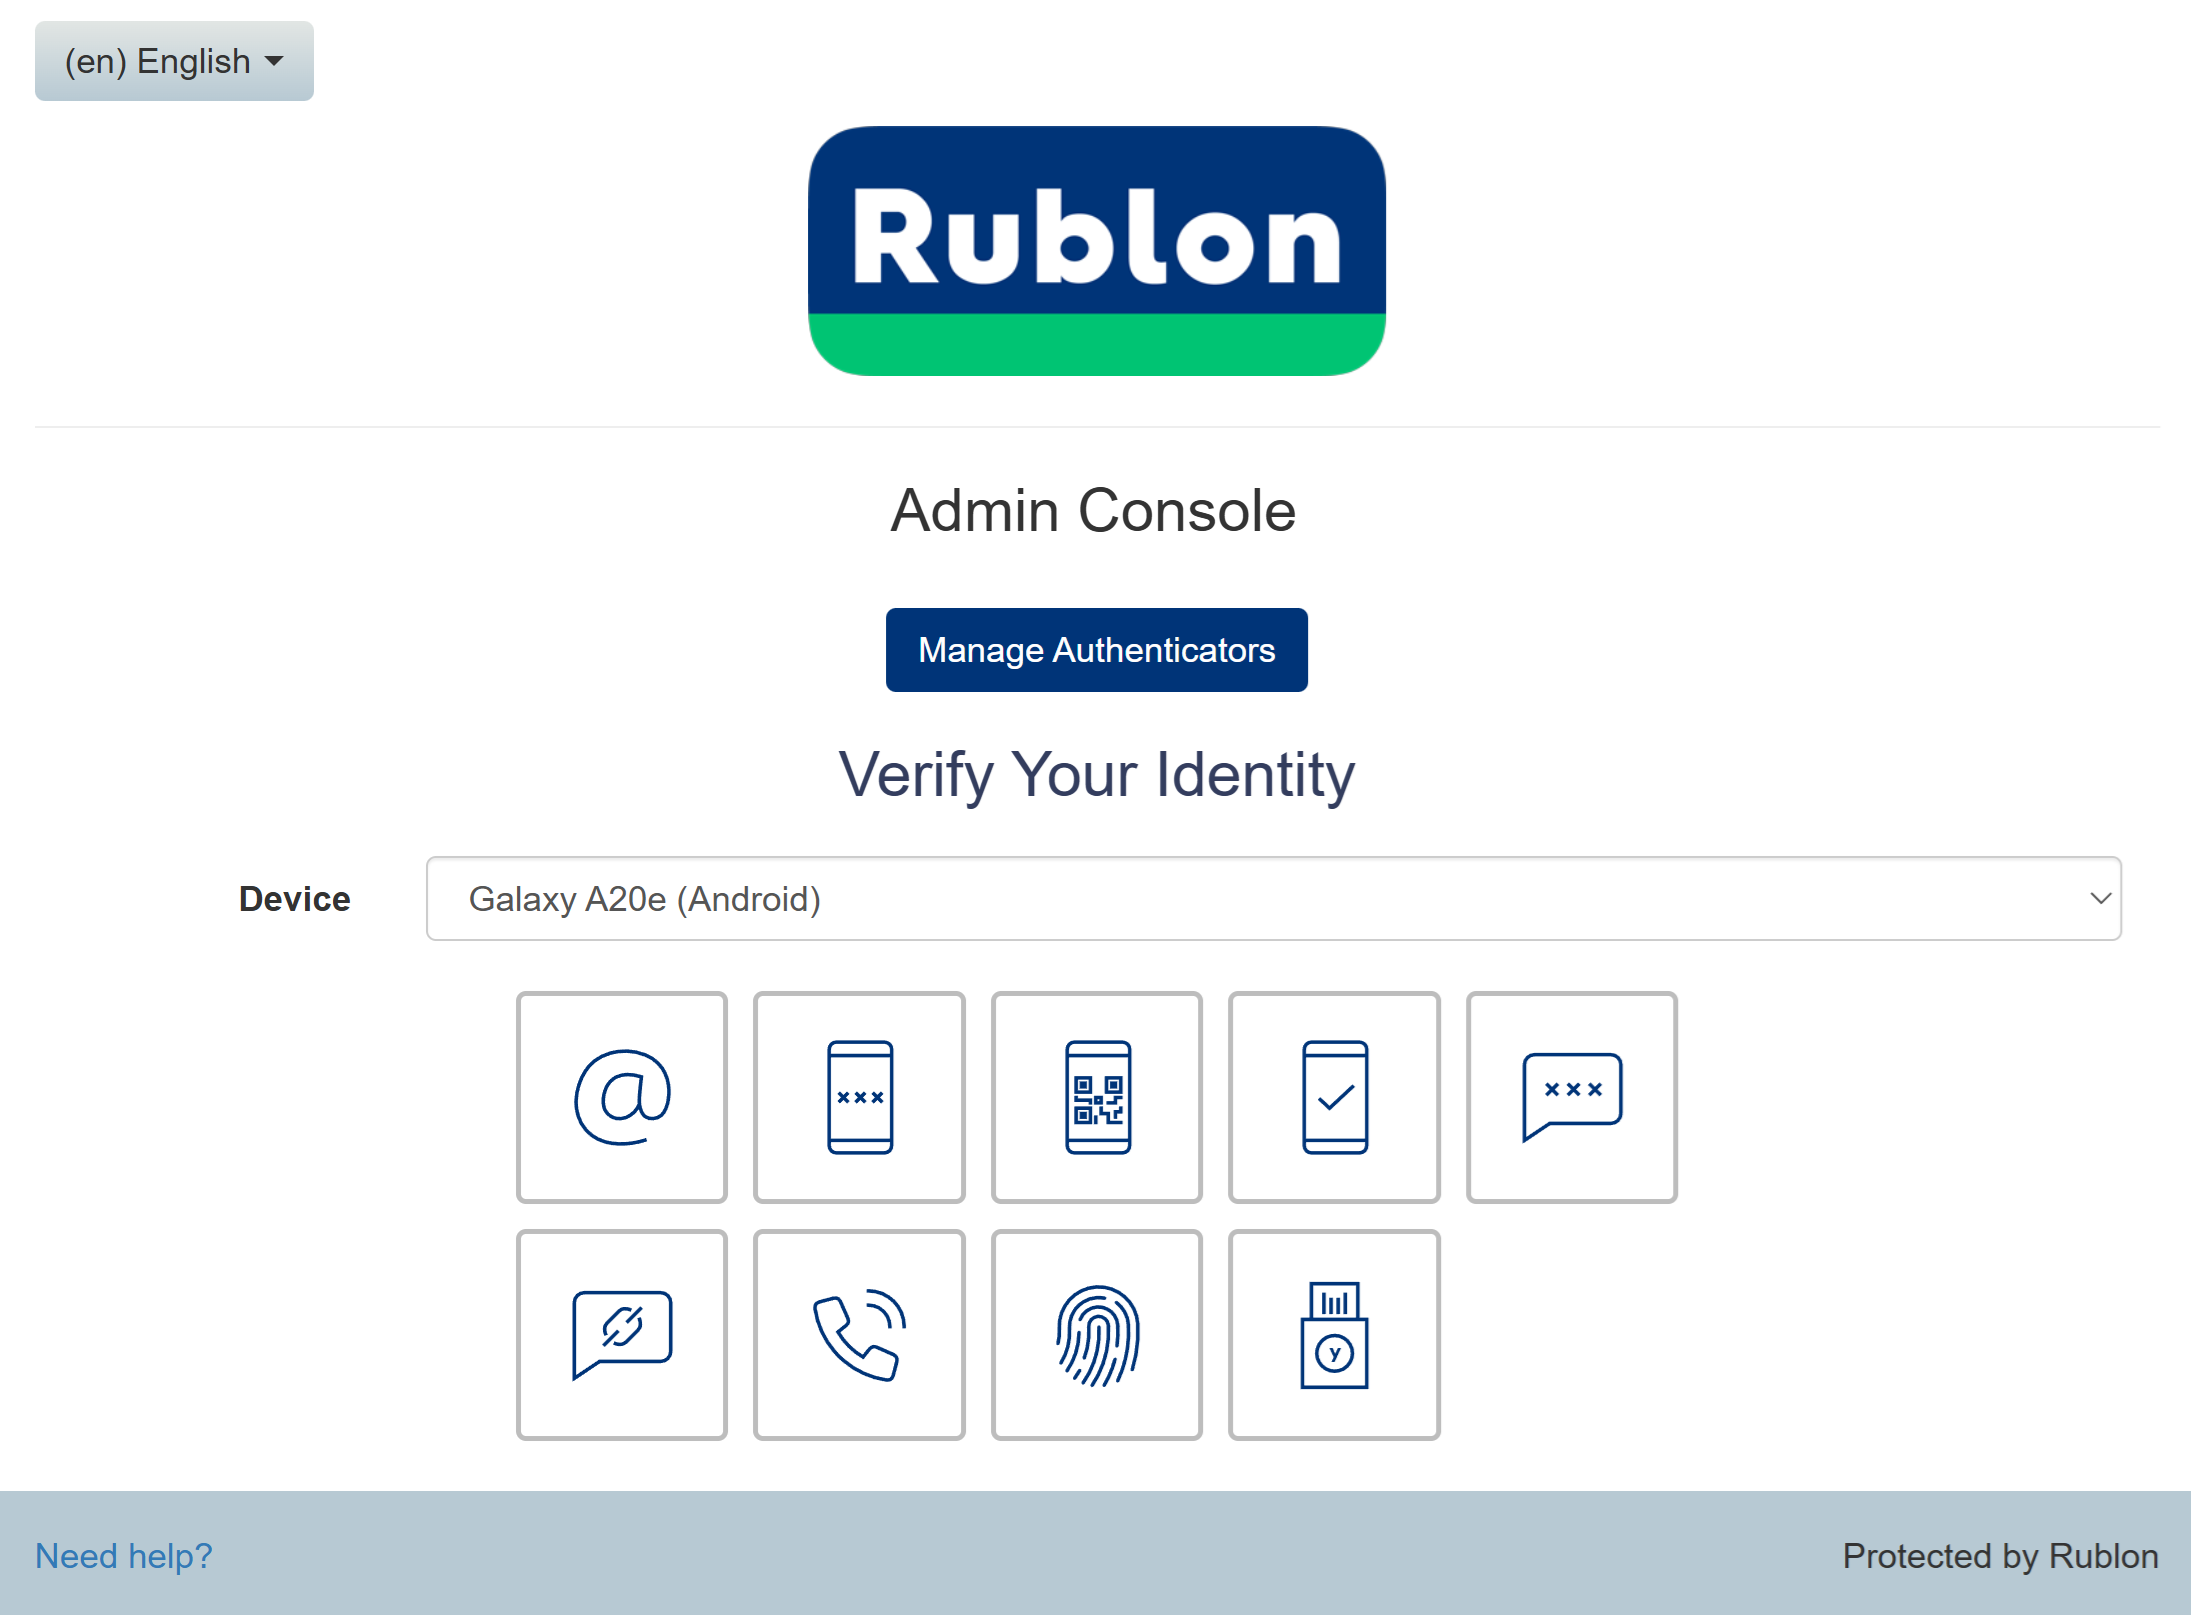
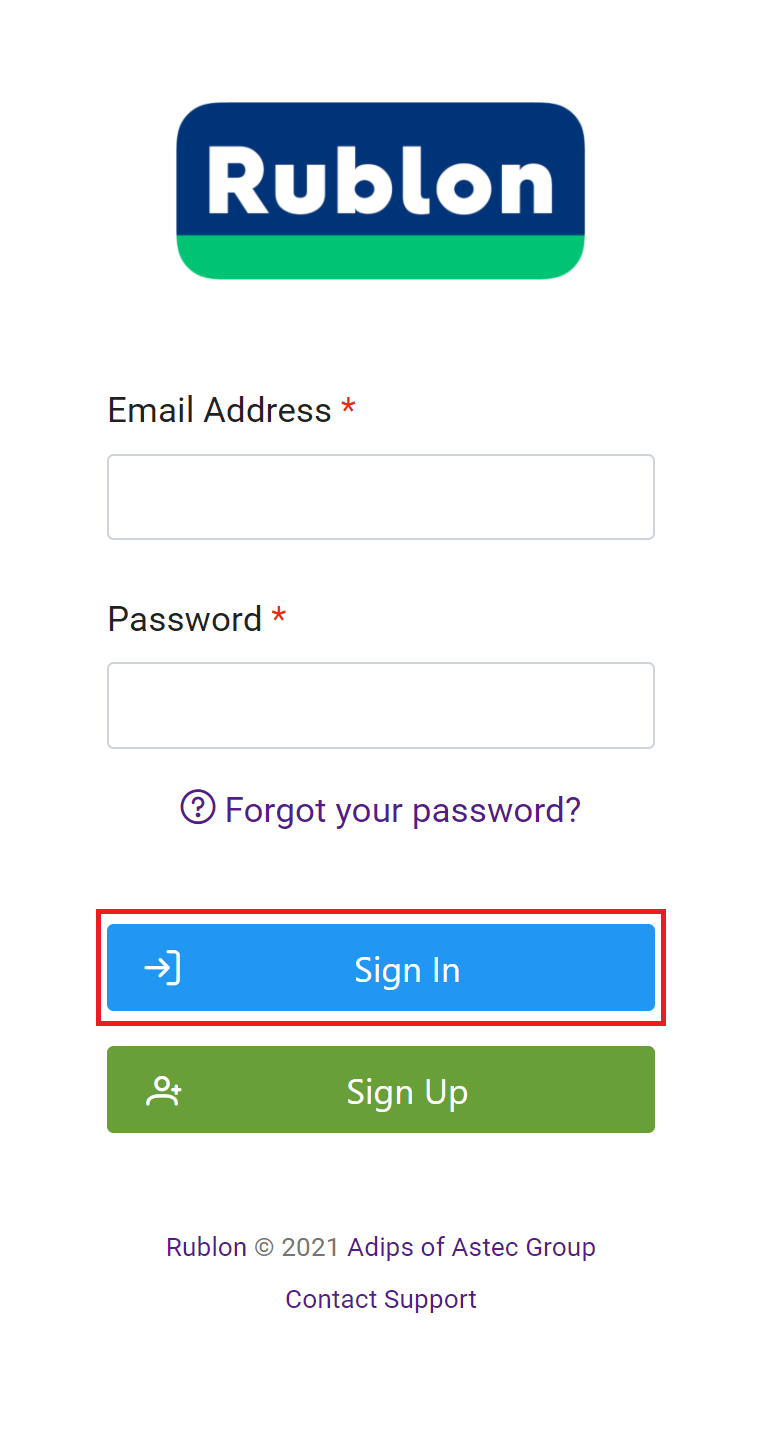
Sign in to Rublon Admin Console

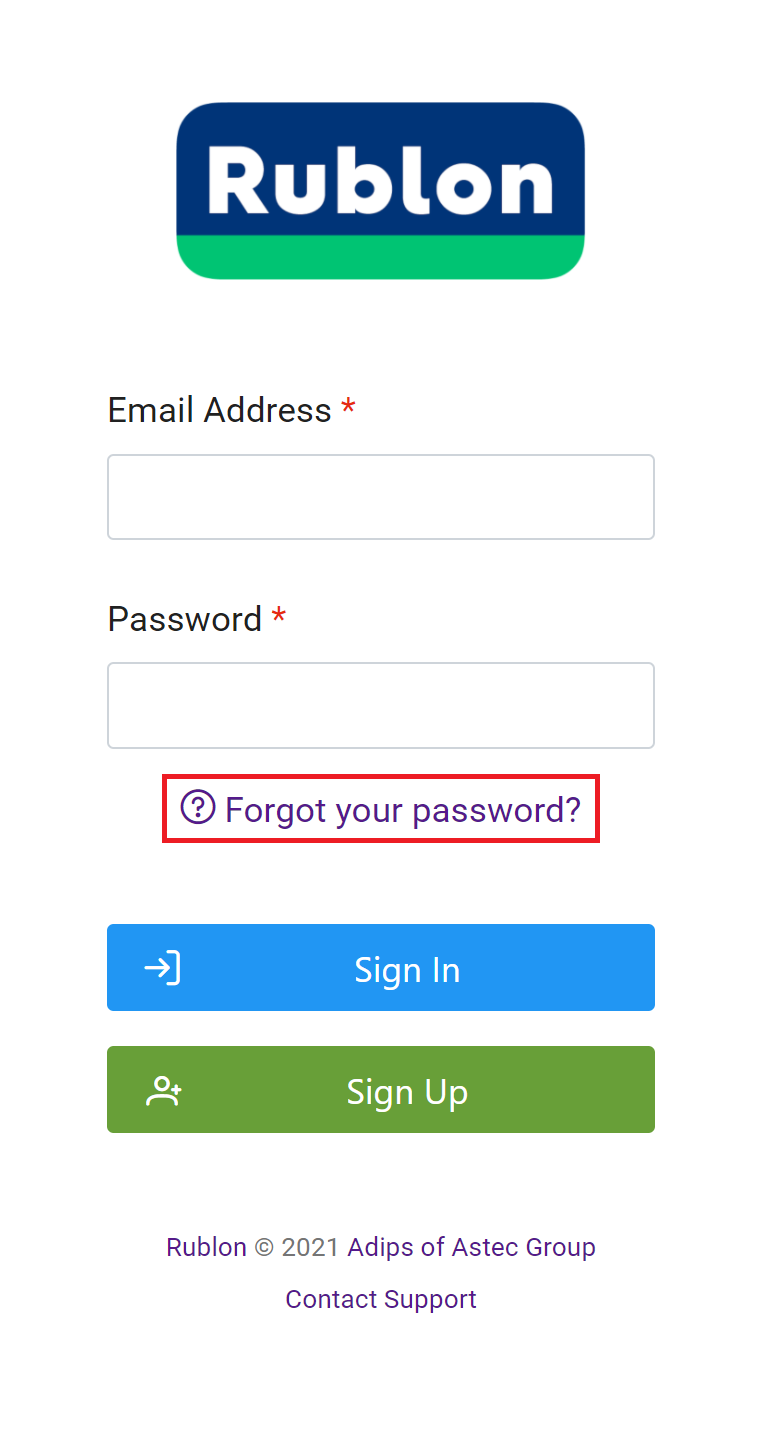
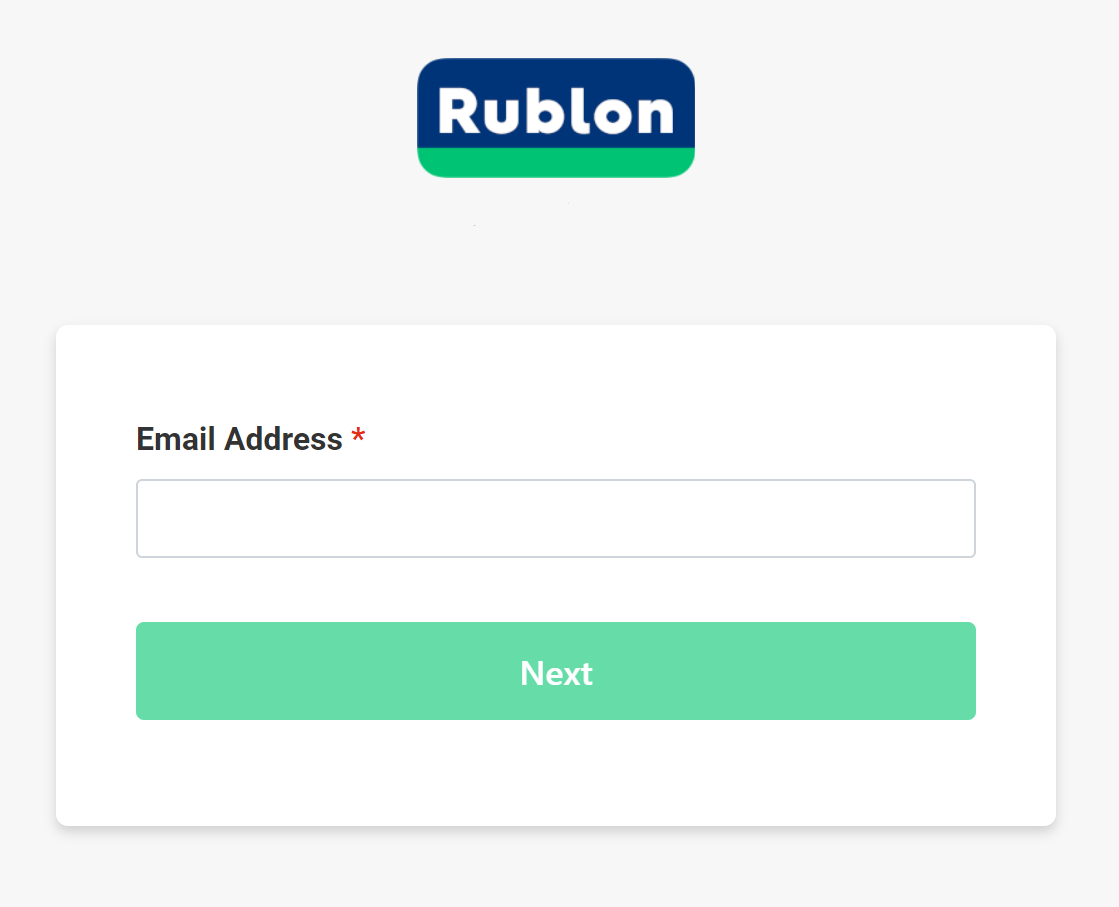
Password Reset


Configuration
Dashboard

Applications

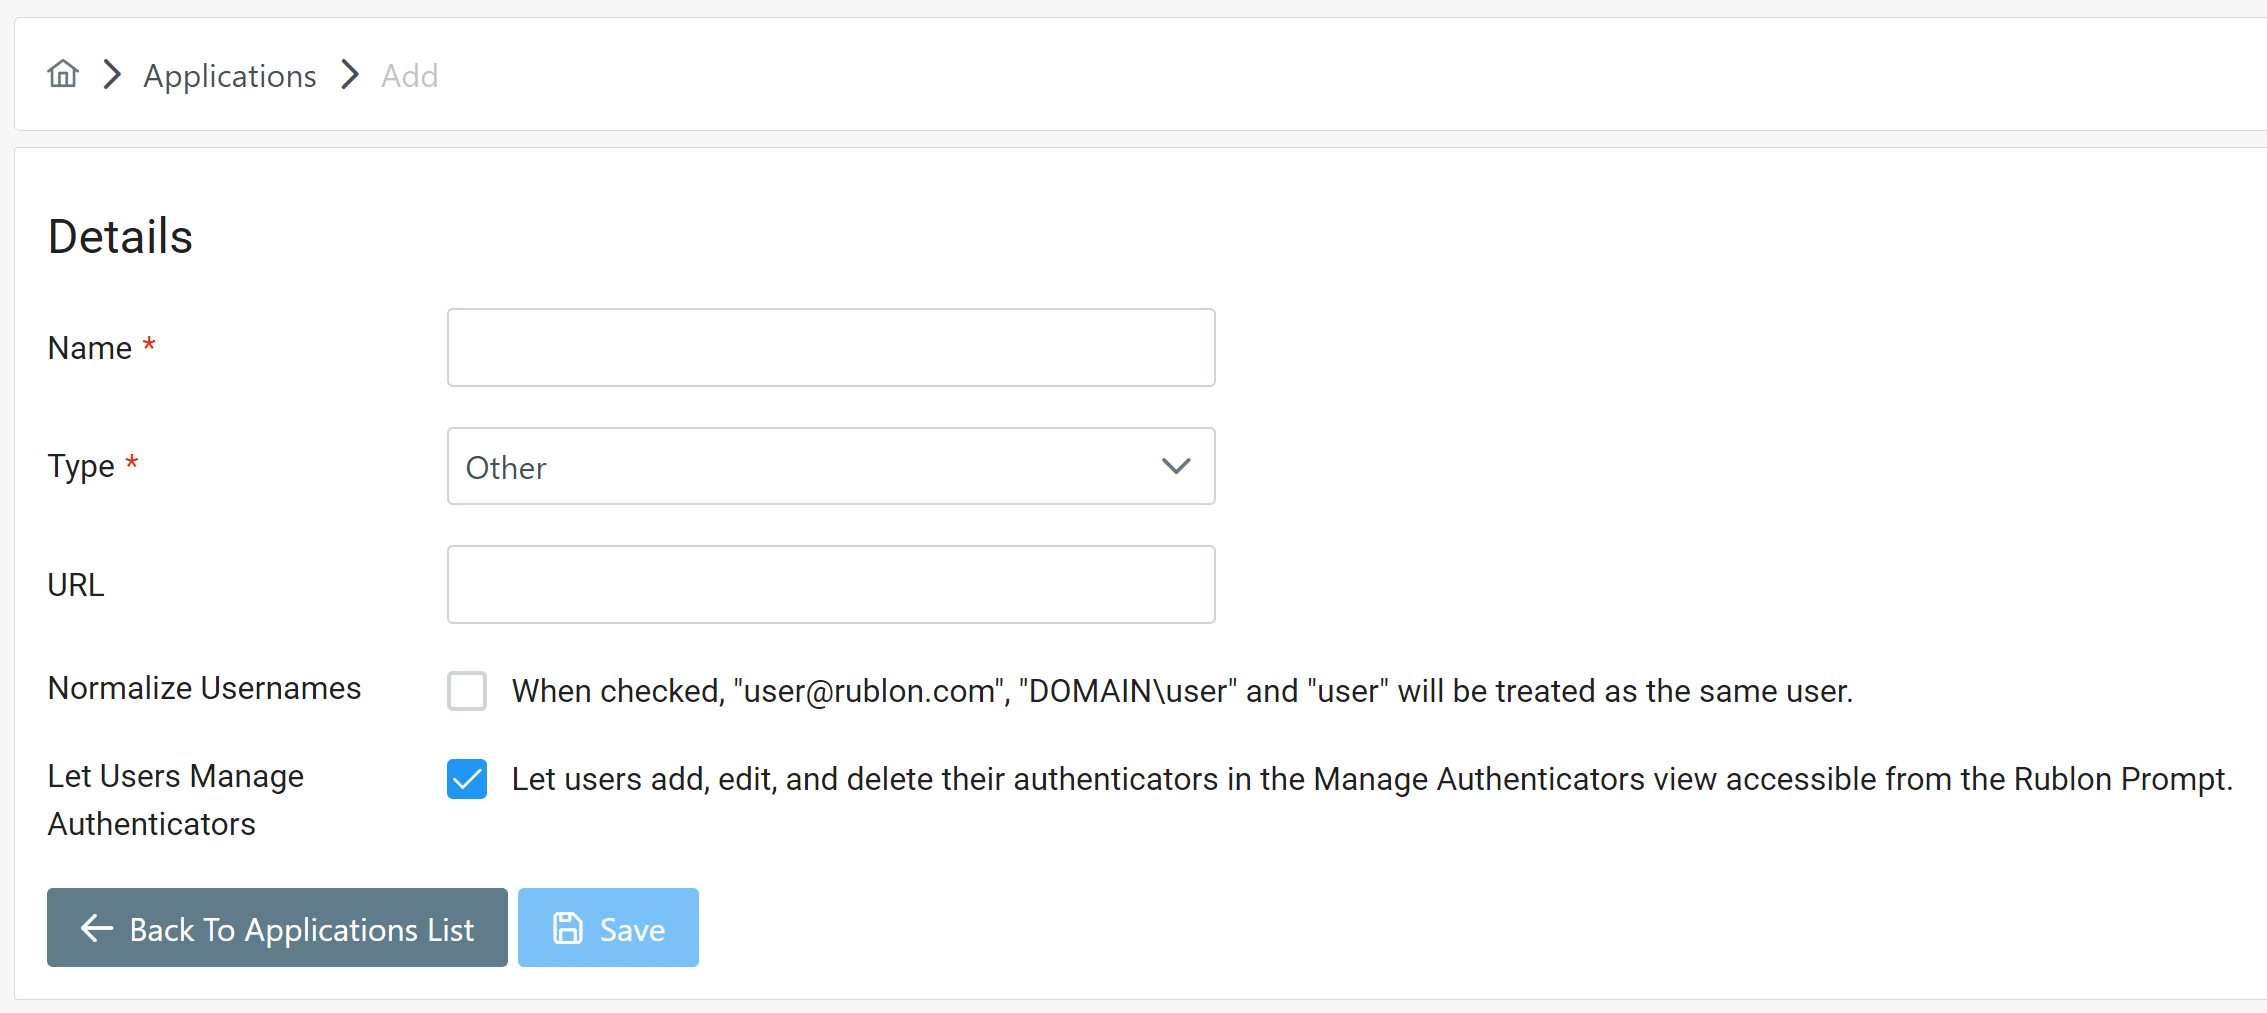
How to add an application
Note
How to edit an application


How to assign Application Policy to an application

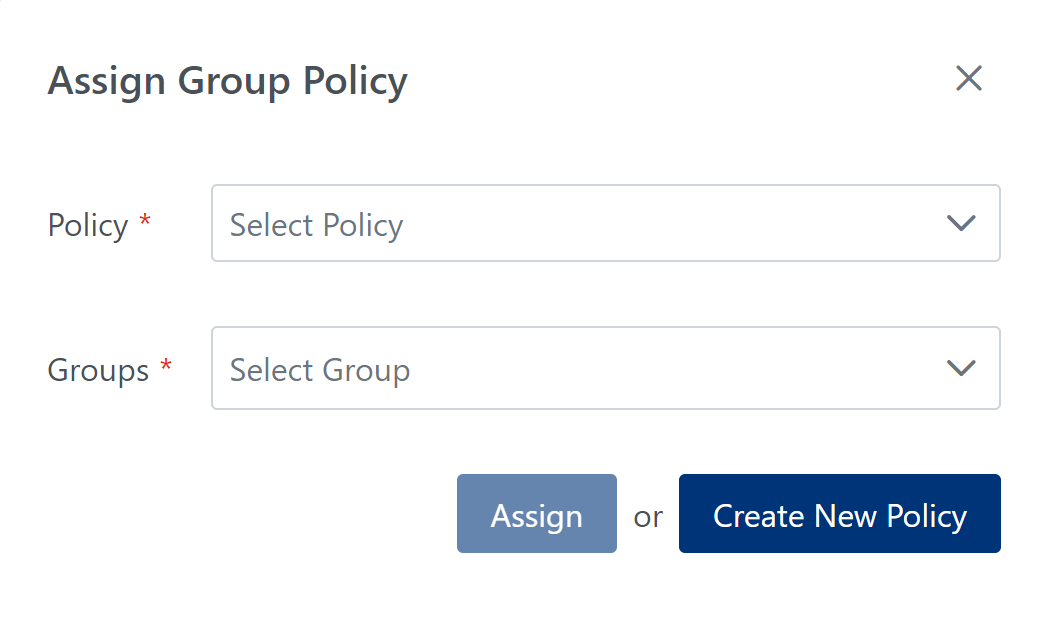
How to assign Group Policies to groups within an application
How to delete an application

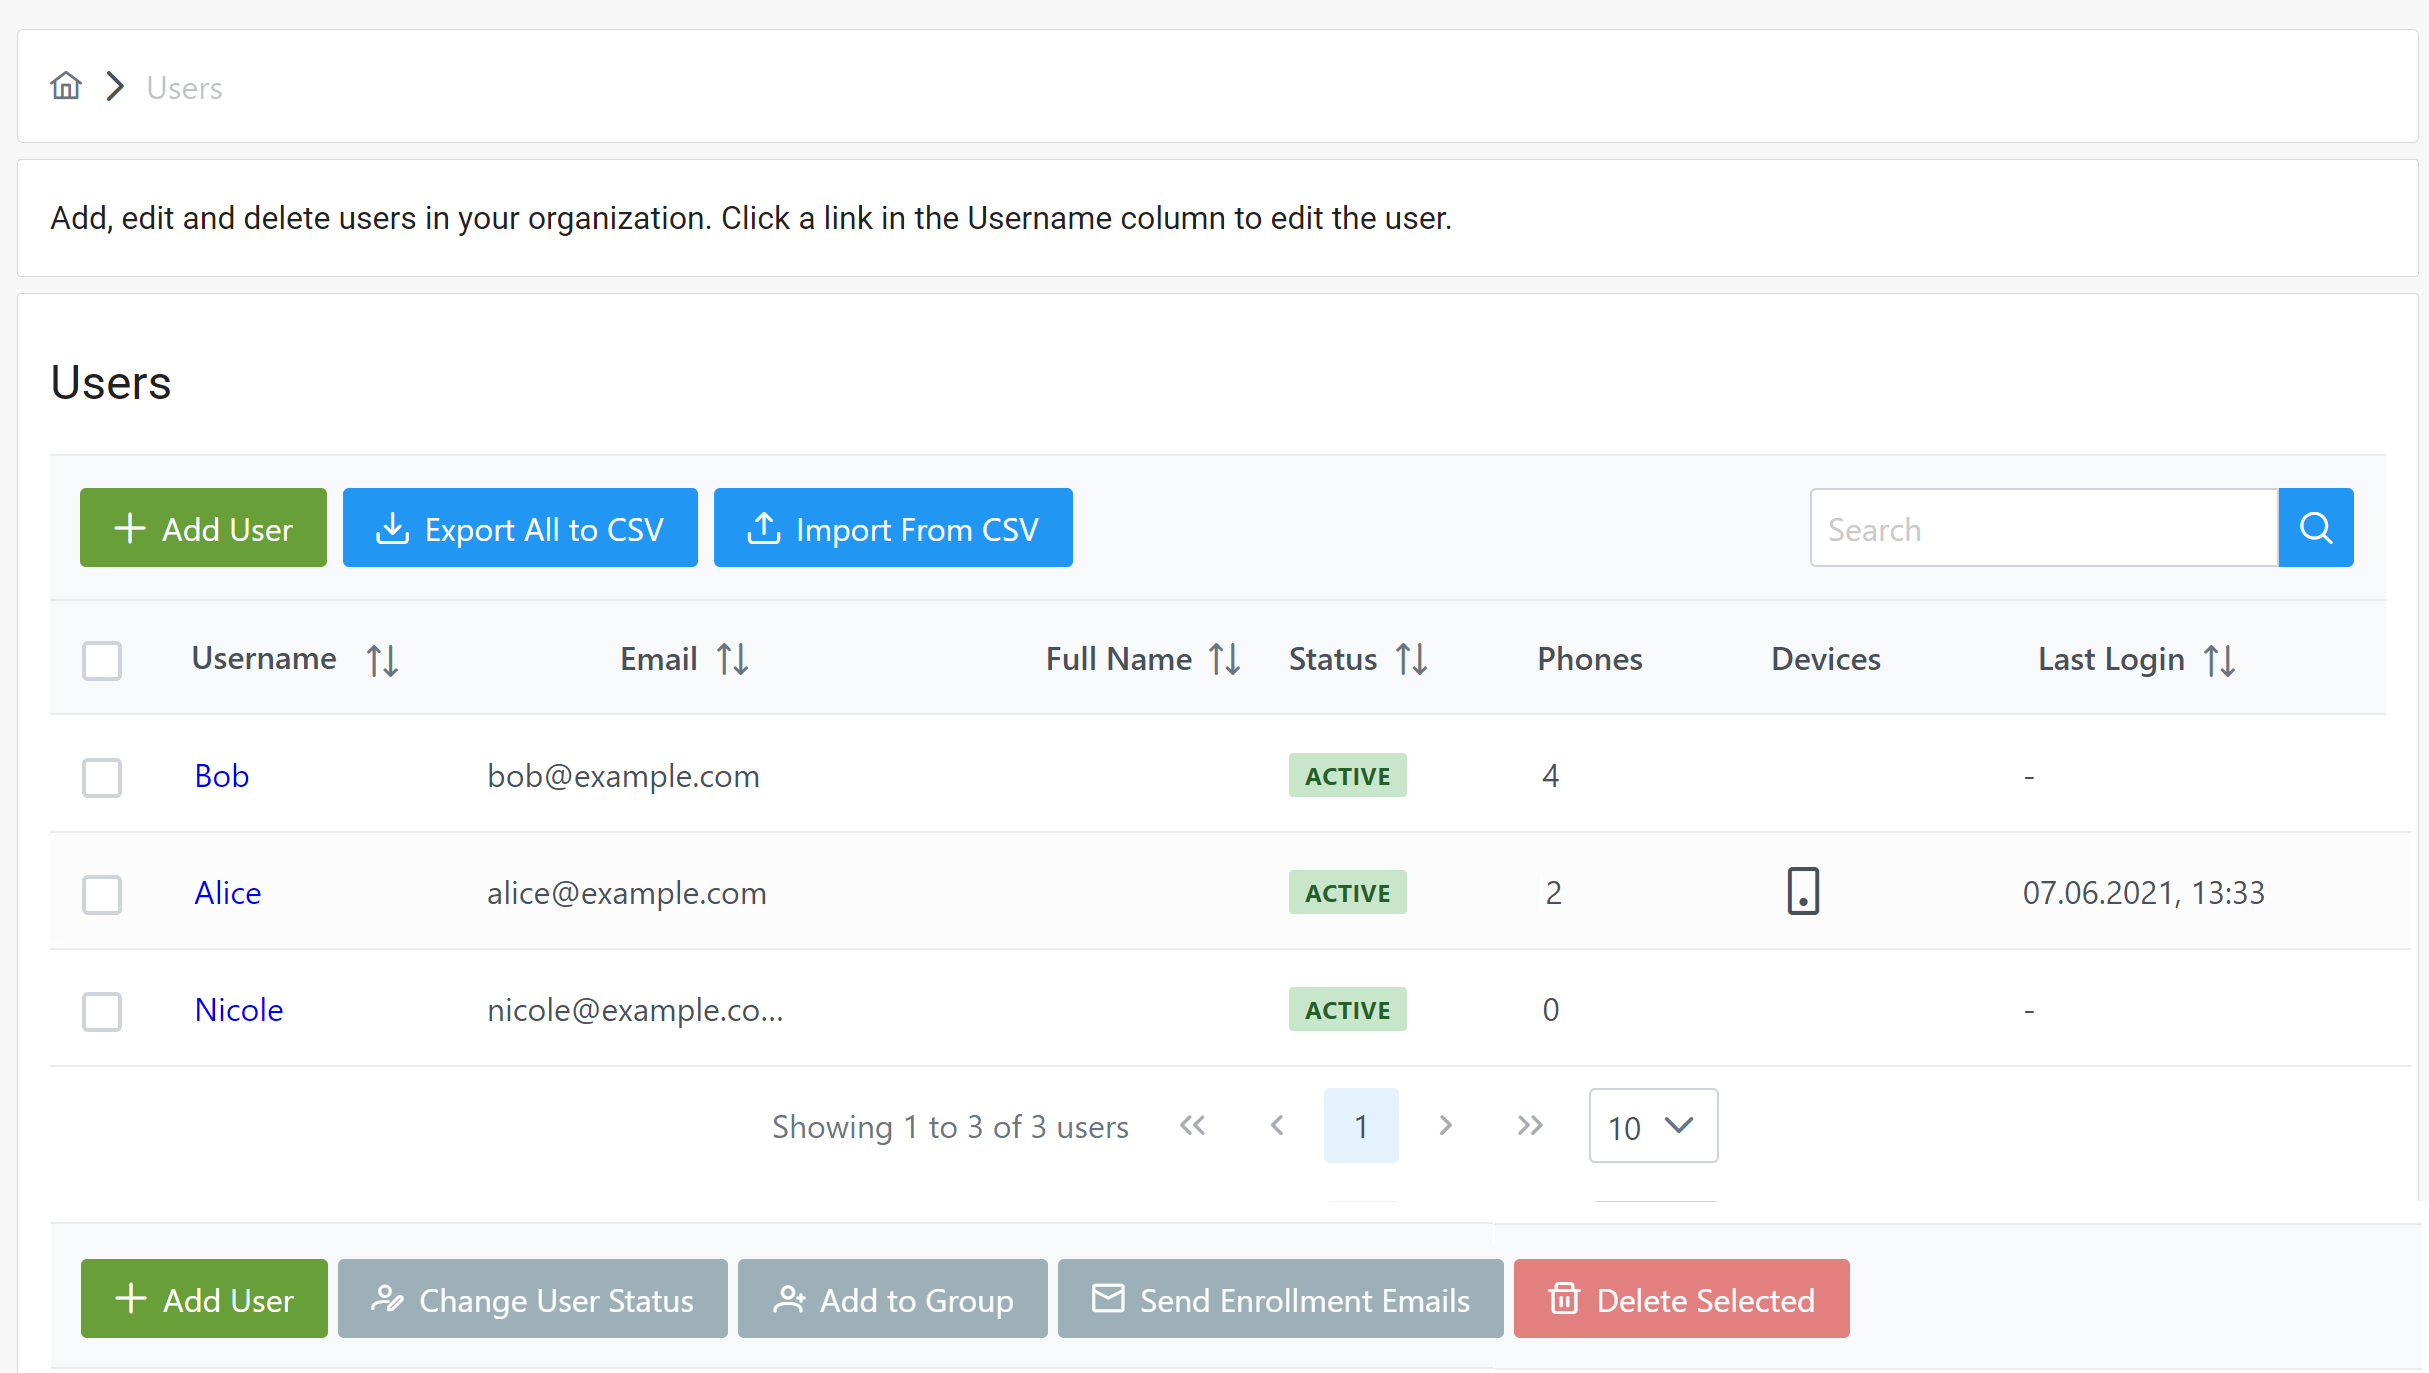
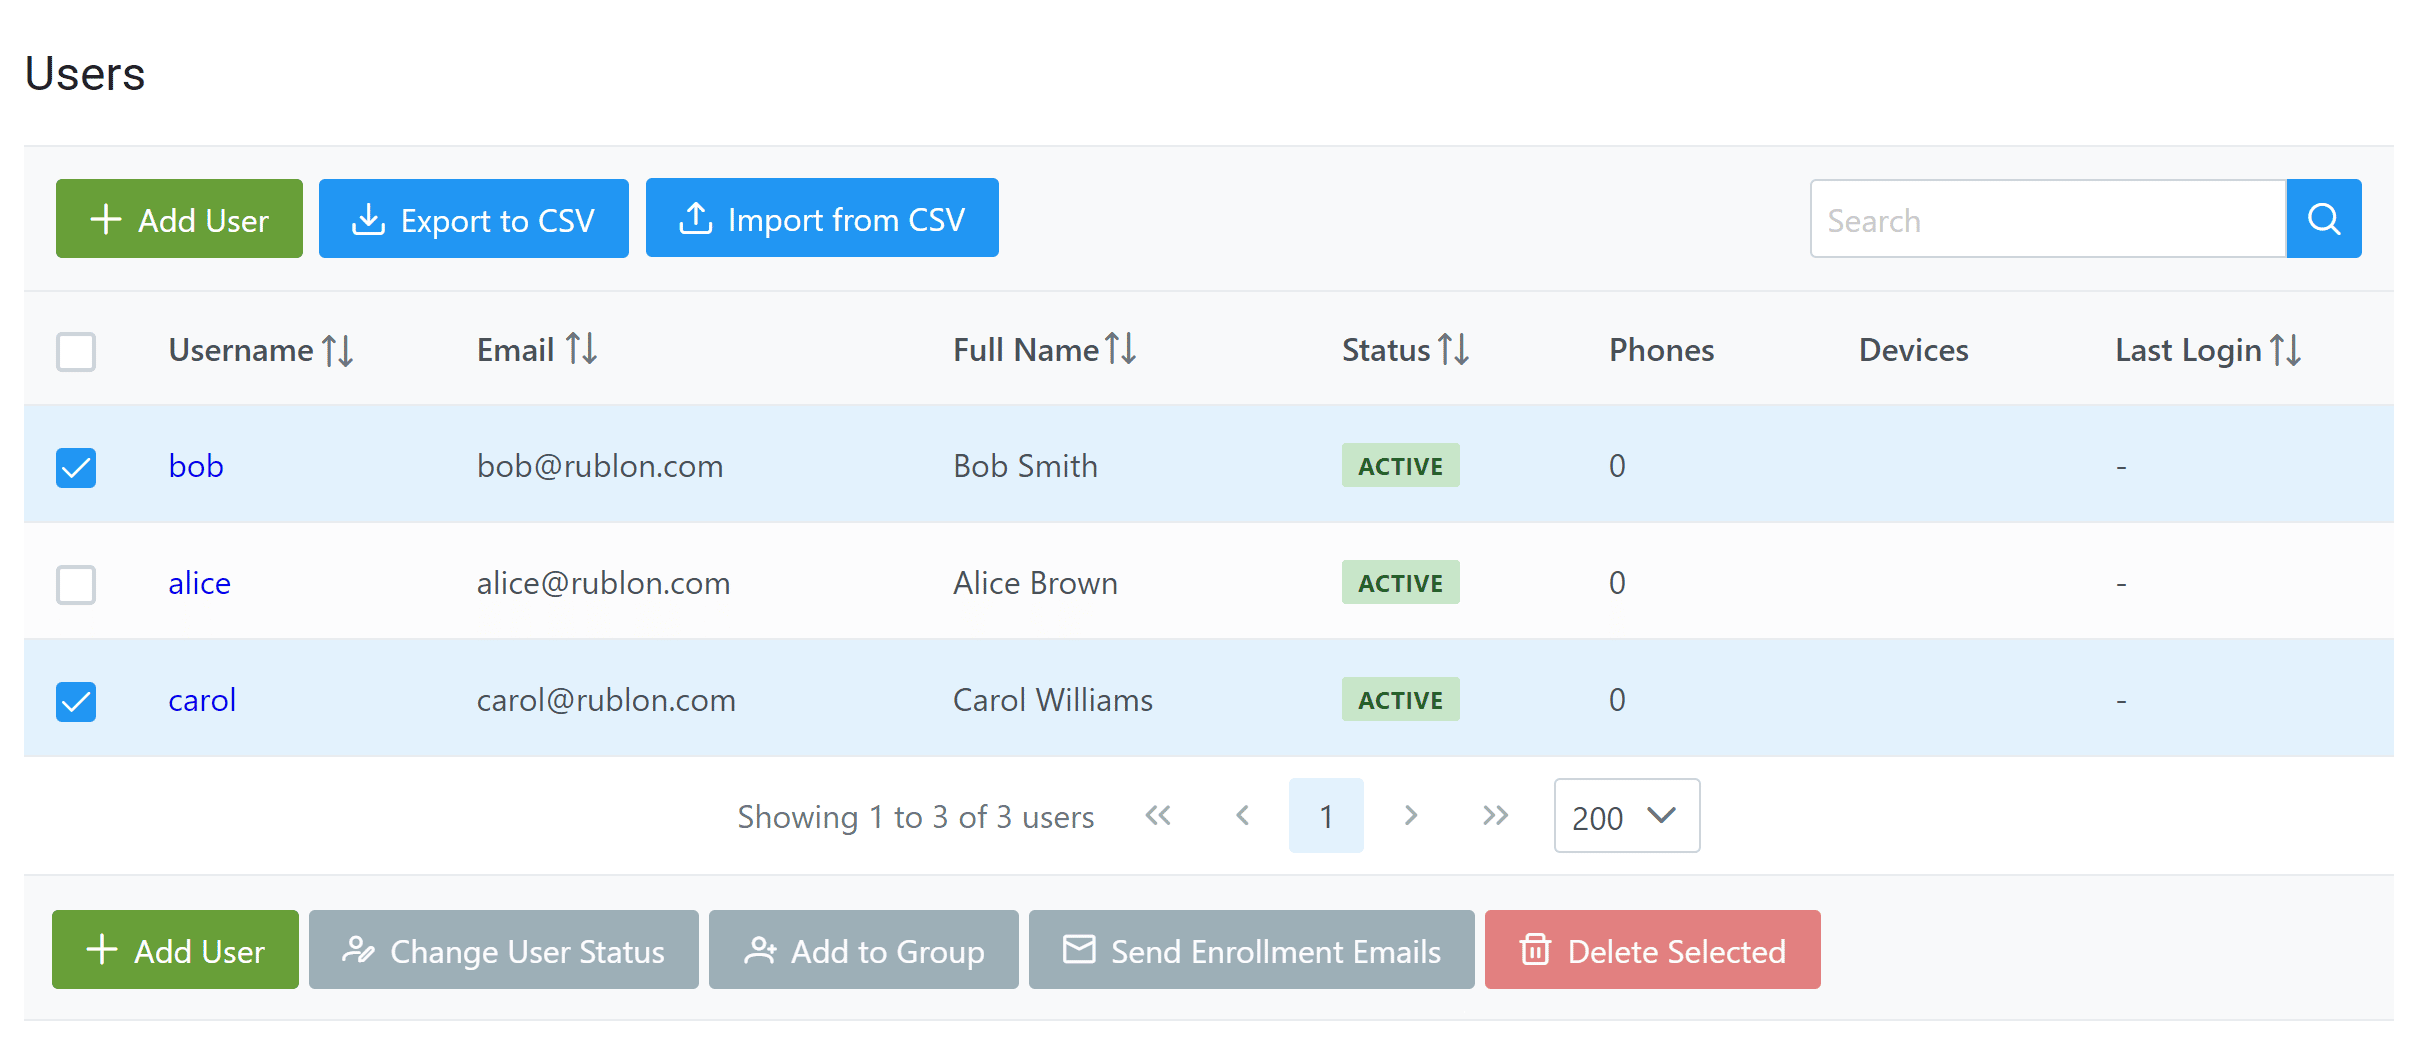
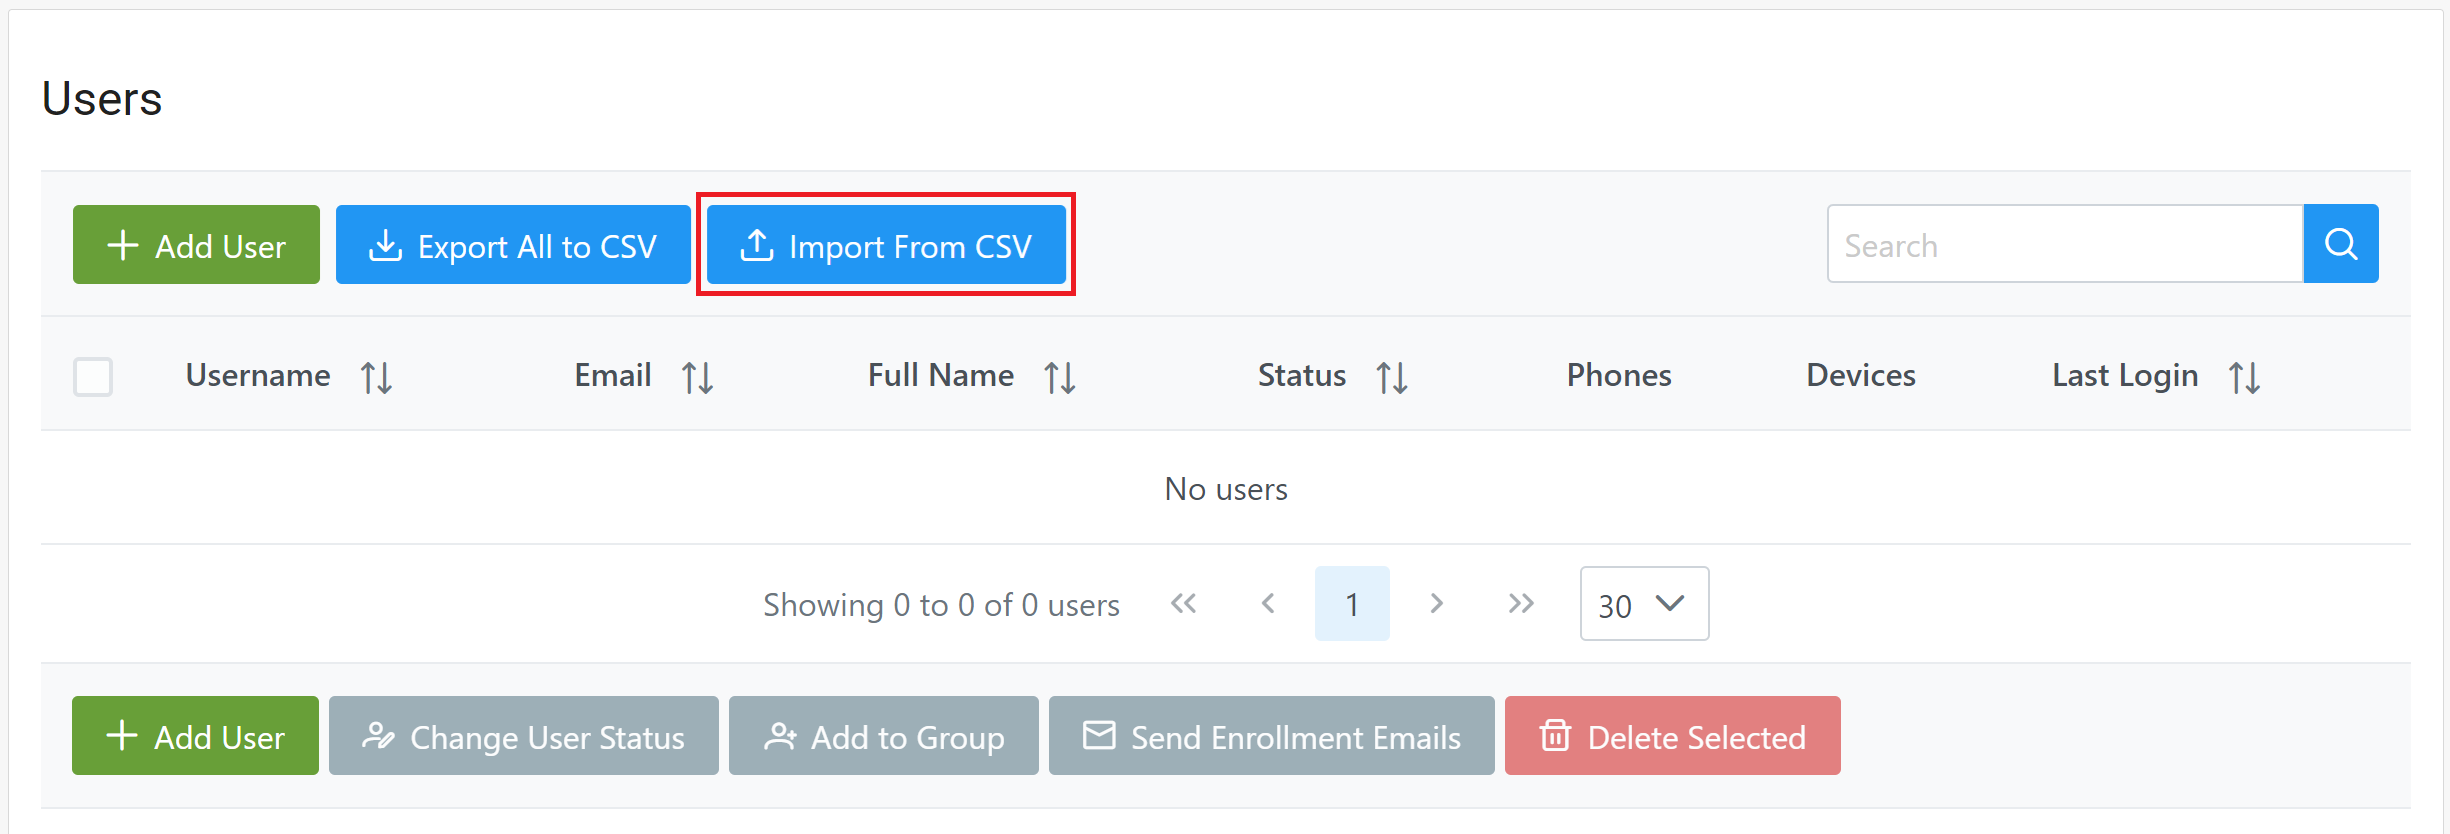
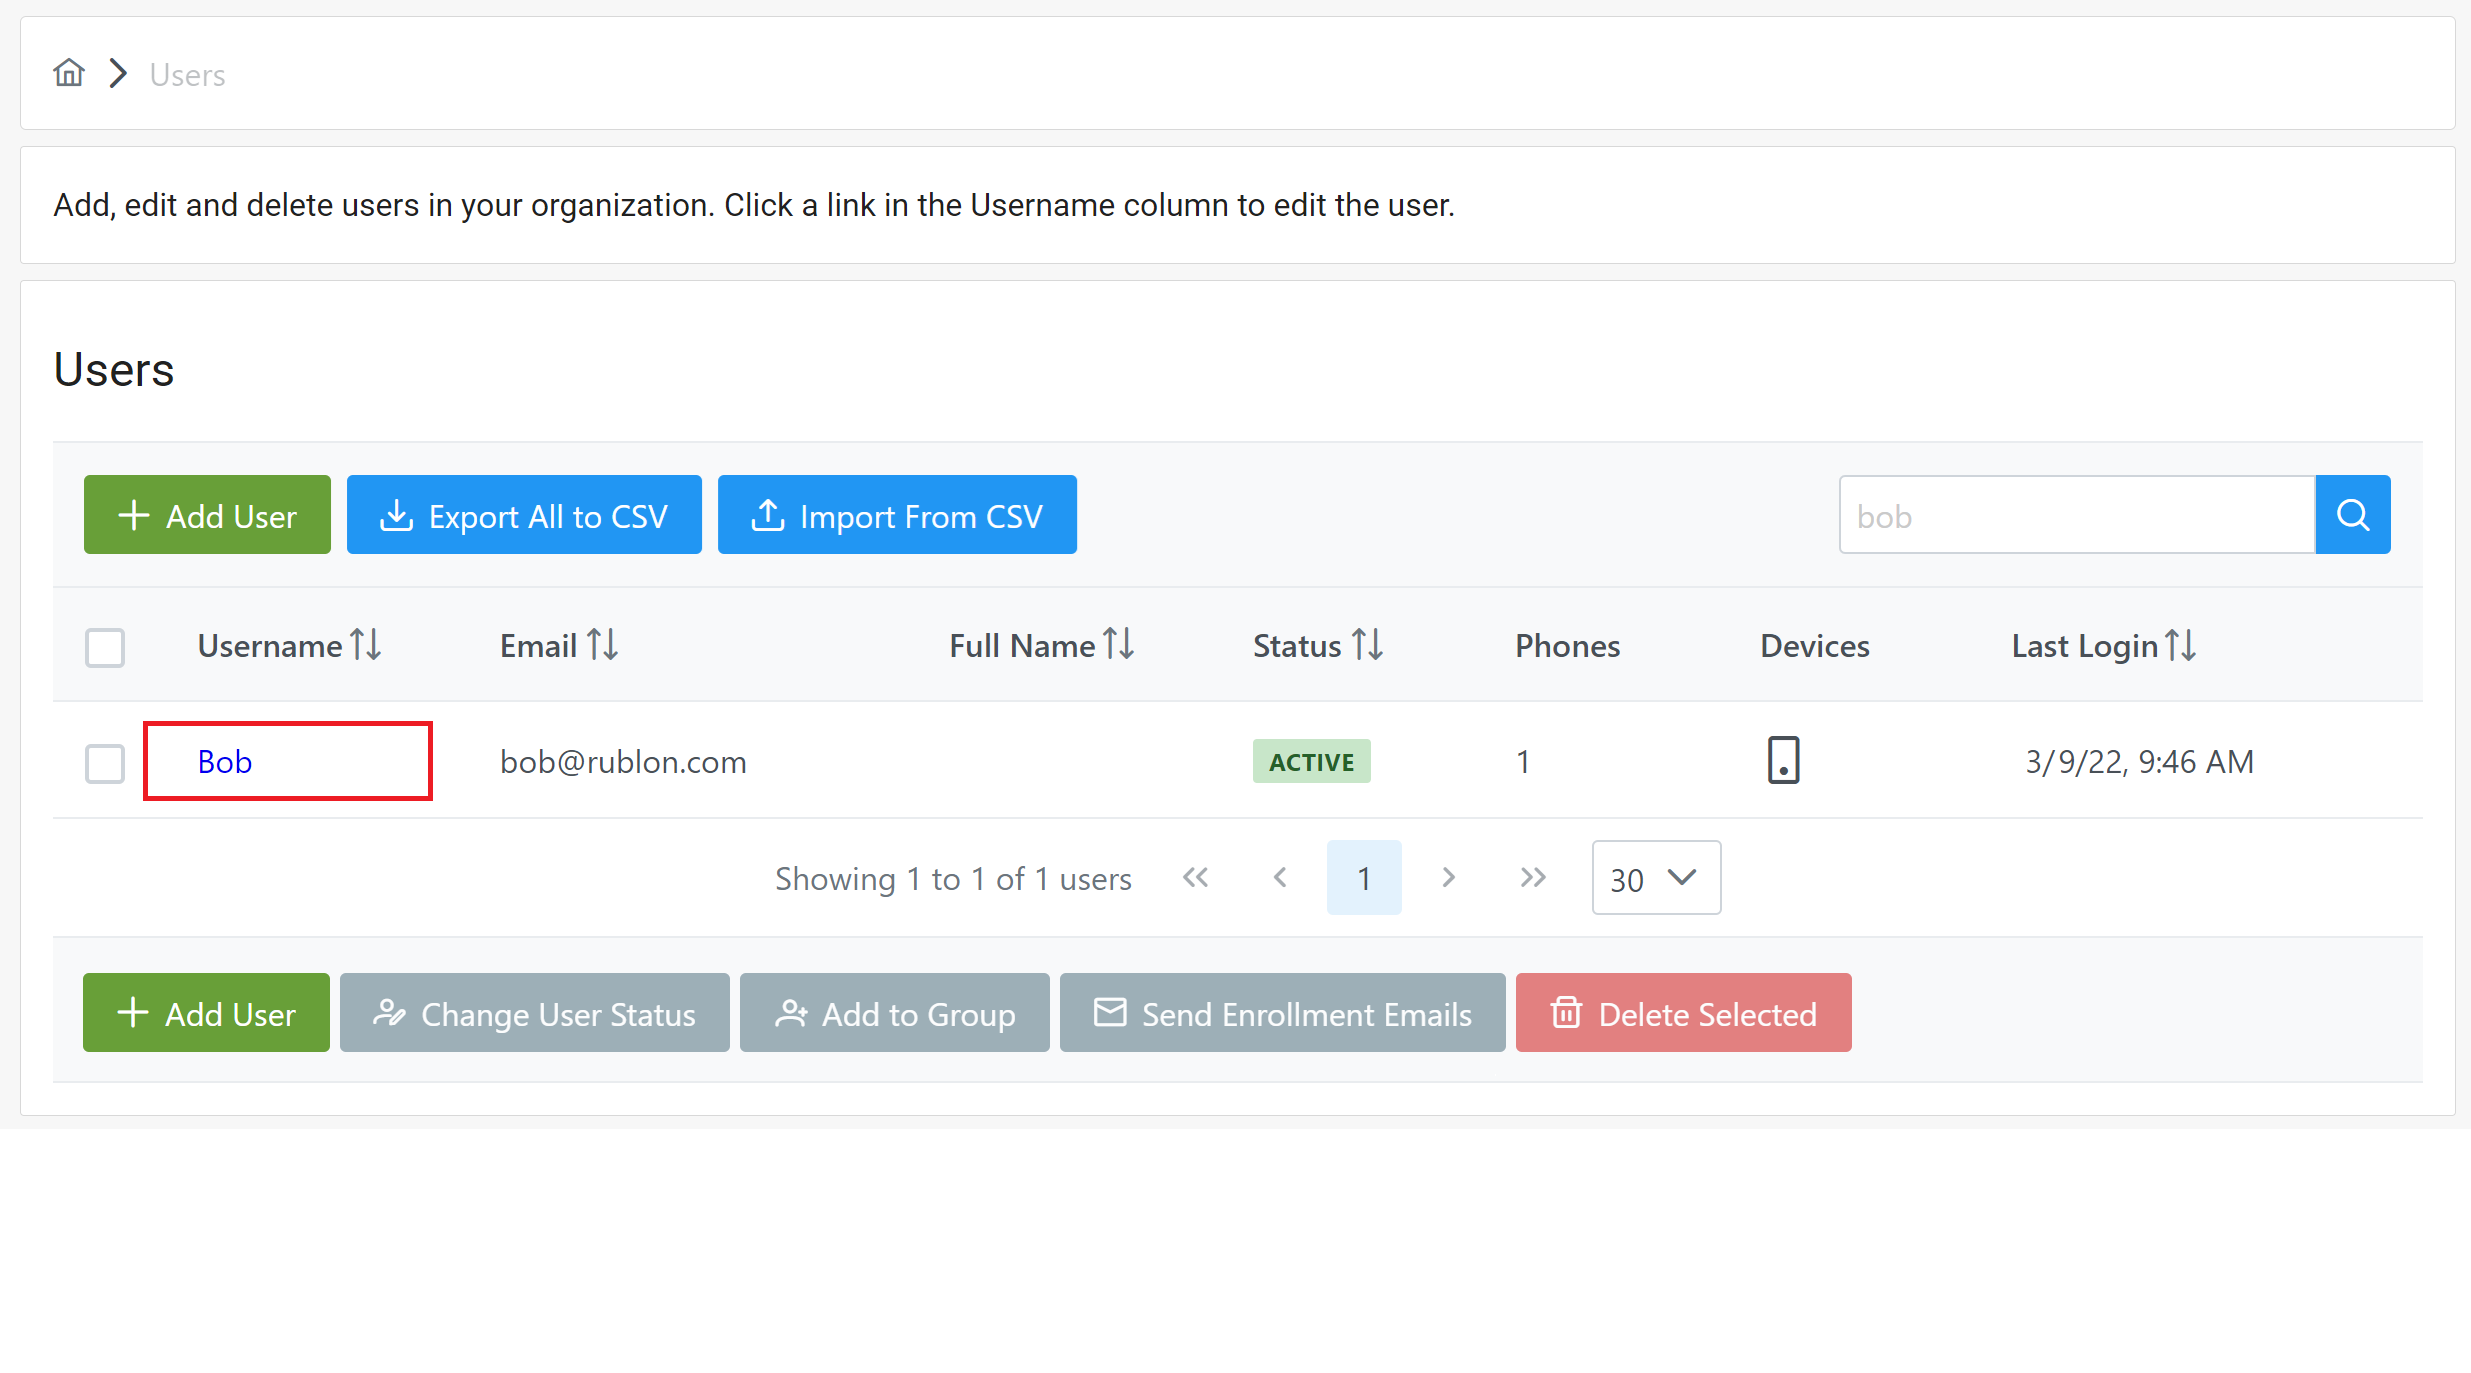
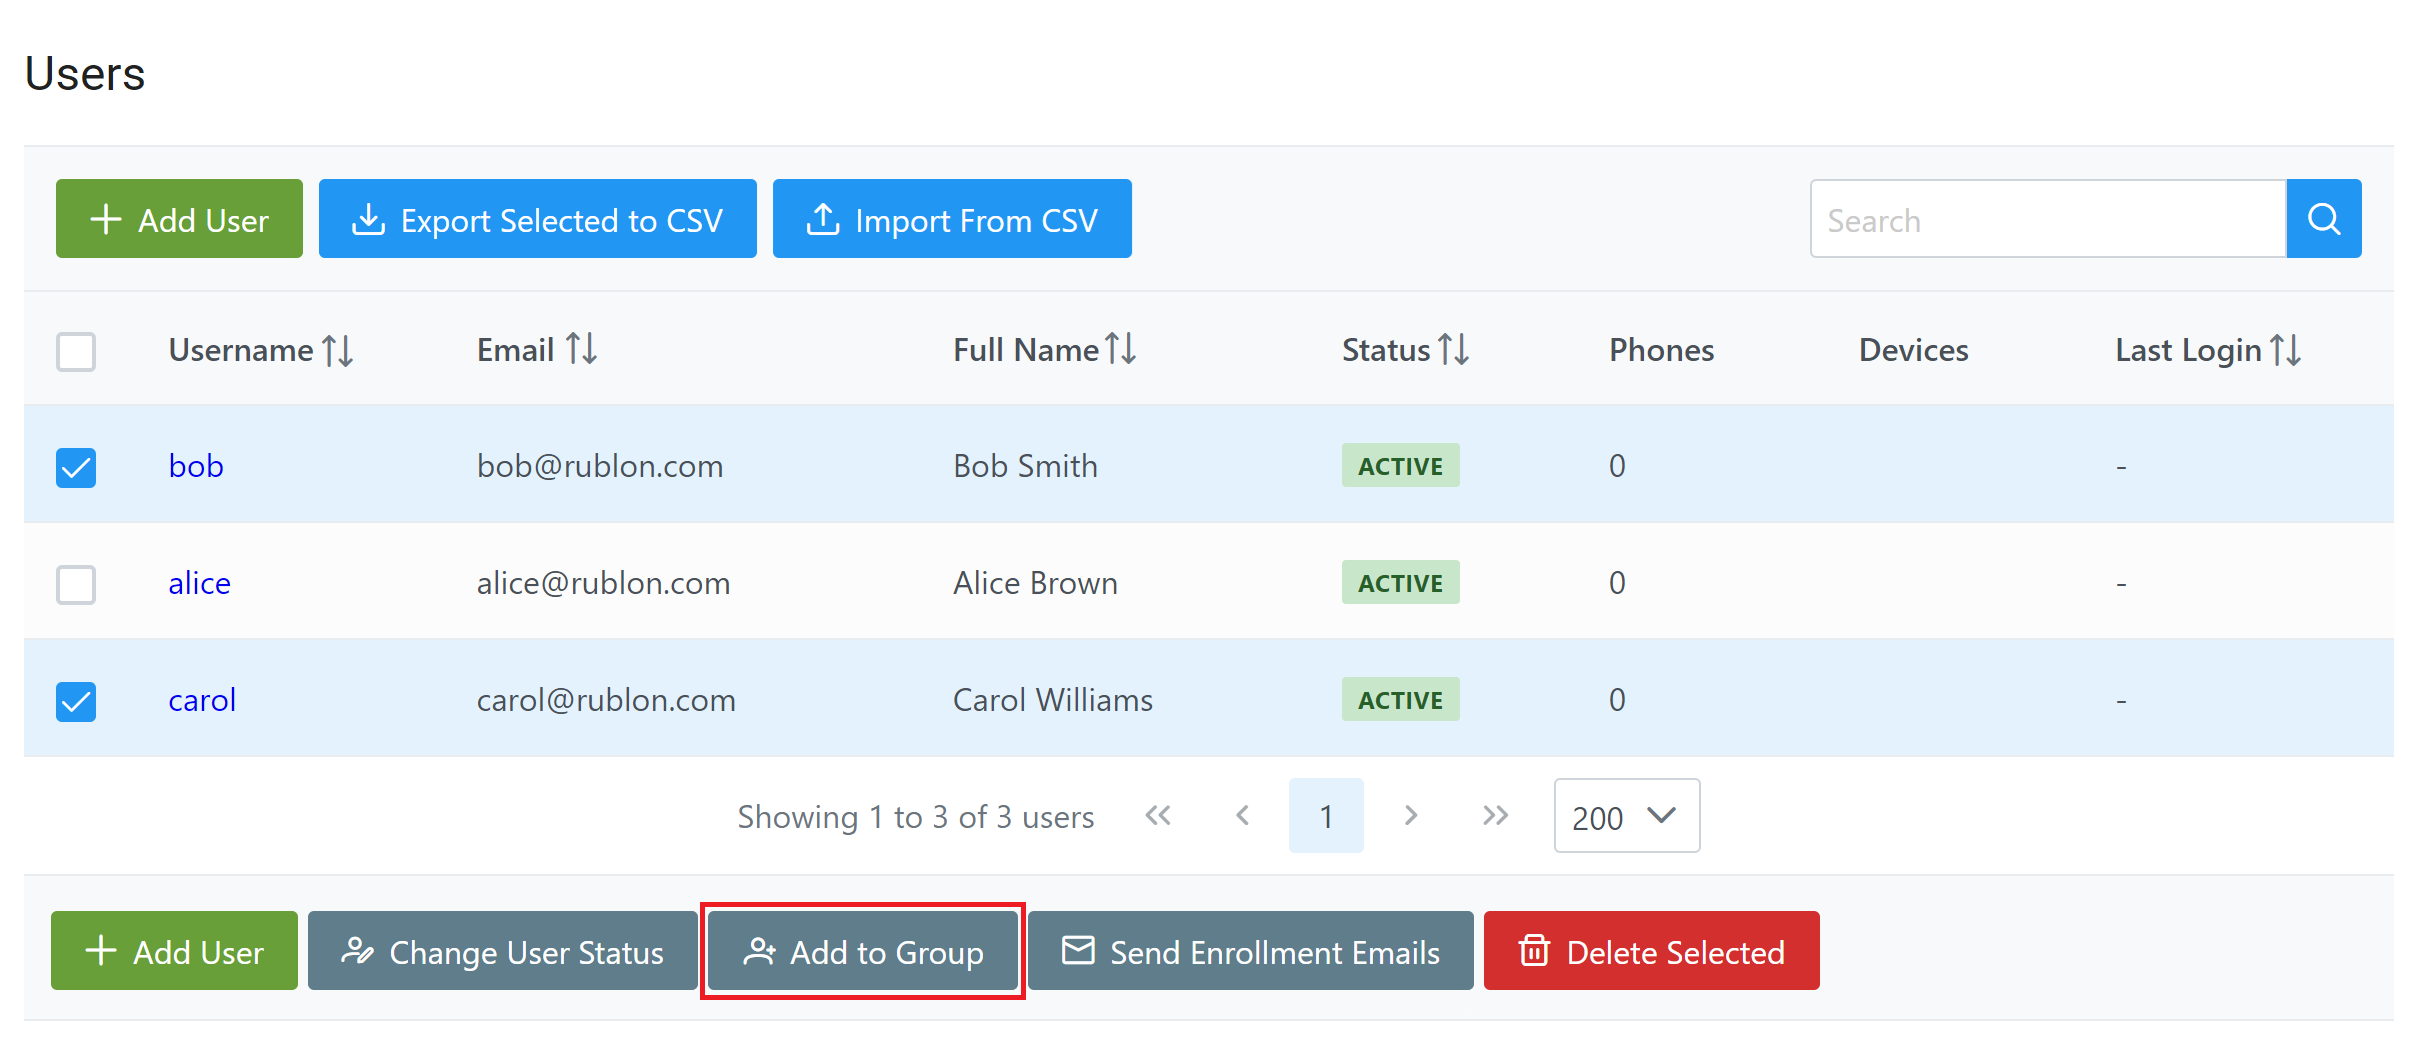
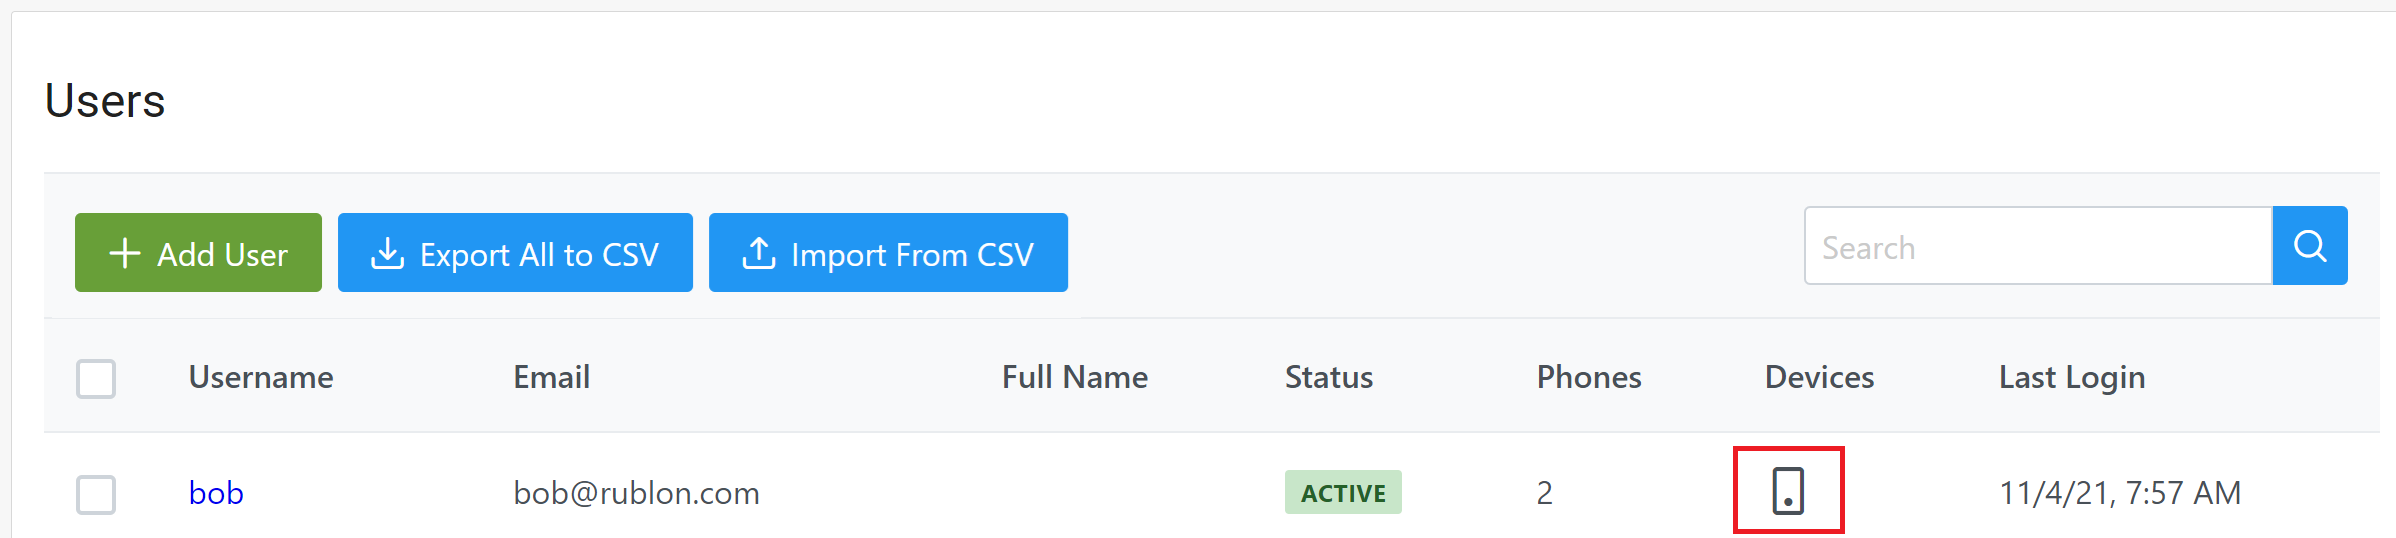
Users
User Status
Search for users
How to export users to CSV

How to import users from CSV
Note

Note
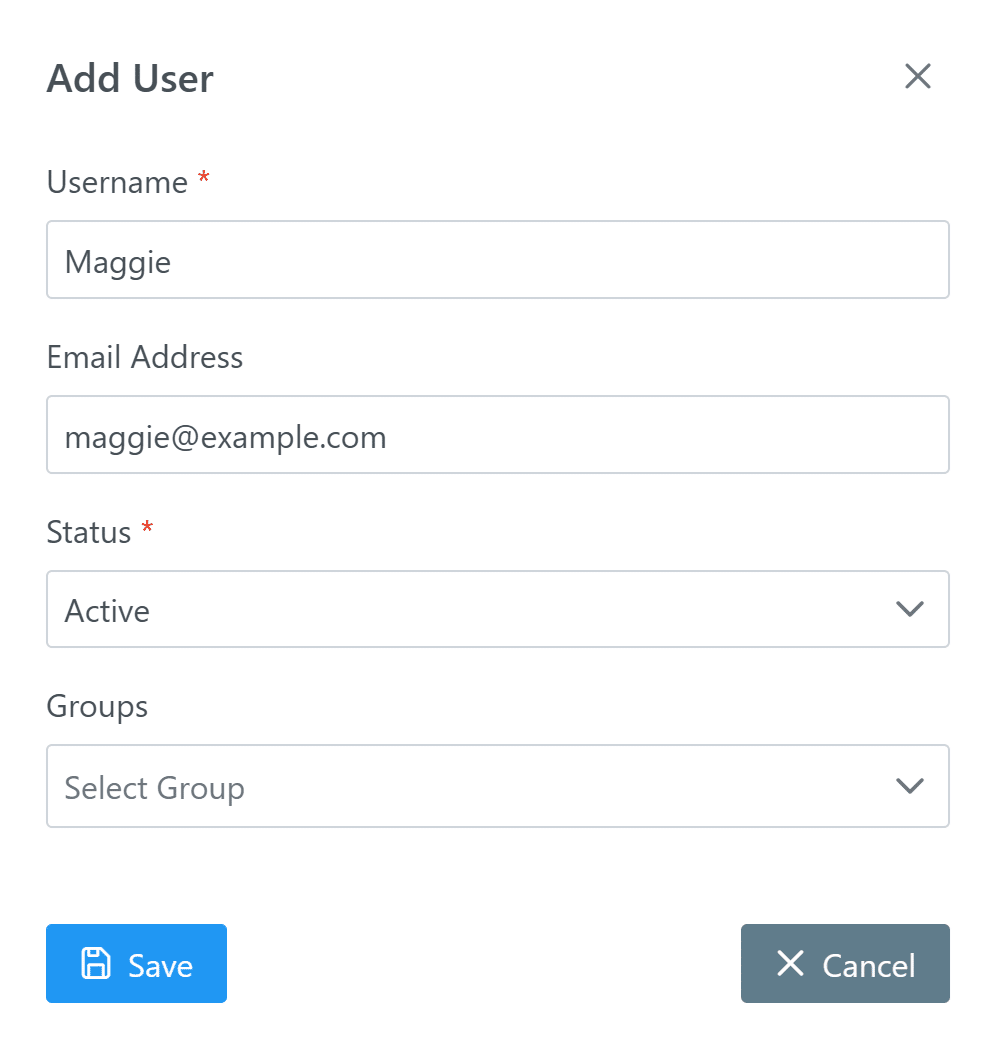
How to add a user
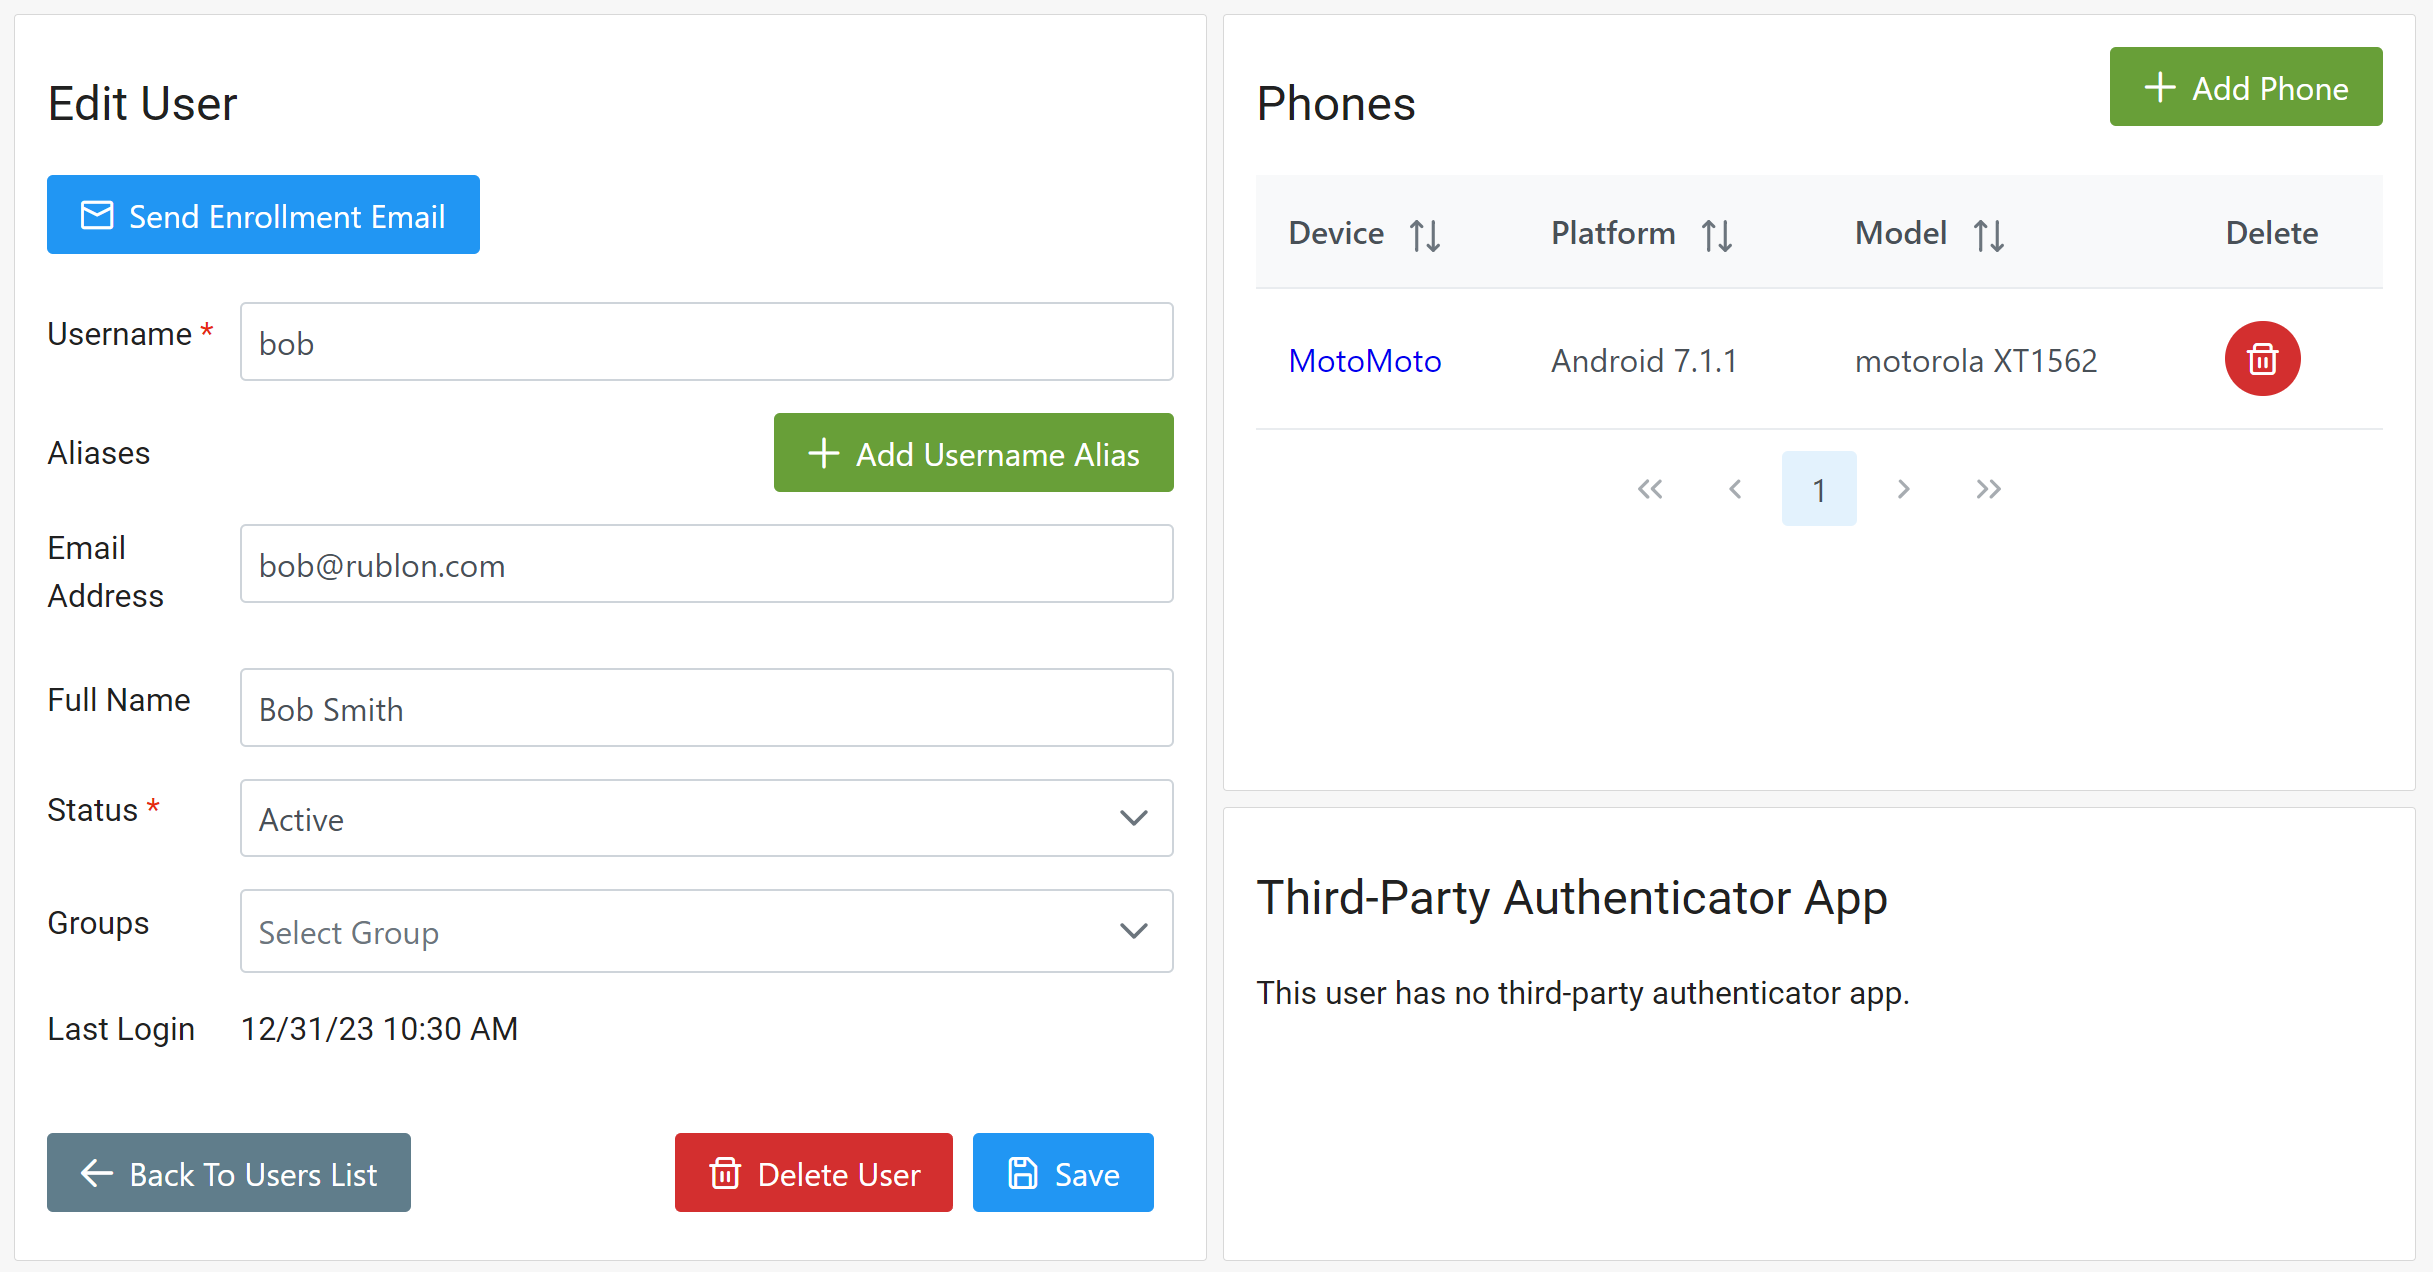
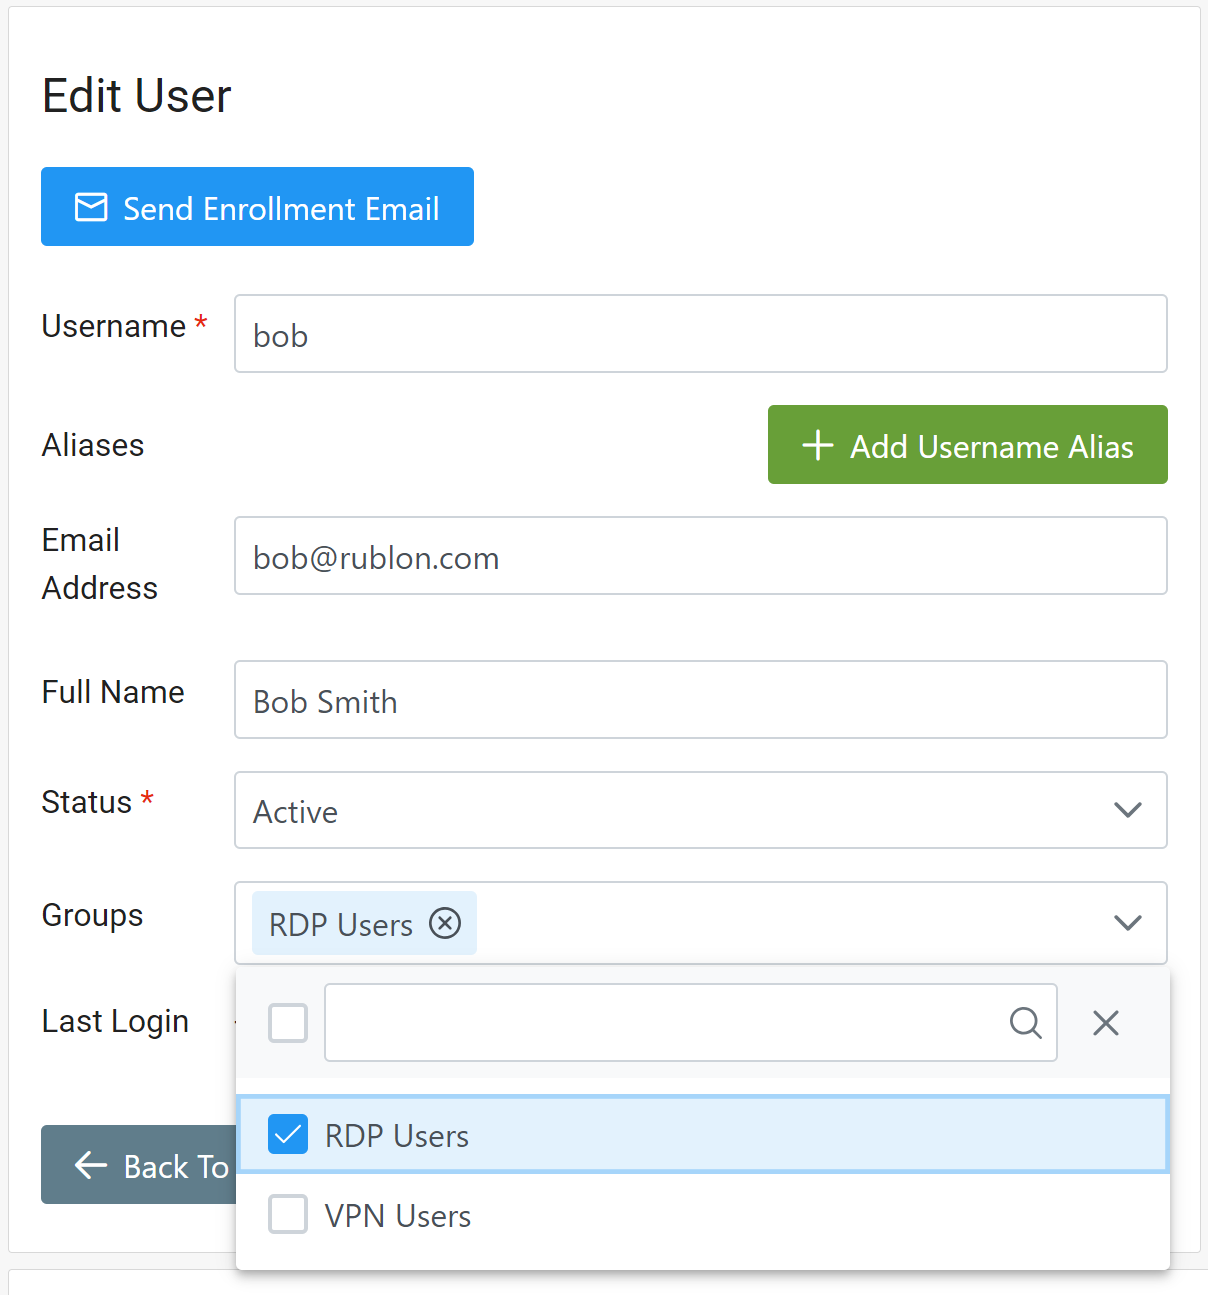
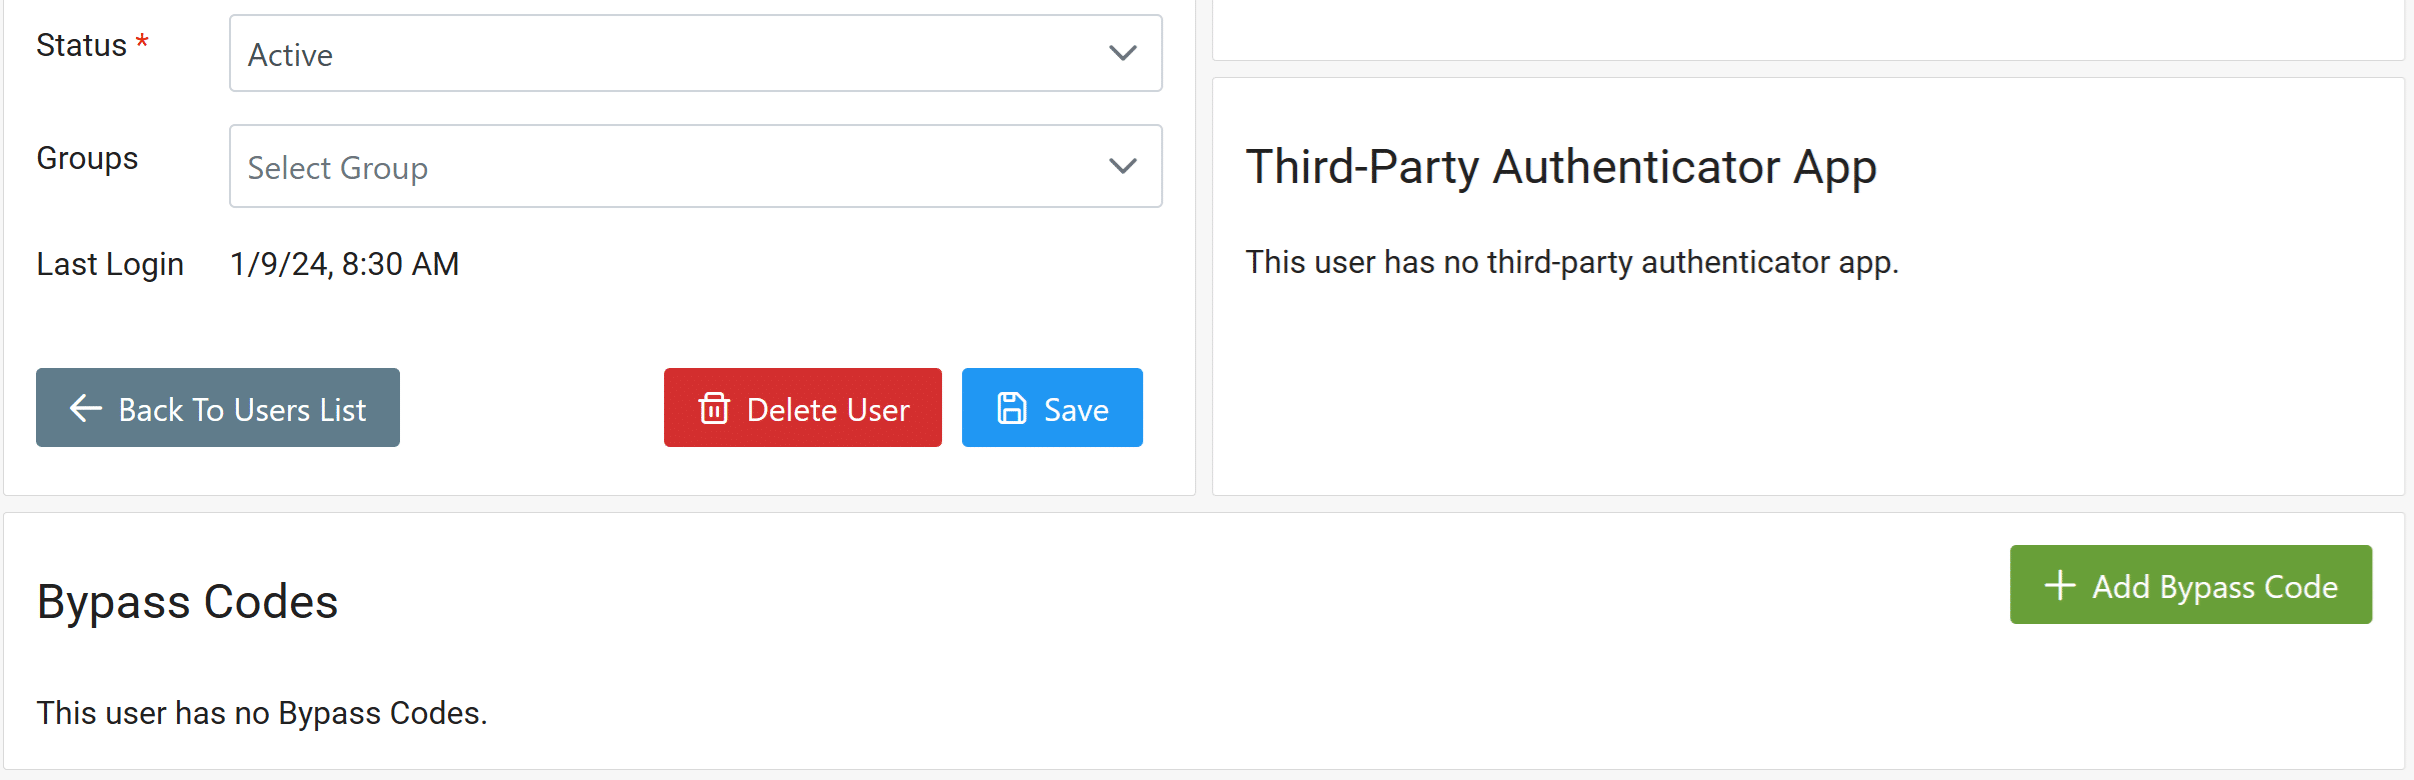
How to edit a user
How to change user status
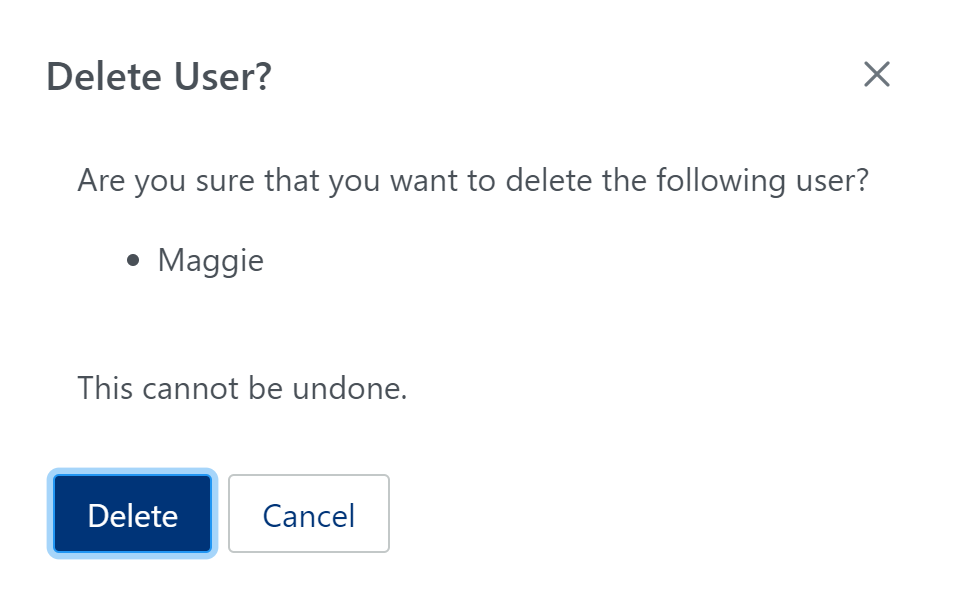
How to delete a user
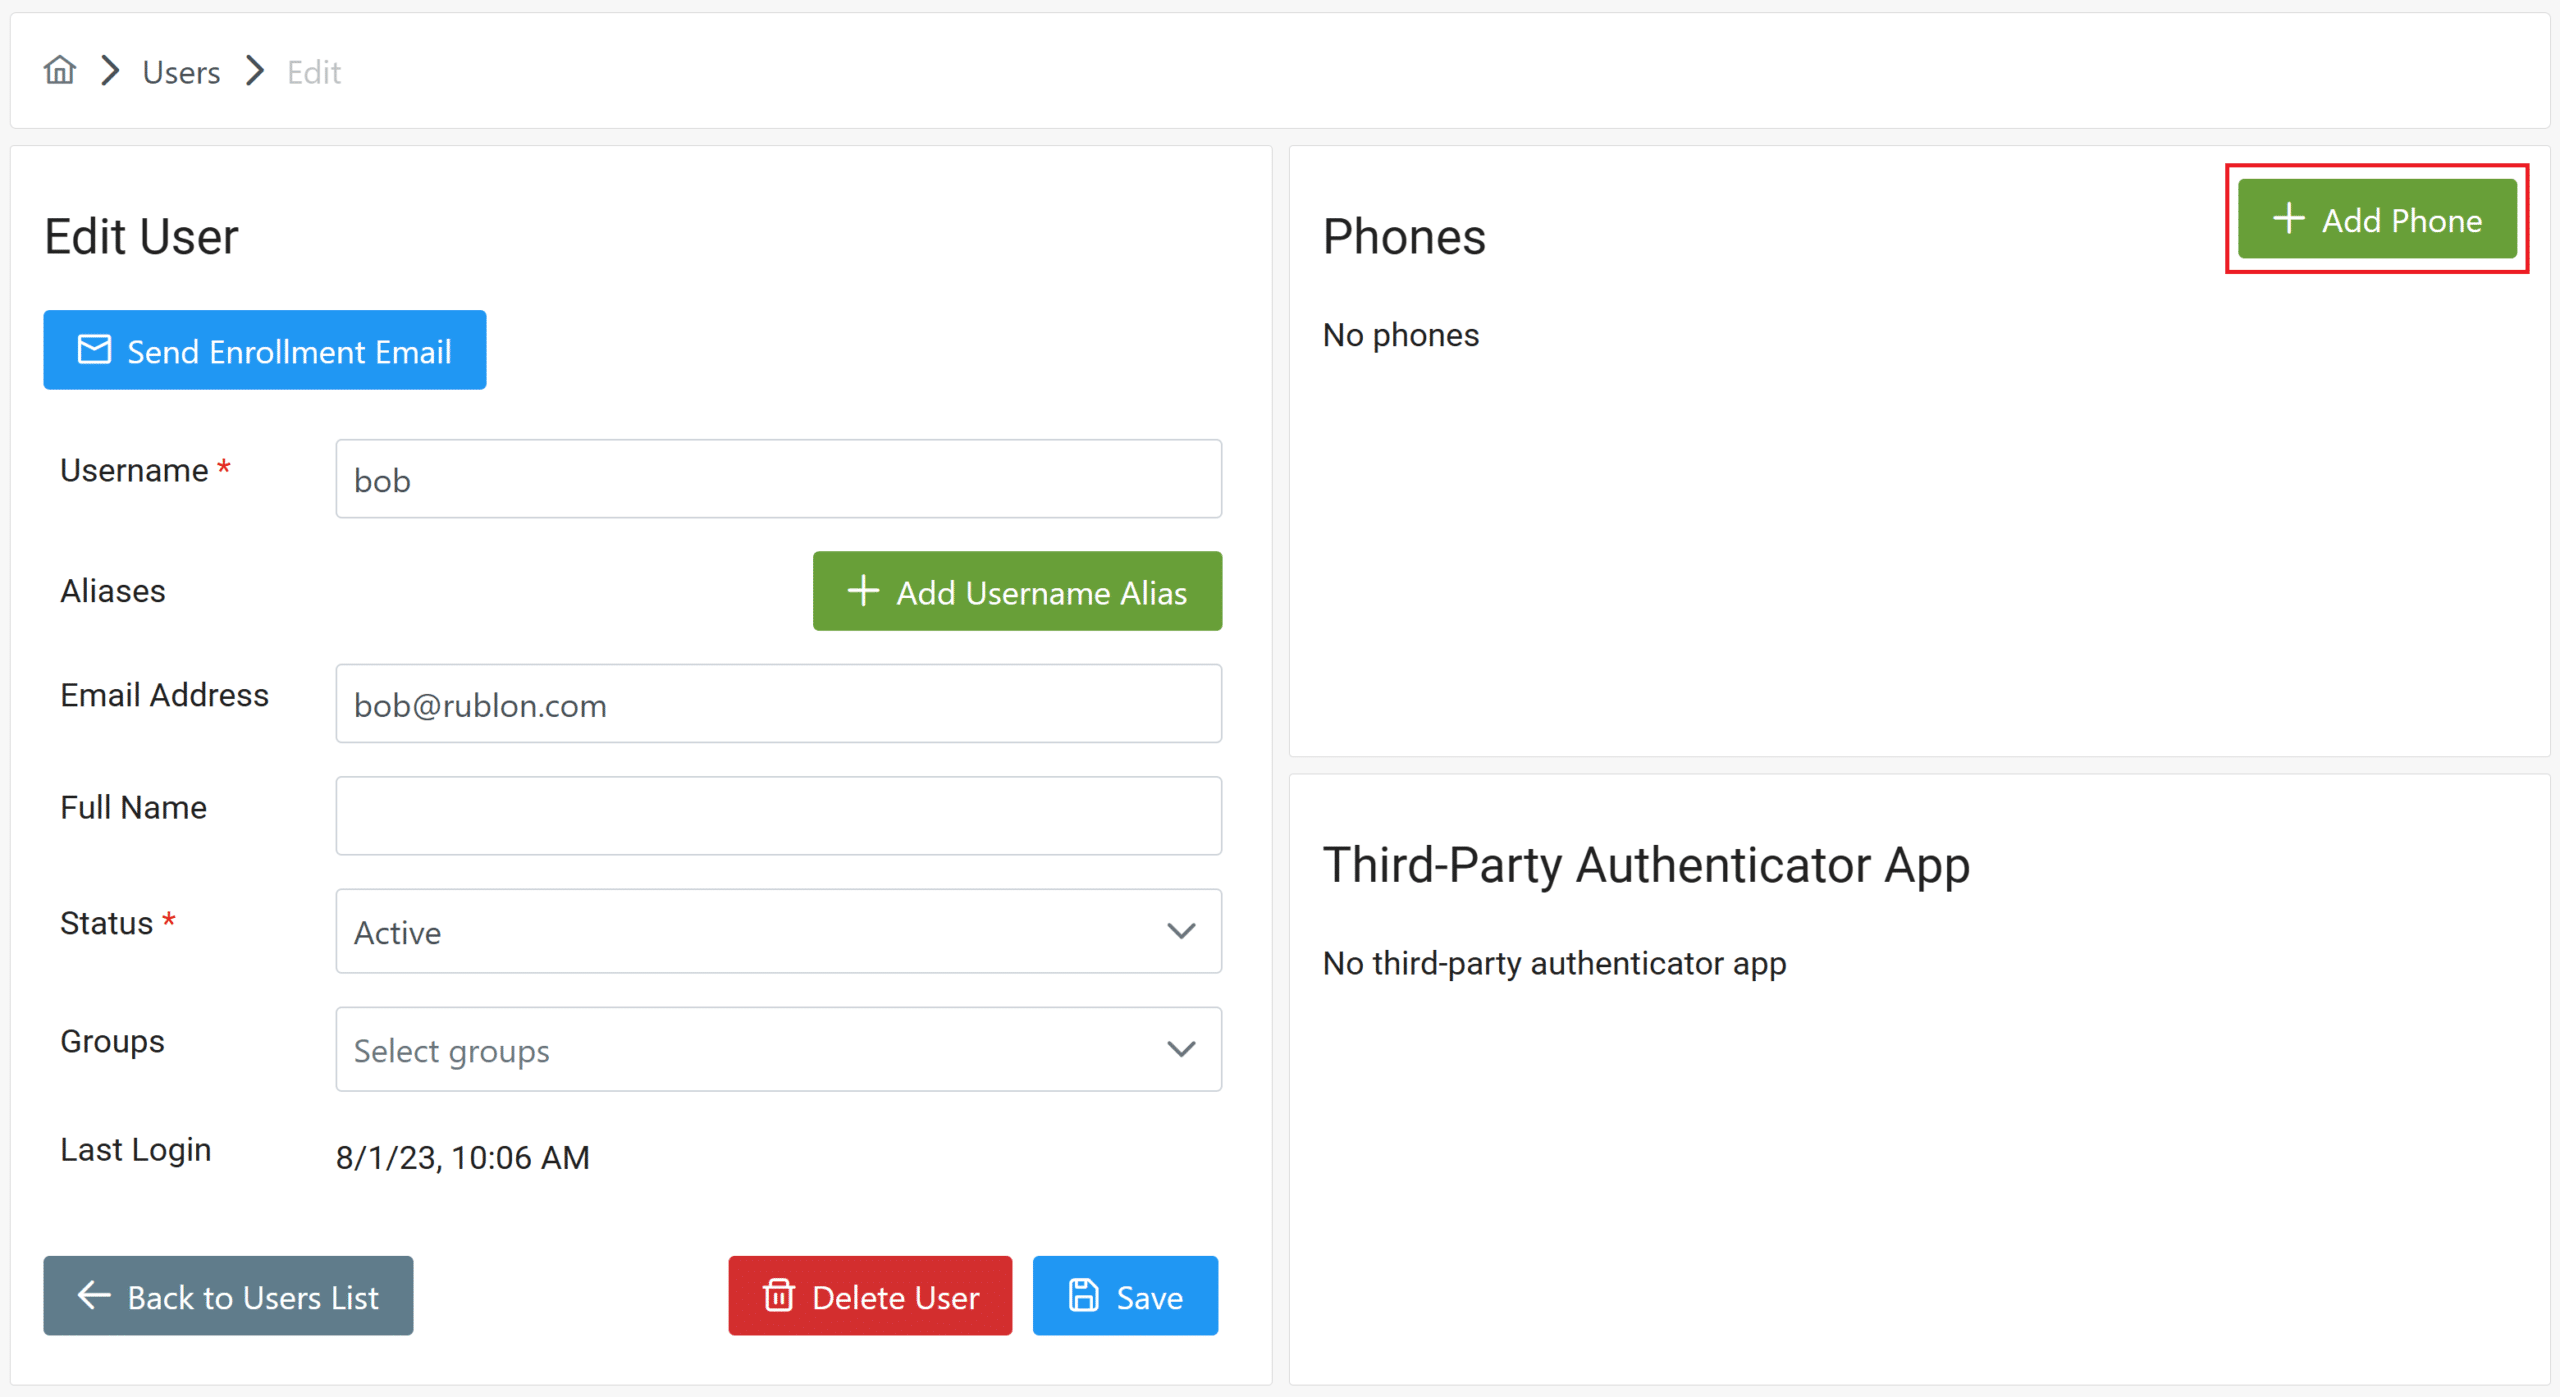
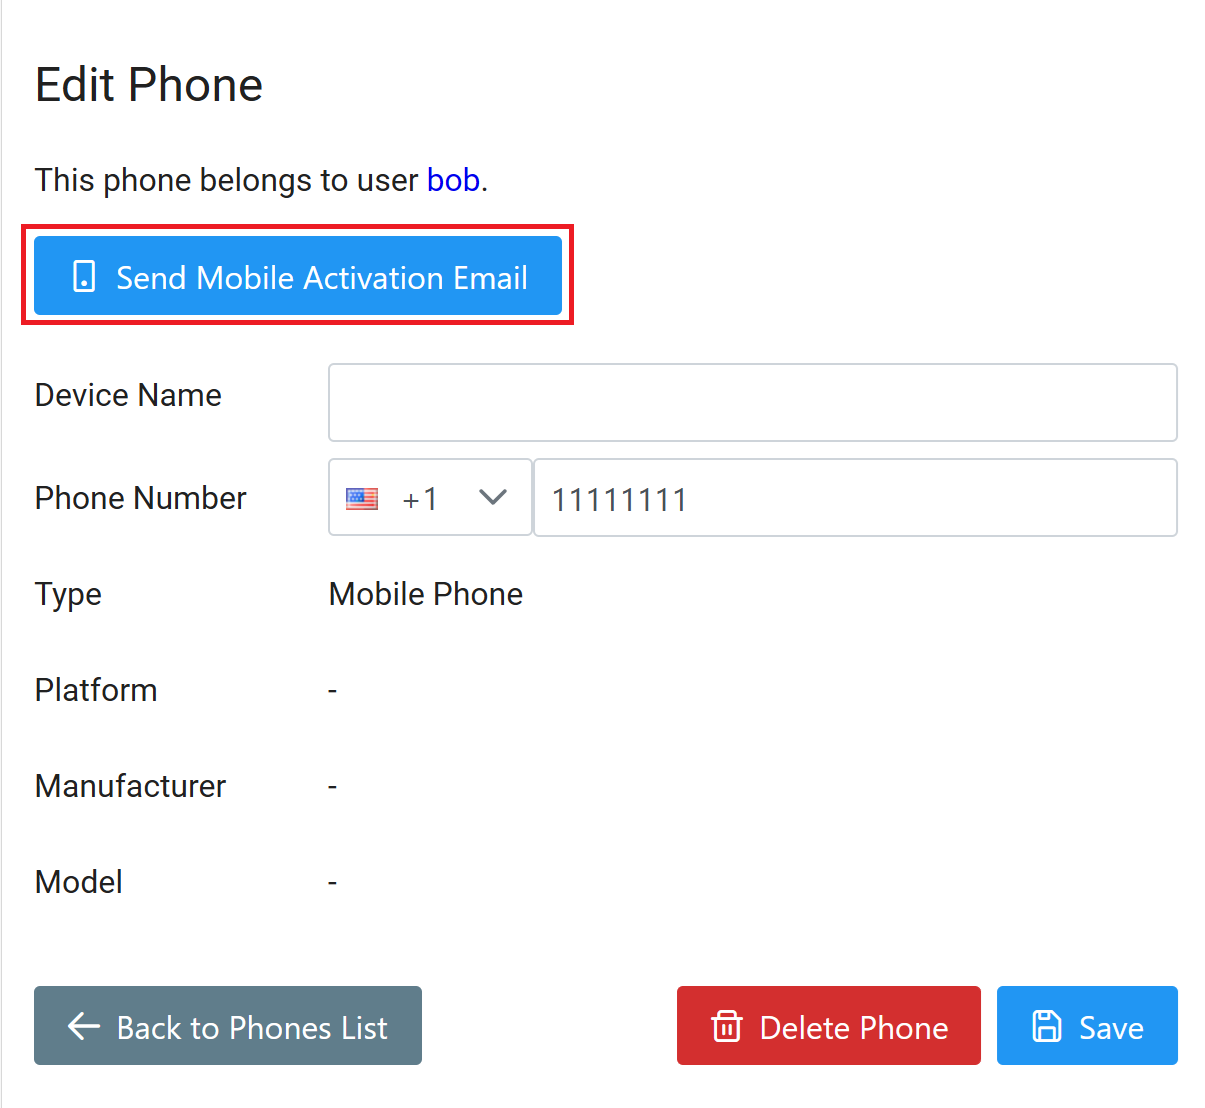
How to add a user’s phone
Note
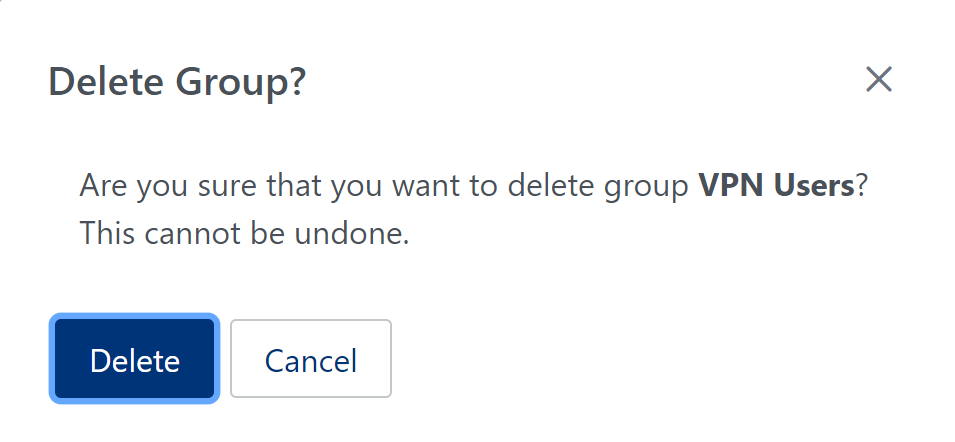
How to delete a user’s phone

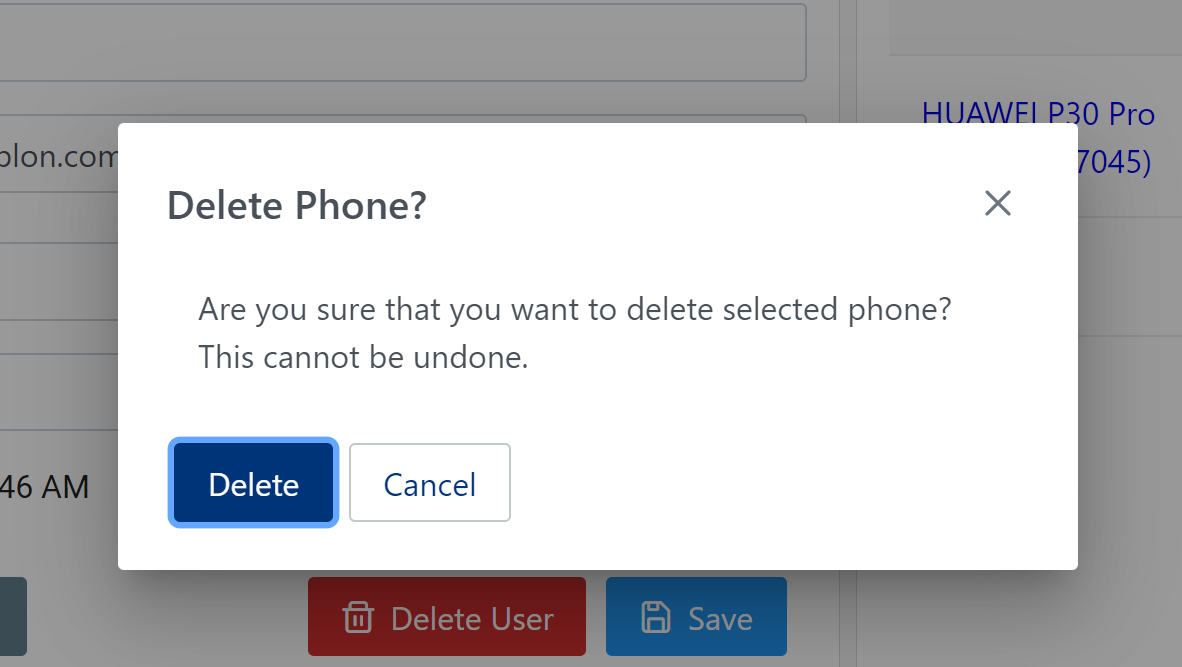
Note
How to add a user’s FIDO authenticator
1. Sign in to the Rublon Admin Console.
2. Select the Users tab.
3. Click the name of a user you would like to add a FIDO authenticator for. You can use the search feature to find the user.
4. In FIDO Authenticators, click Add FIDO.
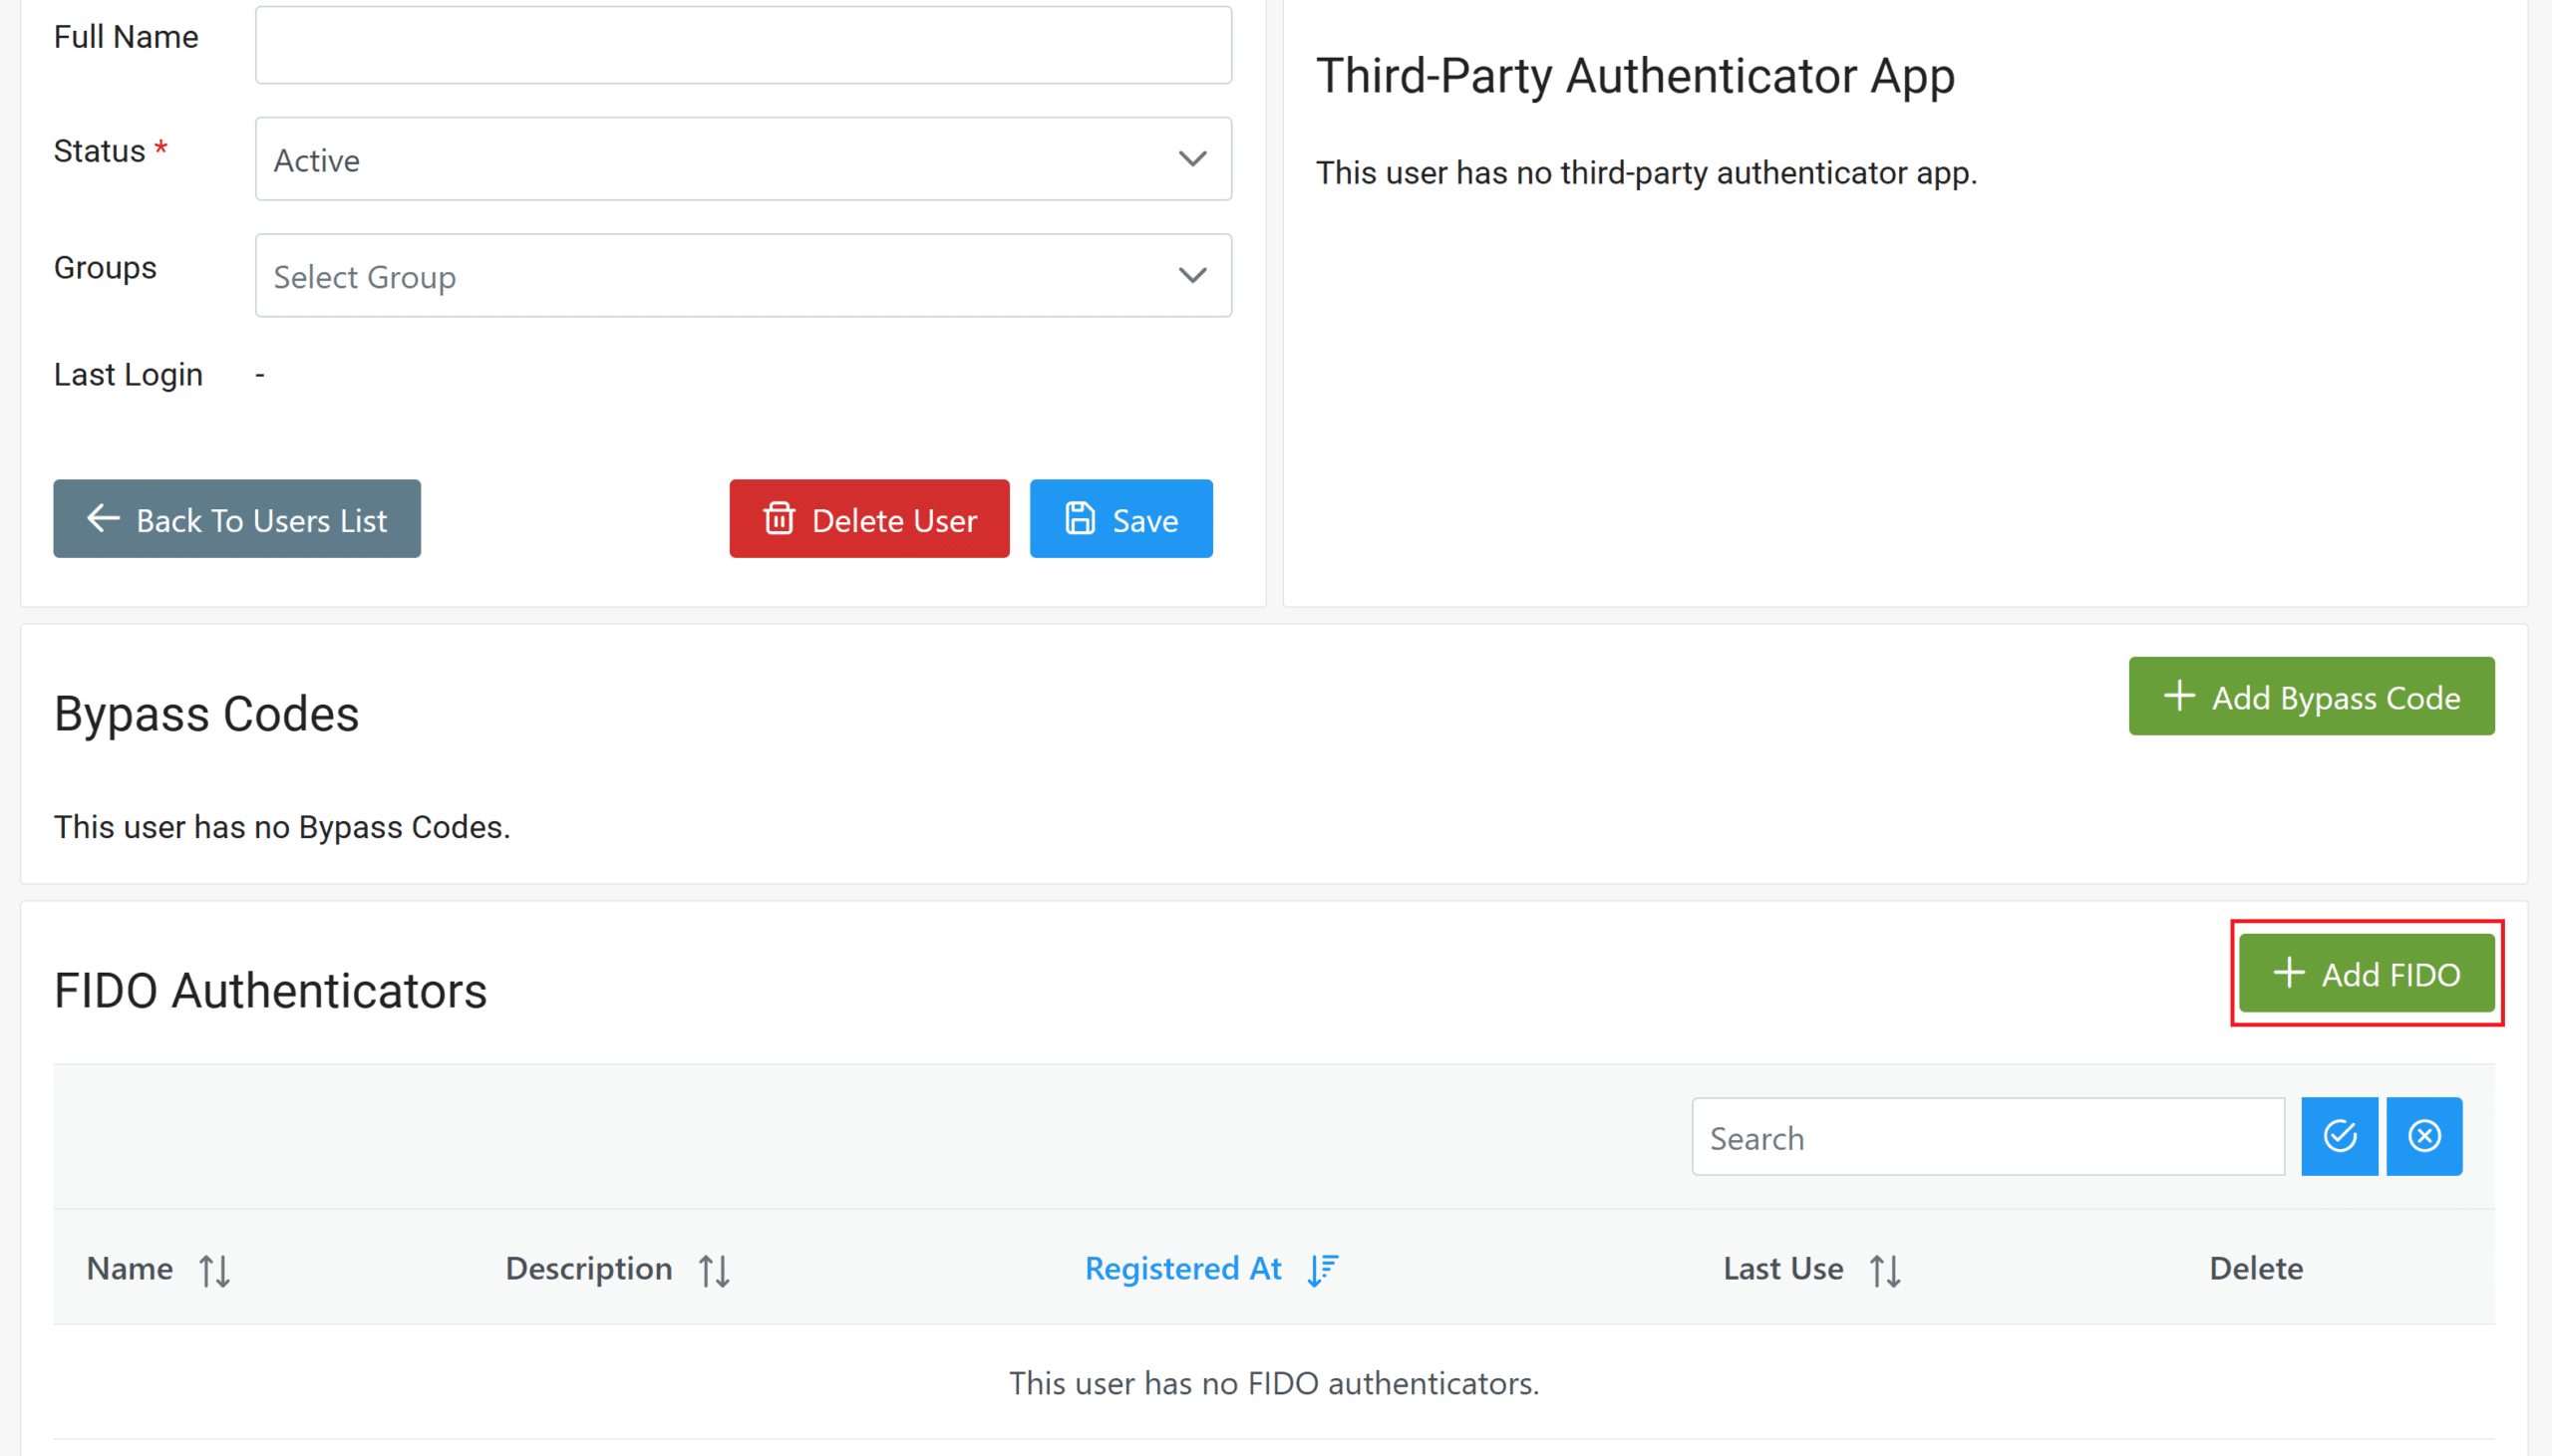
5. Enter a name for the key and click Add.
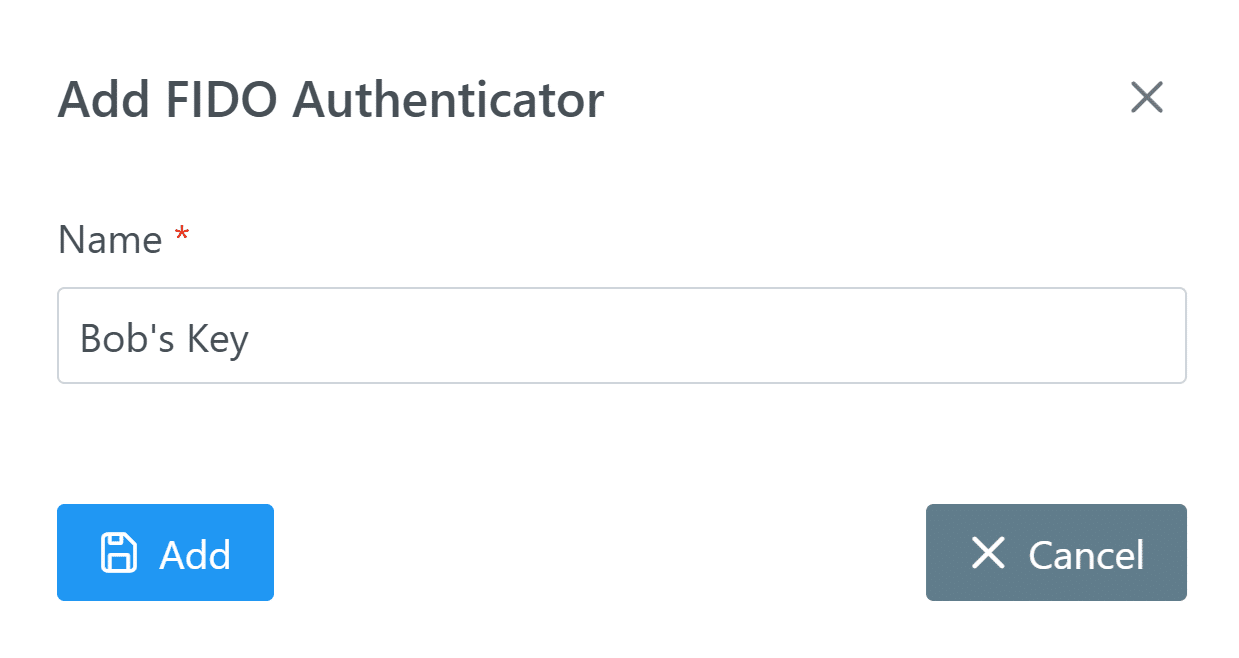
6. Follow the screen prompts to enroll the security key.
Note
Rublon MFA’s admin-side FIDO enrollment supports External authenticators and cloud-synced Built-in authenticators.
Examples of supported FIDO authenticators (admin-enrollable):
• Physical FIDO U2F & FIDO2 security keys (e.g., YubiKey, Google Titan)
• Cloud-synced passkeys with no shared space (e.g., Google Password Manager, iCloud Keychain)
• Cloud-synced passkeys with shared space – Learn more: Deploying Admin-Enrolled Passkeys With Enterprise Password Managers
Examples of unsupported FIDO authenticators (user self-enroll only):
• Windows Hello (TPM-backed passkeys strengthened with PIN, face, or fingerprint)
• On-device Touch ID / Face ID passkeys that never leave the Secure Enclave.
Note
At this time, administrators can enroll FIDO authenticators for user accounts only. Enrolling a key for another admin account is not supported.
Note
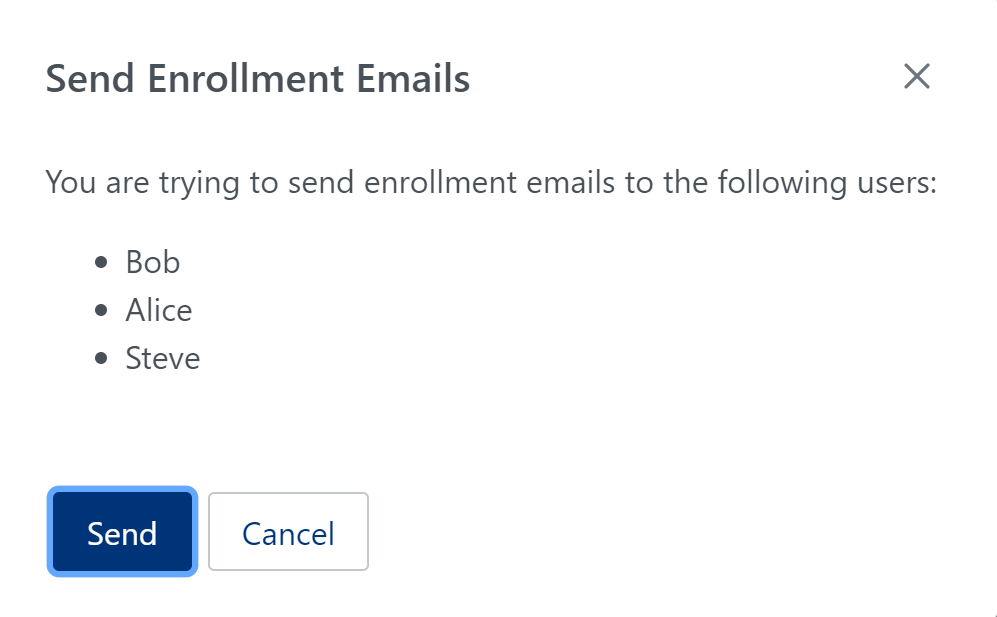
How to send an Enrollment Email

Note
How to bulk enroll authenticators for multiple users

Note
Note
How to add a user to a group
How to bulk add users to a group

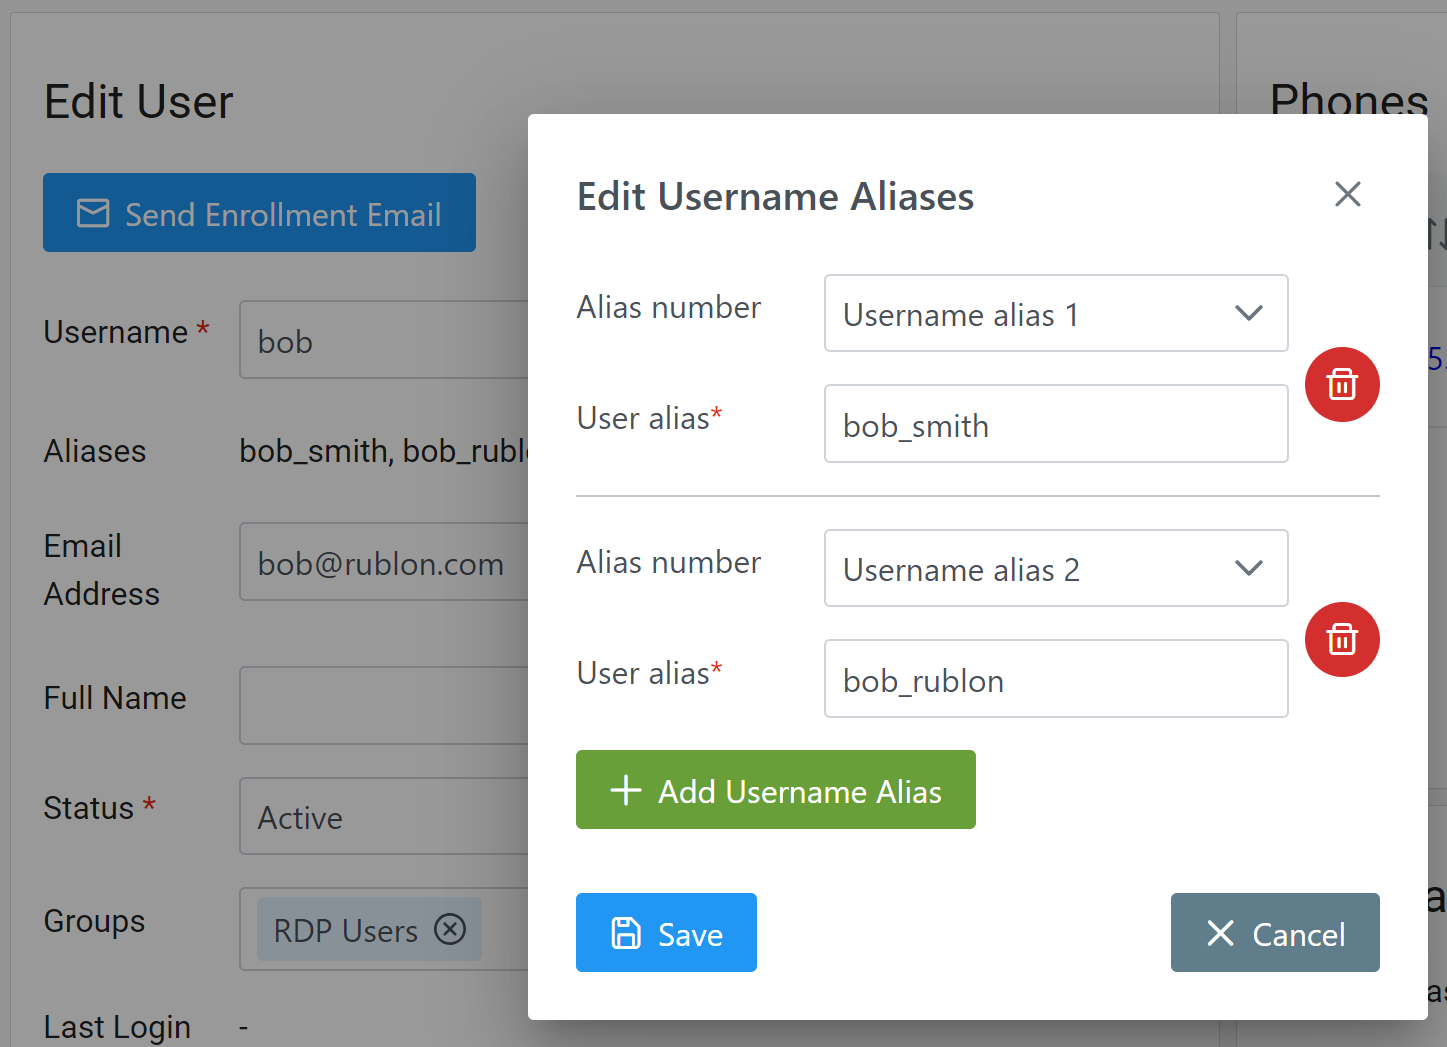
How to add, edit, and delete user aliases
How to add a Bypass Code for a user

Directory Sync
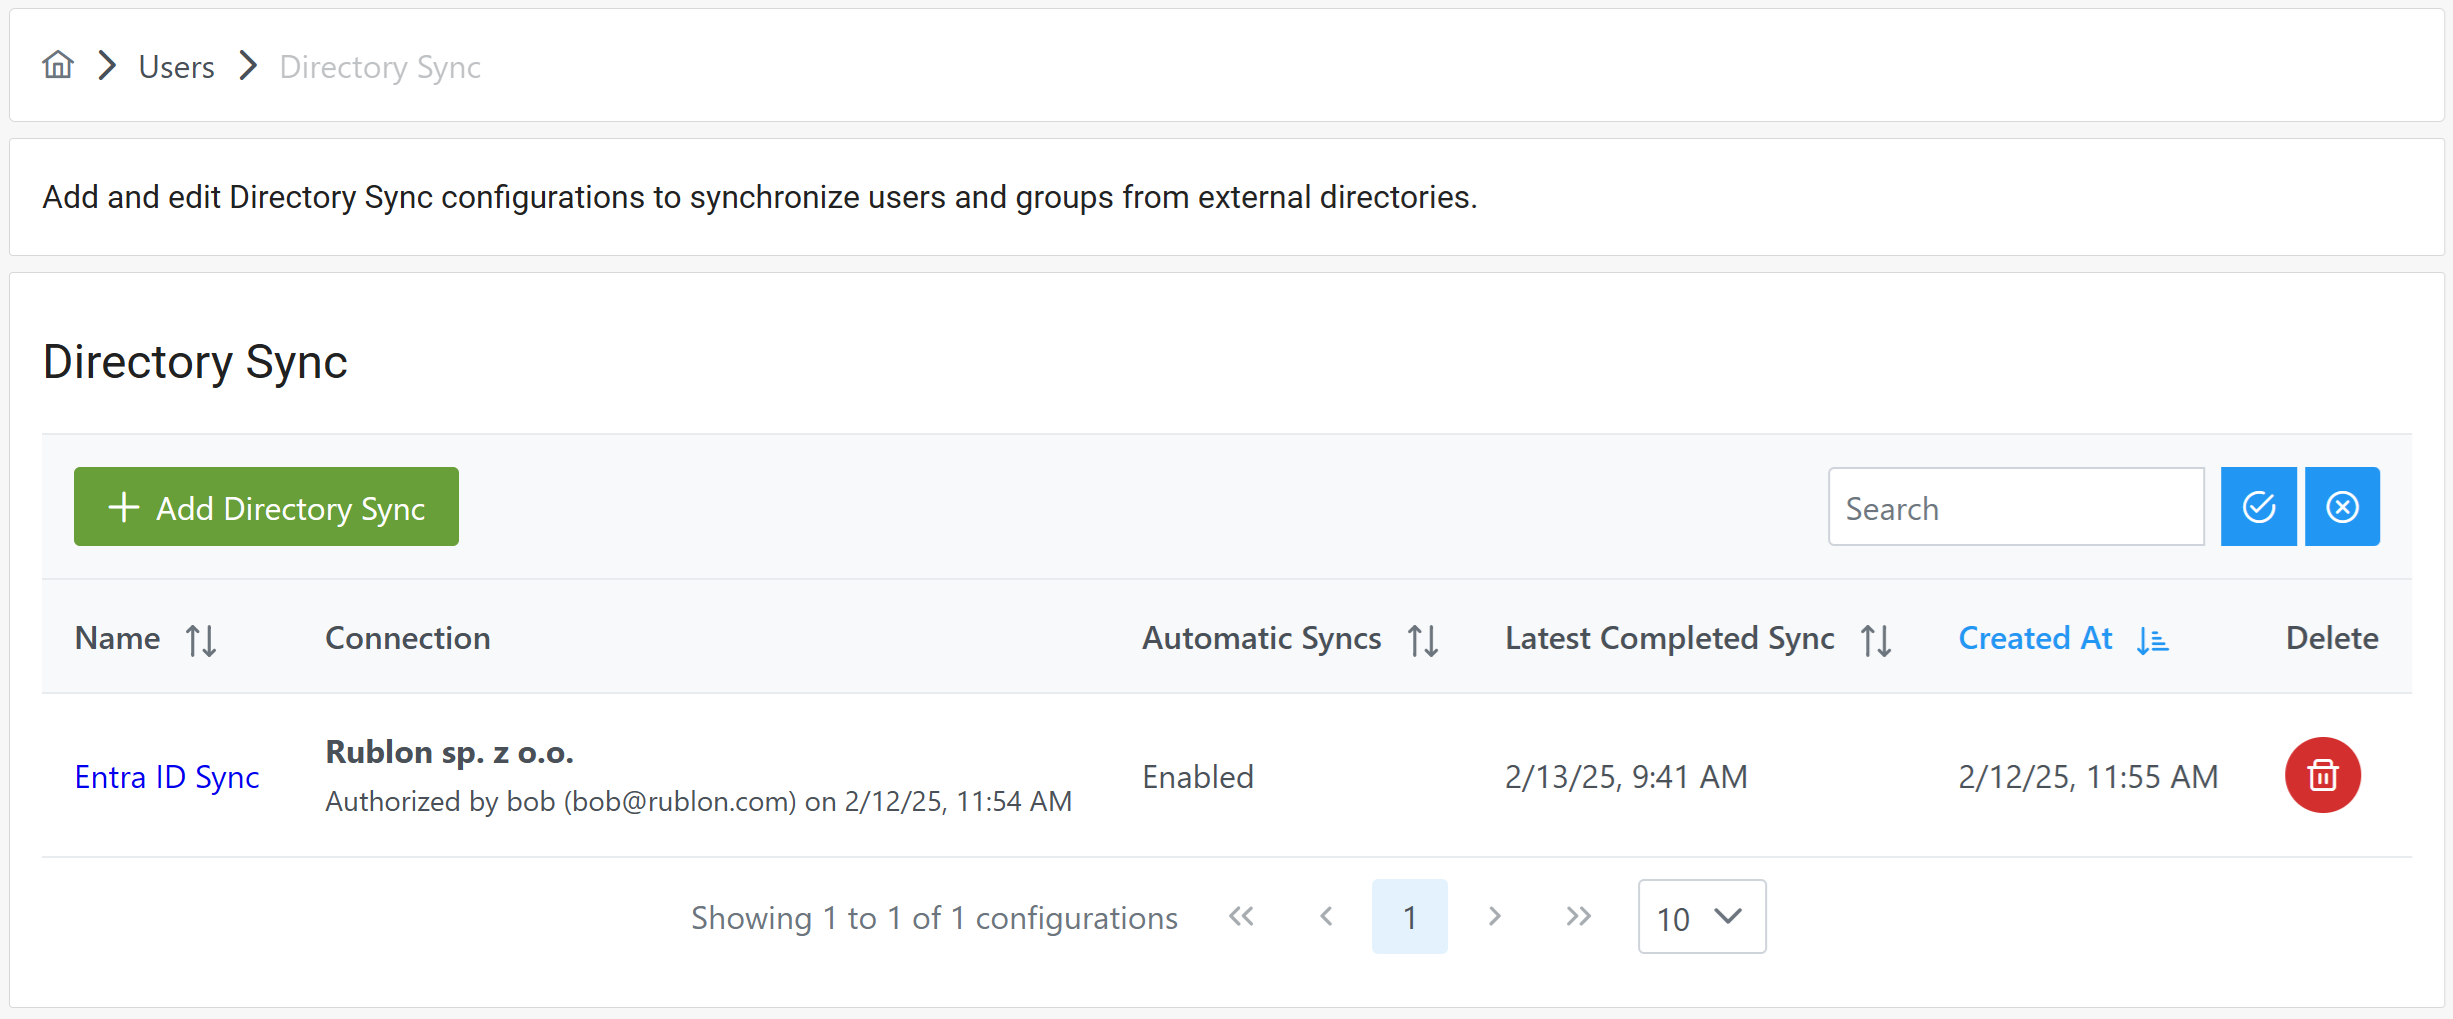
How to synchronize users from Entra ID using Directory Sync?
How to synchronize users from other directories using Directory Sync?
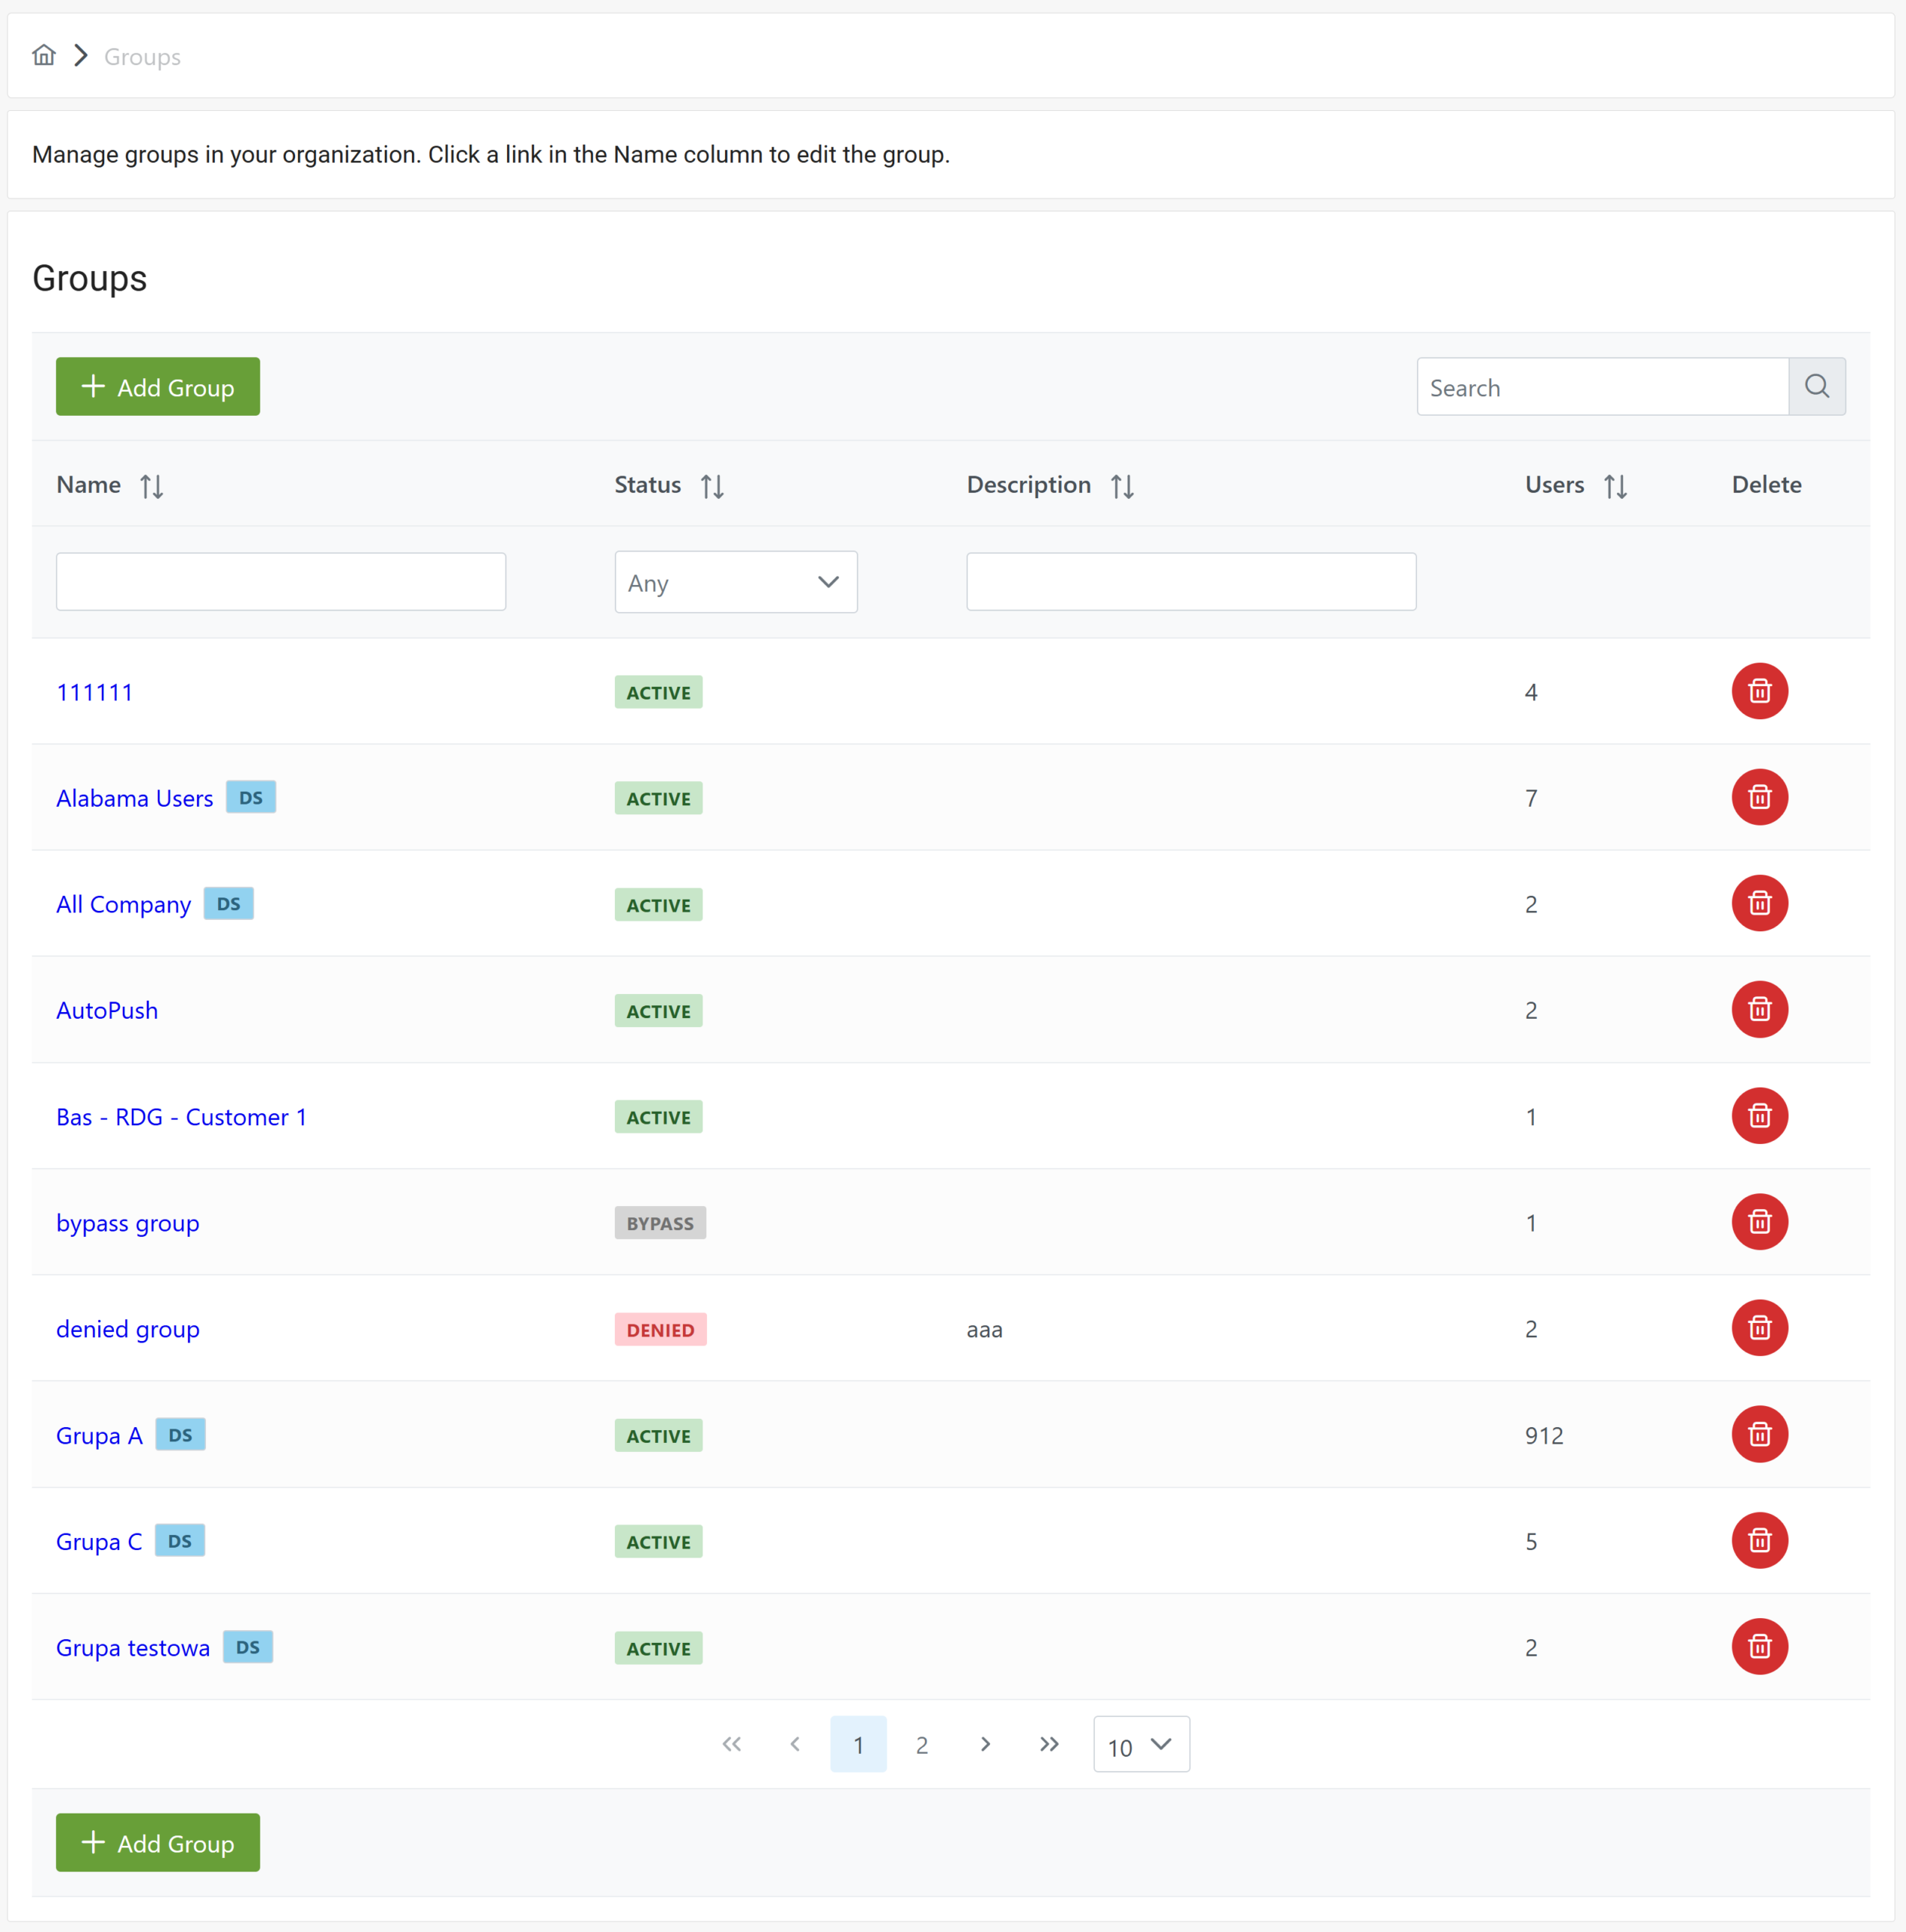
Groups

Note
Permitted Groups

Using Groups to Manage Application Access


How to add a group

How to add users to a group
How to assign administrative units to a group
How to edit a group
How to delete a group
Authenticators
Click the Authenticators tab to expand it and show its subtabs. Refer to the following subtabs to learn more about them.
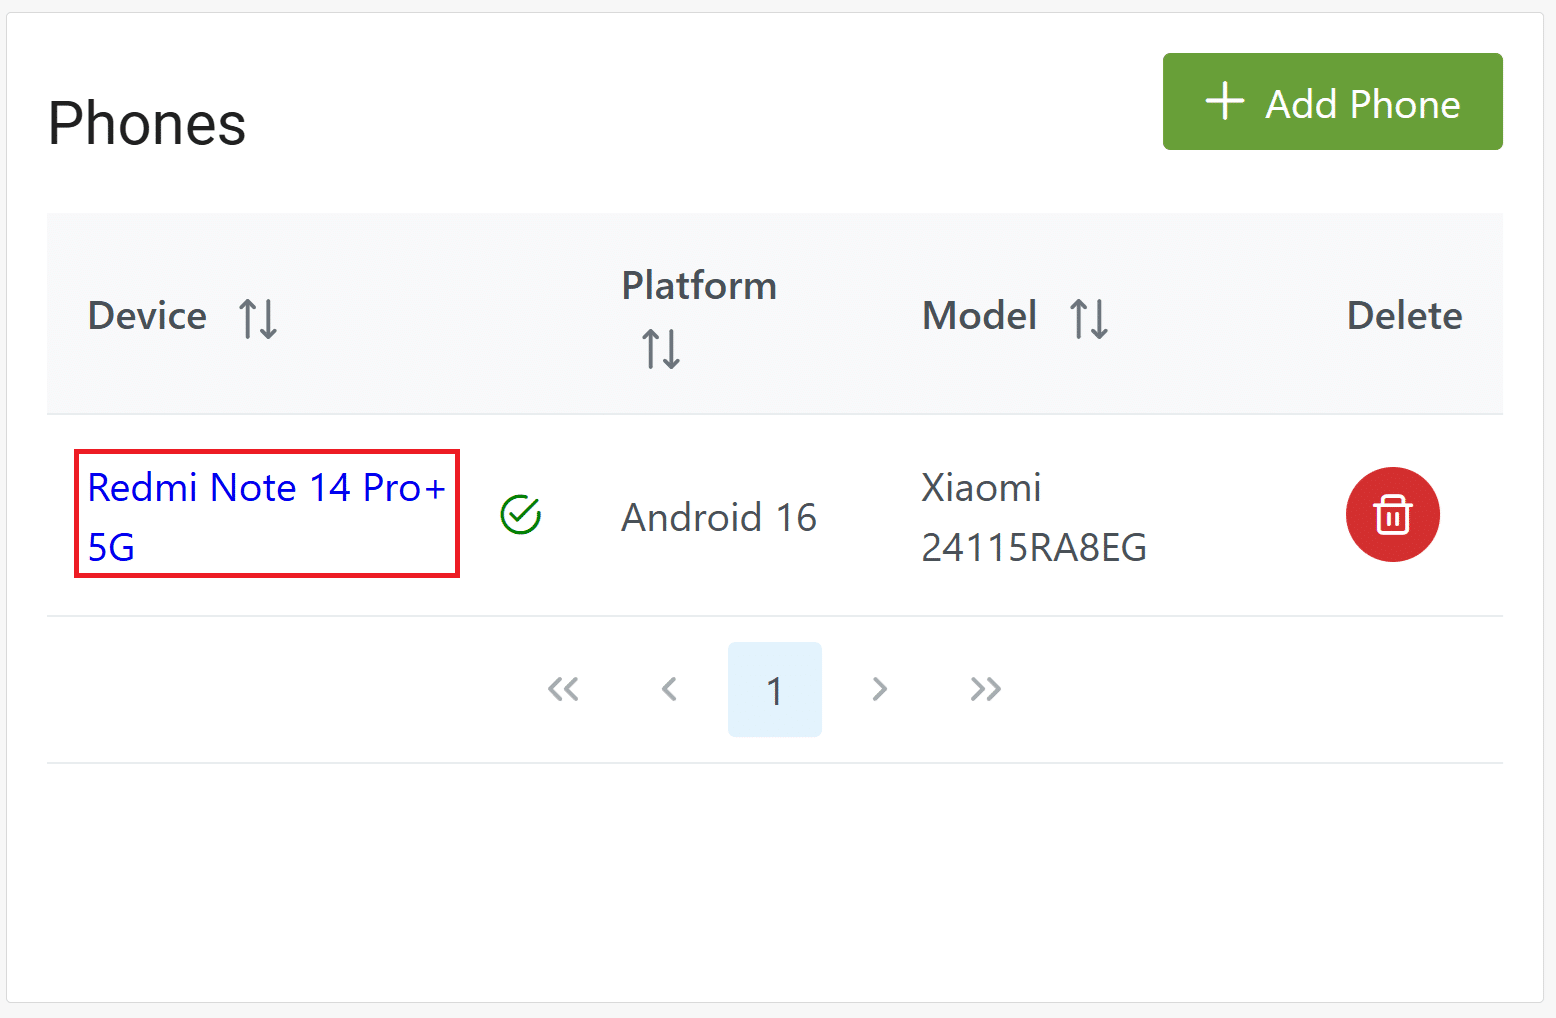
Phones

How to add a phone
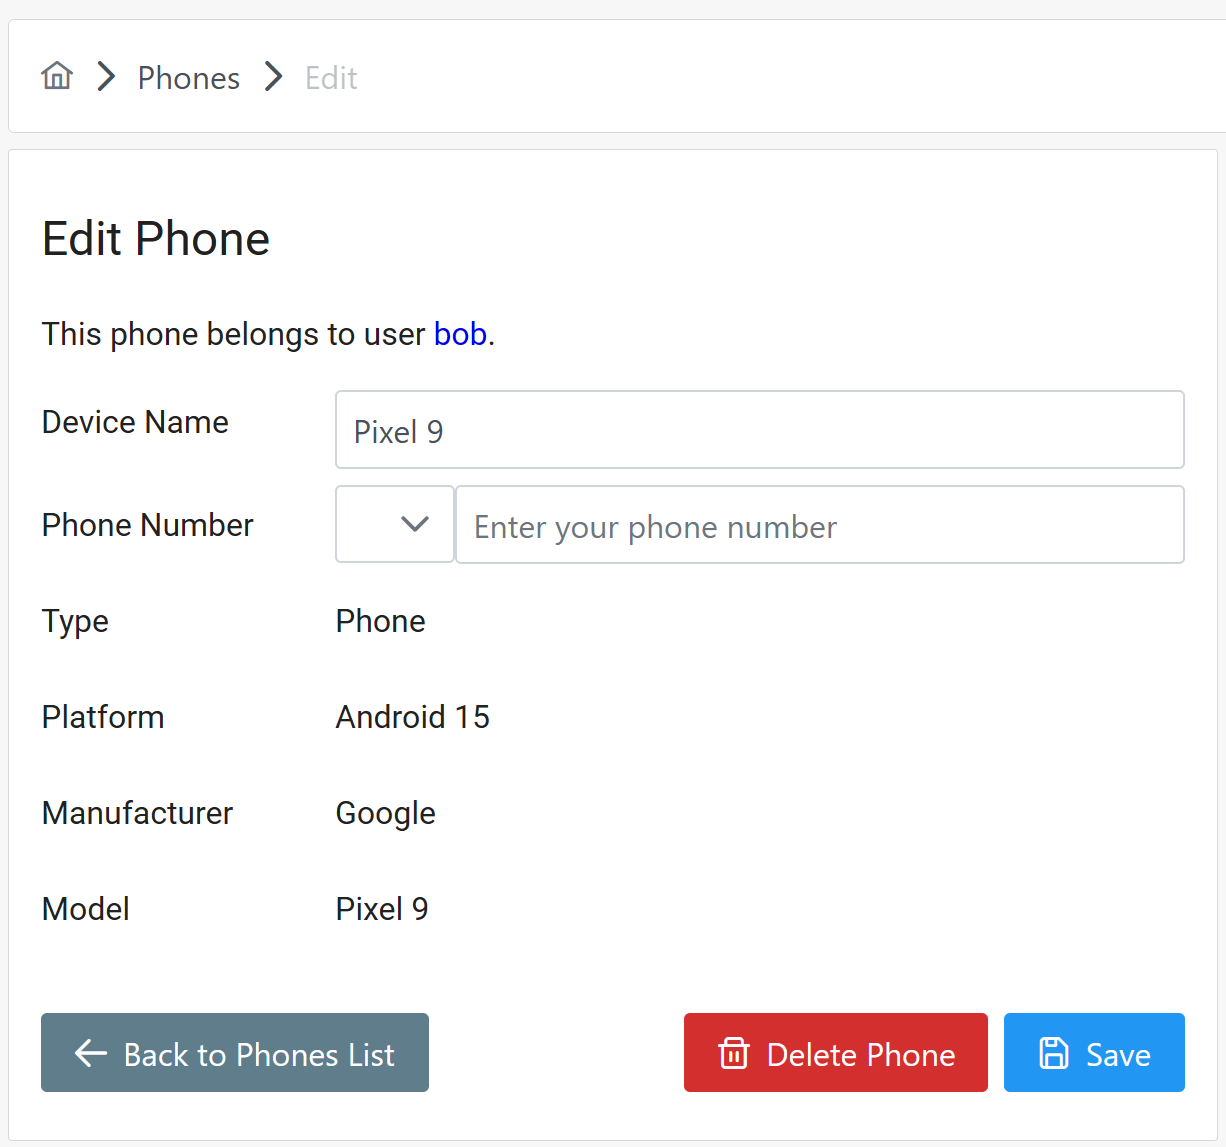
How to edit a phone
How to delete phone
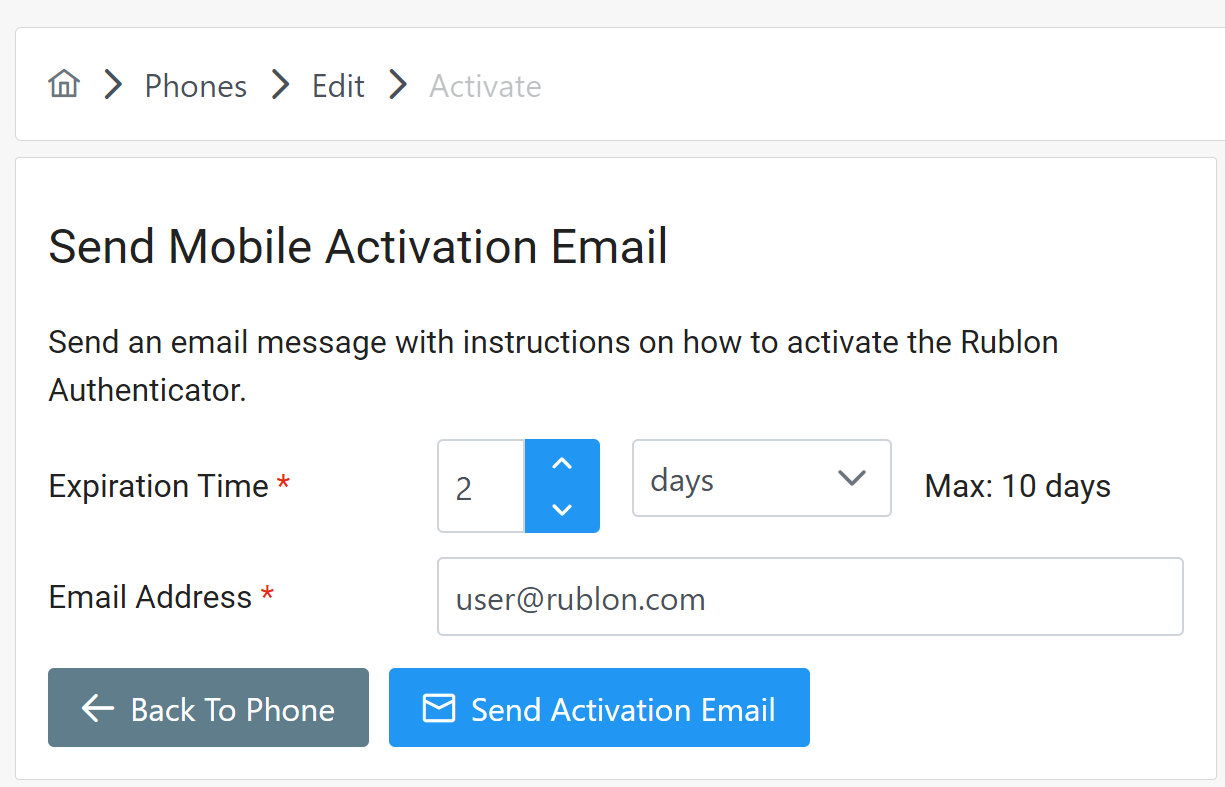
How to send a Mobile Activation Email
How to check a user’s Rublon Authenticator information
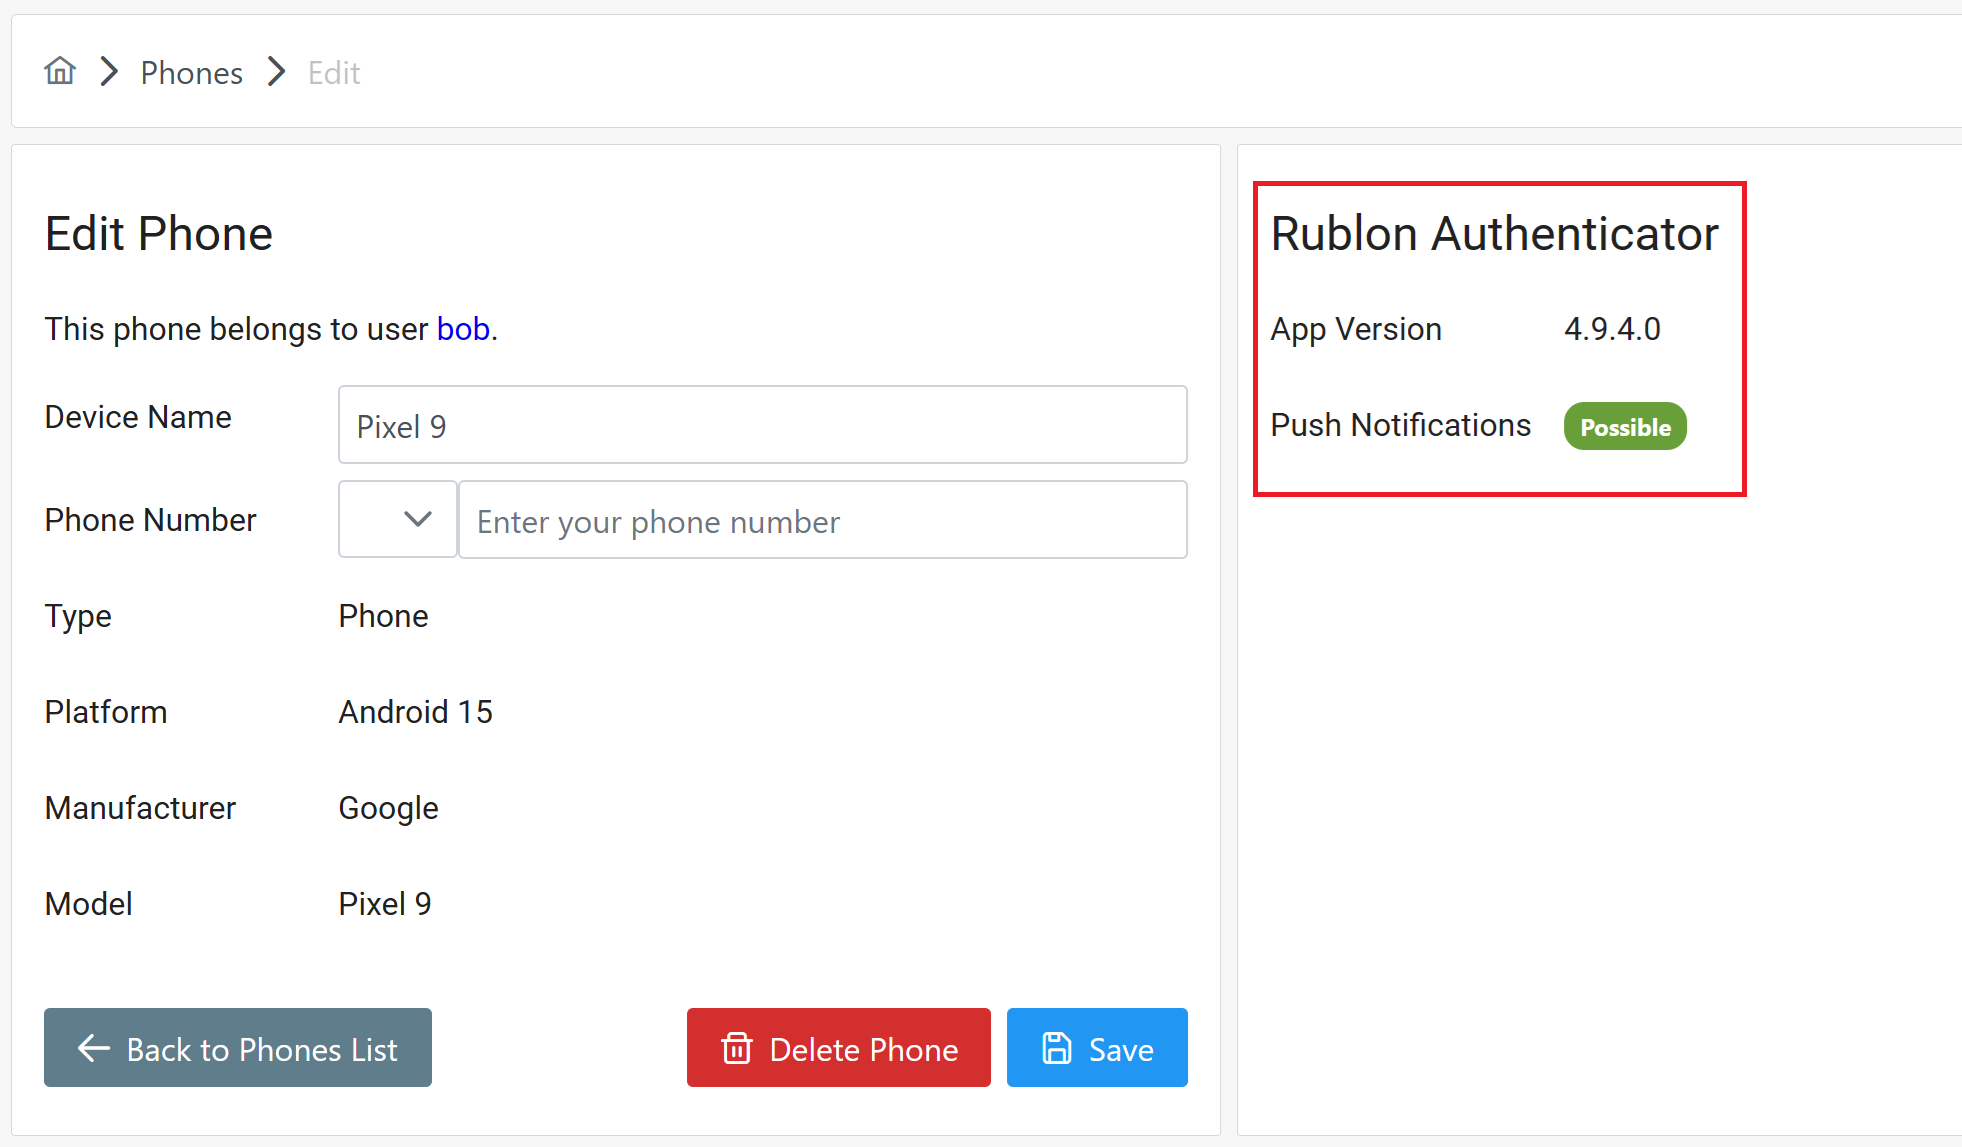
Note
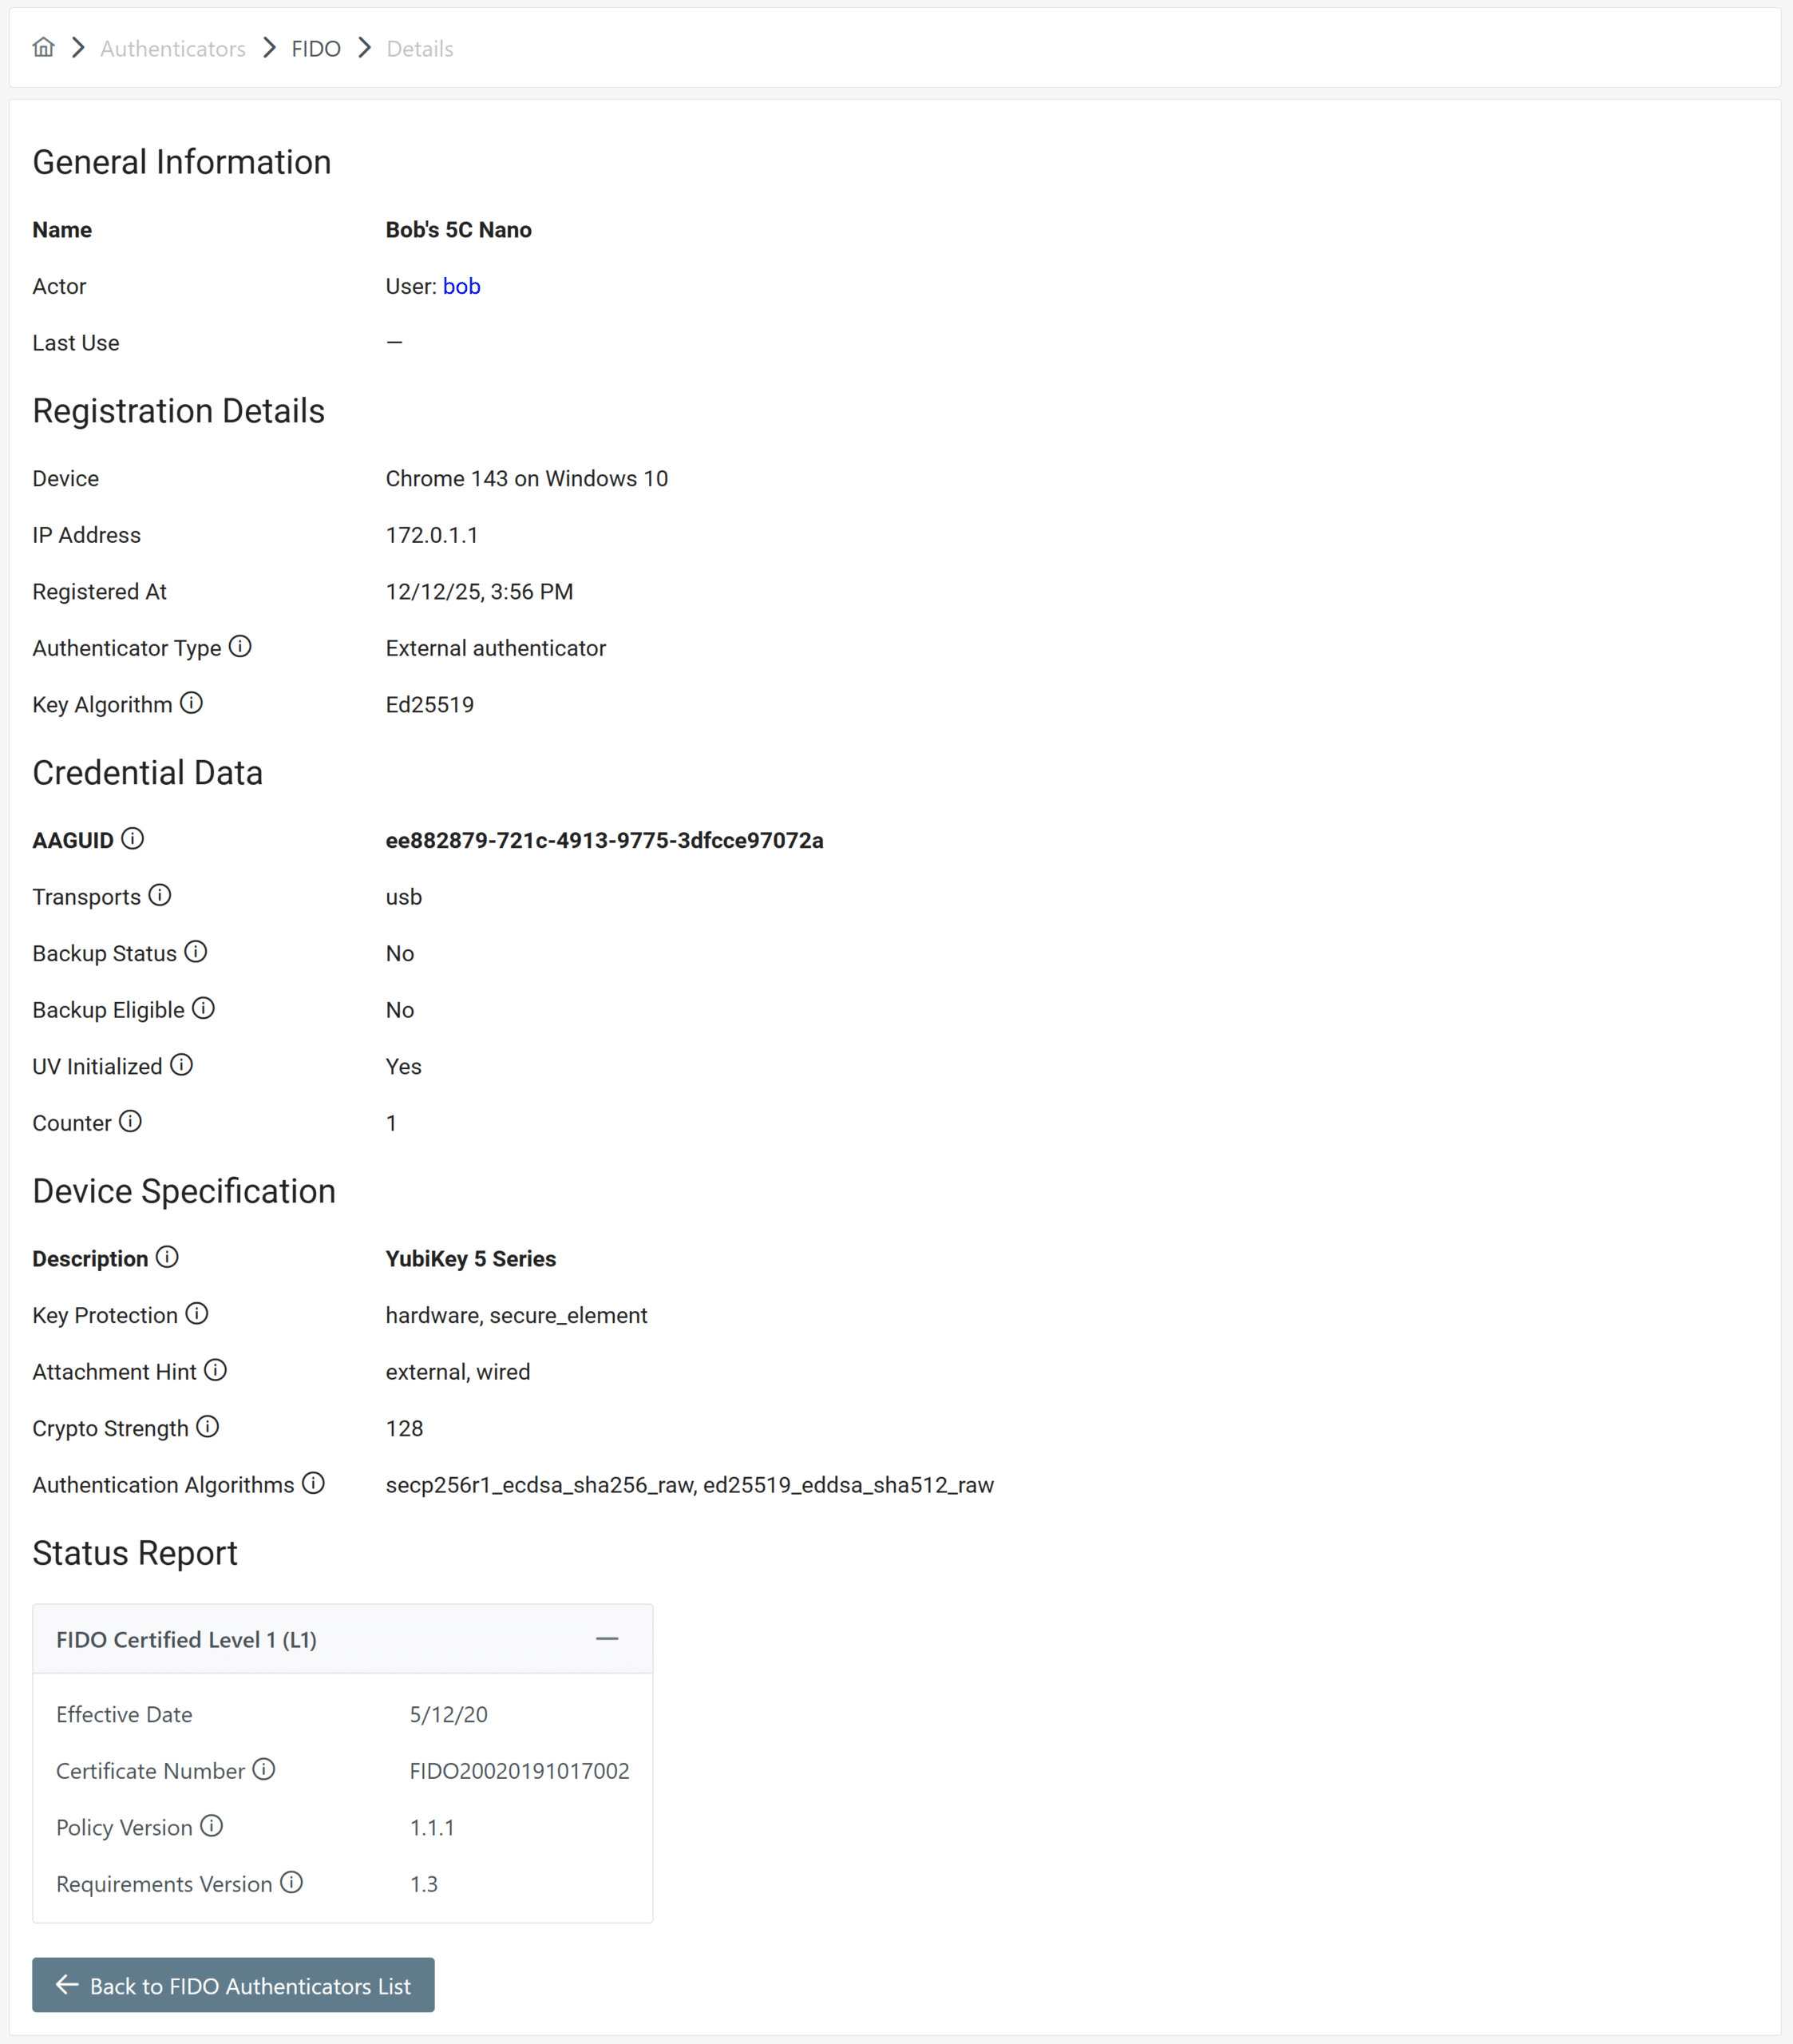
FIDO Authenticators
FIDO Authenticators allows you to see all FIDO U2F & FIDO2 security keys and FIDO2 passkeys in your organization. These authenticators are used when logging in to applications protected by Rublon MFA.
The FIDO Authenticators section depicts all FIDO authenticators in the form of a table.
Every FIDO authenticator in the table contains the following information:
- Name – the name of the FIDO authenticator
- Description – the FIDO authenticator model, including its name, purpose, or function
- Registered At – the date and time of FIDO authenticator registration
- Last Use – the date and time of the last use
- Actor – the actor (User or Admin) this authenticator belongs to
- Delete – click the trash bin icon next to a given FIDO authenticator to delete it
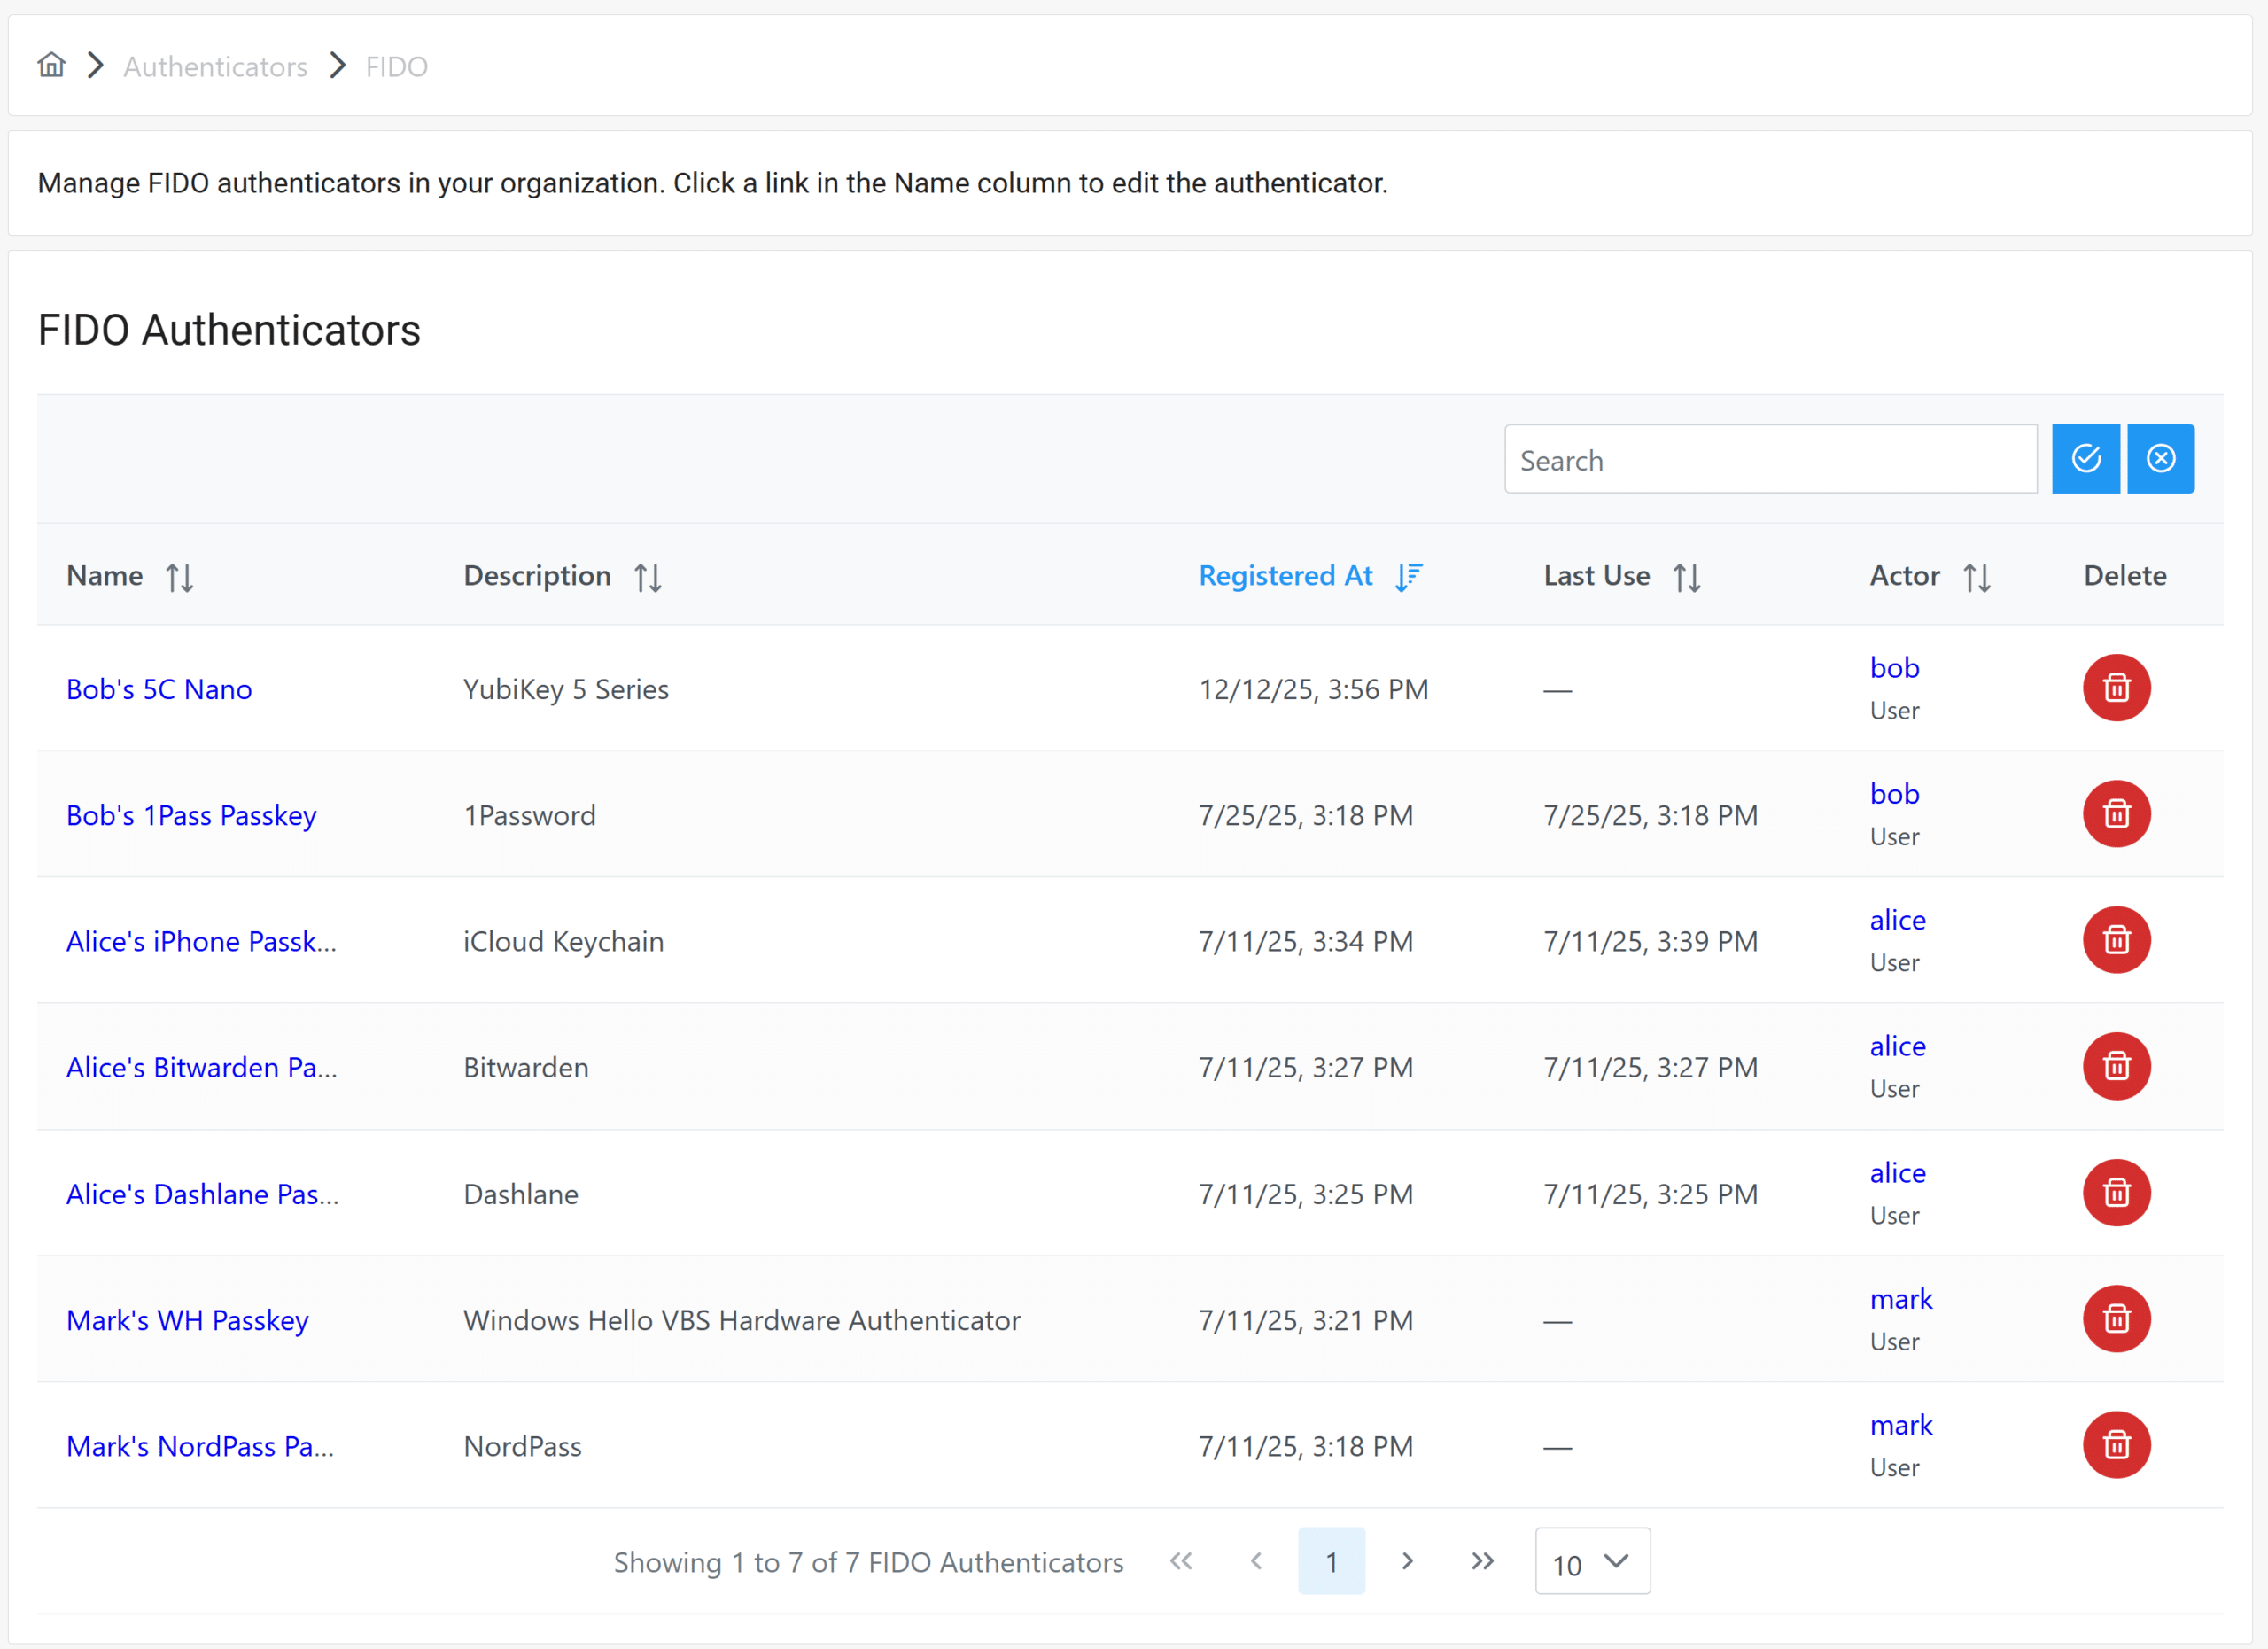
The following sorting, filtering, and searching options are available:
- The FIDO Authenticators table allows sorting by the following columns:
- Name
- Description
- Registered At
- Last Use
- Actor
- The FIDO Authenticators table also allows searching by the following data, thus narrowing down the results:
- Name
- Description
- Actor
Clicking a link in the Name column will show details of that specific FIDO authenticator.
How to add a new FIDO authenticator
- How to add a user’s FIDO authenticator
- Learn how a user can self-enroll a new FIDO security key
- Learn how a user can self-enroll a new FIDO2 passkey
YubiKey OTP Authenticators
YubiKey OTP Authenticators allows you to see all YubiKey OTP security keys in your organization. These keys are used when logging in to applications protected by Rublon MFA.
The YubiKey OTP Authenticators section depicts all security keys in the form of a table.
Every YubiKey OTP authenticator in the table contains the following information:
- Name – the name of the YubiKey OTP authenticator
- Registered At – the date and time of key registration
- Last Use – the date and time of the last key use
- Actor – the actor (User or Admin) this authenticator belongs to
- Delete – click the trash bin icon next to a given key to remove it

The following sorting, filtering, and searching options are available:
- The YubiKey OTP Authenticators table allows sorting by the following columns:
- Name
- Registered At
- Last Use
- Actor
- The YubiKey OTP Authenticators table also allows searching by the following data, thus narrowing down the results:
- Name
- Actor
How to add a new YubiKey OTP authenticator
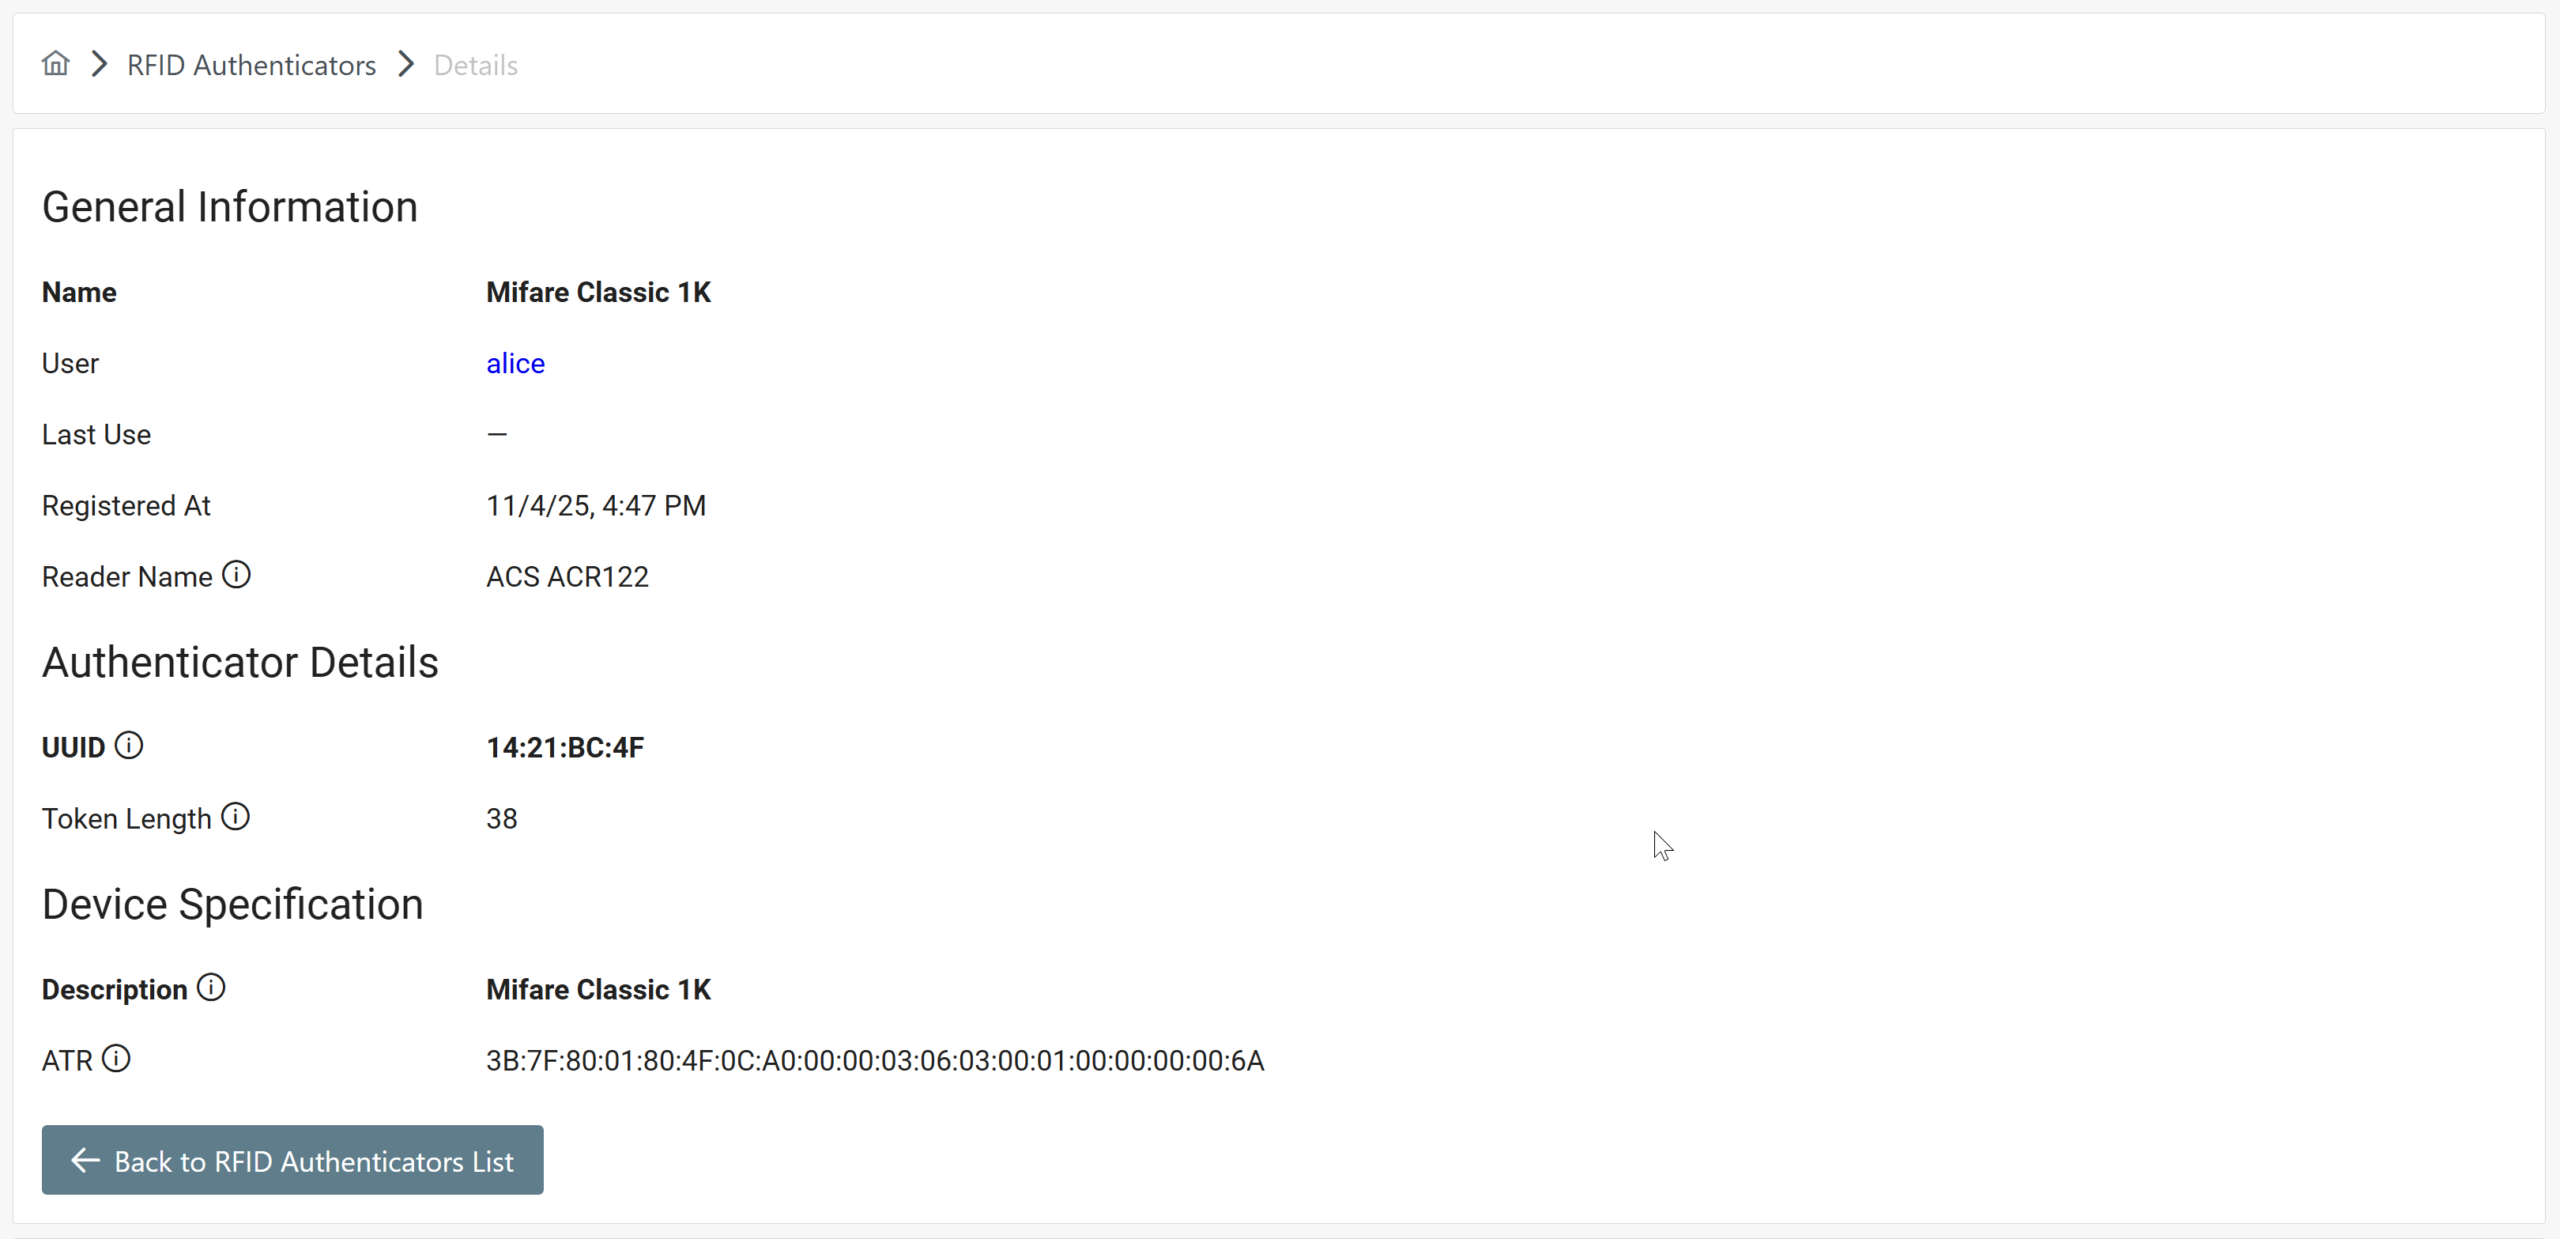
RFID Authenticators
RFID Authenticators allows you to see all RFID authenticators in your organization.
The RFID Authenticators section depicts all RFID authenticators in the form of a table.
Every RFID authenticator in the table contains the following information:
- Name – the name of the RFID authenticator
- Description – the description of the RFID authenticator (e.g., RFID card model)
- User – the user who registered the RFID authenticator
- Last Use – the date and time of the last authenticator use
- Registered At – the date and time of RFID authenticator registration
- Delete – click the trash bin icon next to a given security key to remove that security key

Clicking a link in the Name column will show the details of that specific RFID authenticator.
How to add a new RFID authenticator
Policies

Global Policy
Custom Policies
How to create a new policy
Note
Policy Sections
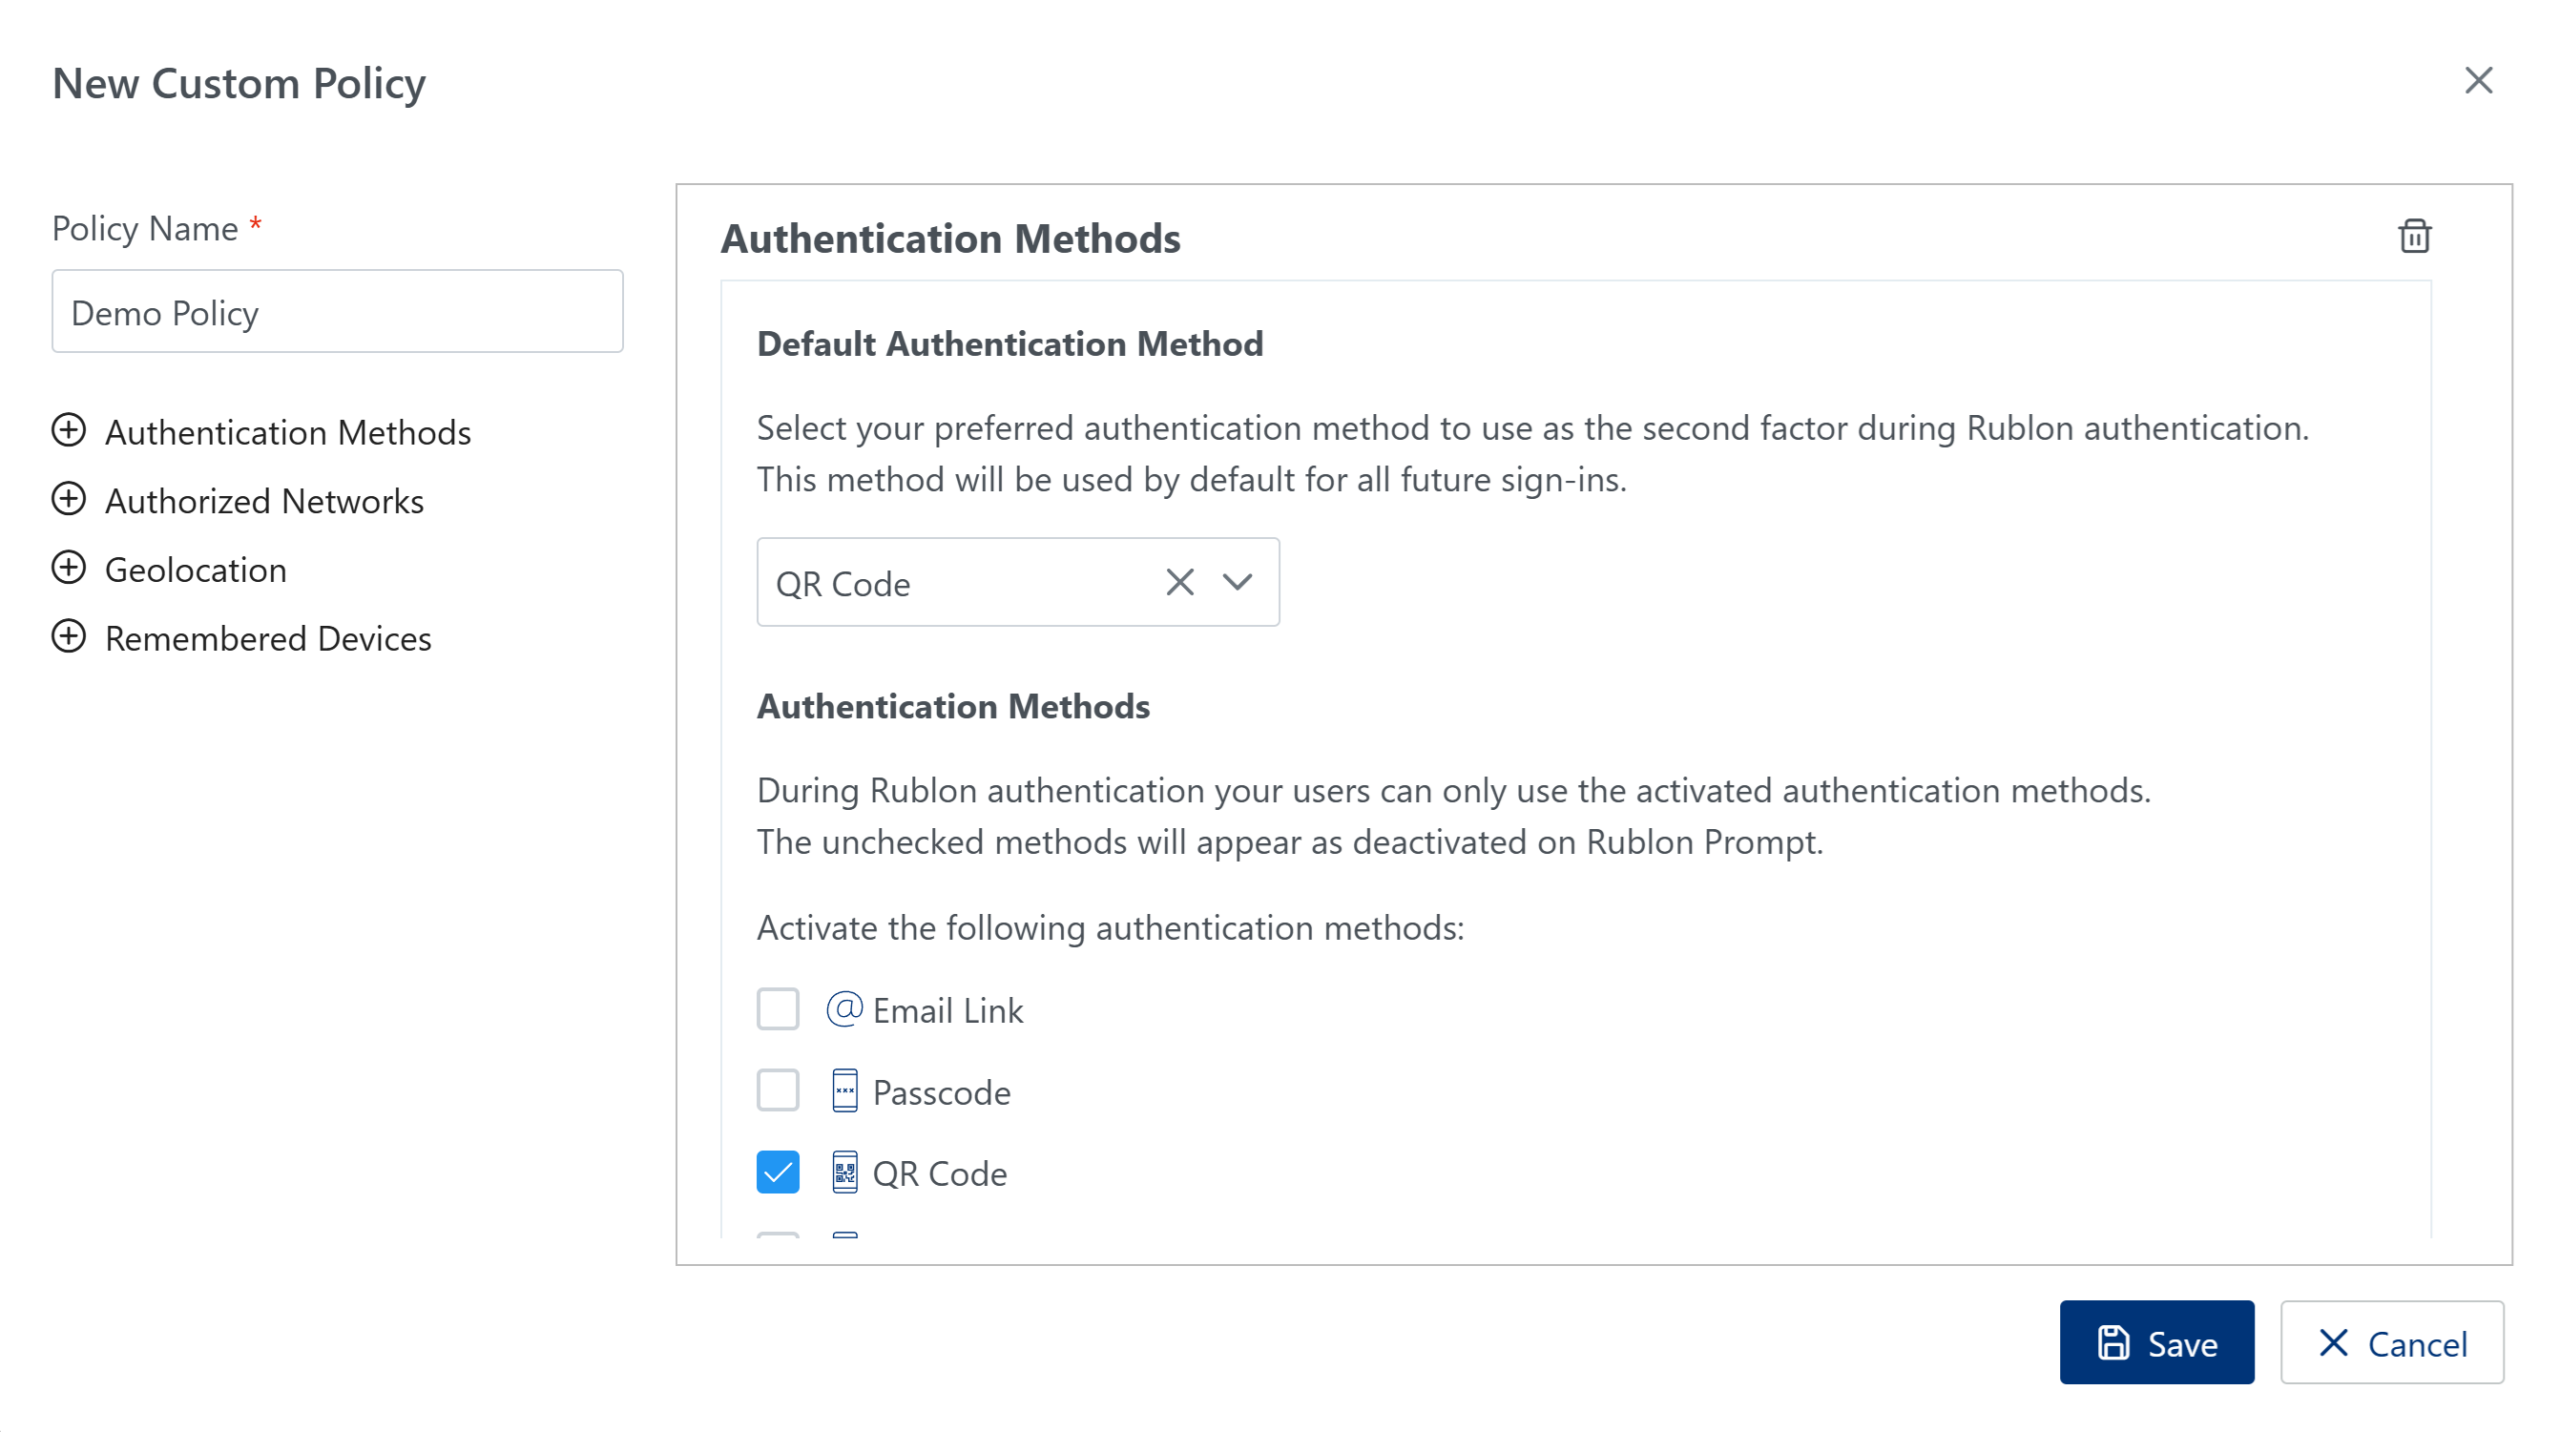
Authentication Methods
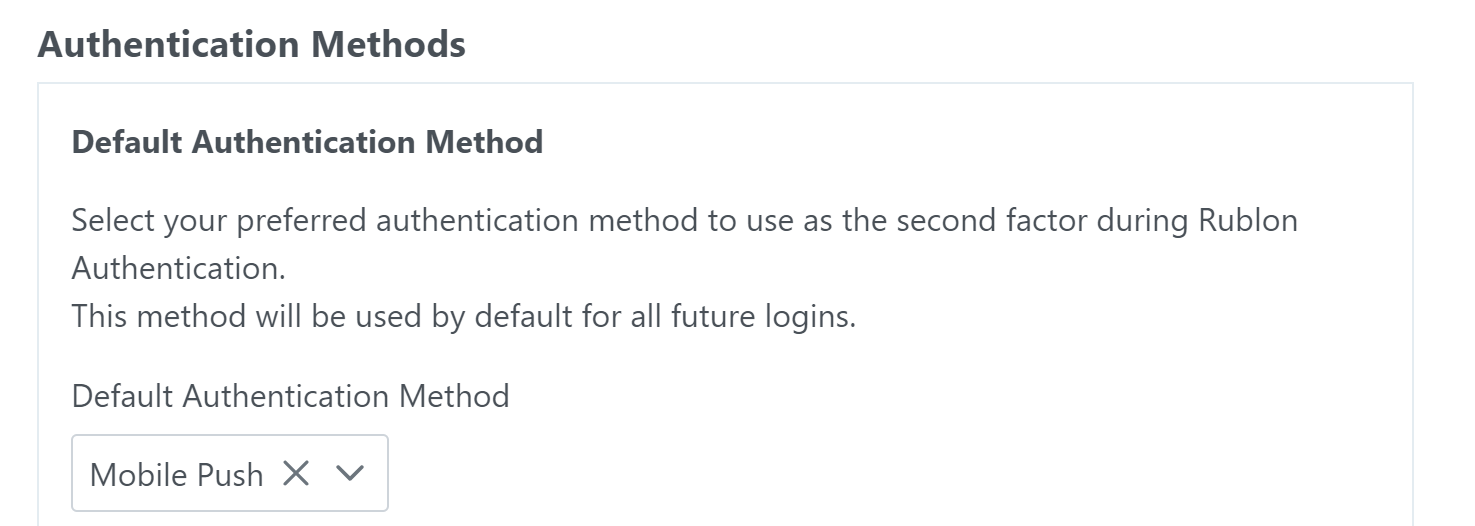
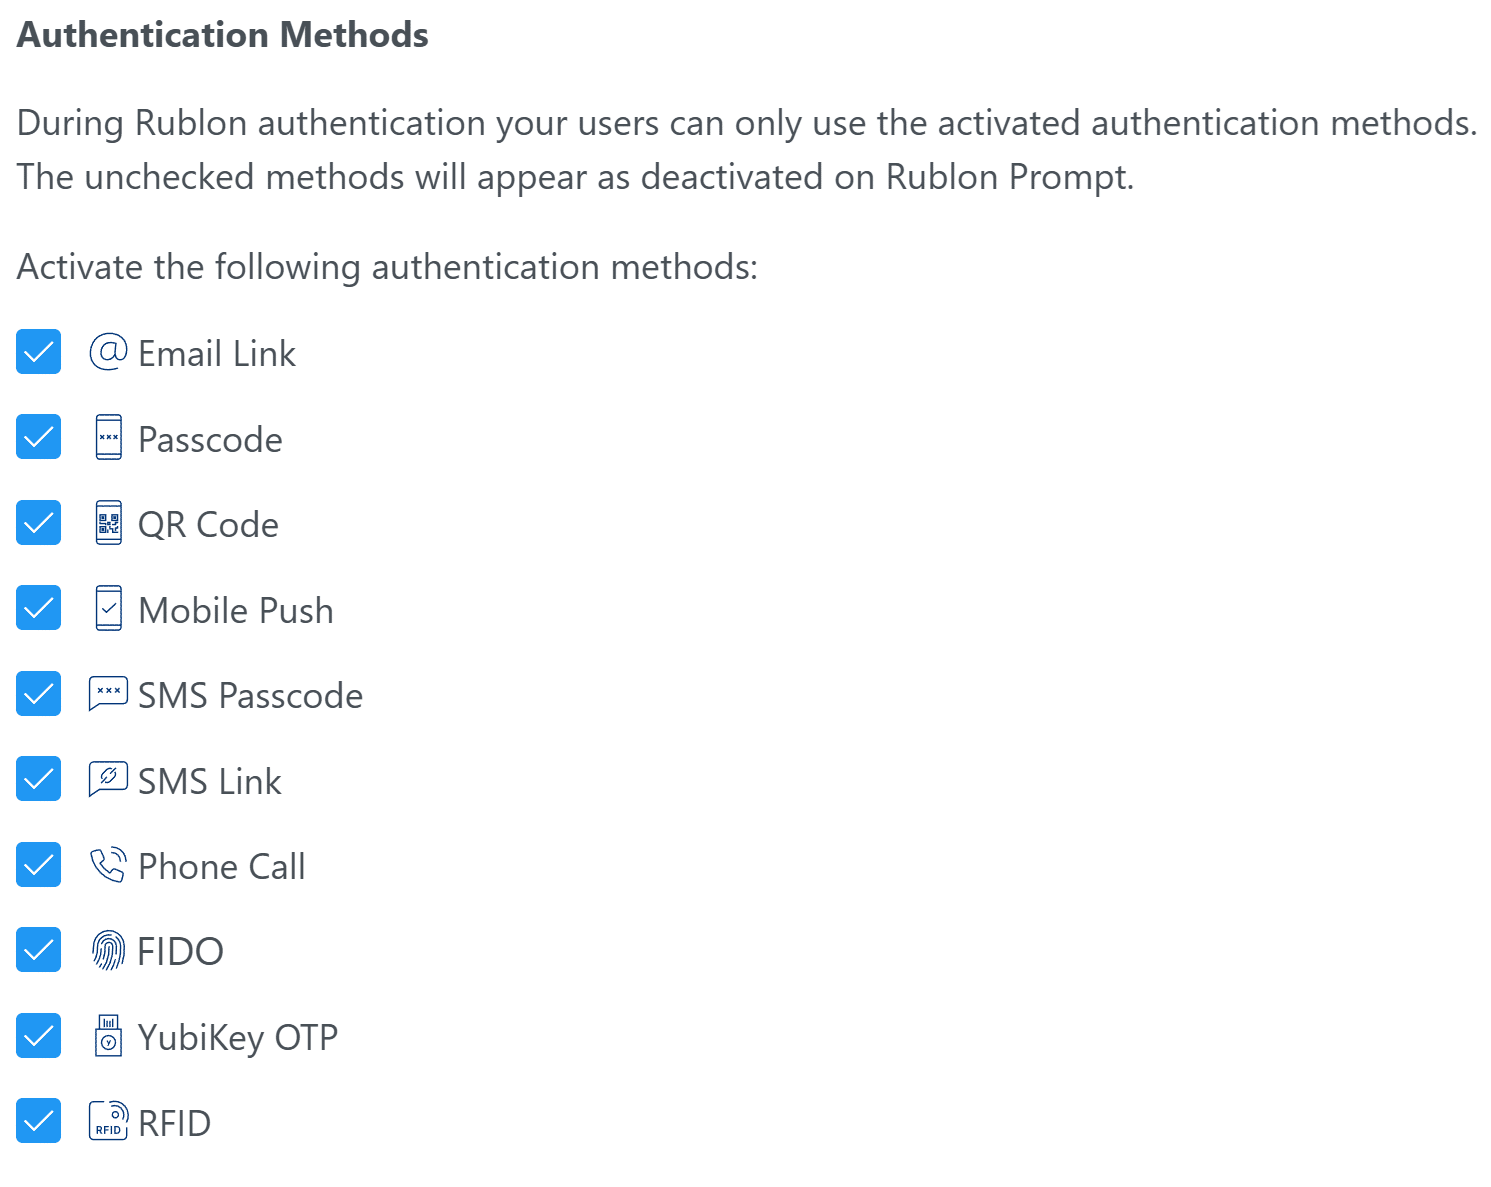
The Hide deactivated authentication methods in the Rublon Prompt. checkbox controls whether authentication methods deactivated in this policy are hidden entirely from the Rublon Prompt or simply shown in a disabled (grayed‑out) state.
- When checked, any method you have deactivated will not appear at all in the Rublon Prompt.
- When unchecked, deactivated methods remain visible but are displayed in a grayed‑out, non‑selectable state.

Authorized Networks
# this comment will be ignored
# 192.168.1.1, 10.0.0.2 - these IPs will be ignored
202.201.200.192


17.5.7.8,17.5.100.0-17.5.100.50,           17.5.100.0/24

203.100.100.5
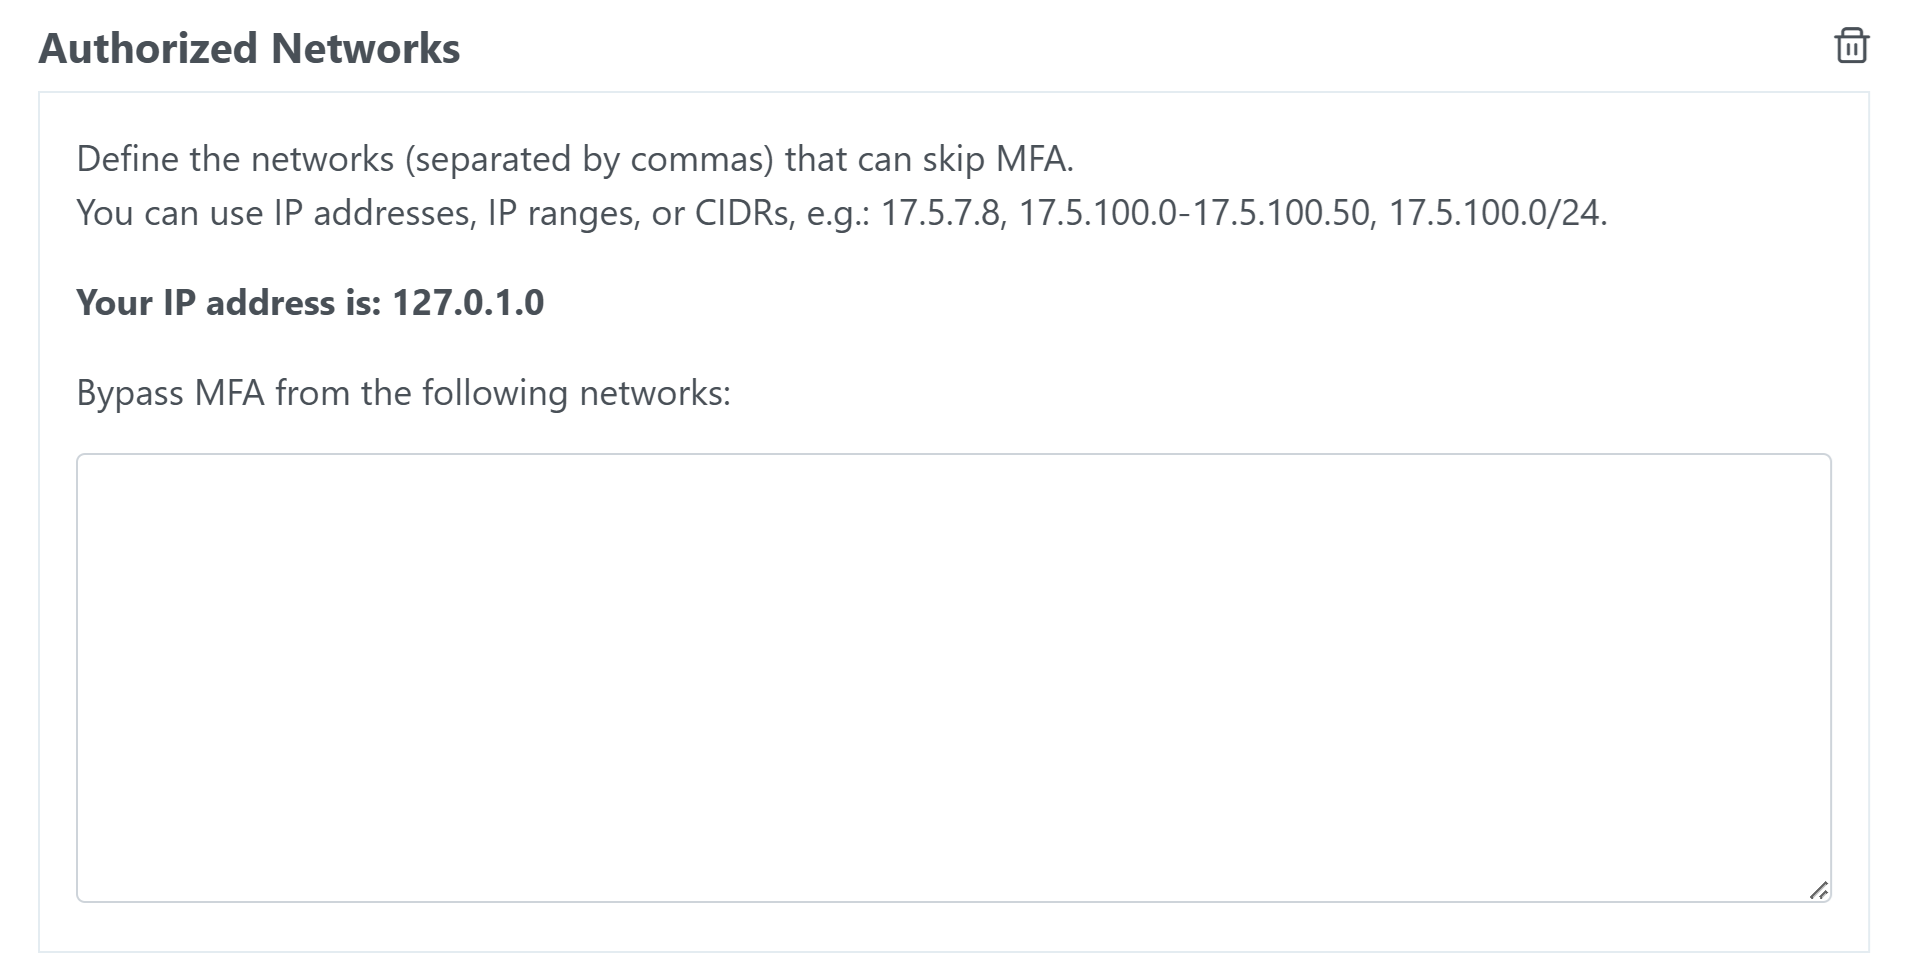
Note
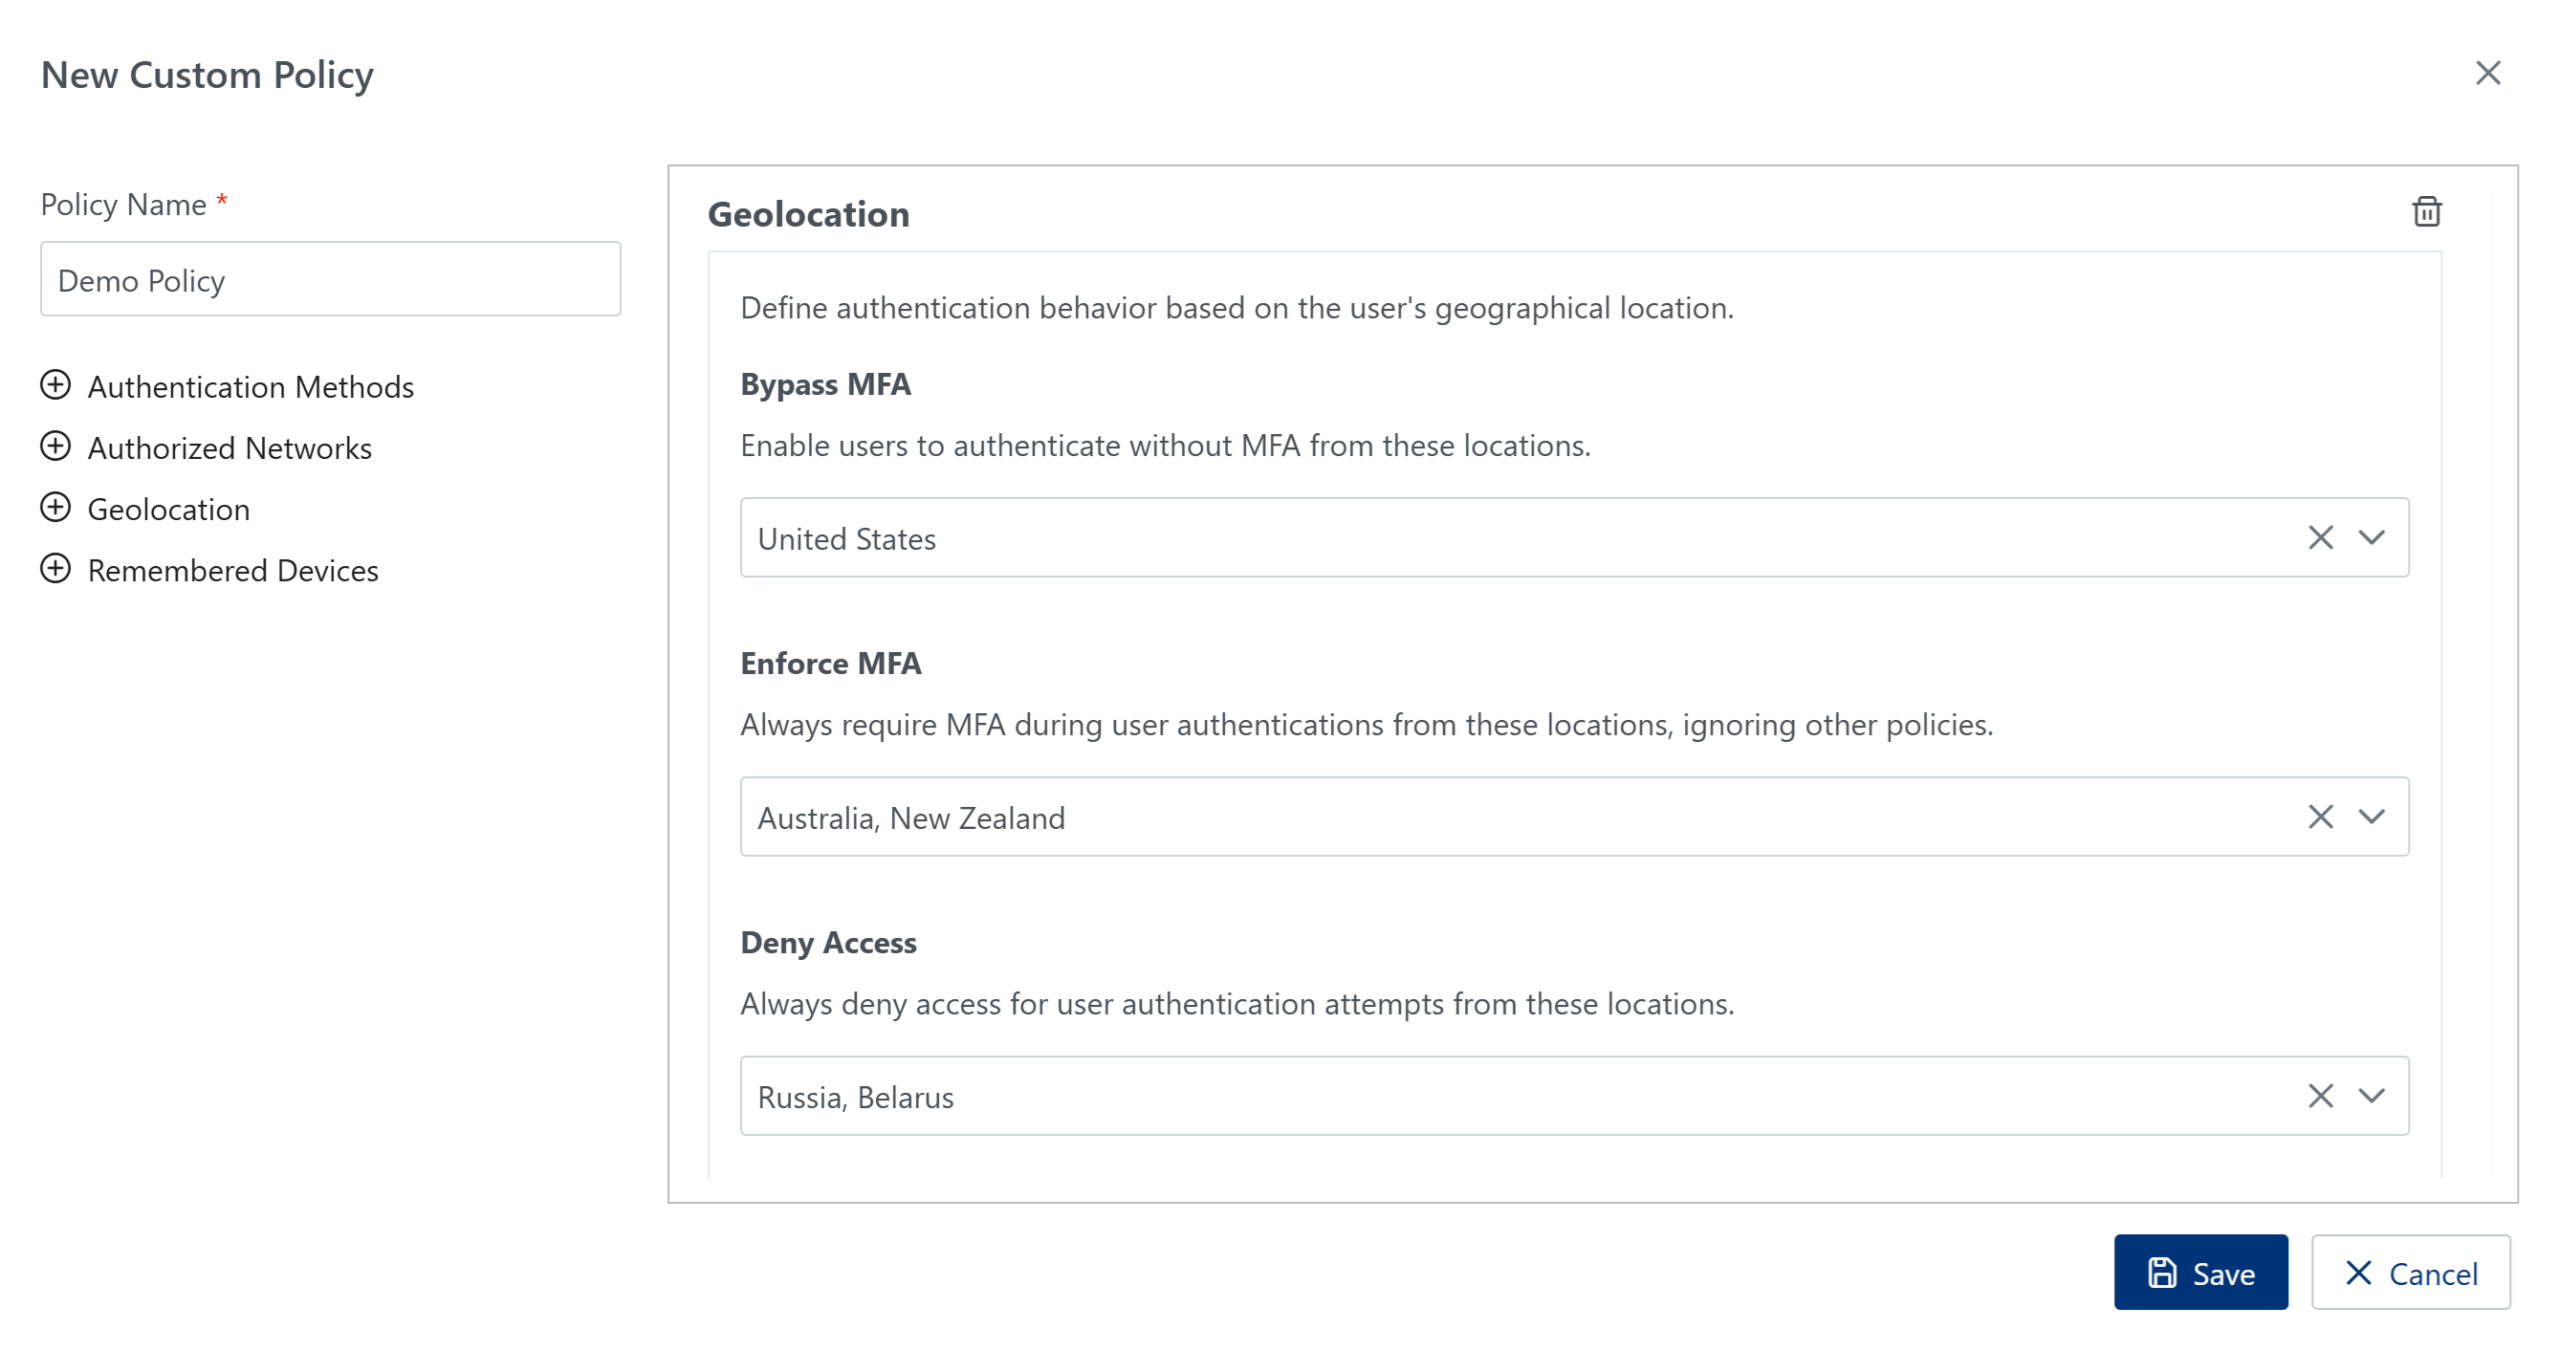
Geolocation
The Geolocation Policy allows administrators to define authentication behavior based on the geographical location from which a user attempts to sign in. This policy helps organizations tailor access controls to geographic risk levels and compliance requirements.
It supports three configurable actions:
- Bypass MFA – lets users authenticate without MFA when signing in from selected countries.
- Enforce MFA – always requires MFA for authentications originating from specified locations, regardless of other policies.
- Deny Access – blocks all authentication attempts from chosen countries.
Note
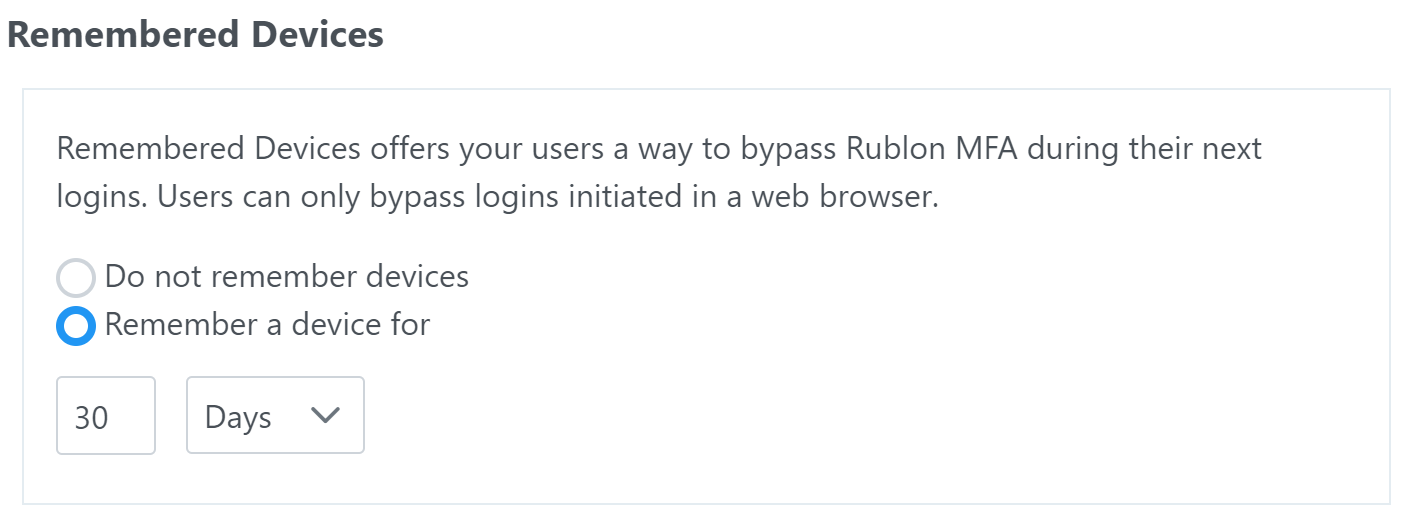
Remembered Devices
Note
Note
Remembered Devices

Administrators

Administrator Roles
How to add an admin

Resend Setup Email

How to add an admin’s phone
How to delete an admin’s phone
Note
How to add an admin to an administrative unit
Administrative Units

Using Administrative Units to Manage Admin’s User Management Privileges
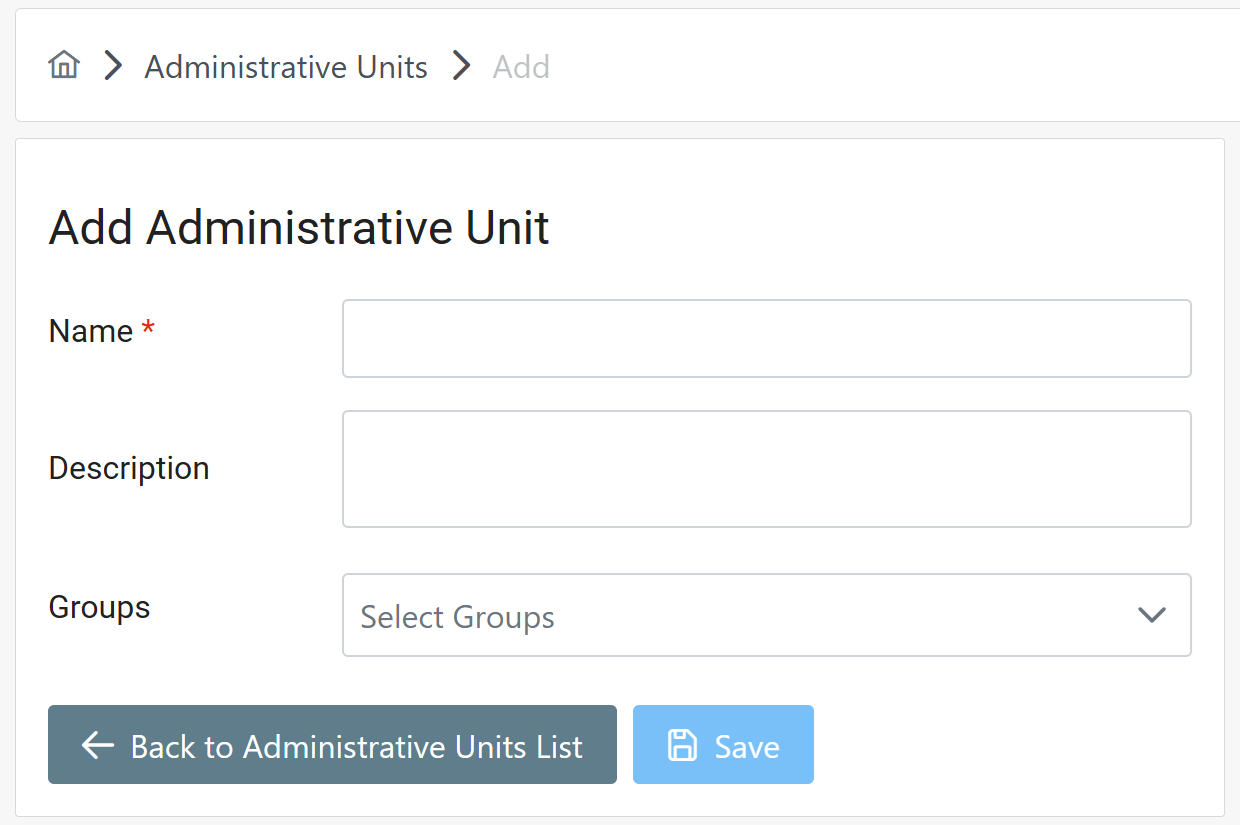
How to add an administrative unit
How to add admins to administrative unit
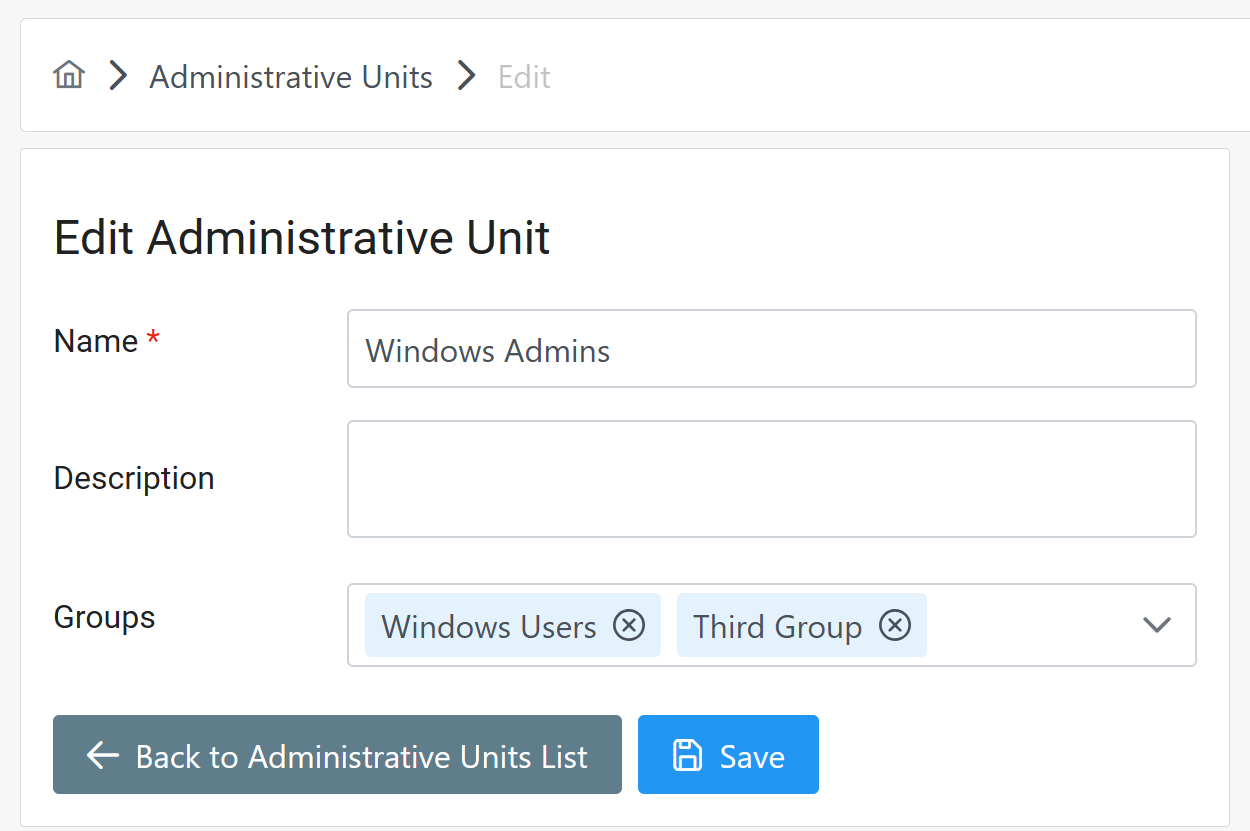
How to edit an administrative unit
How to delete an administrative unit
How to assign an administrative unit to a group
Admin Sign-in Settings
Admin Sign-in Settings allows you to manage administrator sign-in and authentication settings globally in your organization. Decide which authentication methods administrators can use to sign in to the Rublon Admin Console and set the time limit for Rublon Admin Console sessions to ensure NIST AAL3 or NIST AAL2 compliance.
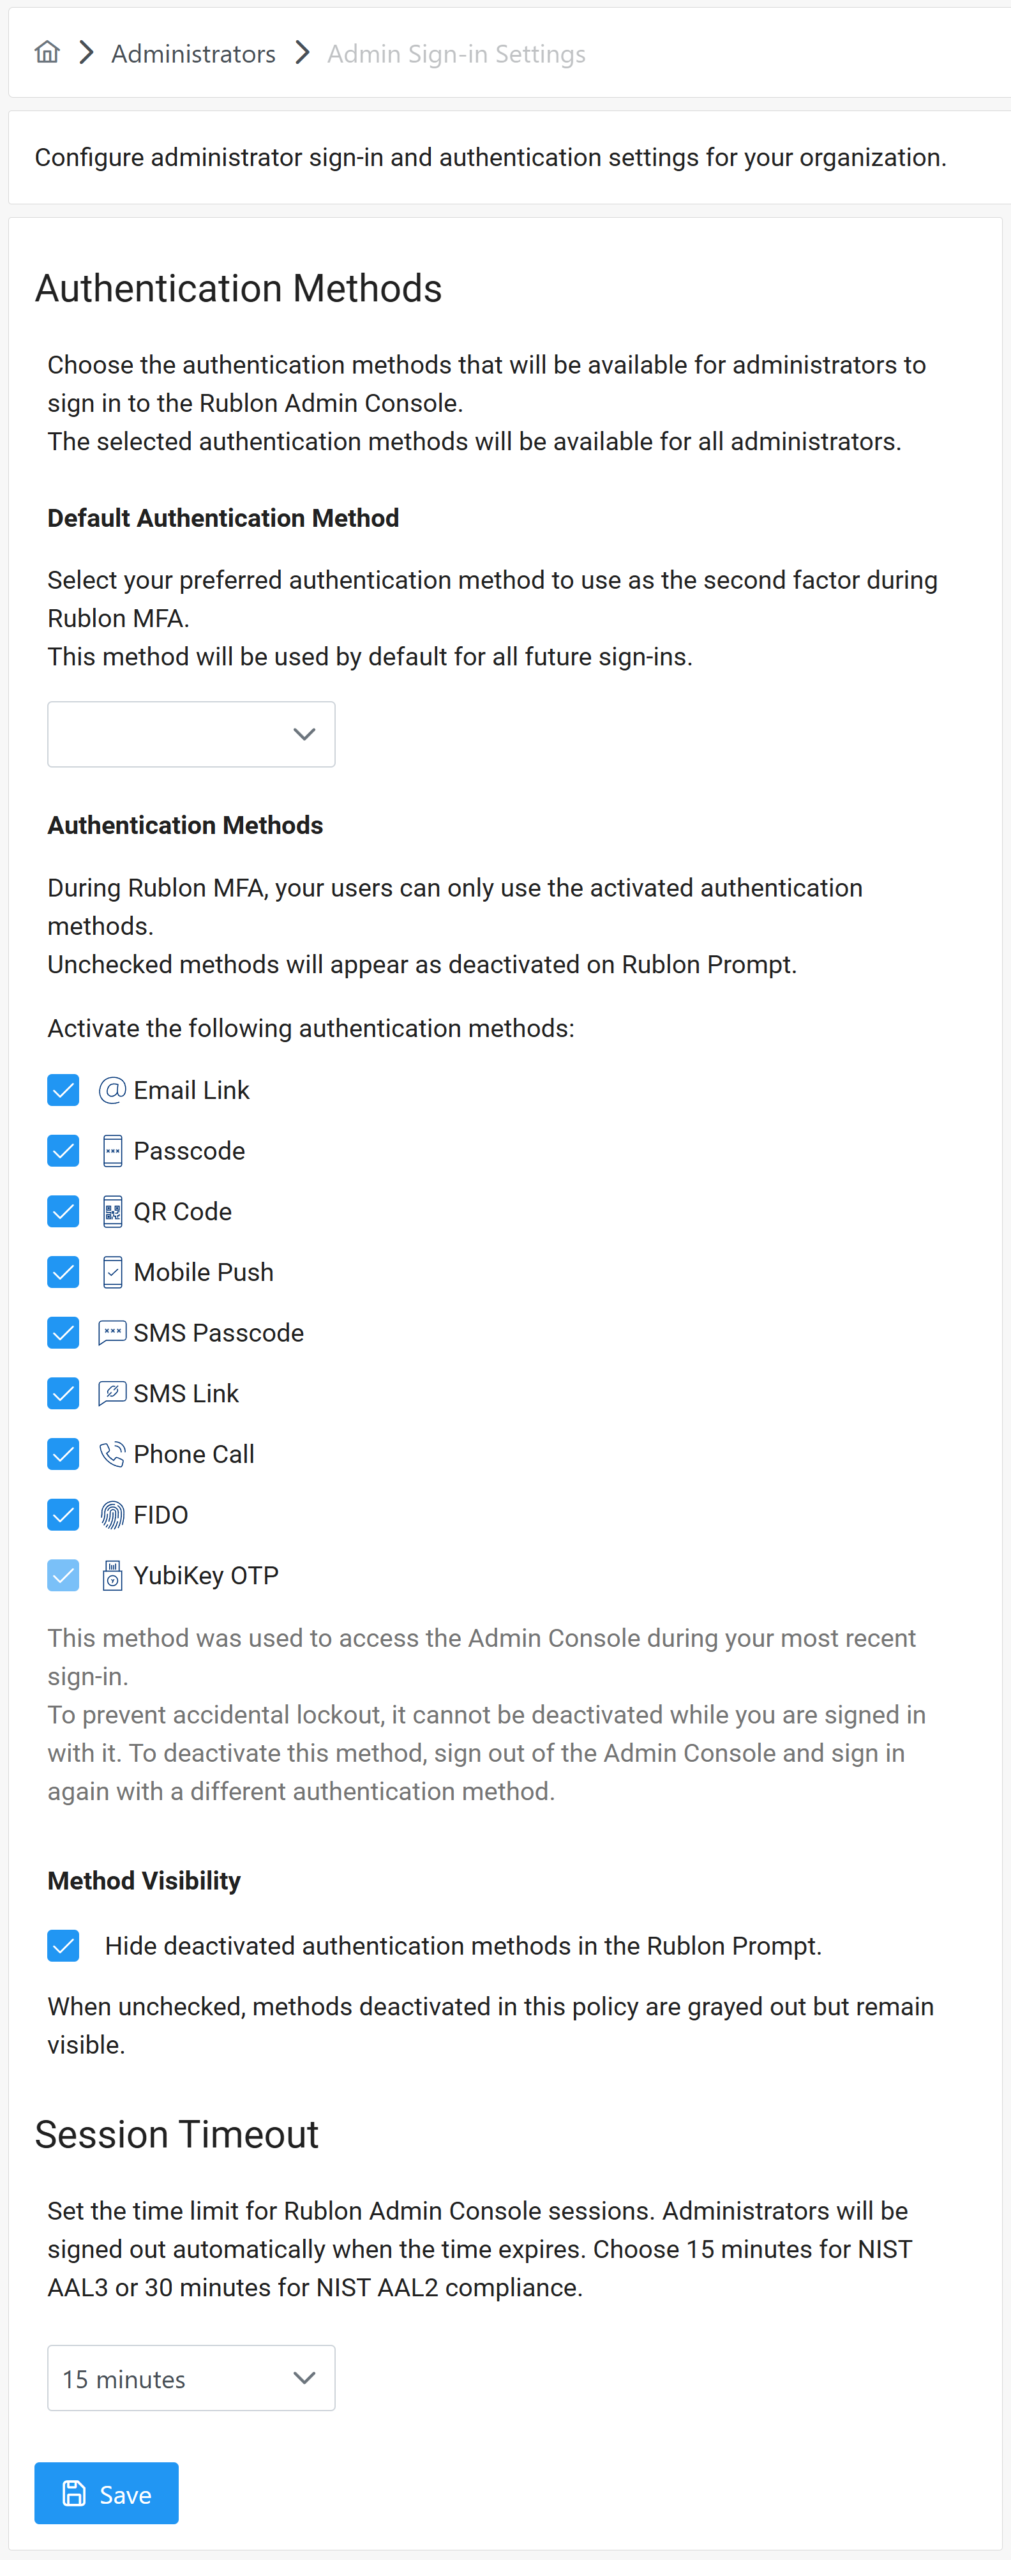
All settings in the Admin Sign-in Settings tab are global, which means they apply to all administrators regardless of their administrator role. When you edit these settings, make sure you do not lock yourself or other admins out of the Rublon Admin Console. To help prevent that, the console enforces three safeguards:
- An administrator cannot deactivate the authentication method they used to access the Rublon Admin Console on their last sign-in. To deactivate that method, the admin must signs out of the Admin Console and signs in again with a different method.
- If Administrator B deactivated the authentication method that Administrator A last used to access the Rublon Admin Console, and Administrator A is still signed in the console, Administrator A will see a red-box warning about that and will not be able to save changes until they check this method again.
- If an administrator changed the available authentication methods and wants to save the changes, a confirmation window appears, asking them to ensure these changes do not block themselves or other admins from accessing the Rublon Admin Console.
Session Timeout
Set the time limit for Rublon Admin Console sessions. Administrators will be signed out automatically when the time expires.
- 15 min (compliant with NIST AAL3, default)
- 30 min (compliant with NIST AAL2)
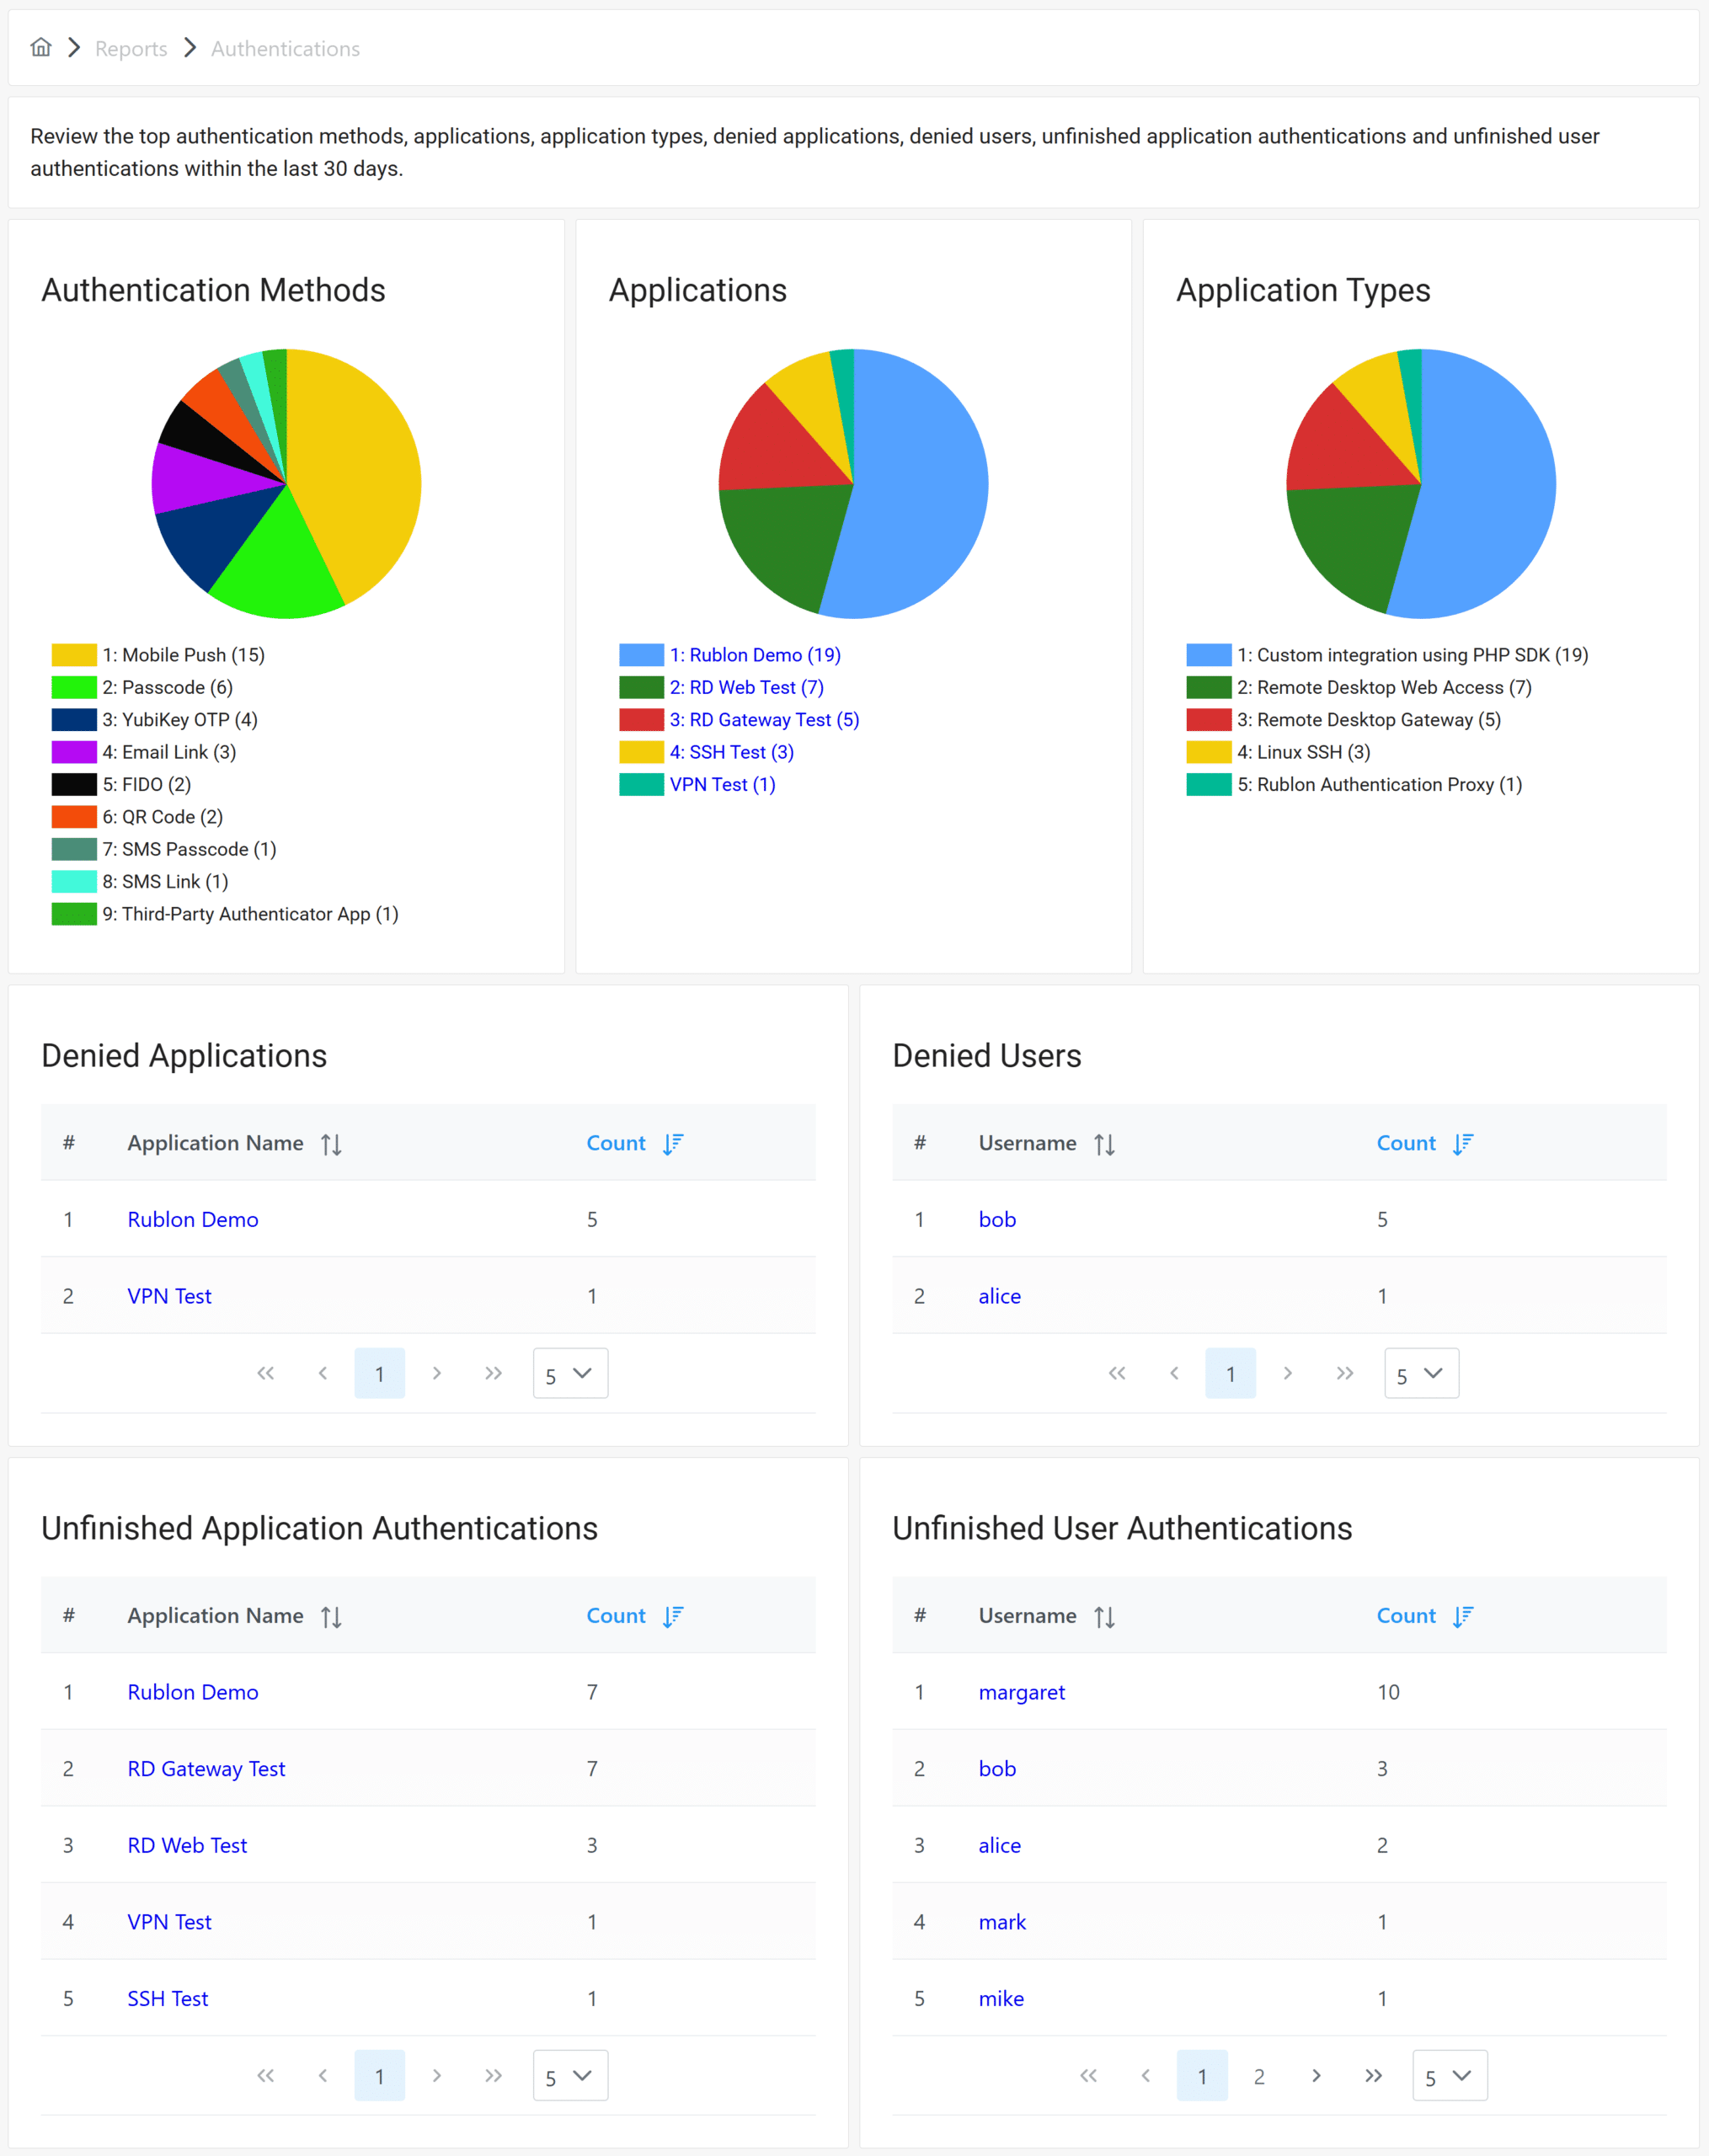
Reports
Authentications
Authentication Logs
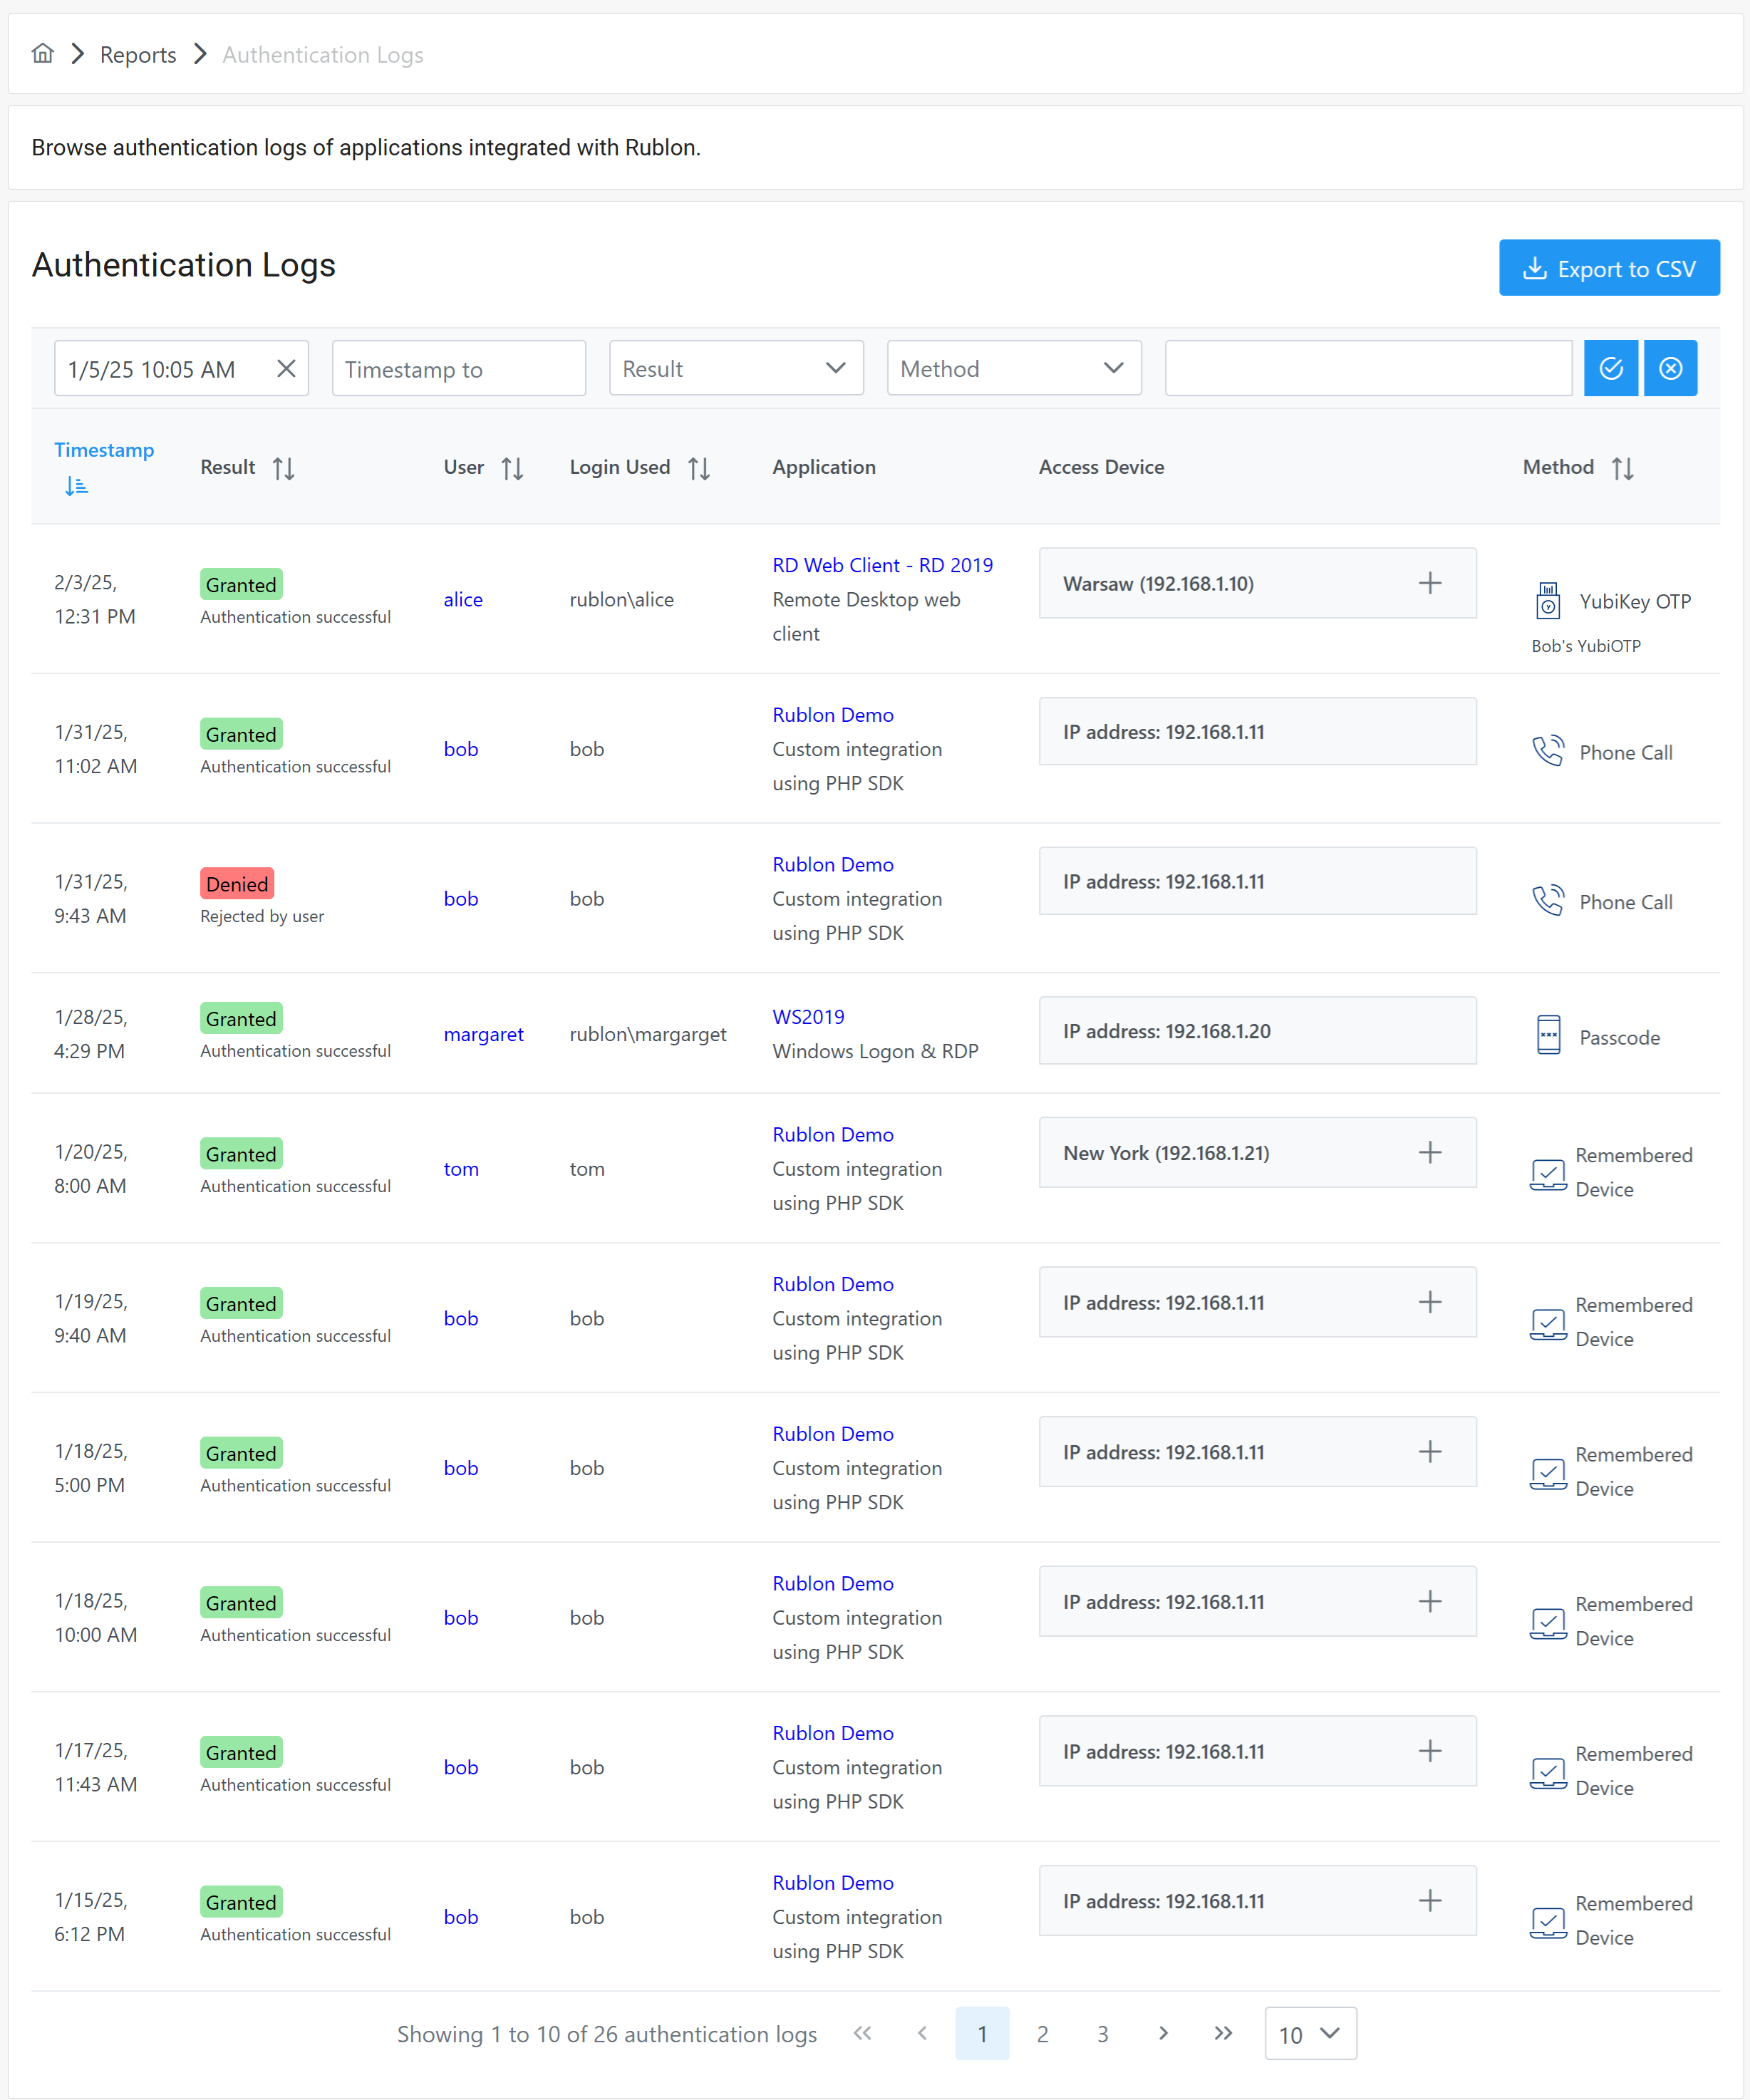

How to export authentication logs
Note
Every time you access the Authentication Logs tab, a Timestamp From filter automatically selects the last 30 days by default. Make sure to remove this filter if you wish to export all authentication logs.
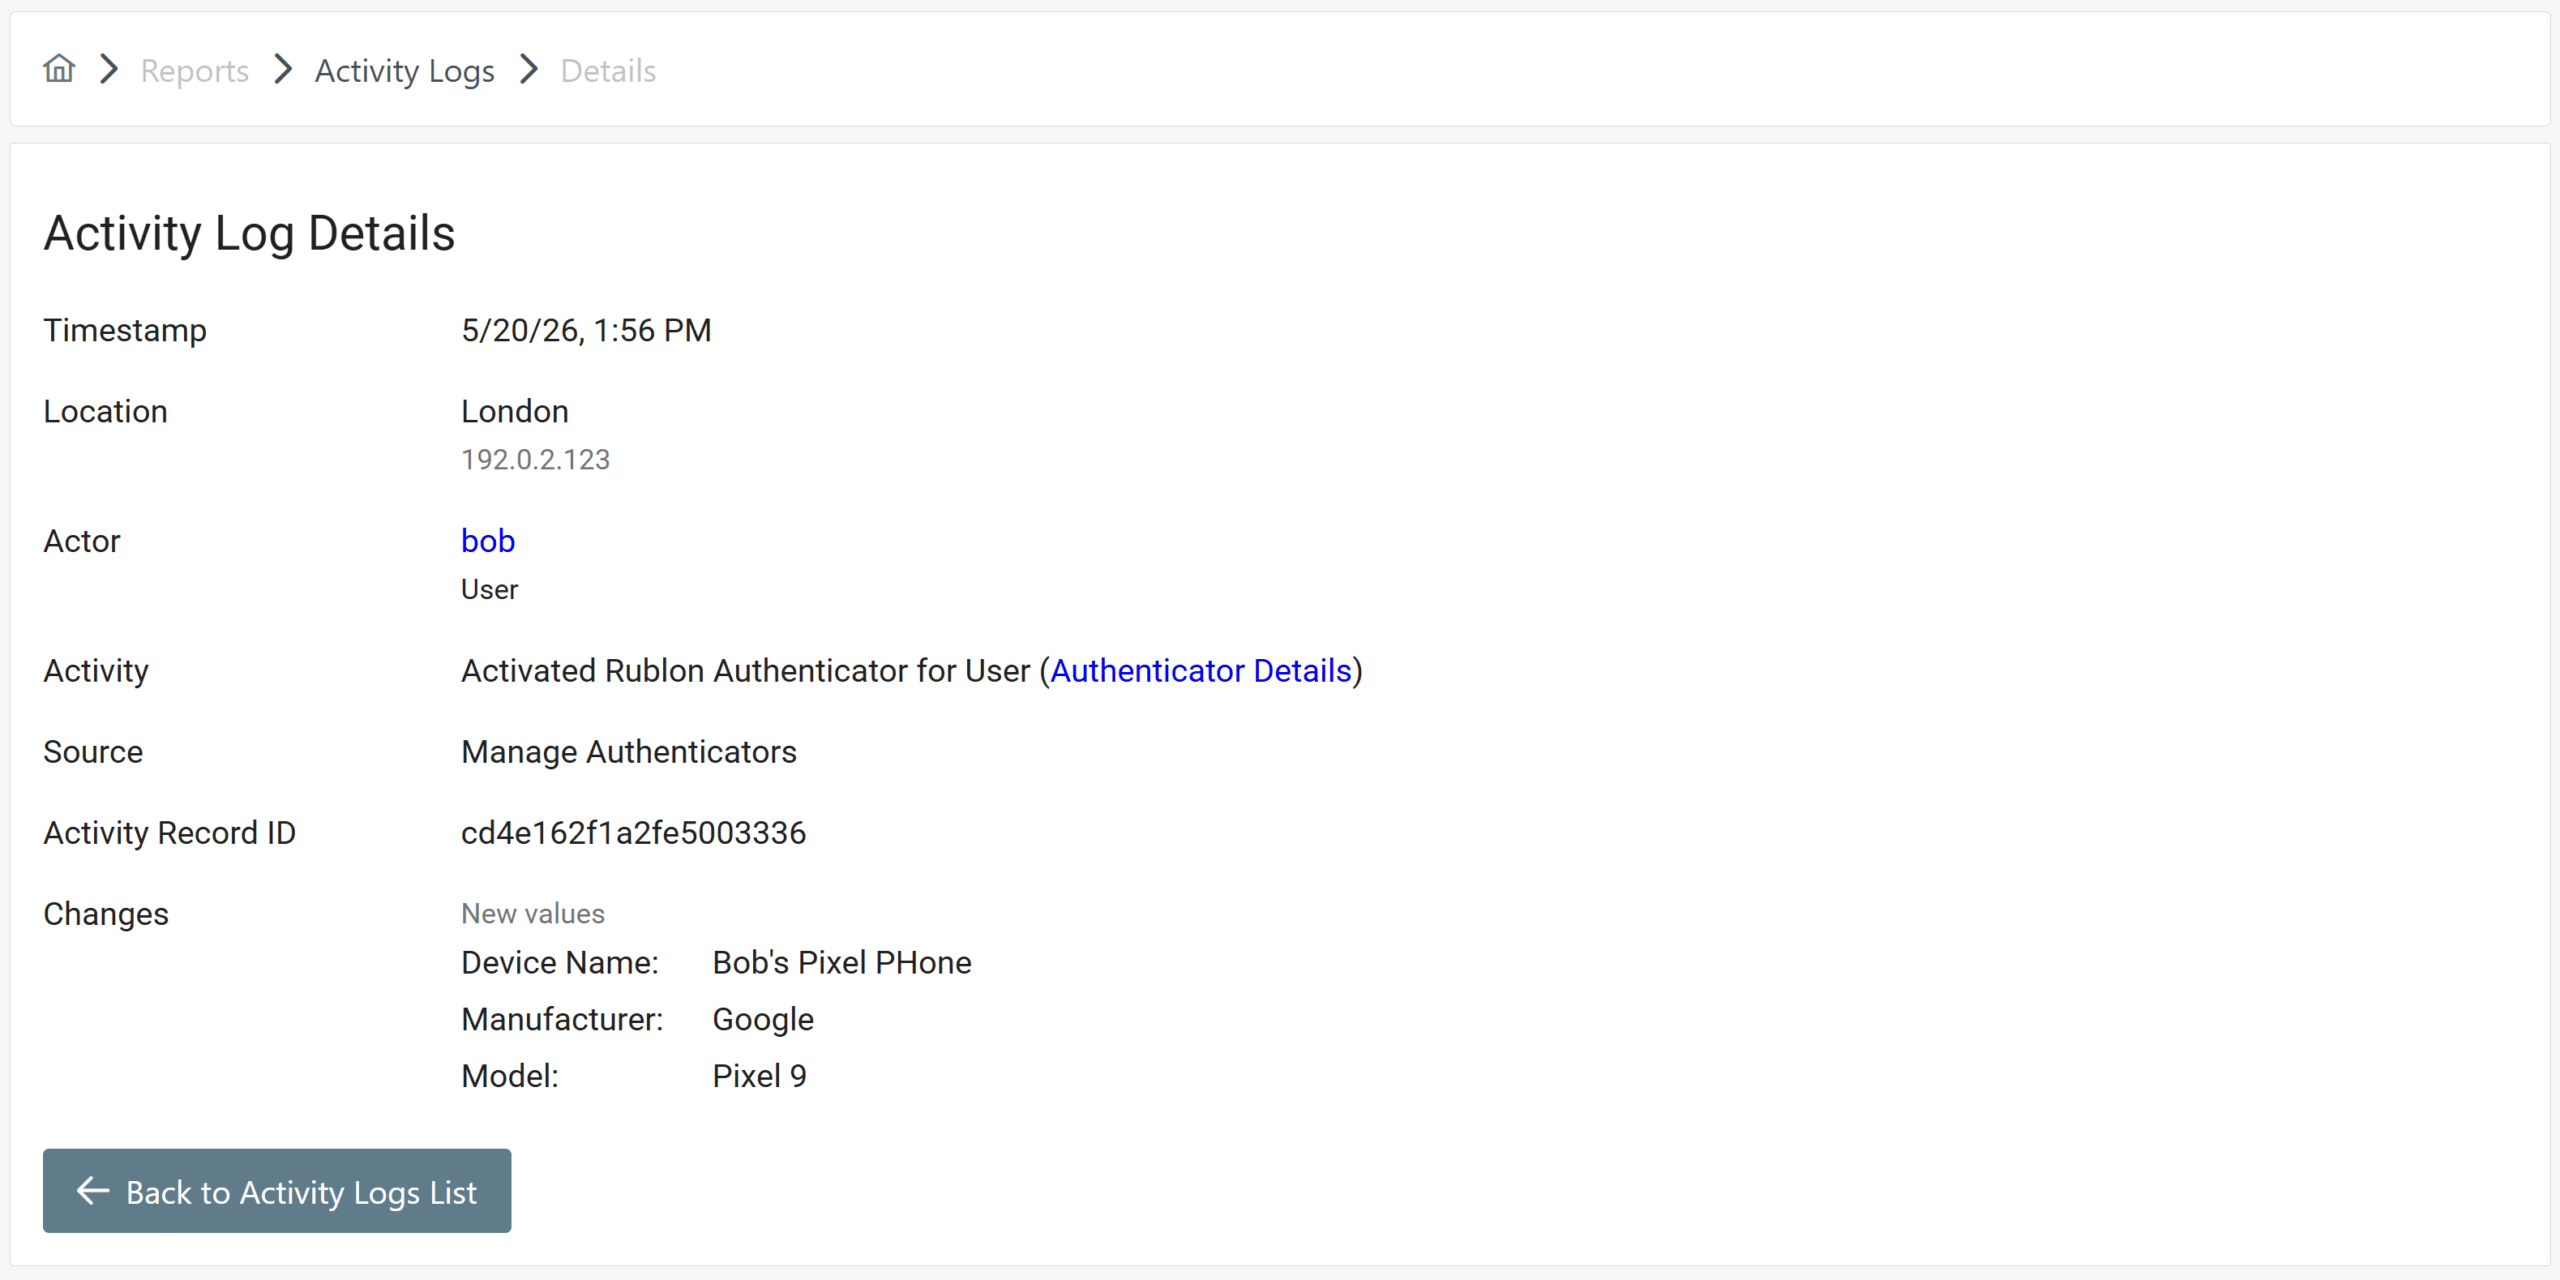
Activity Logs
Activity Logs allows you to browse activity logs of authenticator-related changes performed by users and administrators through self-service flows. This includes the following scenarios:
- Opening the Manage Authenticators view as a user who logs in to an integrated application and adding, deleting, or renaming an authenticator, or setting a Phone authenticator as default.
- Opening the Manage Authenticators view as an administrator who signs in to the Rublon Admin Console and adding, deleting, or renaming an authenticator, or setting a Phone authenticator as default.
- Opening an Enrollment Email as a user and adding or deleting an authenticator.
- Opening an Admin Setup Link as an administrator and adding, deleting, or renaming an authenticator, or setting a Phone authenticator as default.
- Removing an account in the Rublon Authenticator mobile app.
The Activity Logs section depicts all such activity logs in the form of a table. Note that you can change the number of entries shown per page.
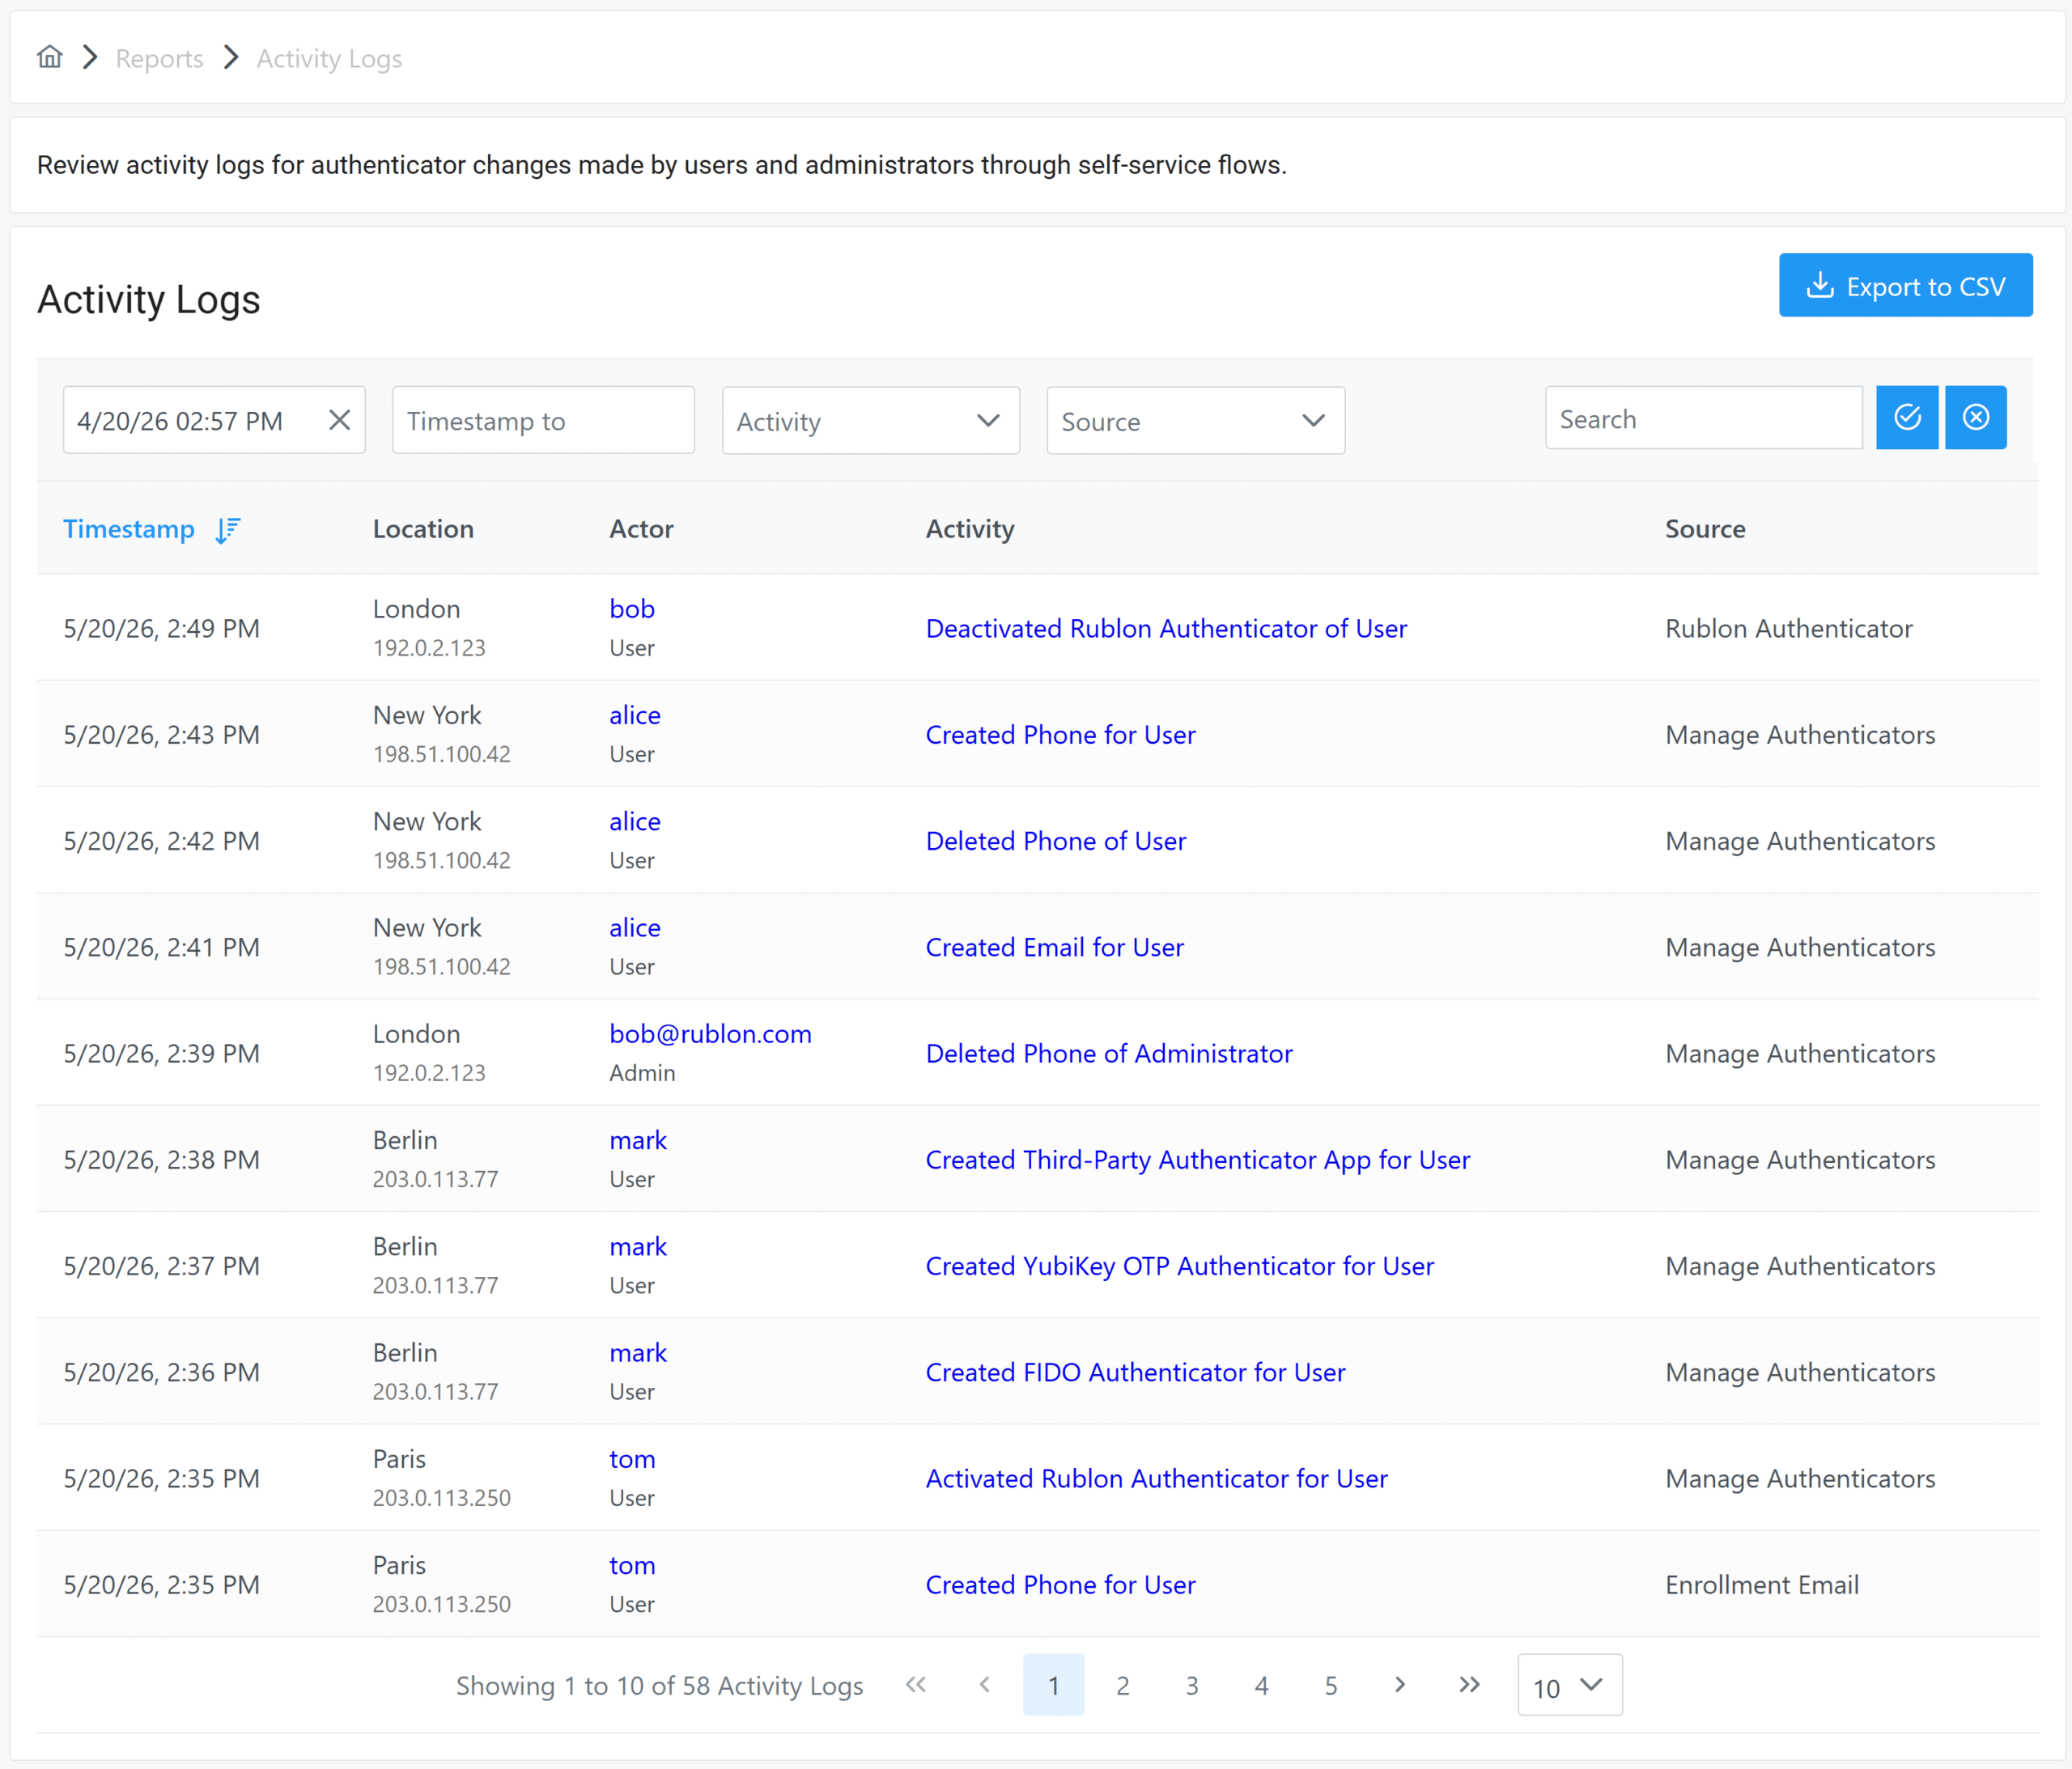
Each log entry contains the following information:
- Timestamp – the date and time the activity occurred.
- Location – the City and IP address of the actor who performed the activity.
- Actor – the username or email address of the user or administrator who performed the activity.
- Activity – the name of the activity:
- Activated Rublon Authenticator for Administrator
- Activated Rublon Authenticator for User
- Created Email for User
- Created FIDO Authenticator for Administrator
- Created FIDO Authenticator for User
- Created Phone for Administrator
- Created Phone for User
- Created RFID Authenticator for User
- Created Third-Party Authenticator App for Administrator
- Created Third-Party Authenticator App for User
- Created YubiKey OTP Authenticator for Administrator
- Created YubiKey OTP Authenticator for User
- Deactivated Rublon Authenticator of Administrator
- Deactivated Rublon Authenticator of User
- Deleted Email of User
- Deleted FIDO Authenticator of Administrator
- Deleted FIDO Authenticator of User
- Deleted Phone of Administrator
- Deleted Phone of User
- Deleted RFID Authenticator of User
- Deleted Third-Party Authenticator App of Administrator
- Deleted Third-Party Authenticator App of User
- Deleted YubiKey OTP Authenticator of Administrator
- Deleted YubiKey OTP Authenticator of User
- Updated Phone of User
- Updated Phone of Administrator
- Updated FIDO Authenticator of Administrator
- Updated FIDO Authenticator of User
- Updated RFID Authenticator of User
- Updated YubiKey OTP Authenticator of Administrator
- Updated YubiKey OTP Authenticator of User
- Source – the source of the activity:
- Enrollment Email
- Manage Authenticators
- Rublon Authenticator
The following sorting, filtering, and searching options are available:
- The Activity Logs table allows sorting by the following columns:
- Timestamp
- The Timestamp From and Timestamp to fields allow you to narrow down the results to the given date and time range.
- The Activity field allows you to narrow down the results to all occurrences of the given activity.
- The Source field allows you to narrow down the results to a given activity source.
- The Activity Logs table also allows searching by the following data, thus narrowing down the results:
- Email Address
- Username
- City
- IP Address
Clicking a link in the Activity column will show details of that specific activity log.
Audit Logs


How to export audit logs?
Note
Phone Logs

How to export phone logs?
Note
Every time you access the Phone Logs tab, a Timestamp From filter automatically selects the last 30 days by default. Make sure to remove this filter if you wish to export all phone logs.
Settings
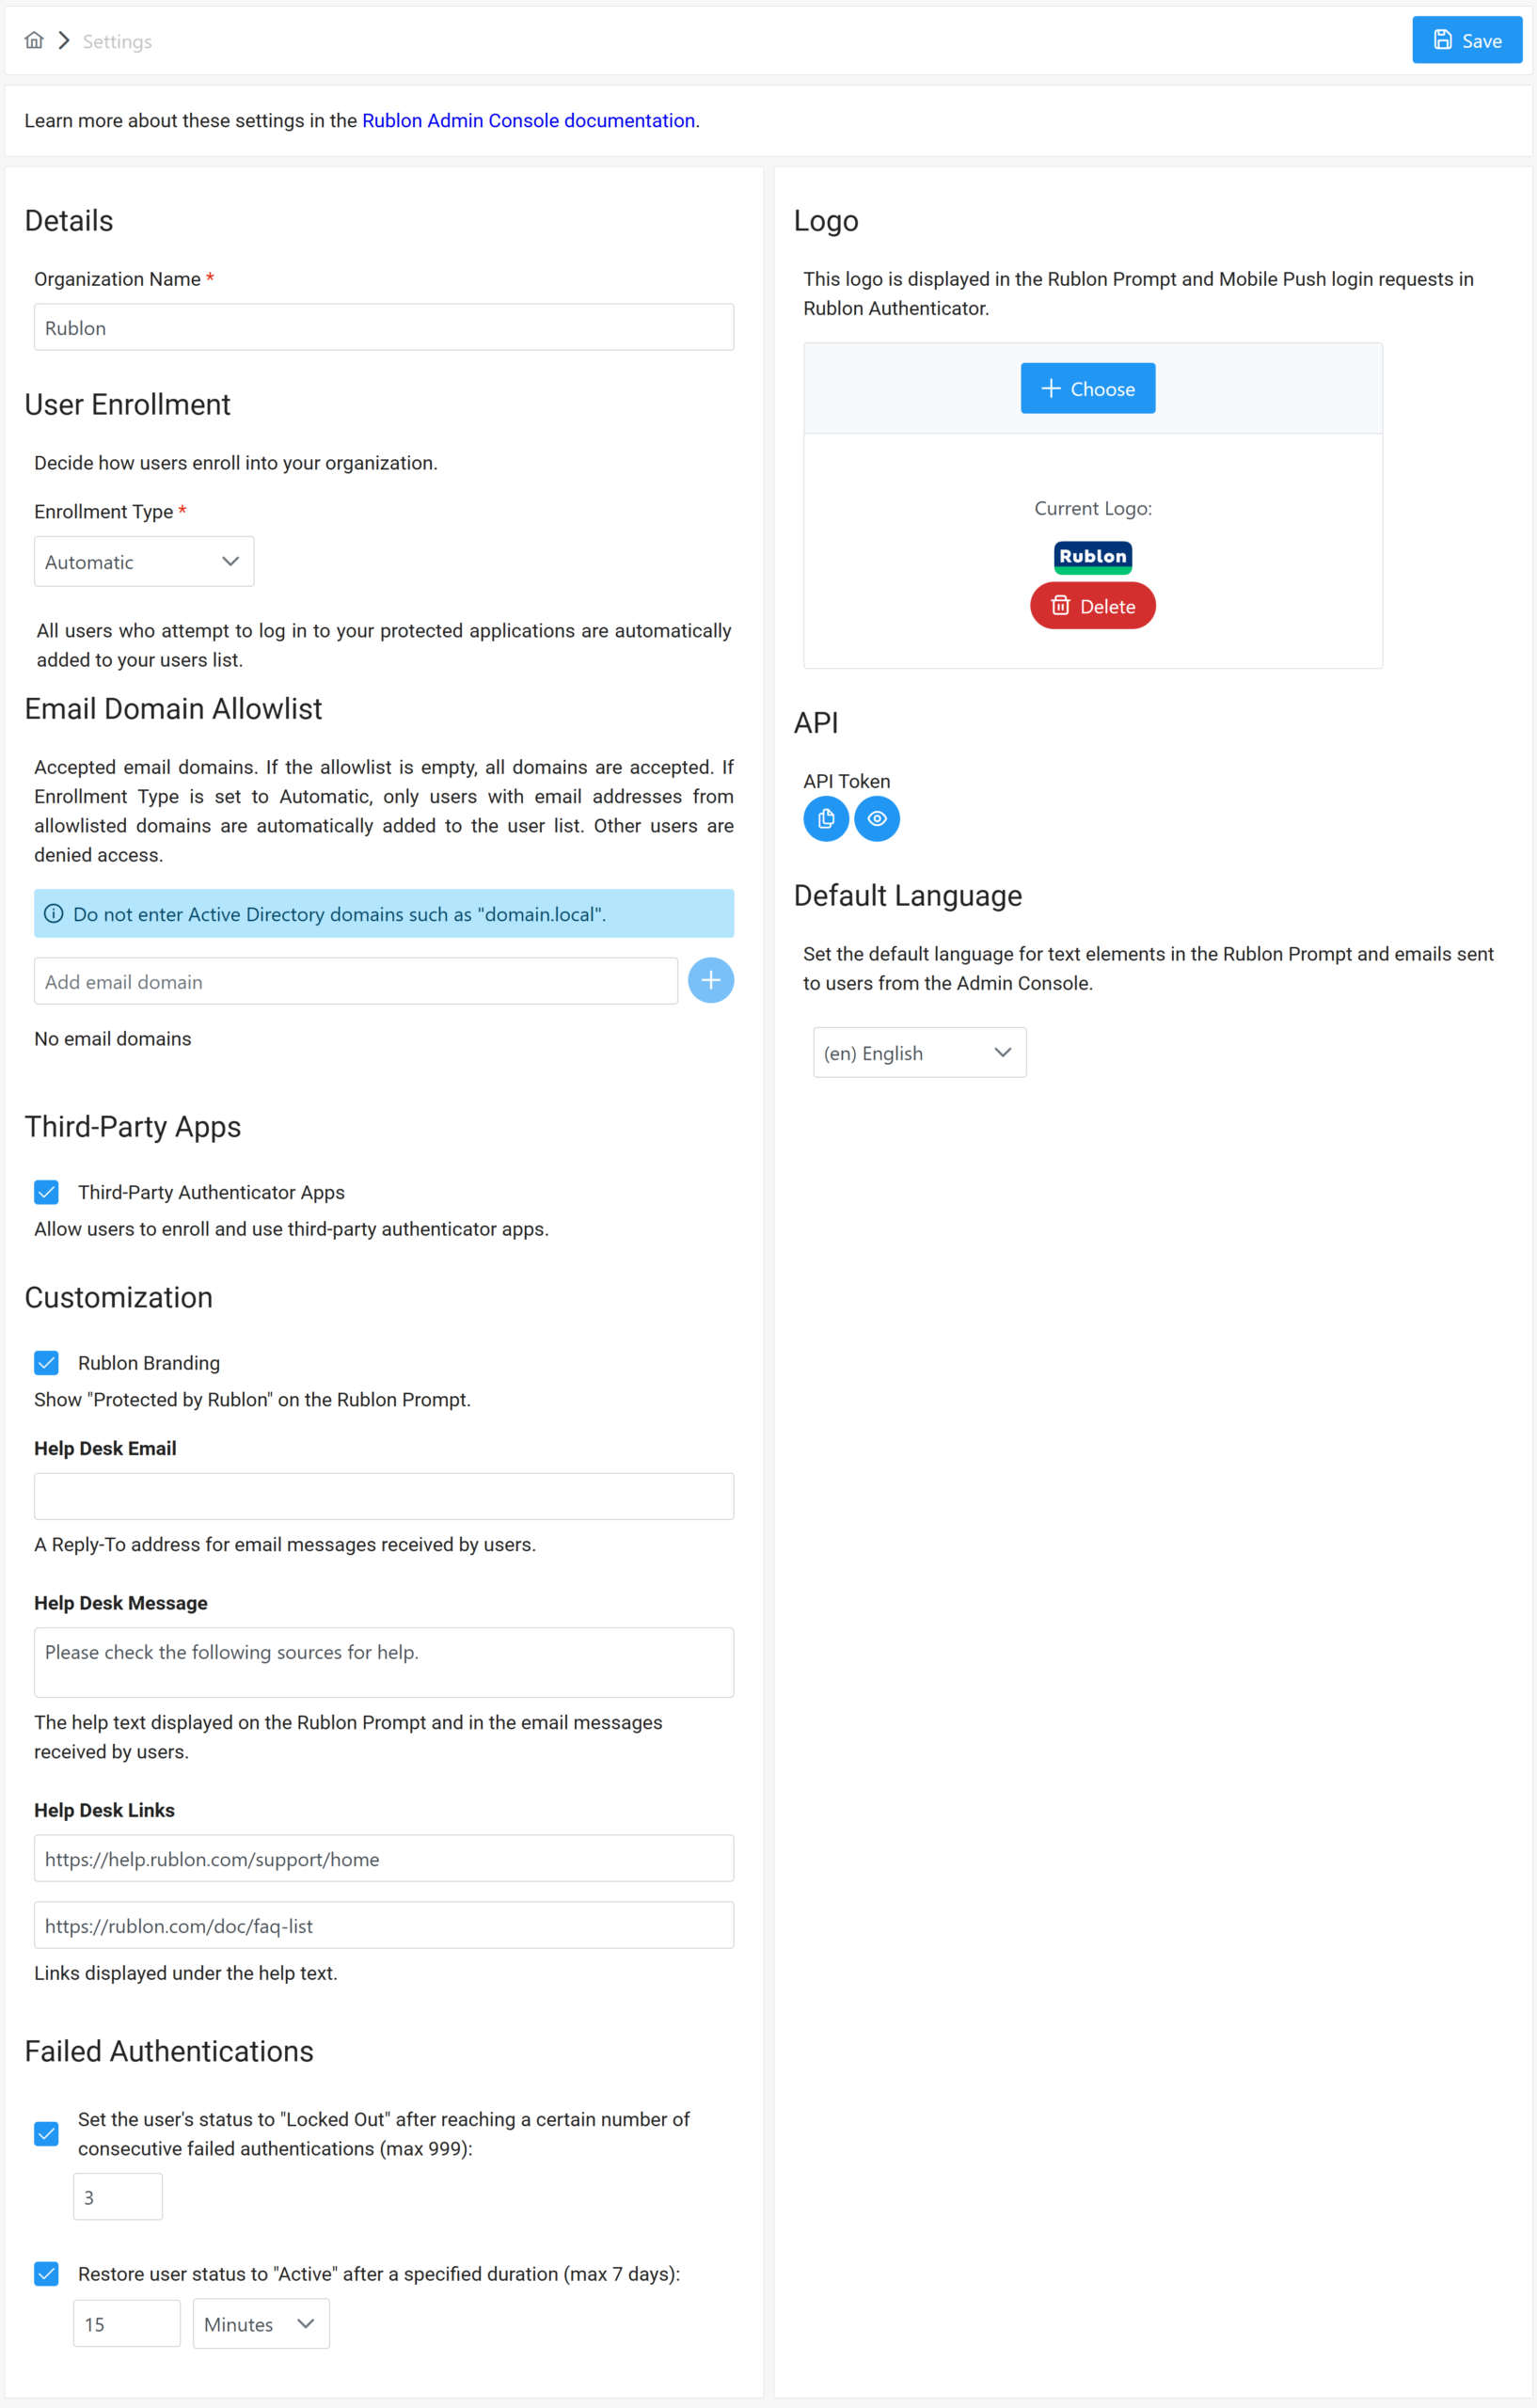
Details
User Enrollment
Email Domain Allowlist
Third-Party Apps
Customization
Logo
Failed Authentications
Note
Failed Authentications are supported only for selected authentication methods. This feature is not supported for Passcode, QR Code, FIDO, YubiKey OTP, and RFID.
Note
The lock-out mechanism only applies to users, not administrators.
API
Default Language
Billing
Overview
Note
How to start a Rublon MFA Business subscription
Phone Credits
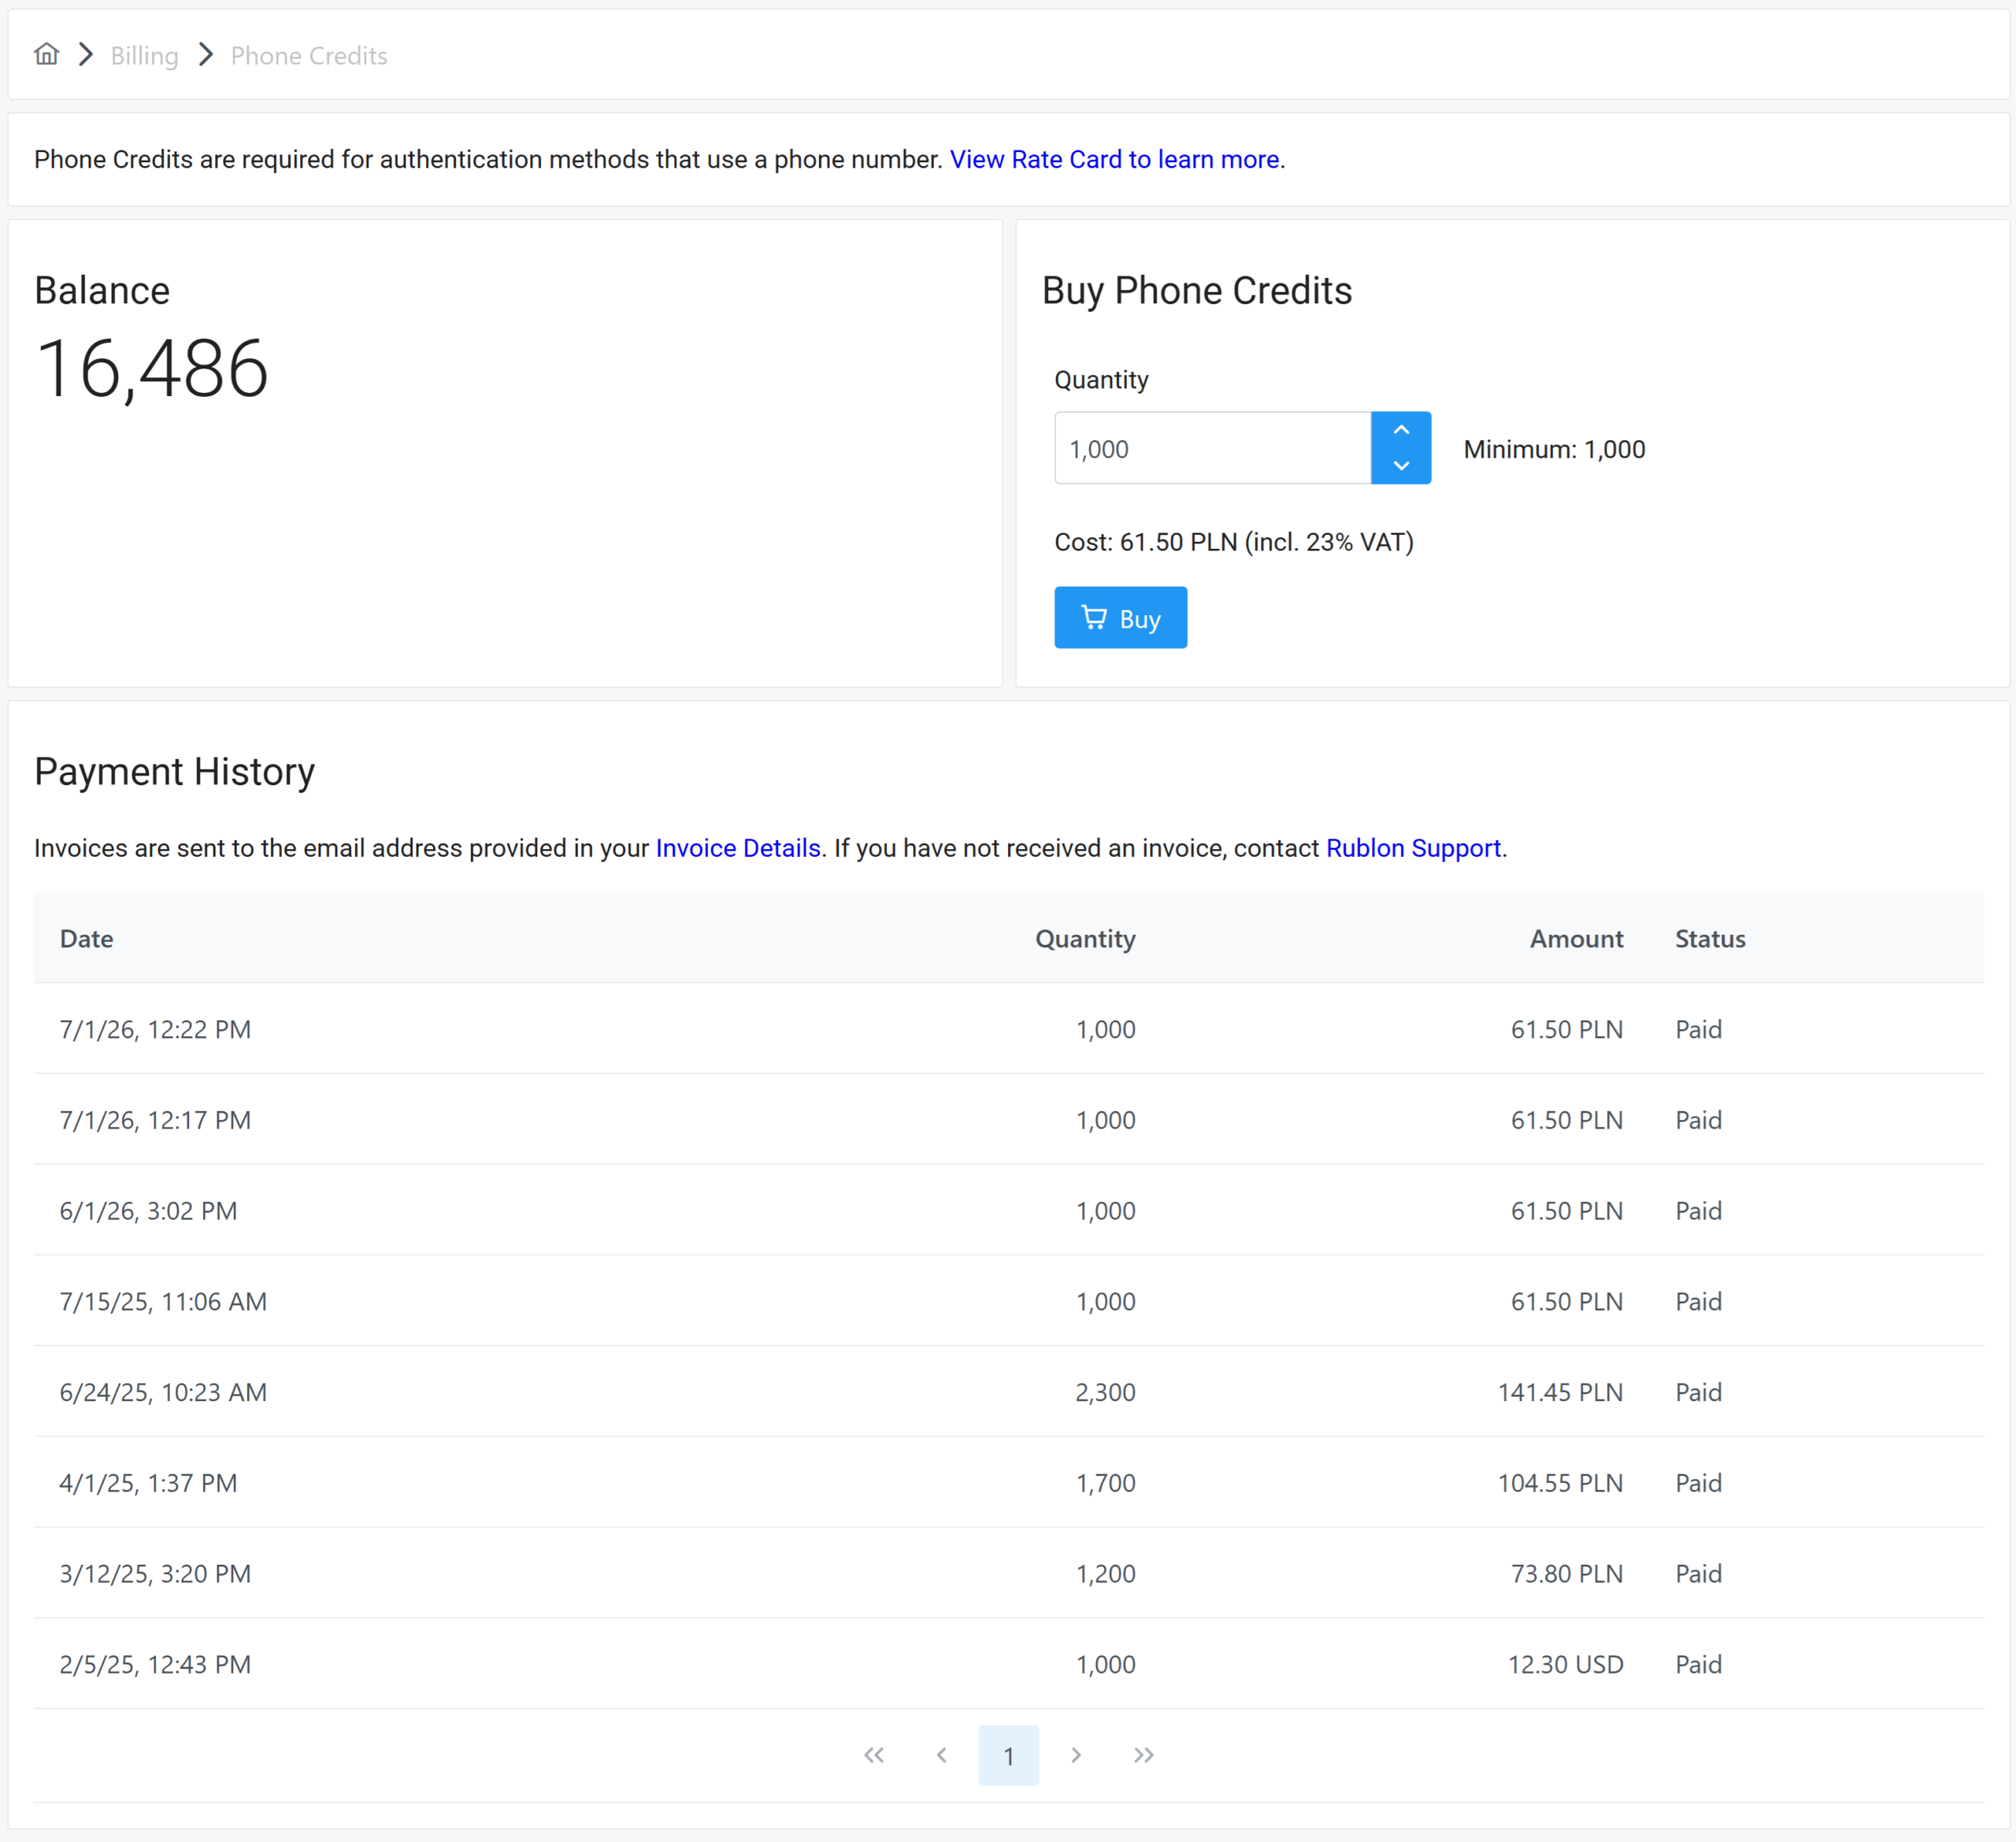
How to buy Phone Credits
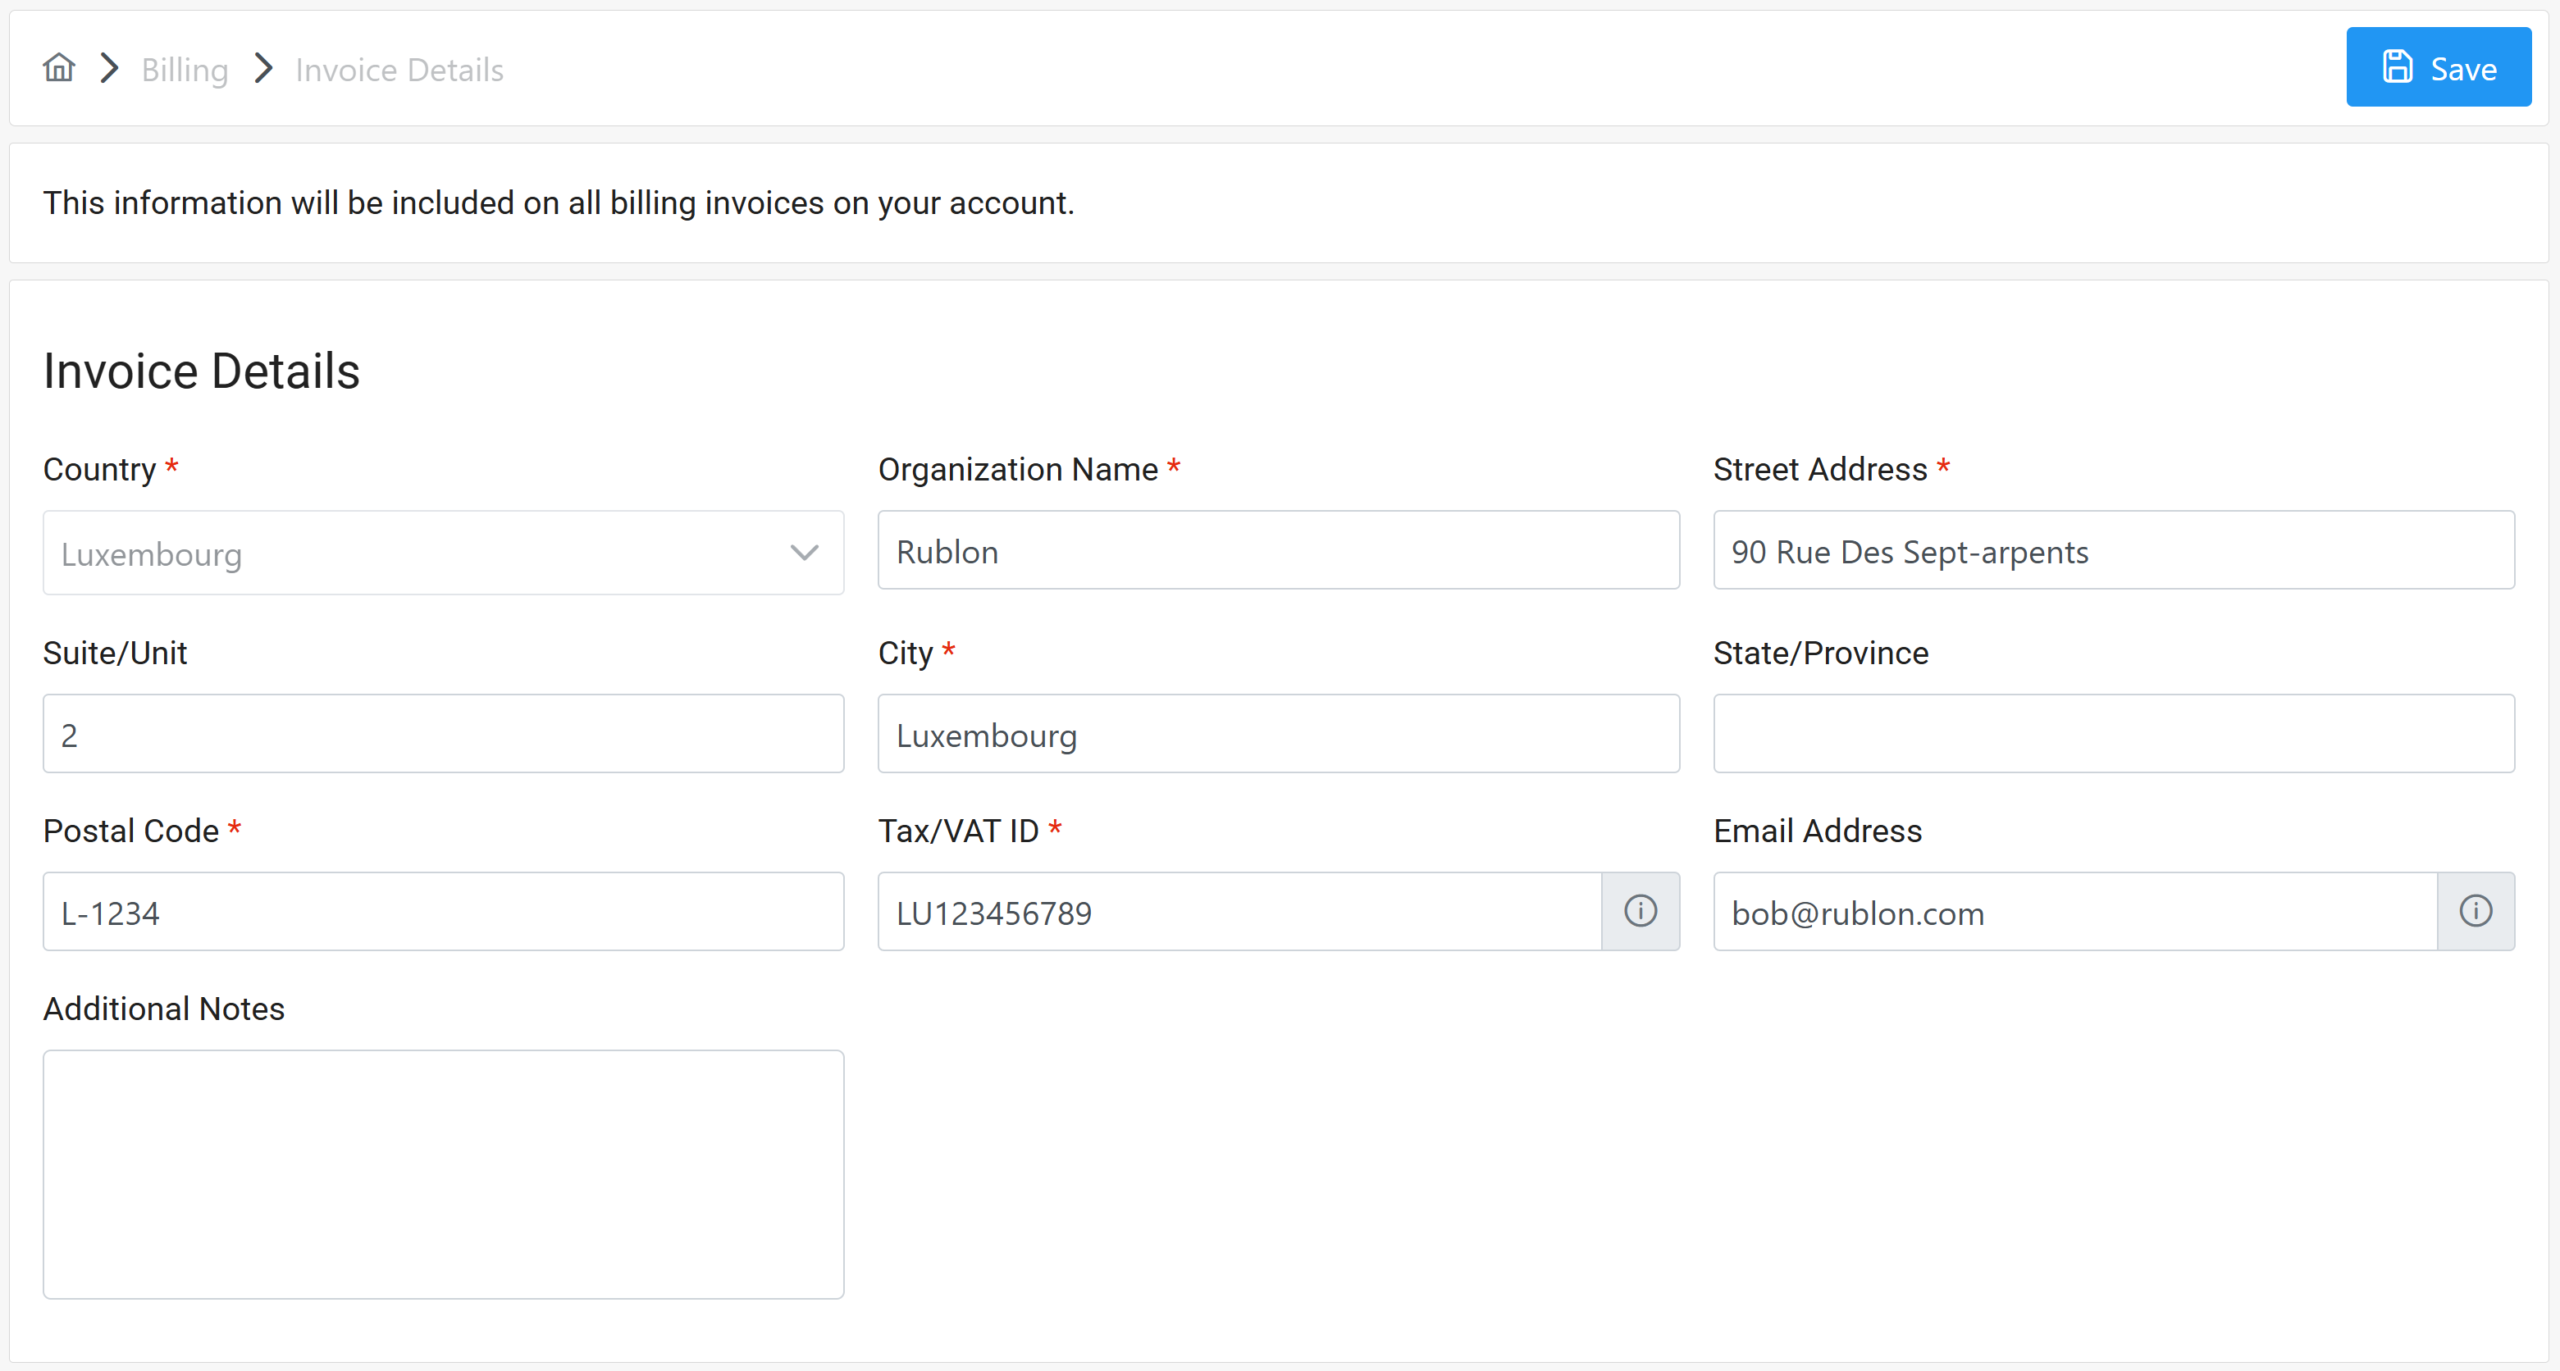
Invoice Details
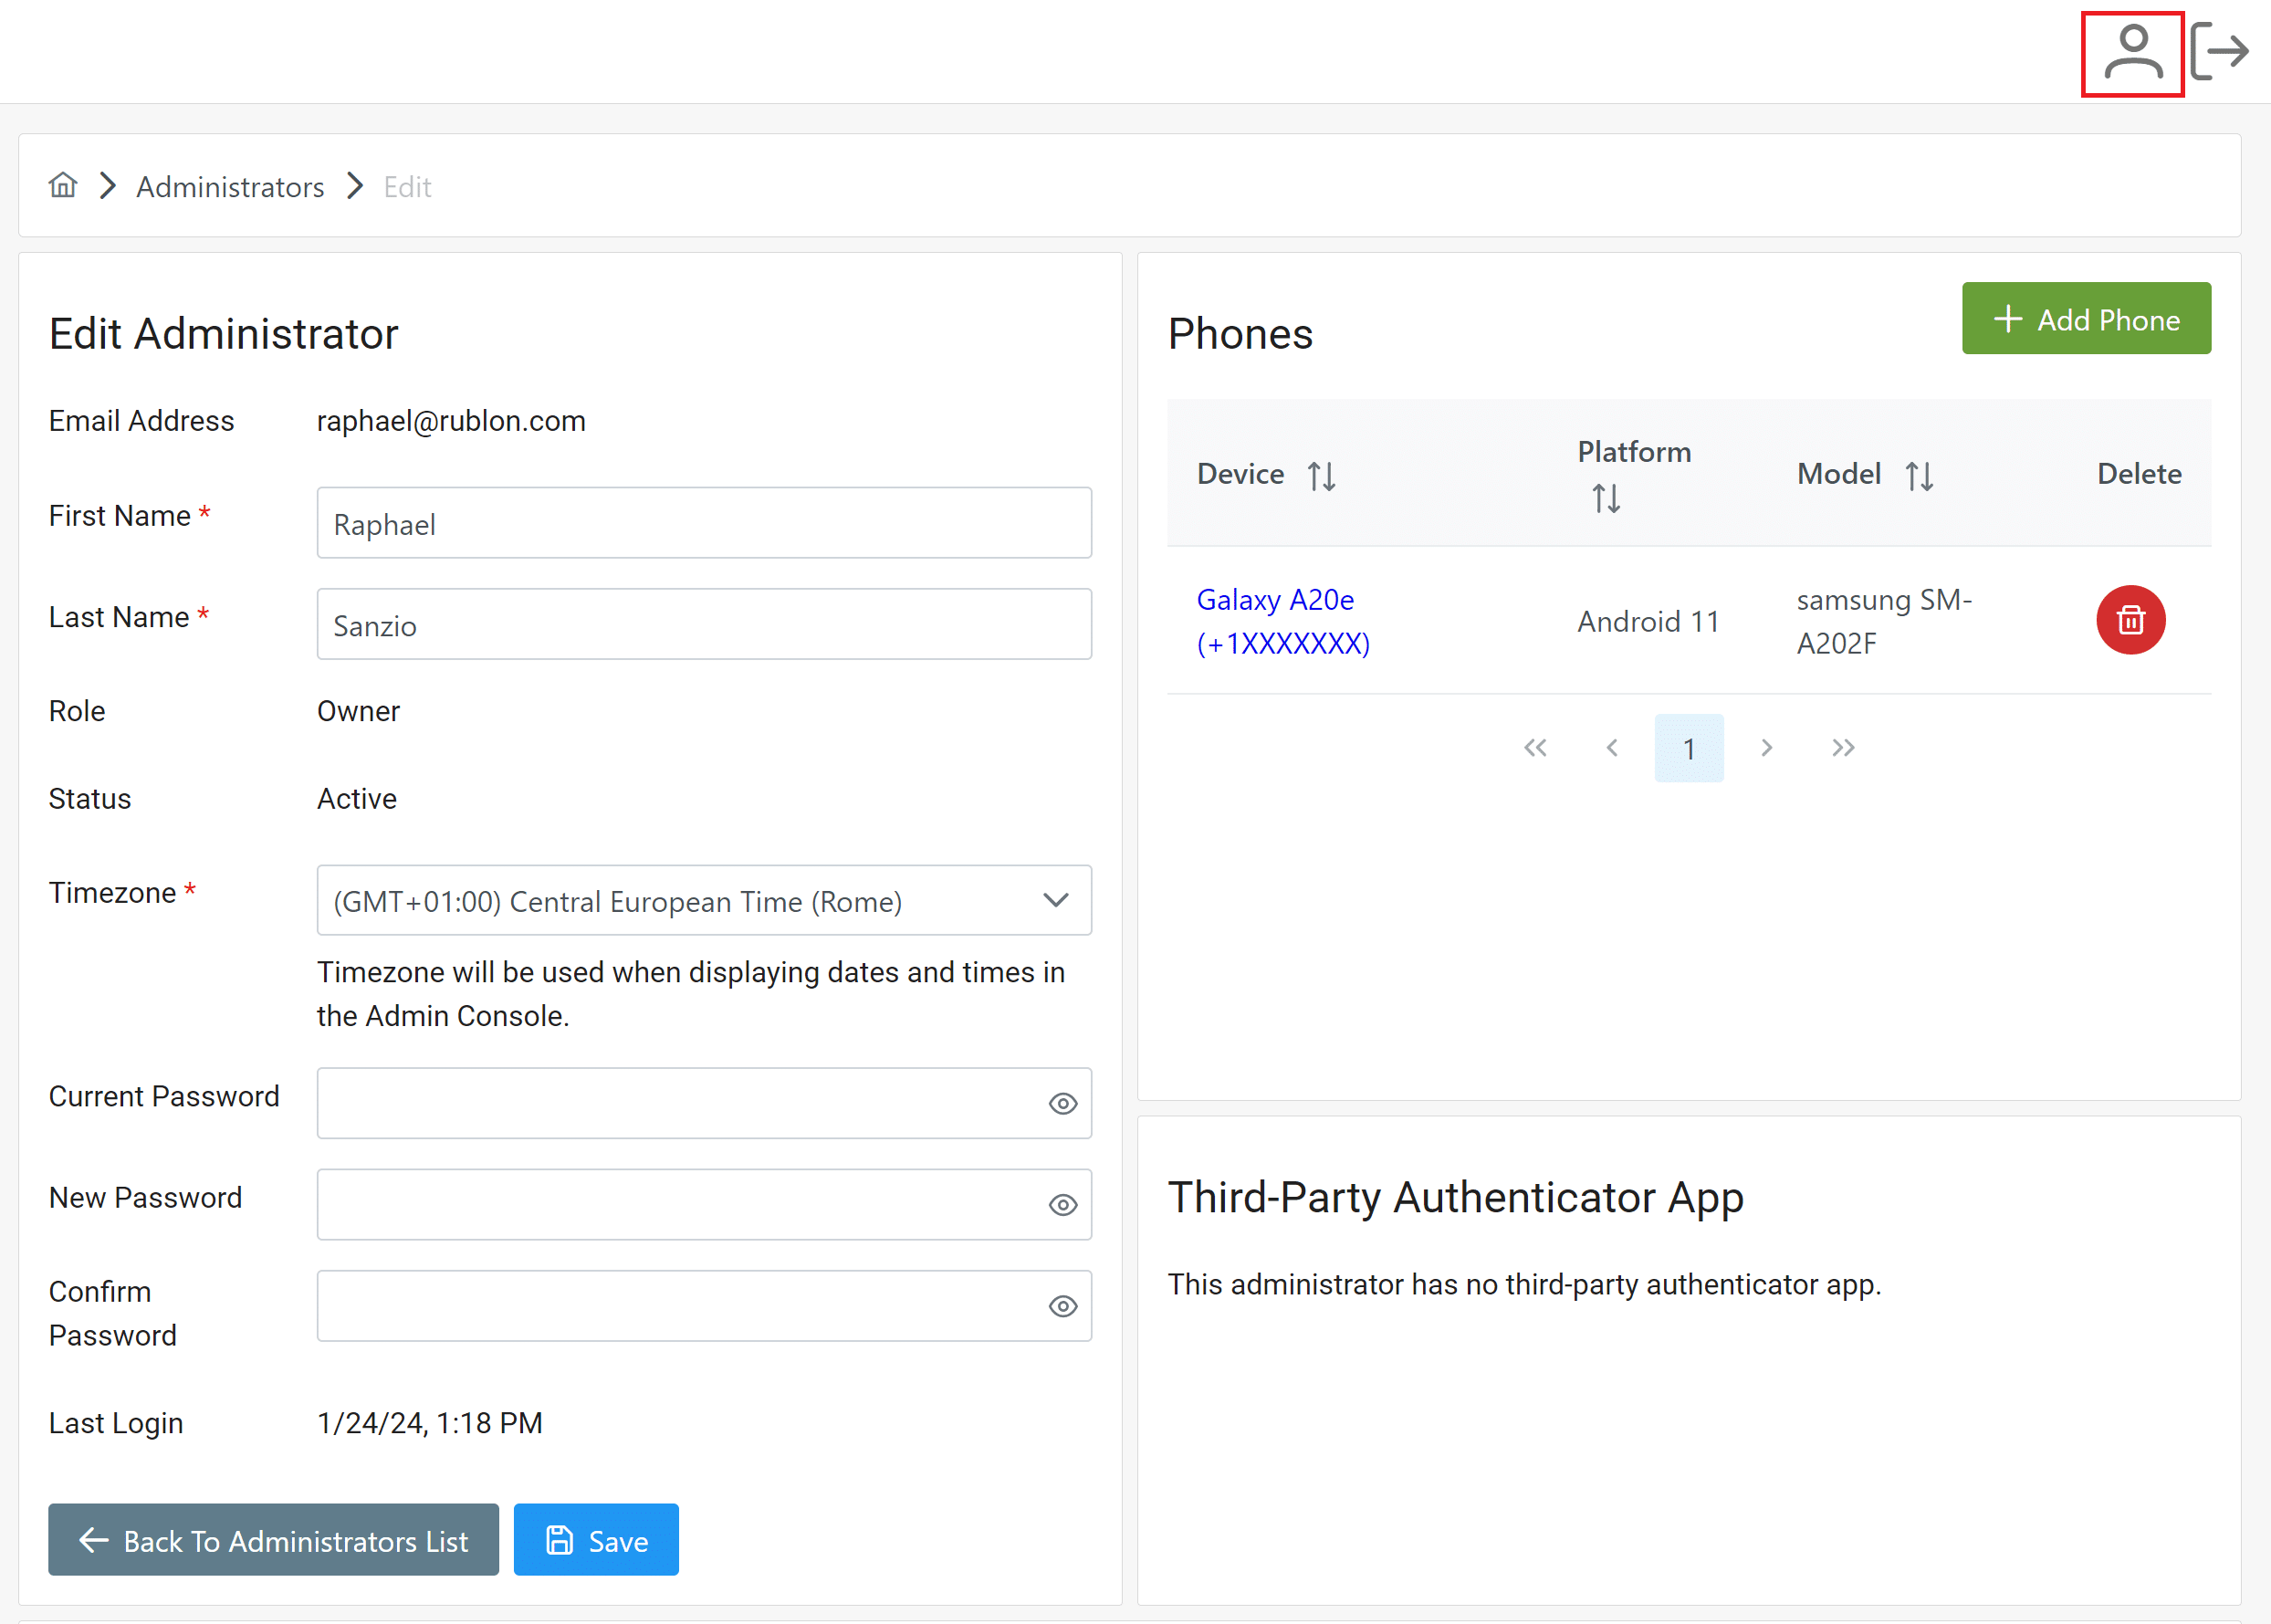
Profile Page
Note
Changing Admin Console Language
You can change the language of the Rublon Admin Console by clicking the Language icon in the top right corner.

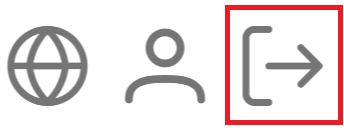
Sign out