Last updated on September 18, 2025
Zimbra Collaboration is an open-source email and productivity suite that combines a mail server with a modern web client, featuring calendars, contacts, tasks, chat, and file-sharing capabilities.
Multi-Factor Authentication (MFA) for Zimbra Collaboration adds an extra layer of security to Zimbra logins. Users must complete both primary (login/password) and secondary (e.g., Mobile Push) authentication. Even if a cybercriminal knows a user’s password, they will not gain access without completing the second step.
Overview of MFA for Zimbra Collaboration
This documentation describes how to integrate Rublon MFA with Zimbra Collaboration using the LDAP protocol to enable multi-factor authentication for user logins.
Rublon MFA for Zimbra Collaboration integrates via the Rublon Authentication Proxy, supporting the LDAP protocol. It ensures that only authorized users can complete the secondary authentication method, denying access to potential intruders.
Supported Authentication Methods
| Authentication Method | Supported | Comments |
| Mobile Push | ✔ | N/A |
| FIDO | – | N/A |
| Passcode | ✔ | N/A |
| SMS Passcode | – | N/A |
| SMS Link | ✔ | N/A |
| Phone Call | ✔ | N/A |
| QR Code | – | N/A |
| Email Link | ✔ | N/A |
| YubiKey OTP | ✔ | N/A |
| RFID | – | N/A |
Demo Video

Before You Start Configuring MFA for Zimbra Collaboration
Before configuring Rublon MFA for Zimbra Collaboration:
- Ensure you have prepared all required components.
- Create an application in the Rublon Admin Console.
- Install the Rublon Authenticator mobile app.
Required Components
1. User Identity Provider (IdP) – You need an external Identity Provider, such as Microsoft Active Directory, OpenLDAP, or FreeIPA.
2. Rublon Authentication Proxy – Install the Rublon Authentication Proxy if you have not already, and configure the Rublon Authentication Proxy as an LDAP proxy.
3. Zimbra Collaboration – A properly installed and configured Zimbra Collaboration Server. Tested on Ver. 10.1.0.
Create an Application in the Rublon Admin Console
1. Sign up for the Rublon Admin Console. Here’s how.
2. In the Rublon Admin Console, go to the Applications tab and click Add Application.
3. Enter a name for your application (e.g., Zimbra Collaboration) and then set the type to Rublon Authentication Proxy.
4. Click Save to add the new application in the Rublon Admin Console.
5. Copy the values of System Token and Secret Key of the newly created application. You will need them later.
Install Rublon Authenticator
Some end-users may use the Rublon Authenticator mobile app. So, as a person configuring MFA for Zimbra Collaboration, we highly recommend you install the Rublon Authenticator mobile app, too. Thanks to that, you will be able to test MFA for Zimbra Collaboration via Mobile Push.
Download the Rublon Authenticator for:
Configuring Multi-Factor Authentication (MFA) for Zimbra Collaboration
Rublon Authentication Proxy
1. Edit the Rublon Auth Proxy configuration file and paste the previously copied values of System Token and Secret Key in system_token and secret_key, respectively.
2. Config example file in YAML:
log:
  debug: true

rublon:
  api_server: https://core.rublon.net
  system_token: token_from_admin_console
  secret_key: secret_from_admin_console

proxy_servers:
  - name: LDAP-Proxy
    type: LDAP
    ip: 0.0.0.0
    port: 389
    transport_type: plain
    auth_source: LDAP_SOURCE_1
    auth_method: push,email

auth_sources:
  - name: LDAP_SOURCE_1
    type: LDAP
    ip: x.x.x.x
    port: 389
    search_dn: DC=domain,DC=local
    access_user_dn: CN=rap,OU=RUBLON,DC=domain,DC=local
    access_user_password: P@ssw0rd123
Creating a Domain
Note
Follow these steps only if you have no domain in Configure → Domains.
If you already have a domain, you can go straight to Configuring Authentication for the Domain.
1. Log in to the Zimbra Administration Console.
2. In the left pane, go to Configure → Domains. Then, select the gear icon in the upper-right corner and select New.

3. In General Information, enter the domain name and select Next.

4. In GAL Mode Settings, select your Mail Server from the dropdown list. Keep the remaining settings as default, or adjust them as needed. Then select Next.

5. In SSO, keep all settings as default and select Next.

6. In Authentication Mode, fill in the fields and select Next. Refer to the following image and table.
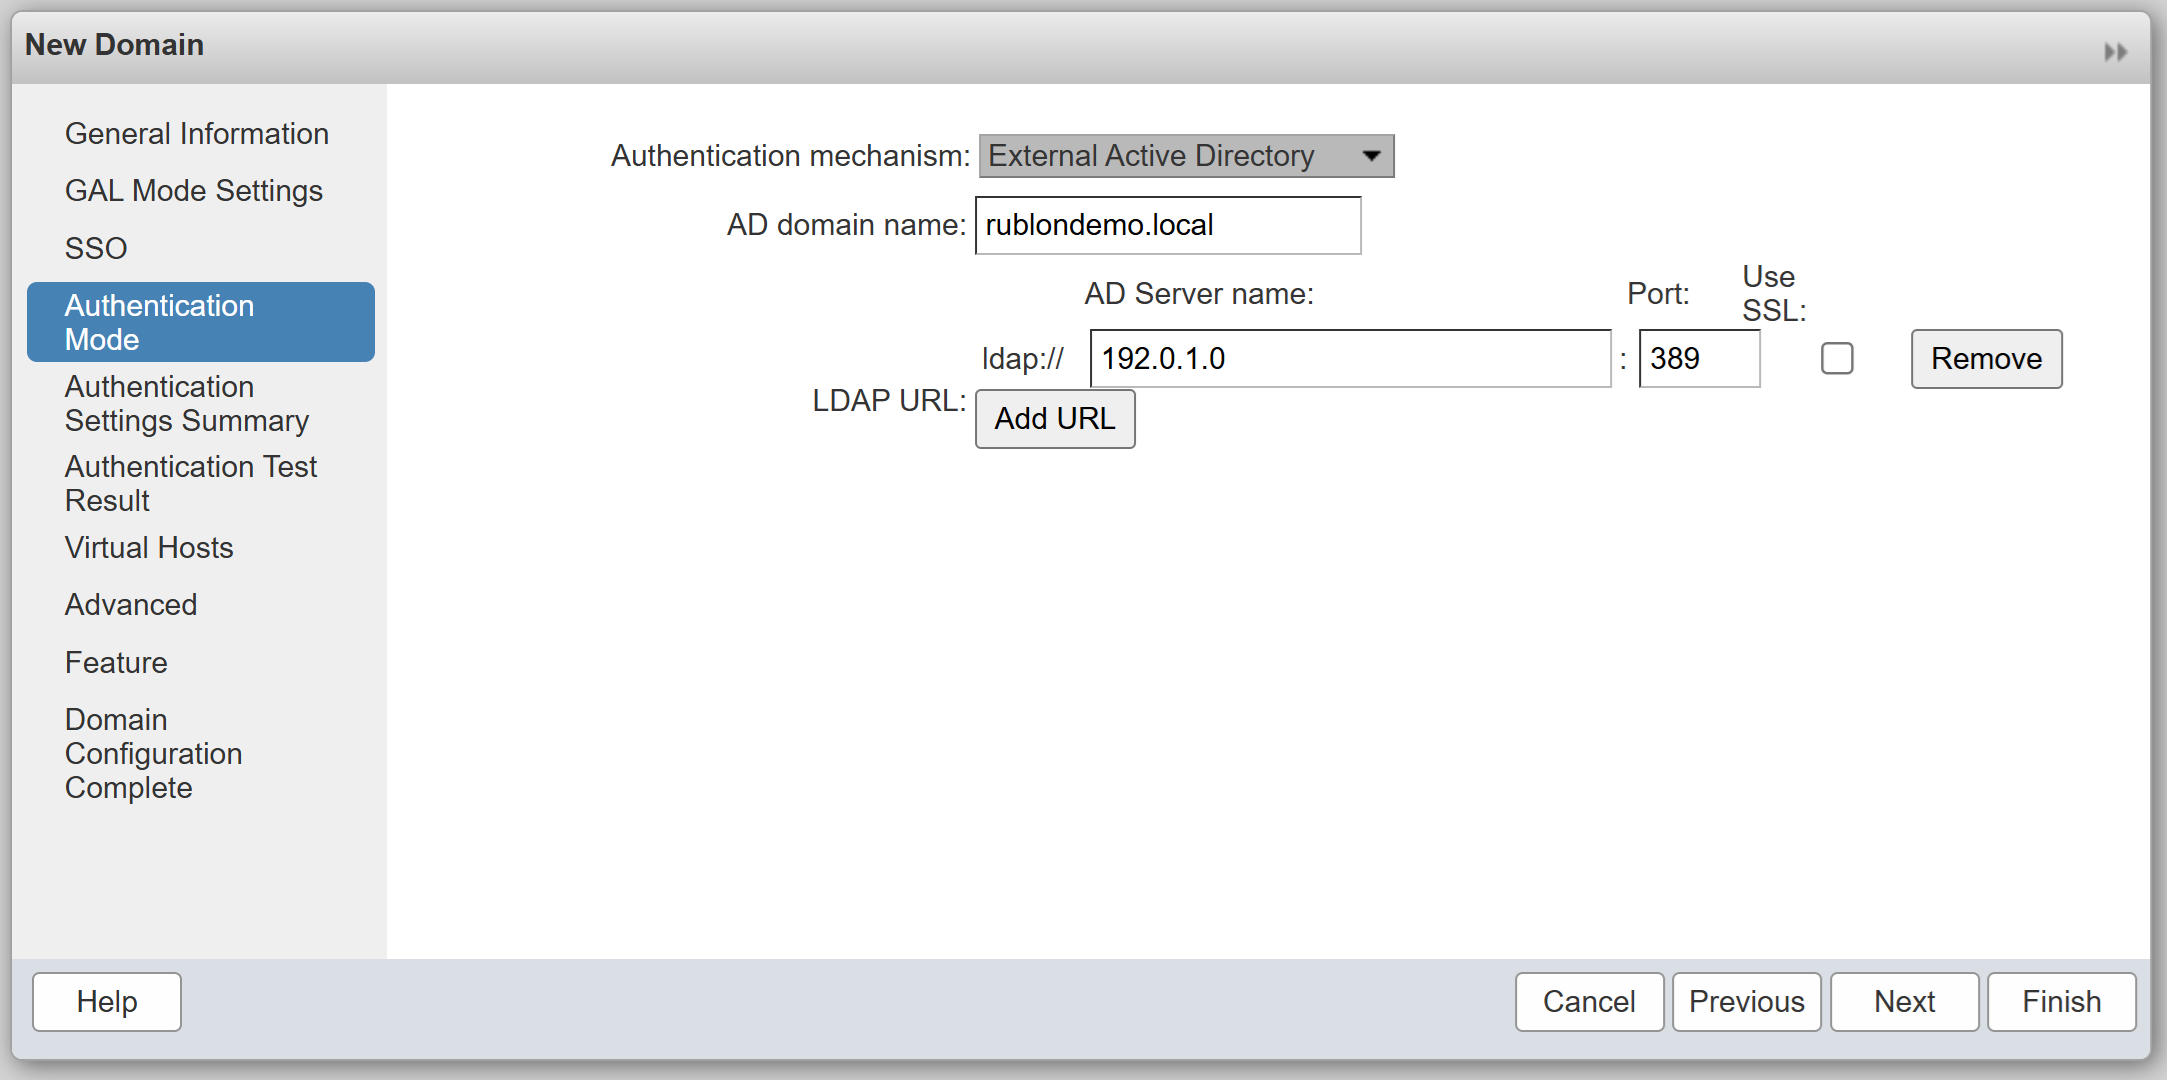
| Authentication mechanism | External Active Directory |
| AD domain name | Enter the AD domain name. |
| LDAP URL | The IP address or hostname of the Rublon Authentication Proxy. |
| Port | The port of the Rublon Auth Proxy (389 for LDAP). |
7. In Authentication Settings Summary, review the summary of your LDAP Proxy configuration and select Next.
Note
Do not use the test option at this stage, as it is expected to fail. This does not impact actual user authentication. Logins to Zimbra will function correctly with Rublon MFA.
8. The remaining tabs are optional and can be skipped. Select Finish to complete your domain configuration.
Configuring Authentication for the Domain
1. In the left pane of the Zimbra Administration Console, go to Configure → Domains and choose your domain. Then, select the gear icon in the upper-right corner and select Configure Authentication.

2. A new window will pop up with the authentication configuration wizard. In Authentication Mode, choose External Active Directory and select Next.
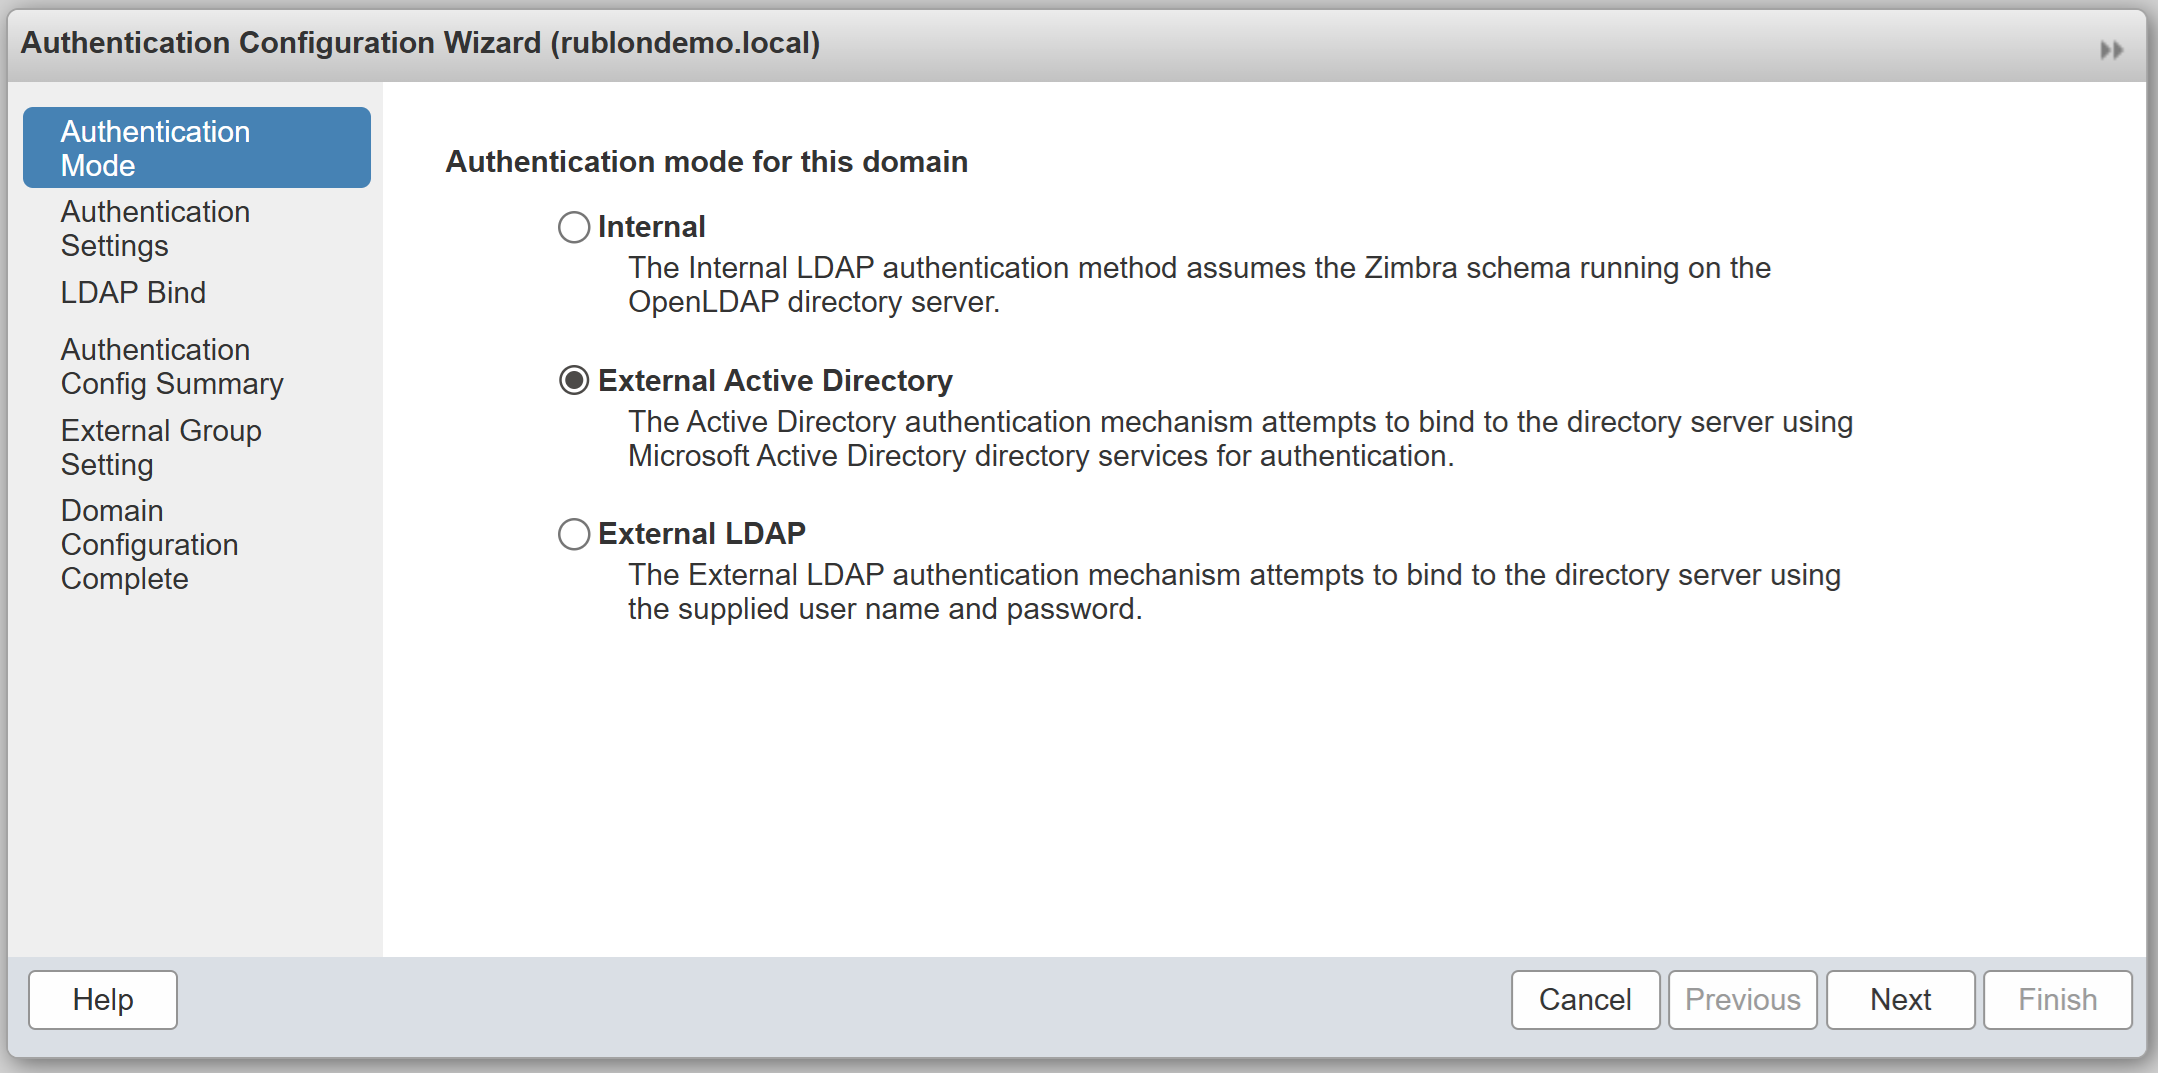
3. In Authentication Settings, fill in the fields and select Next. Refer to the following image and table.

| AD domain name | Enter the AD domain name. |
| AD Server name | The IP address or hostname of the Rublon Authentication Proxy. |
| Port | The port of the Rublon Auth Proxy (389 for LDAP). |
4. In LDAP Bind, fill in the fields and select Next. Refer to the following image and table.

| Use DN/Password to bind to external server | Check |
| Bind DN | The Bind DN (the full LDAP path of the service account, e.g., CN=rublonadmin,OU=Rublon,DC=rublondemo,DC=local) that Zimbra will use to authenticate and access the LDAP directory for querying user information. Note: This Bind DN must be the same as access_user_dn in your Rublon Auth Proxy’s config file. |
| Bind password | The password of the user defined in the Bind DN. Note: This Bind password must be the same as access_user_password in your Rublon Auth Proxy’s config file. |
| Confirm bind password | Re-enter the password above. |
5. The remaining tabs are optional and can be skipped. Select Finish to complete your domain authentication configuration.
Note
Do not use the test option at this stage, as it is expected to fail. This does not impact actual user authentication. Logins to Zimbra will function correctly with Rublon MFA.
Configuring MFA for Users and Administrators
1. In the left pane, go to Manage → Accounts, choose the user (or admin), select the gear icon in the upper-right corner, and select Edit.
2. In General Information, fill in the fields. Refer to the following image and table.
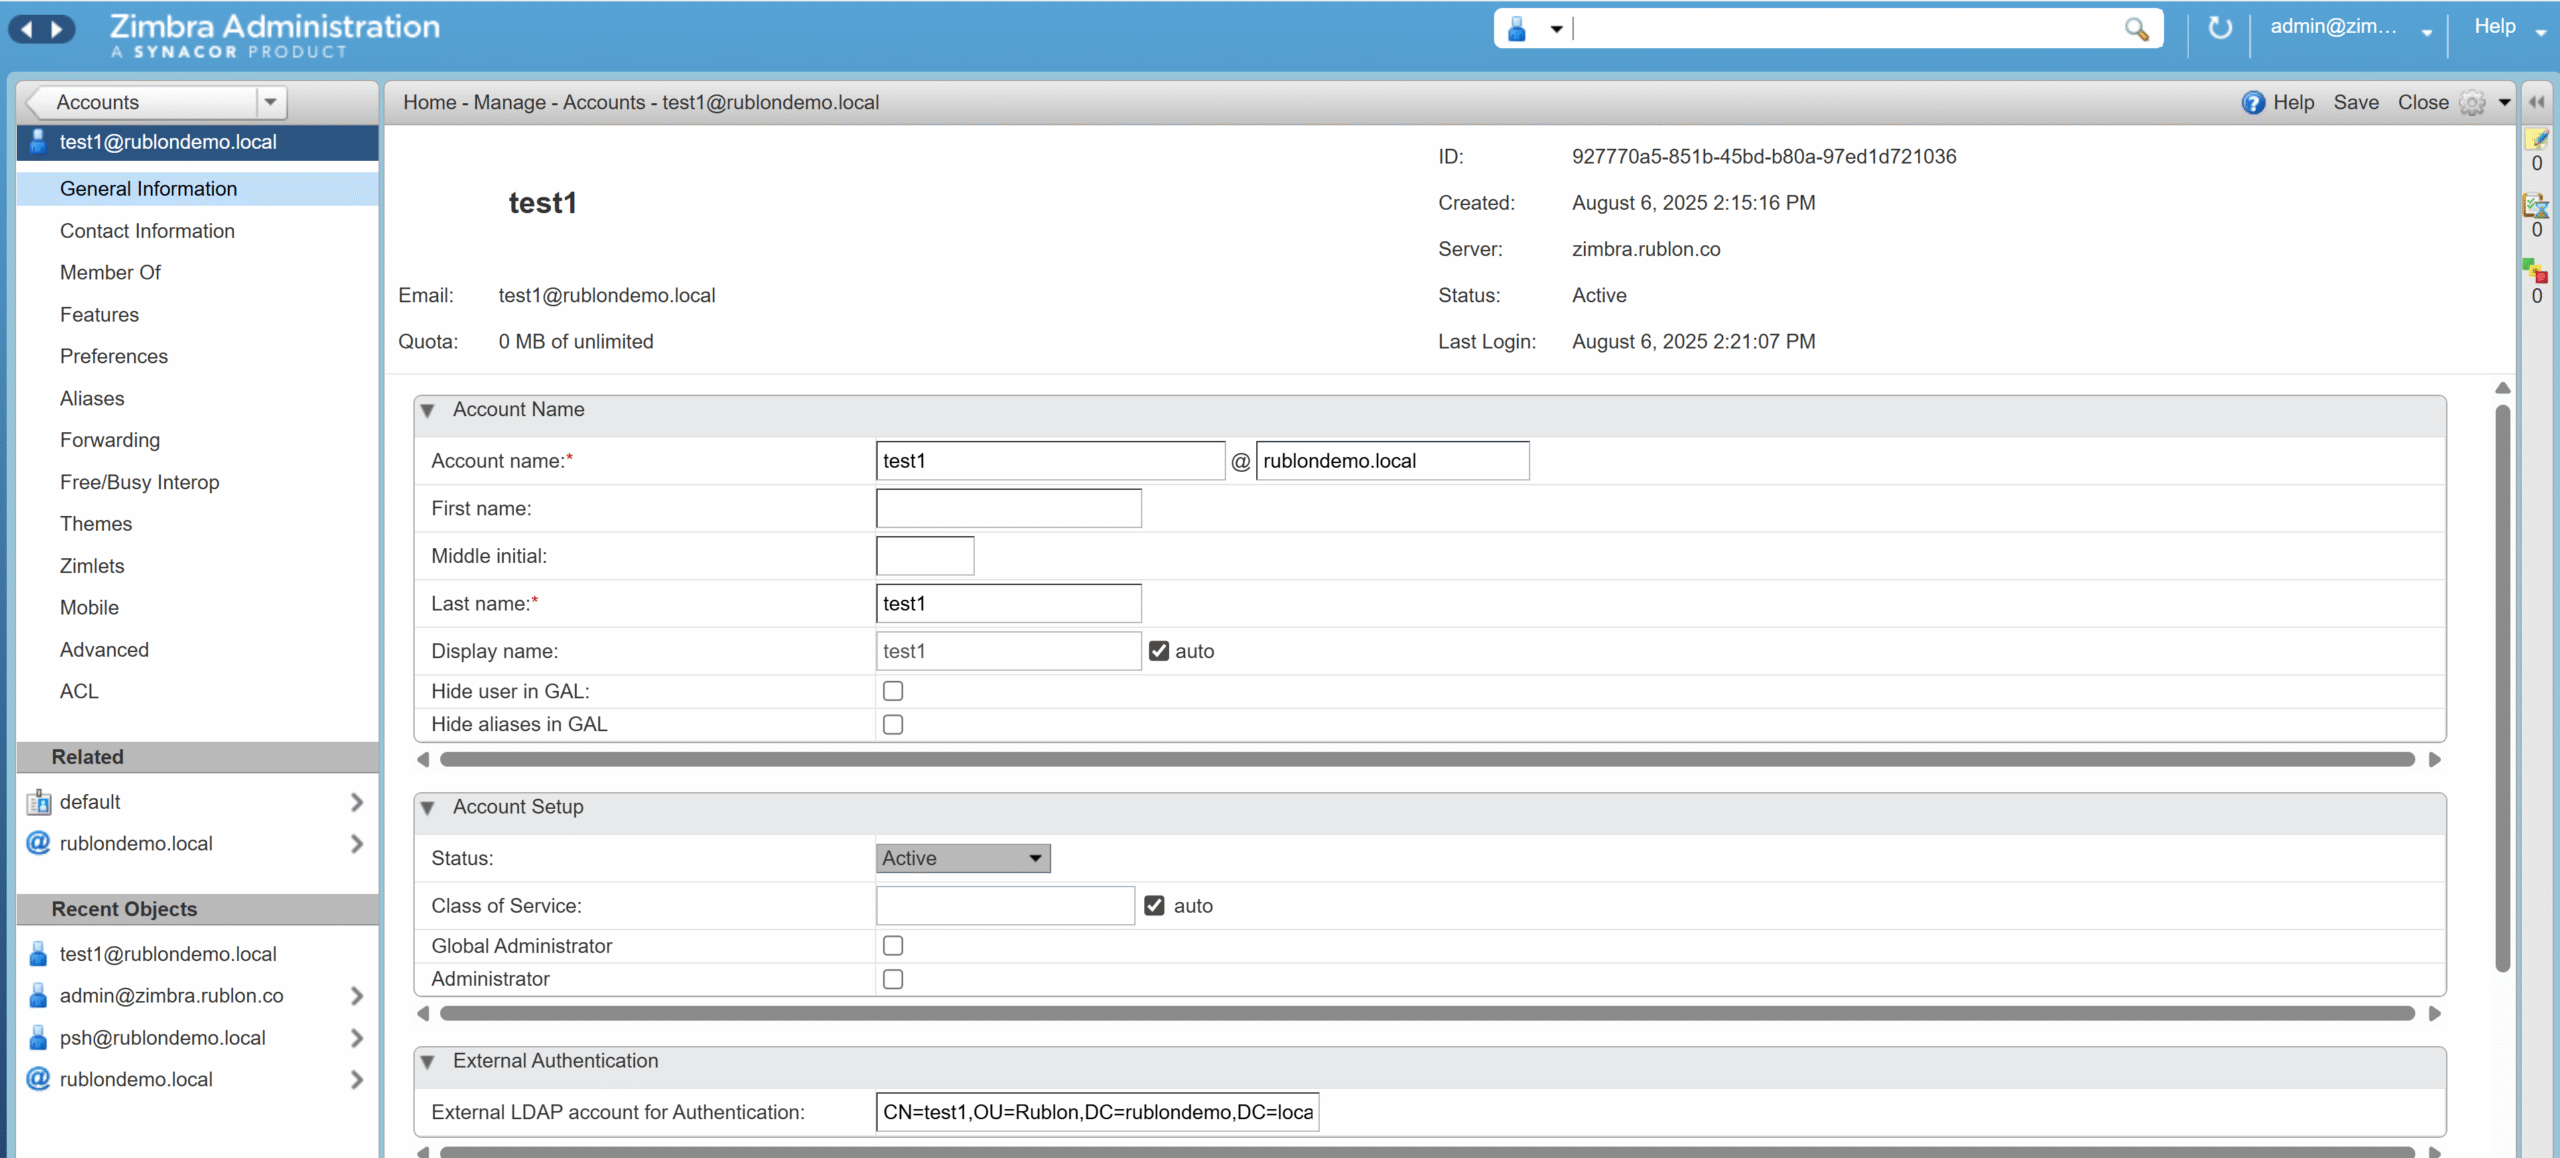
| Account name | Enter the user account name in the following form: “username@your_domain” – e.g., test@rublondemo.local. |
| Last name | Enter the last name of the user. (Zimbra requires this field.) |
| External Authentication | Enter the External LDAP account for authentication as an LDAP Bind for that user. It has to be defined in LDAP notation, e.g., CN=test,OU=Rublon,CN=rublondemo,CN=local. |
3. Keep the remaining settings as default, or adjust them as needed, and select Save to save the changes.
Testing Multi-Factor Authentication (MFA) for Zimbra Collaboration
This example portrays logging in to Zimbra Collaboration with Rublon Multi-Factor Authentication. Mobile Push has been set as the second factor in the Rublon Authentication Proxy configuration (AUTH_METHOD was set to push).
1. Open the Zimbra GUI portal, enter your login and password, and select Log in.

2. Rublon will send a Mobile Push authentication request to your phone. Tap APPROVE.

3. You will be logged in to Zimbra.
Troubleshooting MFA for Zimbra Collaboration
If you encounter any issues with your Rublon integration, please contact Rublon Support.