
Last updated on October 19, 2026
Note: This document describes how to deploy Rublon MFA for Windows using SCCM. Note that you can also use PDQ Deploy, Intune, or Group Policy (GPO) to achieve the same results. Deploying MFA for Windows Logon and RDP using PDQ Deploy is faster than using SCCM. So, we recommend using PDQ Deploy unless you specifically need to use SCCM.
Overview
Microsoft System Center Configuration Manager (SCCM) is a Windows product that allows managing a large number of endpoints. One of the benefits of SCCM is that you can use it to deploy a computer program on dozens of machines at once, substantially cutting down the deployment time.
You can use Microsoft System Center Configuration Manager (SCCM) to deploy the Rublon MFA for Windows & RDP connector on many machines at once. We recommend you deploy the connector manually if you have only a few machines. However, if you need to deploy the connector on a large number of machines, we recommend using SCCM to automate the process.
Before You Start
- Ensure you have correctly configured Microsoft System Center Configuration Manager (SCCM) so that it will be possible to create and deploy an application on multiple endpoints.
- Download the latest EXE or MSI installer for the Rublon MFA for Windows Logon and RDP connector.
Configuration
You can deploy Rublon MFA for Windows Logon and RDP using either the EXE or MSI installer. First, prepare the required installation files, and then create and deploy the application using SCCM.
Prepare the Installer Files
1. Create a source folder that can be accessed by the SCCM site server.
2. If you want to:
- deploy the EXE installer, copy RublonForWindows-6.8.1.exe to the source folder.
- If you want to deploy the MSI installer:
- Copy RublonForWindows-6.8.1.msi to the source folder.
- Create the rublon.conf file as described in the Using a Configuration File section.
- Save rublon.conf in the same source folder as the MSI installer.
IMPORTANT
When using the MSI installer, all Rublon MFA configuration options must be specified in the rublon.conf file. Ensure that the file contains the correct settings before deploying the connector.
Creating Application Rublon MFA for Windows using SCCM
1. Open Microsoft Endpoint Configuration Manager and navigate to Software Library.
2. Expand Application Management, right-click Application and select Create Application.

3. In a newly-opened window, select Manually specify the application information and click Next.

4. In General Information, fill in the form and click Next:
- In Name, enter a name for your application, e.g., Rublon RDP.
- In Publisher, enter Rublon.
- In Software version, enter the version of the Rublon MFA for Windows Logon & RDP connector you are deploying
- All other options are optional; you can leave the default values

5. All options in Software Center are optional. Leave the default values or change them if you want. Click Next.

6. In Deployment Types, click Add.

7. A new window will open. In Type, select Script Installer and click Next.

8. In General Information, fill in the form and click Next:
- In Name, enter a name for your application, e.g., Rublon RDP.
- In Languages, select your language.
- In Administrator comments, you can enter optional comments.

9. In Content, fill in the form and click Next:
- In Content location, specify the UNC path to the source folder containing the installer.
- In Installation program, enter the appropriate installation command:
- EXE installer, first deployment:
RublonForWindows-6.8.1.exe /verysilent /token=<token> /key=<secret> /failMode=bypass /rdpOnly=0 /norestart - EXE installer, update:
RublonForWindows-6.8.1.exe /verysilent /norestart - MSI installer:
msiexec /i RublonForWindows-6.8.1.msi RUBLONCONF="rublon.conf" /qn /norestart /l*vx C:\Windows\Temp\rublon.log
- EXE installer, first deployment:
When using the EXE installer, replace <token> and <secret> with the System Token and Secret Key of your application of type Windows Logon & RDP in the Rublon Admin Console.
When using the MSI installer, all Rublon MFA configuration options must be specified in the rublon.conf file located in the source folder. The RUBLONCONF parameter is the only supported method of providing the connector configuration to the MSI installer.
The /qn option prevents Windows Installer from displaying a user interface during deployment.
Refer to the Rublon MFA for Windows Logon and RDP documentation for more information about both installers and their parameters.

10. In Detection Method, click Add Clause and configure the following version-based detection rule. This rule works regardless of whether you deploy the EXE or MSI installer and allows SCCM to distinguish the version being deployed from earlier connector versions.
| Setting Type | Registry |
| Hive | HKEY_LOCAL_MACHINE |
| Key | SOFTWARE\Rublon\WindowsLogon\Data |
| Value | Version |
| Data Type | Version |
| Operator | Greater than or equal to |
| Value | 6.8.1 |
| This registry key is associated with a 32-bit application on 64-bit systems | Uncheck. |
IMPORTANT
When deploying a later connector version, update the expected Version value in the detection rule to the version you are deploying.

11. Click OK and then click Next.
12. In User Experience, enter the following information and click Next:
- In Installation behavior, select Install for system.
- In Logon requirement, select Whether or not a user is logged on.
- In Installation program visibility, select Normal.
- All other options are optional; you can leave the default values.

13. The Requirements and Dependencies tabs are optional. You can skip them by clicking Next twice.
14. In Summary, review the options you have selected before and click Next.


15. Click Close to finish creating the Deployment Type and return to the previous window where you have created the application.
16. In Create Application Wizard, you should now see the newly created Deployment Type.

17. You can now finish creating the Application by reviewing the Summary and then exit the wizard by clicking Close after you see the information that the task has been completed successfully.

18. You have successfully created the application. You now need to deploy the application you have just created to all endpoints.
Deploying Rublon MFA for Windows using SCCM
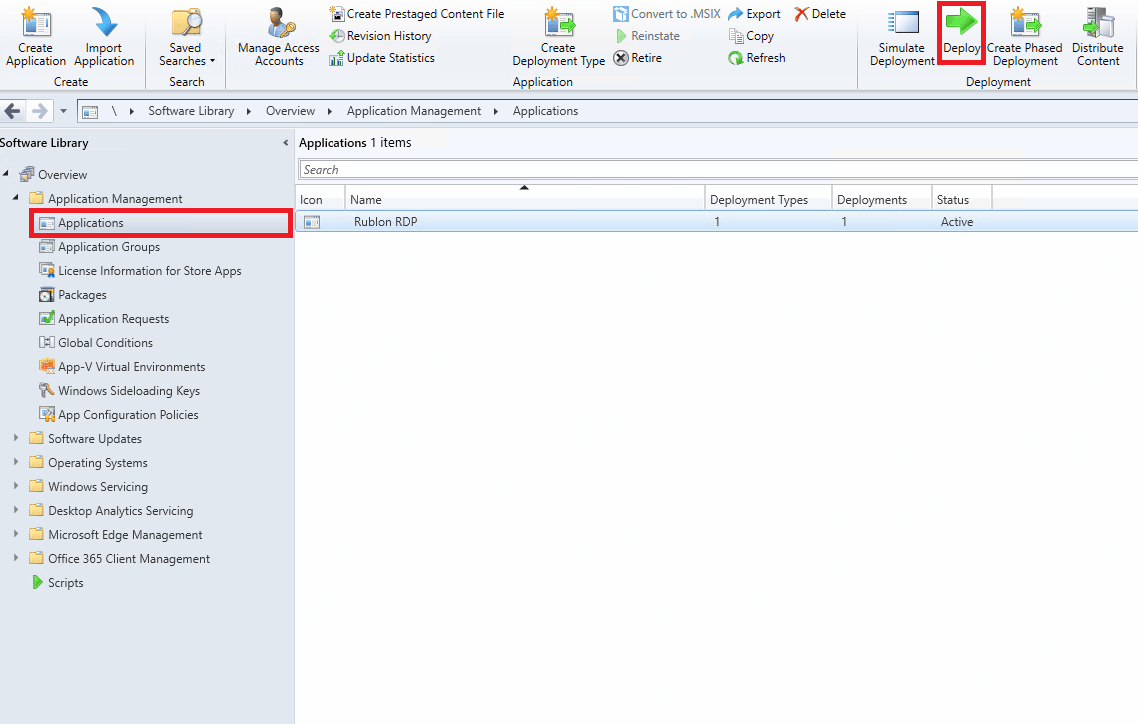
1. In the Applications tab of Microsoft Endpoint Configuration Manager, select your newly created application and click Deploy.
2. A new window will open. In Content, you need to select the collection. To do that, click Browse and select the collection you want.

3. Click Next and then click Add, select the main SCCM server as Distribution Point, and click Next again.

4. In Deployment Settings, select the following options and click Next:
- In Action, select Install.
- In Purpose, select Required.
- All checkboxes are optional.

5. Scheduling, User Experience, and Alerts tabs are all optional. You can edit them to your liking or just skip them and go straight to the Summary tab.
6. In Summary, review your configuration and click Next to start the deployment.

7. You can follow the progress of your deployment in Monitoring → Deployments.
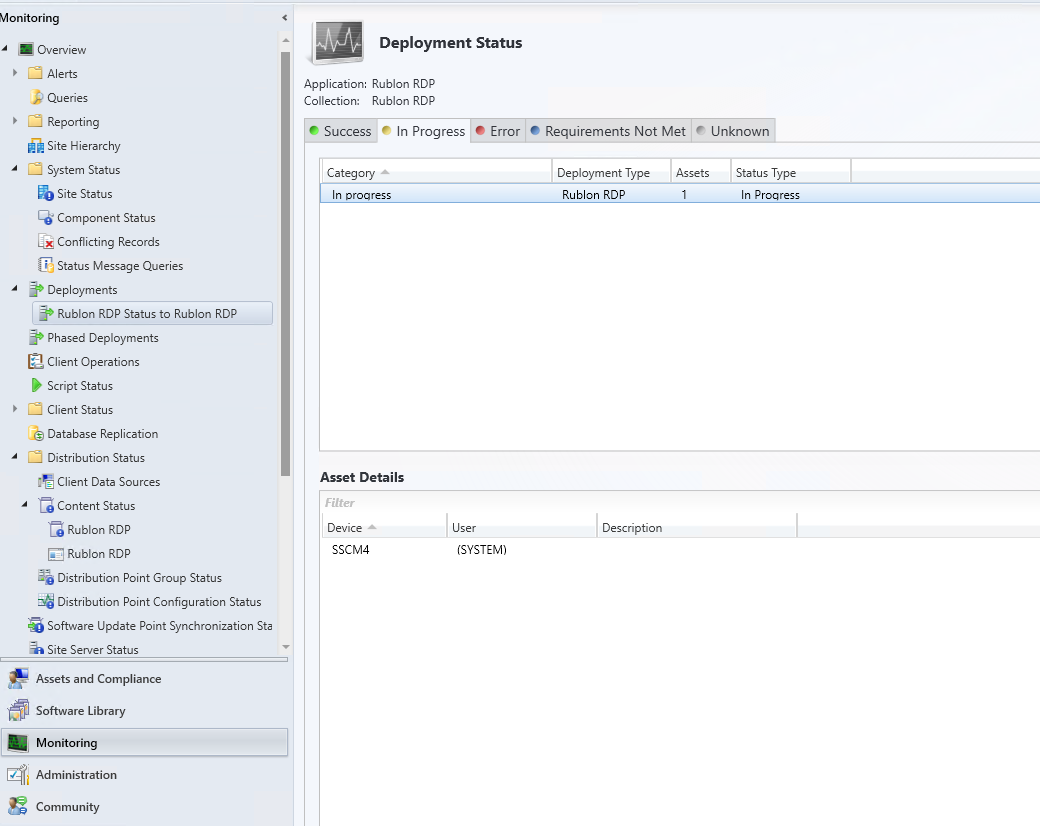
8. After the deployment, you should test if the installation of the Rublon for Windows & RDP connector was successful.
Testing Deployment of Rublon MFA for Windows
To test your deployment, connect to at least one of your endpoints and try to log in. After you provide your login and password, a Rublon Prompt should appear. Refer to the following two instructions for step-by-step guidance on how Rublon Multi-Factor Authentication works after installing Rublon:
Updating the Connector
To update the connector to the latest version:
- Download the latest EXE or MSI installer from Rublon Downloads.
- Update the files in the source folder:
- When using the EXE installer, replace the existing EXE file with the latest version.
- When using the MSI installer, replace the existing MSI file and update
rublon.confif necessary.
- Edit the existing SCCM application or create a new application. Ensure that you:
- Update Software version.
- Select the source folder containing the latest installer.
- Update Installation program with the new installer filename.
- Include the current
rublon.conffile when using the MSI installer. - Update the expected Version value in the detection rule to the version you are deploying.
You can use the MSI installer to update a connector previously installed using the EXE installer. The MSI installer replaces the application entry created by the EXE installer in the list of installed apps in Windows.
After switching to the MSI installer, we recommend using MSI installers for subsequent updates. Using an EXE installer over an MSI installation creates separate EXE and MSI application entries in Windows.
Troubleshooting
If you encounter any issues with your Rublon MFA integration, contact Rublon Support.
Related Posts
Rublon 2FA for Windows Logon and RDP
How to deploy Rublon MFA for Windows Logon & RDP on multiple endpoints using PDQ Deploy
How to deploy Rublon MFA for Windows Logon & RDP on many endpoints at once using Intune