
Last updated on November 3, 2026
Overview of MFA for Microsoft RRAS VPN
Multi-Factor Authentication (MFA) for Microsoft RRAS VPN is an additional security measure that requires users to present two factors of authentication when attempting to access Microsoft RRAS VPN. The first factor involves the user entering their Active Directory / RADIUS username and password. After successfully completing the first factor, the user is then subjected to a secondary authentication procedure that can utilize methods such as Mobile Push or Email Link. When both authentication factors have been completed, the user will gain access to the RRAS VPN. Enabling Multi-Factor Authentication (MFA) or Two-Factor Authentication (2FA) for Microsoft RRAS VPN aids in ensuring hackers are not able to use stolen user credentials to gain access.
Rublon MFA supports VPN connections made with the built-in Windows VPN client to a Microsoft Routing and Remote Access Service (RRAS) VPN server. The integration uses Rublon Authentication Proxy, with RRAS configured to send authentication requests to it over RADIUS. Users can keep using the built-in Windows VPN client while Rublon MFA protects authentication to the VPN.
Enable Entra ID logins to Microsoft RRAS VPN using Rublon MFA
If Microsoft RRAS VPN authenticates users through LDAP or RADIUS, you can use Rublon Authentication Proxy to validate primary credentials against Microsoft Entra ID and then enforce Rublon MFA. This allows users to sign in to Microsoft RRAS VPN with Microsoft Entra ID credentials, even when Microsoft RRAS VPN does not support Microsoft Entra ID, SAML, OAuth 2.0, or OpenID Connect natively.
See how to authenticate LDAP and RADIUS with Microsoft Entra ID credentials and MFA, or explore the related use case: Microsoft Entra ID logins for LDAP and RADIUS applications with MFA.
Supported Authentication Methods
| Authentication Method | Supported | Comments |
| Mobile Push | ✔ | N/A |
| FIDO | – | N/A |
| Passcode | ✔ | N/A |
| SMS Passcode | – | N/A |
| SMS Link | ✔ | N/A |
| Phone Call | ✔ | N/A |
| QR Code | – | N/A |
| Email Link | ✔ | N/A |
| YubiKey OTP | ✔ | N/A |
| RFID | – | N/A |
Before you start
You need to install the Rublon Authentication Proxy itself before configuring the Microsoft Routing and Remote Access Server to work with it. Please read the Rublon Authentication Proxy documentation and follow the steps in Installation. Then, configure your Rublon Authentication Proxy using the snippet in the Rublon Authentication Proxy subsection of the Configuration section in this document. Refer to the Configuration section of Rublon Authentication Proxy to learn more about each property.
Ensure that you have properly set up your authentication source, that is, an external Identity Provider (IdP) like RADIUS, OpenLDAP, or Microsoft Active Directory.
Ensure that you have Windows Server with the RRAS role installed and configured.
Note
Rublon MFA for Microsoft RRAS VPN supports Windows Server Standard, Windows Server Essentials, Windows Server Datacenter, and Windows Server Datacenter: Azure Edition.
Configuration of MFA for Microsoft RRAS VPN
Follow the steps in this section to enable Rublon 2FA for Microsoft RRAS.
Rublon Authentication Proxy
Use to the following config.yaml snippet as a template for your configuration:
log:
  debug: false

rublon:
  api_server: https://core.rublon.net
  system_token: system_token_obtained_from_rublon_admin_console
  secret_key: secret_key_obtained_from_rublon_admin_console

proxy_servers:
  - name: RADIUS-Proxy
    type: RADIUS
    ip: 192.168.1.13
    port: 1812
    radius_secret: testing1234
    mode: standard
    auth_source: LDAP_AUTH_SOURCE_1
    auth_method: push,email

auth_sources:
  - name: LDAP_AUTH_SOURCE_1
    type: LDAP
    ip: private_ip_of_the_idp
    port: 389
    transport_type: plain
    search_dn: dc=domain,dc=local
    access_user_dn: cn=Administrator,cn=users,dc=domain,dc=local
    access_user_password: v3ryH@rdpa$$w0rd
Microsoft RRAS
1. Open Routing and Remote Access on your Windows Server machine.
2. Right-click on your server and select Properties.

3. Go to the Security tab and locate Authentication provider. Select RADIUS Authentication from the drop-down list.

4. Click Configure….
5. A new window will open. You have to add a new RADIUS server. Click Add….
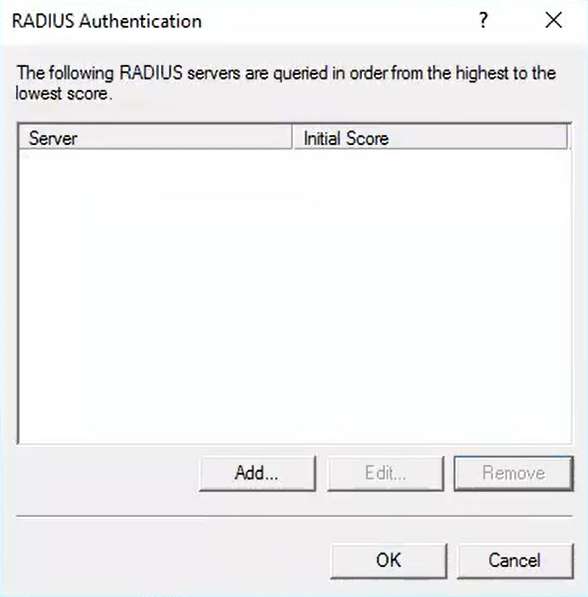
6. Another window will open. Fill in the settings and click OK. Note that your settings should match the settings you have specified in the RADIUS section of Rublon Authentication Proxy’s config.yaml. Refer to the following image and table.
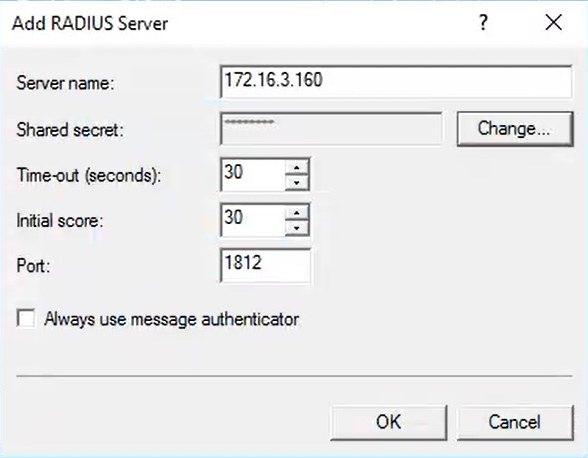
| Server Name | Enter the hostname or IP address of your Rublon Authentication Proxy instance. |
| Shared secret | Enter the RADIUS Secret you set in the RADIUS section of Rublon Authentication Proxy’s config.yaml. |
| Time-out (seconds) | Set to 30. |
| Initial score | Set to 30. This setting is irrelevant if you only have one RADIUS server. Initial score is important only if you have added more than one RADIUS server. If you have more than one RADIUS server, Initial score determines which RADIUS server should be used first when authenticating a certain user. The lower the Initial score, the higher the rank of the RADIUS server. |
| Port | Enter the RADIUS port you set in the RADIUS section of Rublon Authentication Proxy’s config.yaml. Default: 1812 |
| Always use message authenticator | Uncheck. |
7. Click OK to close the list of RADIUS servers and get back to your server’s properties.
8. Click Authentication Methods….

9. A new window will open. Check Unencrypted password (PAP) and uncheck every other checkbox.
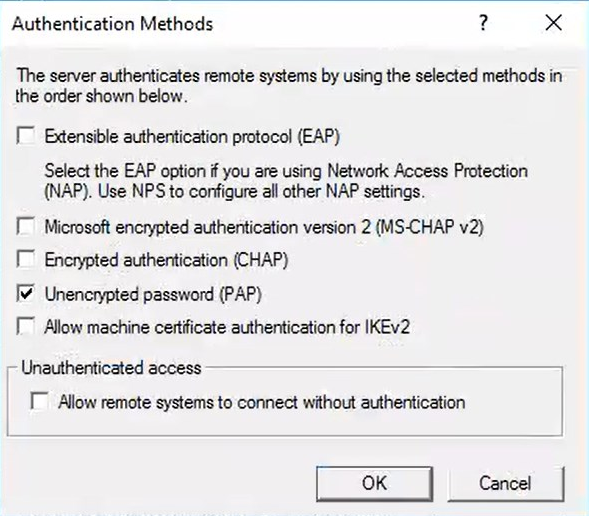
10. Click OK to save the changes and click OK again to close your server’s properties.
11. You have to adjust Security Policies to allow connections using PAP. To do so, right-click Remote Access Logging & Policies and select Launch NPS.

12. A new Network Policy Server window will open.
13. Navigate to the left pane and click Network Policies.

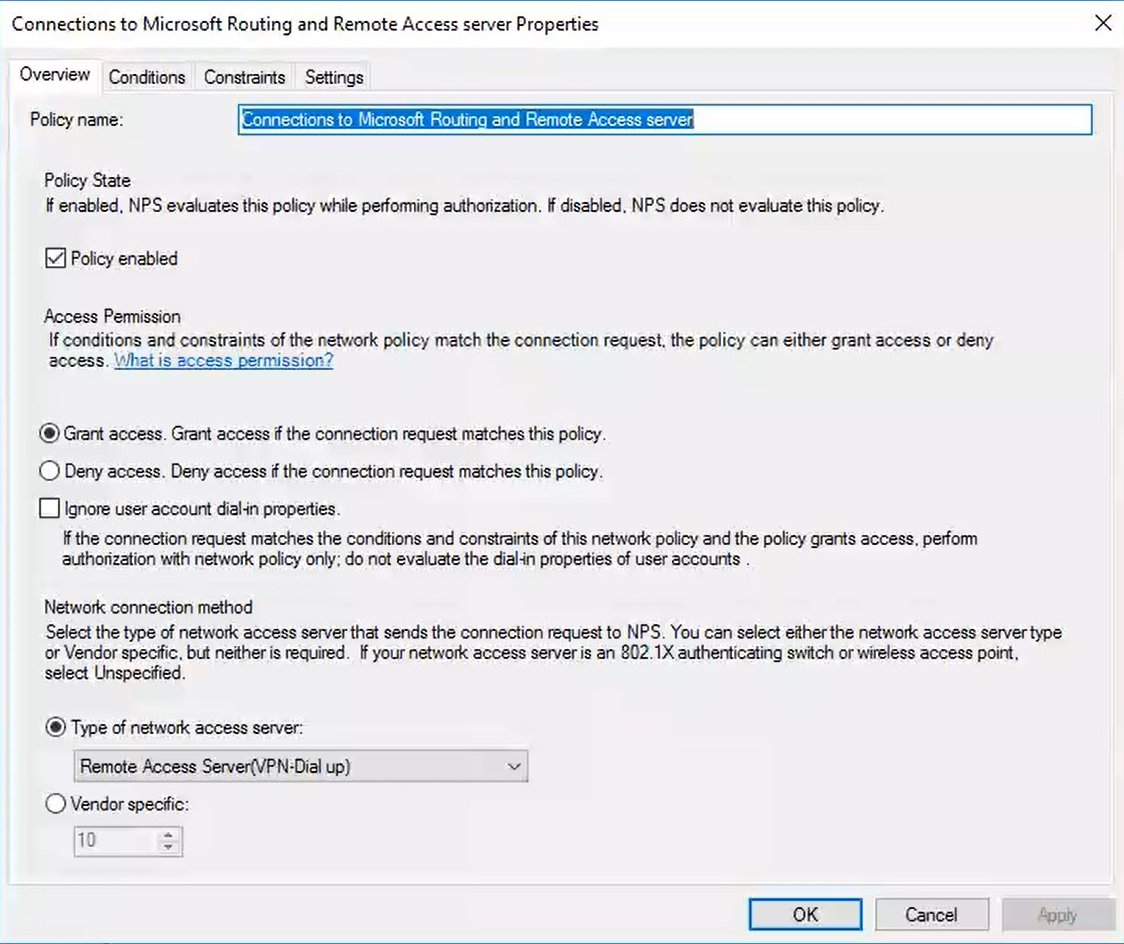
14. Double-click the Connections to Microsoft Routing and Remote Access server policy.
15. A new window will open. Go to the Overview tab. Ensure that:
- Policy enabled is checked.
- Grant access is selected in the Access Permission section.
- Remote Access Server (VPN-Dial up) is selected in Type of network access server.
16. Go to the Constraints tab.
17. Select Authentication Methods.
18. Check Unencrypted authentication (PAP, SPAP) and uncheck all other checkboxes.

19. Click OK to save the changes.
20. You just finished configuring Routing and Remote Access Server. You can close the Network Policy Server window. You have to set up the Windows VPN Client now.
Configure the Built-in Windows VPN Client
The following instructions portray setting up Windows VPN Client on Windows 10. The steps on other versions of Windows should be similar.
1. Go to Settings → Network & Internet → VPN → Add a VPN Connection and fill in the form. Refer to the following image and table.
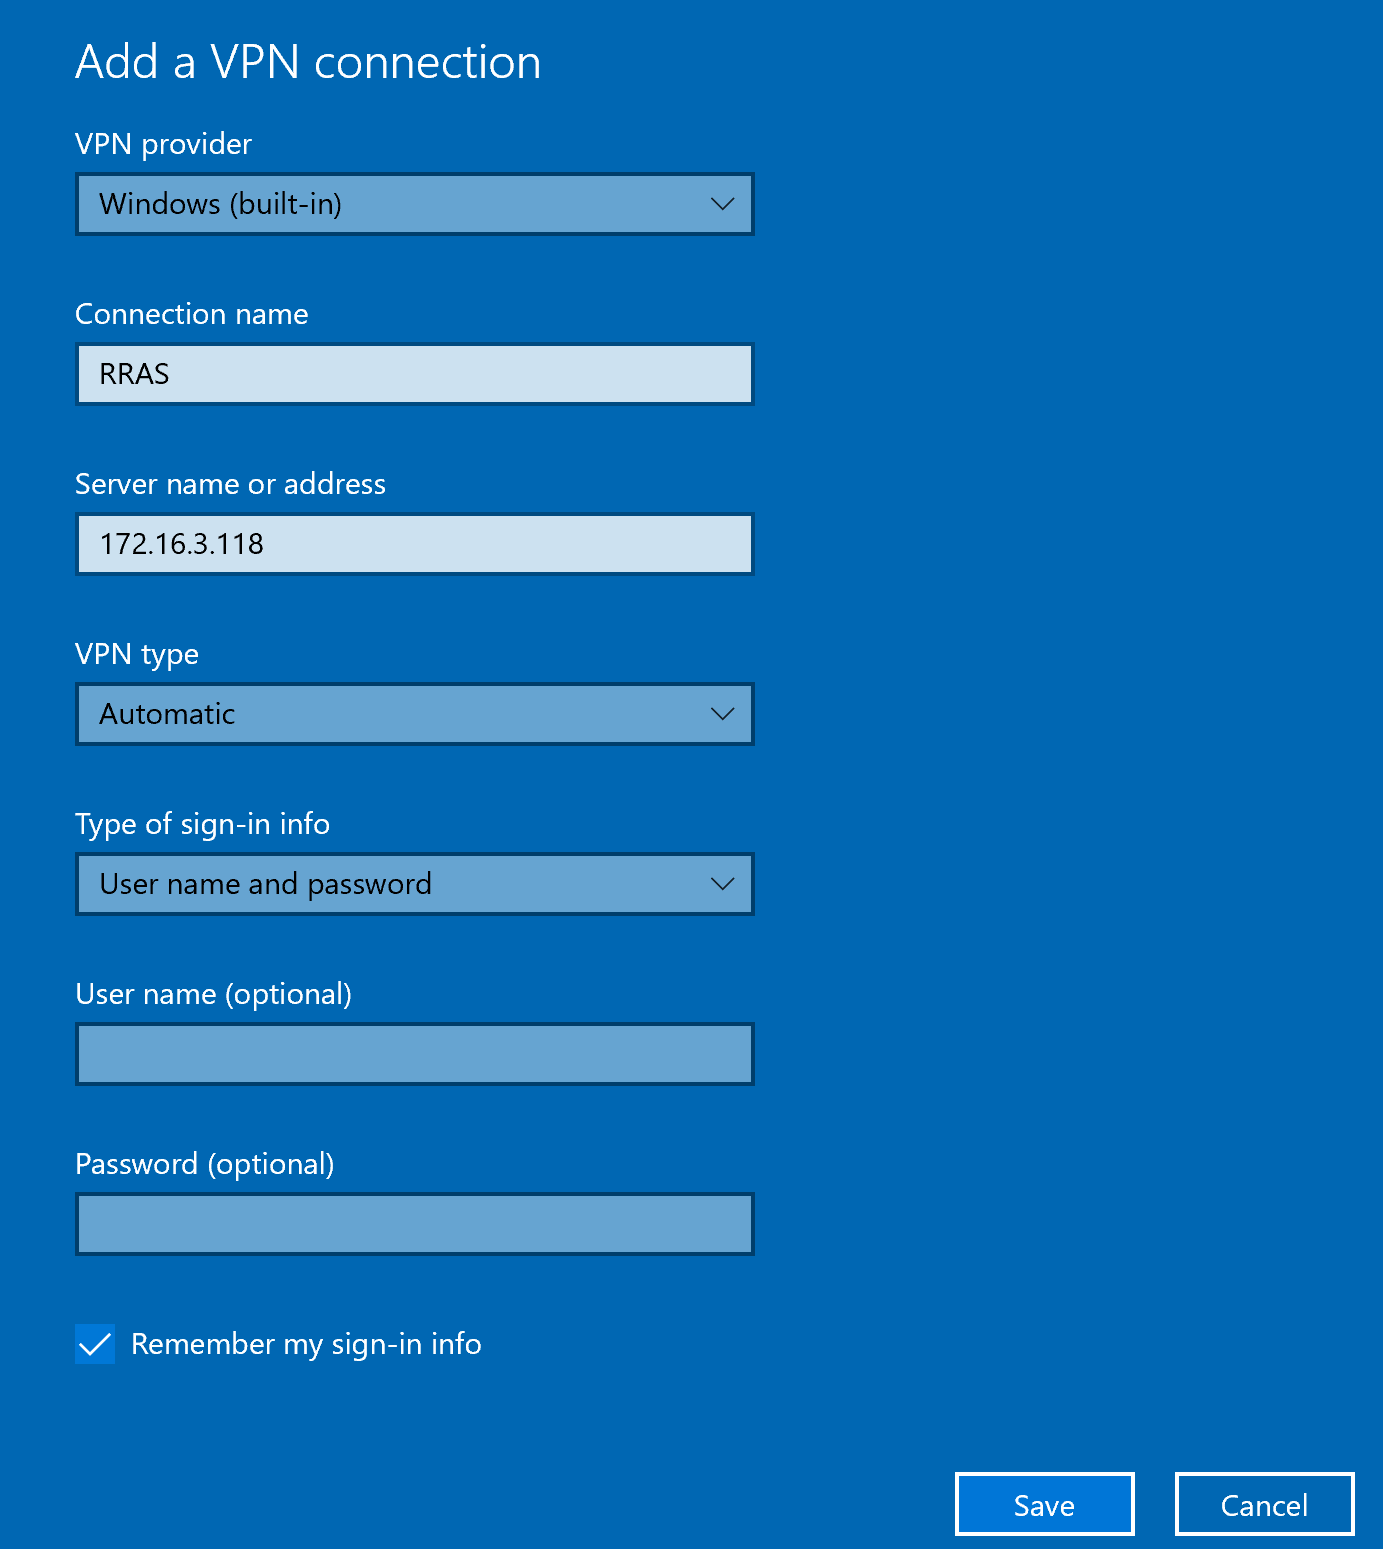
| Connection name | Set a name for your VPN connection, e.g. RRAS. |
| Server name or address | Enter the IP address or hostname of your RRAS Server. |
| VPN Type | Set to Automatic. |
| Type of sign-in info | Set to User name and password. |
| User name (optional) | We recommend you enter your user name. If you do not specify the optional User name and Password when adding a new connection, you will be asked to provide the credentials every time you connect to the VPN. |
| Password (optional) | We recommend you enter your password. If you do not specify the optional User name and Password when adding a new connection, you will be asked to provide the credentials every time you connect to the VPN. |
| Remember my sign-in info | Optional. Check to save your user credentials. |
2. Click Save to save your new VPN connection profile.
3. Now you have to edit the VPN connection and specify the authentication protocol.
Go to Control Panel → Network and Sharing Center and select Change adapter settings from the menu on the left.
4. Right-click the newly created VPN profile and select Properties.
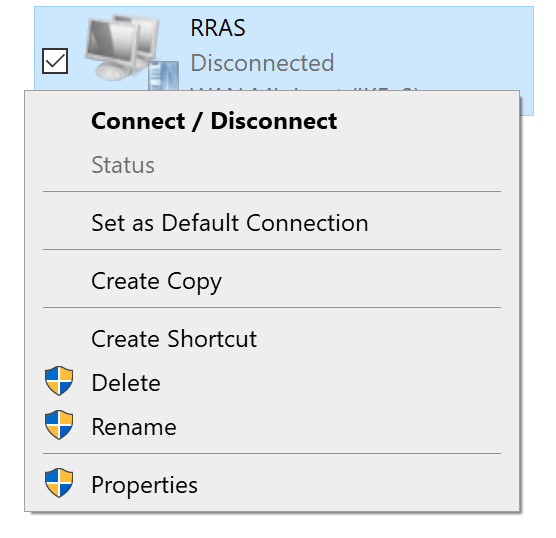
5. A new window with properties for this connection will open.
6. Go to the Security tab and change Authentication to Allow these protocols. Then, check Unencrypted password (PAP).

6. Click OK to save and confirm the changes.
7. Your configuration is complete. You can now connect to your RRAS server VPN using Rublon 2FA.
Testing MFA for Microsoft RRAS VPN
1. Select your connection and click Connect.
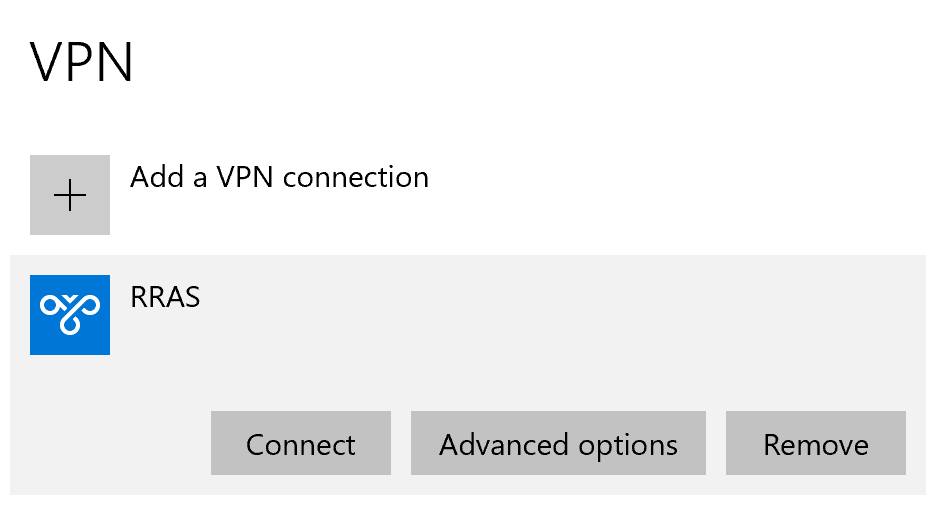
2. If you have not set user name and password while adding your VPN connection, a window will appear for you to provide your credentials. Provide your user name and password and click OK.
3. You will be sent an automatic push notification on your phone.

4. Tap APPROVE.
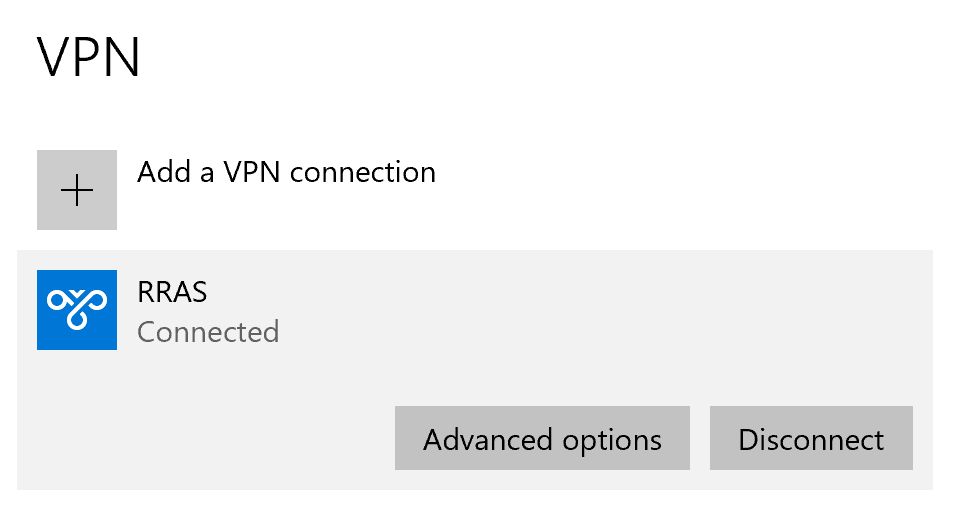
5. You will be successfully connected to Microsoft RRAS.
Troubleshooting MFA for Microsoft RRAS VPN
Blast-RADIUS Vulnerability Protection
RADIUS integrations may enforce the validation of the Message-Authenticator RADIUS attribute as part of their mitigations for the Blast-RADIUS vulnerability.
The Rublon Authentication Proxy supports the Message-Authenticator attribute starting from version 3.5.3. The Rublon Auth Proxy uses the force_message_authenticator option in the configuration file (set to true by default) to safeguard against Blast-RADIUS attacks.
If you are experiencing issues with your RADIUS integration, ensure that the force_message_authenticator is set to true.
If you are using Rublon Authentication Proxy 3.5.2 or older, update to the newest available version.
If you cannot connect to the RRAS VPN with Rublon MFA enabled, and you have both the Rublon Authentication Proxy and RRAS deployed on the same server, try changing the IP address in both the RRAS VPN configuration and the Rublon Authentication Proxy configuration file to the same local IP address: 127.0.0.1. Making all communication take place on the same server is a known solution to multiple issues.
If you encounter any issues with your Rublon MFA integration, contact Rublon Support.